2019 FORD EXPLORER window
[x] Cancel search: windowPage 97 of 571

Blind Spot Information System (If
Equipped)
See
Blind Spot Information System
(page 231).
INTERIOR MIRROR WARNING:
Do not adjust the
mirrors when your vehicle is moving. This
could result in the loss of control of your
vehicle, serious personal injury or death.
Note: Do not clean the mirror housing or
glass with harsh abrasives, fuel or other
petroleum-based cleaning products.
You can adjust the interior mirror to your
preference. Some mirrors also have a
second pivot point. This lets you move the
mirror head up or down and from side to
side.
Manual Dimming Mirror
Pull the tab below the mirror toward you
to reduce the effect of bright light from
behind.
Automatic Dimming Mirror (If Equipped)
Note: Do not block the sensors on the front
and back of the mirror. A rear center
passenger or raised rear center head
restraint may also block light from reaching
the sensor.
The mirror dims to reduce the effect of
bright light from behind. It returns to
normal when the bright light from behind
is no longer present or if you shift into
reverse (R). SUN VISORS
Rotate the sun visor toward the side
window and extend it rearward for extra
shade.
Illuminated Vanity Mirror
Lift the cover to switch the lamp on.
MOONROOF
(IF EQUIPPED)
WARNING: Do not let children play
with the moonroof or leave them
unattended in the vehicle. They may
seriously hurt themselves.
94
Explorer (TUB) Canada/United States of America, enUSA, Edition date: 201807, Second-Printing Windows and MirrorsE138666 E162197
Page 98 of 571
WARNING: When closing the
moonroof, you should verify that it is free
of obstructions and make sure that
children and pets are not in the proximity
of the roof opening.
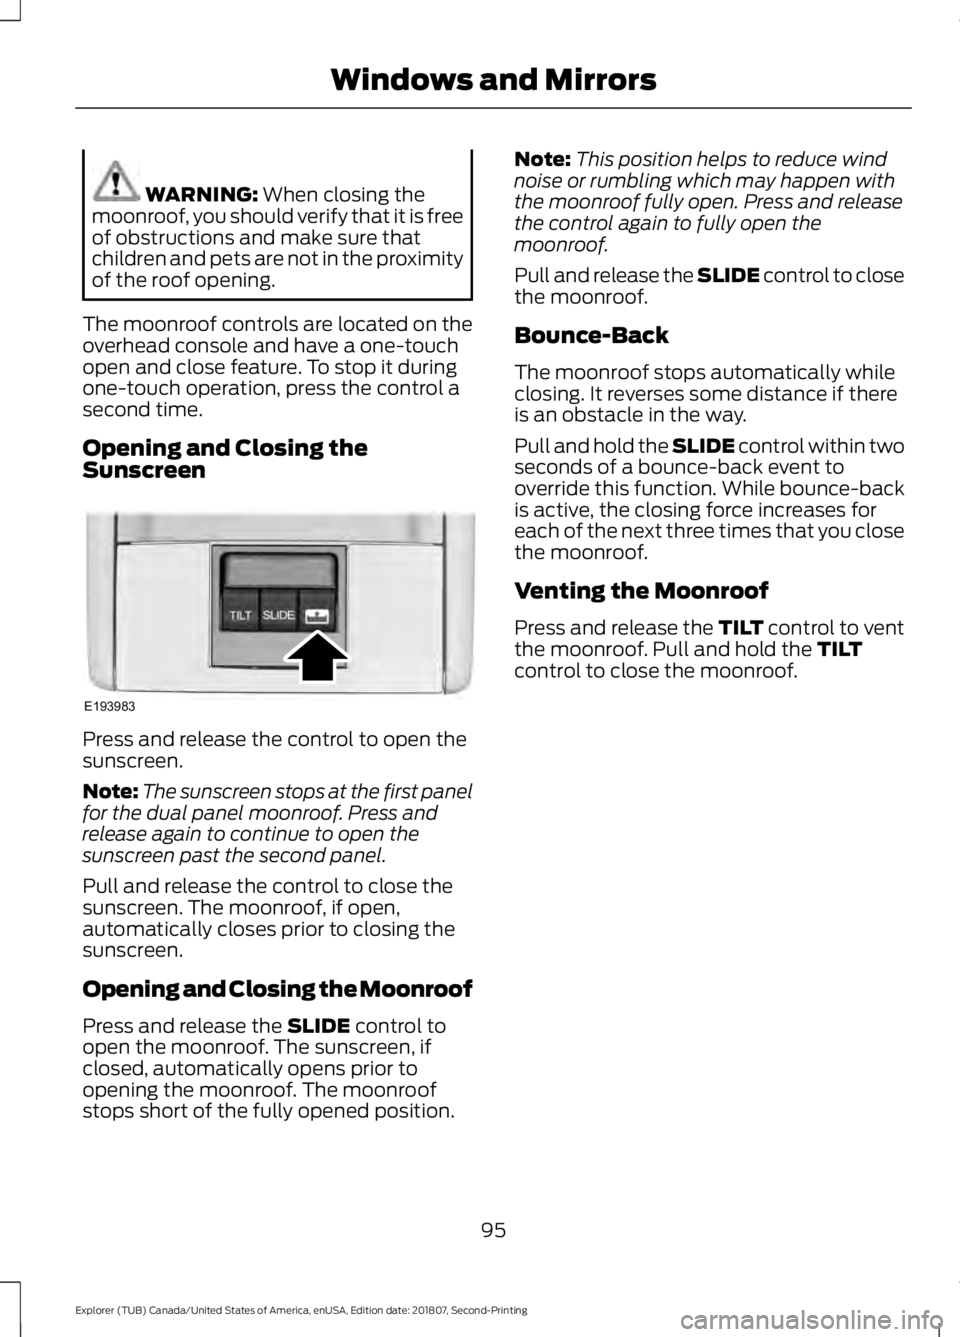
The moonroof controls are located on the
overhead console and have a one-touch
open and close feature. To stop it during
one-touch operation, press the control a
second time.
Opening and Closing the
Sunscreen Press and release the control to open the
sunscreen.
Note:
The sunscreen stops at the first panel
for the dual panel moonroof. Press and
release again to continue to open the
sunscreen past the second panel.
Pull and release the control to close the
sunscreen. The moonroof, if open,
automatically closes prior to closing the
sunscreen.
Opening and Closing the Moonroof
Press and release the
SLIDE control to
open the moonroof. The sunscreen, if
closed, automatically opens prior to
opening the moonroof. The moonroof
stops short of the fully opened position. Note:
This position helps to reduce wind
noise or rumbling which may happen with
the moonroof fully open. Press and release
the control again to fully open the
moonroof.
Pull and release the SLIDE control to close
the moonroof.
Bounce-Back
The moonroof stops automatically while
closing. It reverses some distance if there
is an obstacle in the way.
Pull and hold the SLIDE control within two
seconds of a bounce-back event to
override this function. While bounce-back
is active, the closing force increases for
each of the next three times that you close
the moonroof.
Venting the Moonroof
Press and release the TILT control to vent
the moonroof. Pull and hold the
TILT
control to close the moonroof.
95
Explorer (TUB) Canada/United States of America, enUSA, Edition date: 201807, Second-Printing Windows and MirrorsE193983
Page 110 of 571
Settings
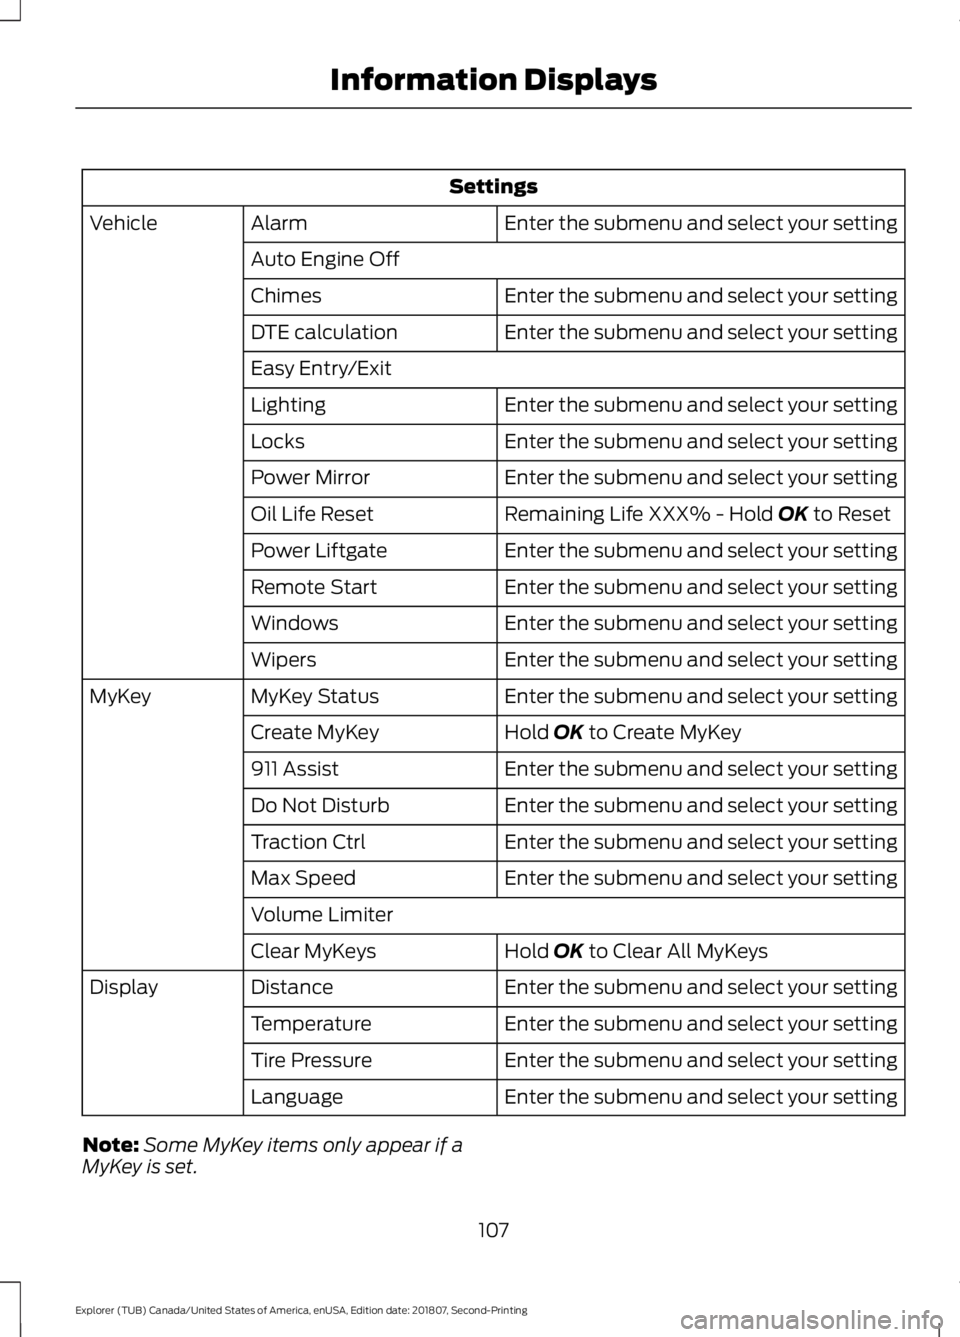
Enter the submenu and select your setting
Alarm
Vehicle
Auto Engine Off Enter the submenu and select your setting
Chimes
Enter the submenu and select your setting
DTE calculation
Easy Entry/Exit
Enter the submenu and select your setting
Lighting
Enter the submenu and select your setting
Locks
Enter the submenu and select your setting
Power Mirror
Remaining Life XXX% - Hold OK to Reset
Oil Life Reset
Enter the submenu and select your setting
Power Liftgate
Enter the submenu and select your setting
Remote Start
Enter the submenu and select your setting
Windows
Enter the submenu and select your setting
Wipers
Enter the submenu and select your setting
MyKey Status
MyKey
Hold
OK to Create MyKey
Create MyKey
Enter the submenu and select your setting
911 Assist
Enter the submenu and select your setting
Do Not Disturb
Enter the submenu and select your setting
Traction Ctrl
Enter the submenu and select your setting
Max Speed
Volume Limiter
Hold
OK to Clear All MyKeys
Clear MyKeys
Enter the submenu and select your setting
Distance
Display
Enter the submenu and select your setting
Temperature
Enter the submenu and select your setting
Tire Pressure
Enter the submenu and select your setting
Language
Note: Some MyKey items only appear if a
MyKey is set.
107
Explorer (TUB) Canada/United States of America, enUSA, Edition date: 201807, Second-Printing Information Displays
Page 114 of 571
Driver Assist
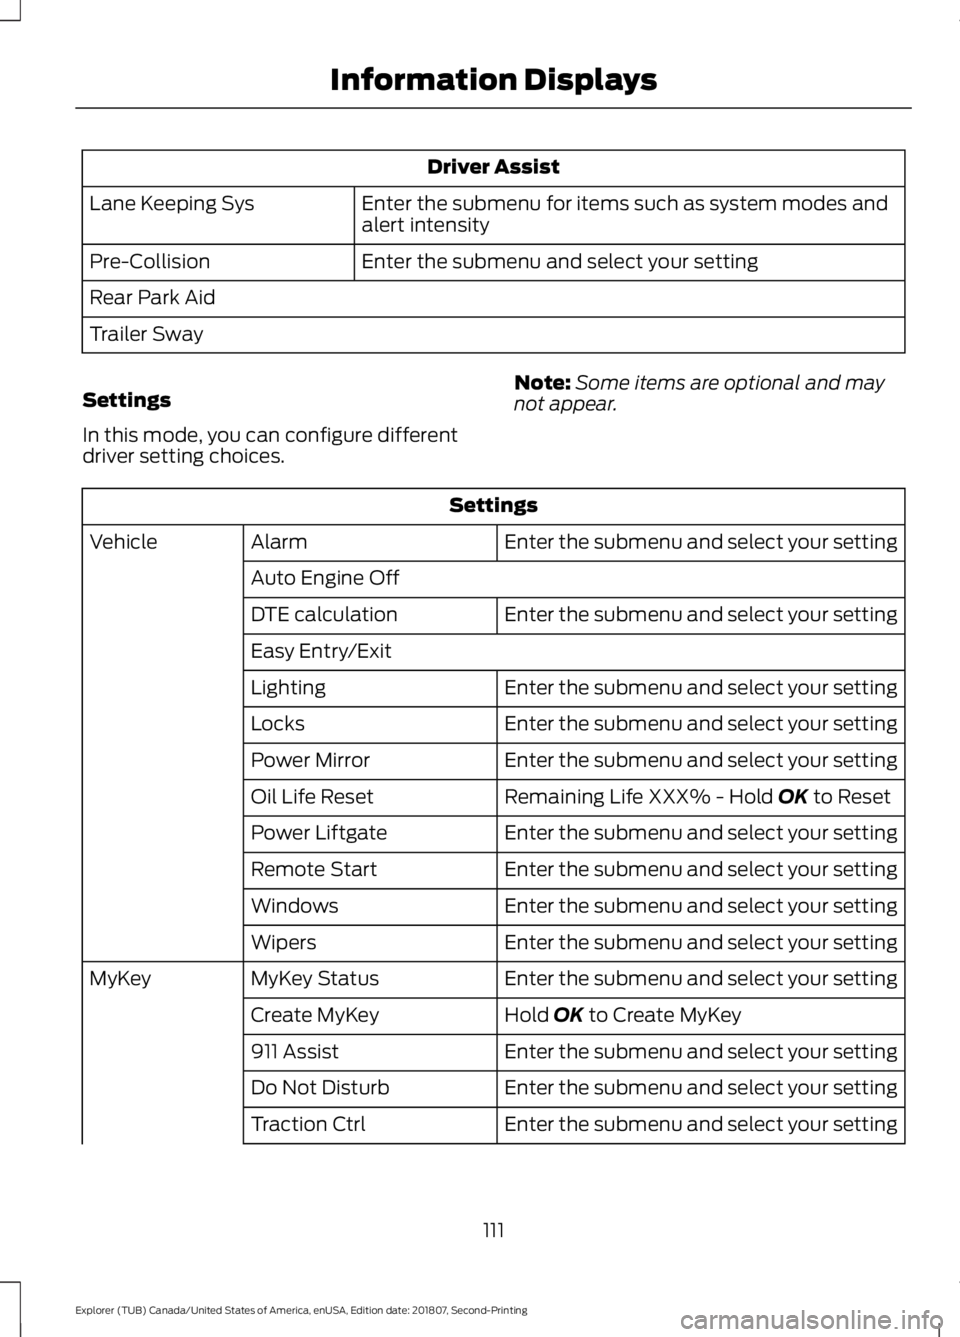
Enter the submenu for items such as system modes and
alert intensity
Lane Keeping Sys
Enter the submenu and select your setting
Pre-Collision
Rear Park Aid
Trailer Sway
Settings
In this mode, you can configure different
driver setting choices. Note:
Some items are optional and may
not appear. Settings
Enter the submenu and select your setting
Alarm
Vehicle
Auto Engine Off Enter the submenu and select your setting
DTE calculation
Easy Entry/Exit
Enter the submenu and select your setting
Lighting
Enter the submenu and select your setting
Locks
Enter the submenu and select your setting
Power Mirror
Remaining Life XXX% - Hold OK to Reset
Oil Life Reset
Enter the submenu and select your setting
Power Liftgate
Enter the submenu and select your setting
Remote Start
Enter the submenu and select your setting
Windows
Enter the submenu and select your setting
Wipers
Enter the submenu and select your setting
MyKey Status
MyKey
Hold
OK to Create MyKey
Create MyKey
Enter the submenu and select your setting
911 Assist
Enter the submenu and select your setting
Do Not Disturb
Enter the submenu and select your setting
Traction Ctrl
111
Explorer (TUB) Canada/United States of America, enUSA, Edition date: 201807, Second-Printing Information Displays
Page 117 of 571
Driver Assist
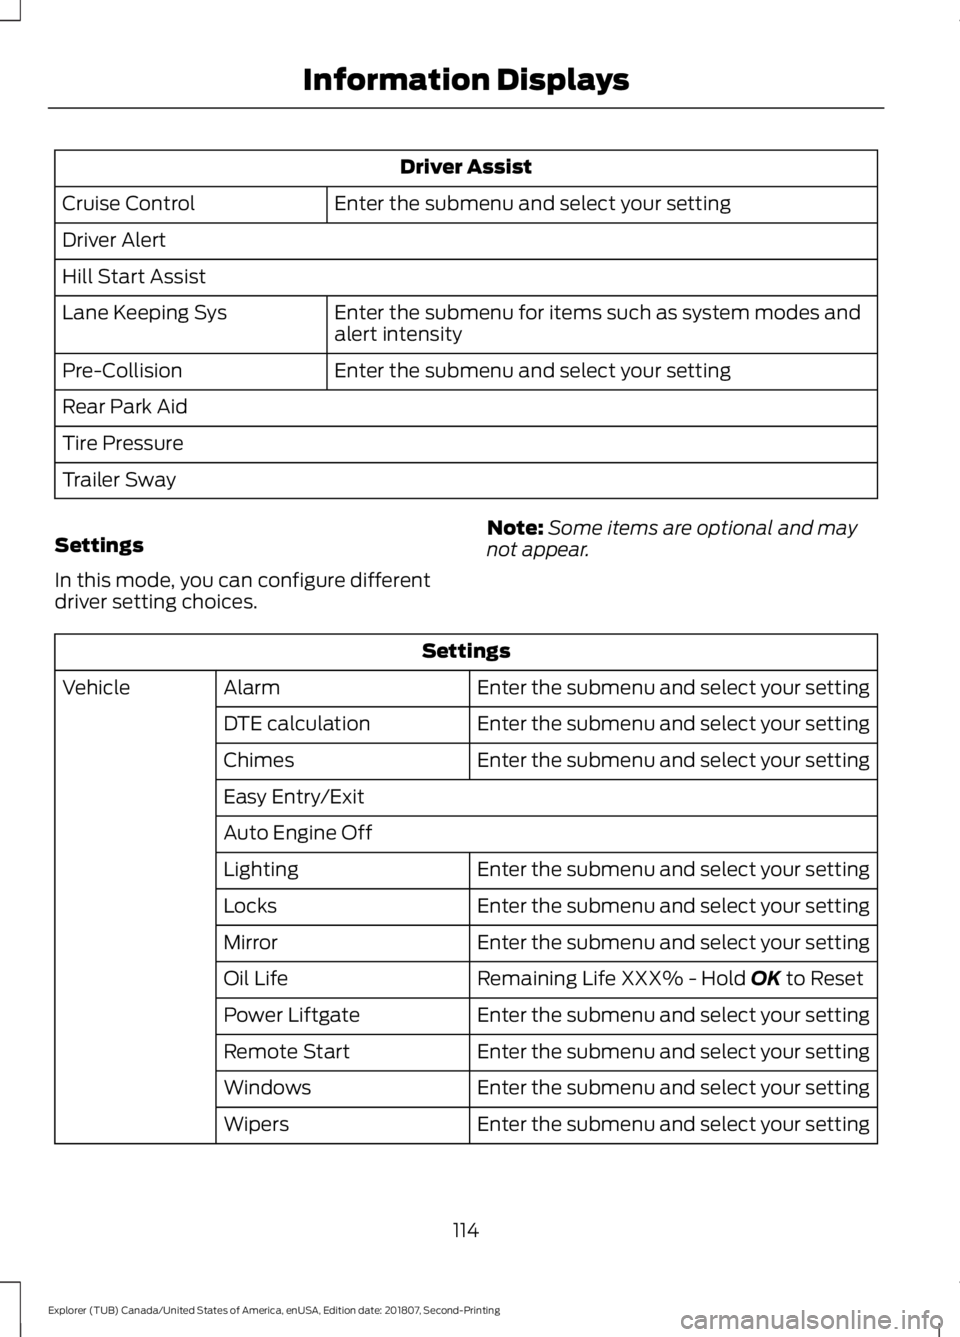
Enter the submenu and select your setting
Cruise Control
Driver Alert
Hill Start Assist
Enter the submenu for items such as system modes and
alert intensity
Lane Keeping Sys
Enter the submenu and select your setting
Pre-Collision
Rear Park Aid
Tire Pressure
Trailer Sway
Settings
In this mode, you can configure different
driver setting choices. Note:
Some items are optional and may
not appear. Settings
Enter the submenu and select your setting
Alarm
Vehicle
Enter the submenu and select your setting
DTE calculation
Enter the submenu and select your setting
Chimes
Easy Entry/Exit
Auto Engine Off
Enter the submenu and select your setting
Lighting
Enter the submenu and select your setting
Locks
Enter the submenu and select your setting
Mirror
Remaining Life XXX% - Hold OK to Reset
Oil Life
Enter the submenu and select your setting
Power Liftgate
Enter the submenu and select your setting
Remote Start
Enter the submenu and select your setting
Windows
Enter the submenu and select your setting
Wipers
114
Explorer (TUB) Canada/United States of America, enUSA, Edition date: 201807, Second-Printing Information Displays
Page 135 of 571
Switching Maximum Defrost On
and Off
Press and release the button for
maximum defrosting.
The left-hand and right-hand settings set
to HI, air flows through the windshield air
vents, and the blower motor adjusts to the
highest speed.
You can also use this setting to defog and
clear the windshield of a thin covering of
ice.
Note: To prevent window fogging, you
cannot select recirculated air when
maximum defrost is on.
Note: The heated rear window also turns
on when you select maximum defrost.
Switching Recirculated Air On and
Off Press and release the button to
switch between outside air and
recirculated air.
The air currently in the passenger
compartment recirculates. This may
reduce the time needed to cool the interior
(when used with A/C) and reduce
unwanted odors from entering your vehicle.
Note: Recirculated air may turn off (or
prevent you from switching on) in all air flow
modes except
MAX A/C to reduce the risk
of fogging. Recirculation may also turn on
and off in various air distribution control
combinations during hot weather in order
to improve cooling efficiency. AUTOMATIC CLIMATE
CONTROL - VEHICLES WITH:
PREMIUM AM/FM/CD
Note:
You can switch temperature units
between Fahrenheit and Celsius. See your
SYNC information.
Directing Air to the Instrument
Panel Air Vents Press and release the button to
direct airflow to instrument
panel air vents.
Directing Air to the Footwell Air
Vents Press and release the button to
direct airflow to footwell air
vents.
Setting the Blower Motor Speed Press and release + or - to adjust
the volume of air circulated in
the vehicle.
Setting the Temperature
Press the toggle button on the left-hand
side of the climate control upward or
downward to set the left-hand
temperature.
Note: This control also adjusts the
right-hand side temperature when you
switch off dual zone mode.
Press the toggle button on the right-hand
side of the climate control upward or
downward to set the right-hand
temperature.
Switching Auto Mode On and Off Press and release the button to
switch on automatic operation,
then set the temperature.
132
Explorer (TUB) Canada/United States of America, enUSA, Edition date: 201807, Second-Printing Climate Control
Page 136 of 571
The system adjusts the blower motor
speed, air distribution, air conditioning
operation, and outside or recirculated air
to reach and maintain the temperature you
have set.
Note:
You can also switch off dual zone
mode by pressing and holding the button
for more than two seconds.
Switching Defrost On and Off Press and release the button to
distribute air through the
windshield air vents and
de-mister.
Air directed to the instrument panel and
footwell air vents turns off. You can also
use this setting to defog and clear the
windshield of a thin covering of ice.
Switching the Air Conditioning On
and Off Press and release the button.
Use air conditioning with recirculated air
to improve cooling performance and
efficiency.
Note: In certain conditions (for example,
maximum defrost) the air conditioning
compressor may continue to operate even
though you switch off the air conditioning.
Switching the Climate Control On
and Off Press and release the button.
Switching Dual Zone Mode On and
Off Press and release the button to
switch on temperature control
for the right-hand side of the
vehicle. Switching the Heated Seats On
and Off Press and release the button to
cycle through the various heat
settings and off.
See Heated Seats (page 154).
Switching Maximum Air
Conditioning On and Off Press and release the button for
maximum cooling.
The left-hand and right-hand settings set
to LO, recirculated air flows through the
instrument panel air vents, air conditioning
turns on and the blower motor adjusts to
the highest speed.
Switching Maximum Defrost On
and Off Press and release the button for
maximum defrosting.
The left-hand and right-hand settings set
to HI, air flows through the windshield air
vents, and the blower motor adjusts to the
highest speed.
You can also use this setting to defog and
clear the windshield of a thin covering of
ice.
Note: To prevent window fogging, you
cannot select recirculated air when
maximum defrost is on.
Note: The heated rear window also turns
on when you select maximum defrost.
Switching Recirculated Air On and
Off Press and release the button to
switch between outside air and
recirculated air.
133
Explorer (TUB) Canada/United States of America, enUSA, Edition date: 201807, Second-Printing Climate Control E265280
Page 137 of 571
The air currently in the passenger
compartment recirculates. This may
reduce the time needed to cool the interior
(when used with A/C) and reduce
unwanted odors from entering your vehicle.
Note: Recirculated air may turn off (or
prevent you from switching on) in all air flow
modes except
MAX A/C to reduce the risk
of fogging. Recirculation may also turn on
and off in various air distribution control
combinations during hot weather in order
to improve cooling efficiency.
HINTS ON CONTROLLING THE
INTERIOR CLIMATE
General Hints
Note: Prolonged use of recirculated air may
cause the windows to fog up.
Note: You may feel a small amount of air
from the footwell air vents regardless of the
air distribution setting.
Note: To reduce humidity build-up inside
your vehicle, do not drive with the system
switched off or with recirculated air always
switched on.
Note: Do not place objects under the front
seats as this may interfere with the airflow
to the rear seats.
Note: Remove any snow, ice or leaves from
the air intake area at the base of the
windshield. Note:
To improve the time to reach a
comfortable temperature in hot weather,
drive with the windows open until you feel
cold air through the air vents.
Manual Climate Control
Note: To reduce fogging of the windshield
during humid weather, adjust the air
distribution control to the windshield air
vents position.
Automatic Climate Control
Note: Adjusting the settings when your
vehicle interior is extremely hot or cold is
not necessary. The system automatically
adjusts to heat or cool the interior to your
selected temperature as quickly as possible.
For the system to function efficiently, the
instrument panel and side air vents should
be fully open.
Note: If you select
AUTO during cold
temperatures, the system directs airflow to
the windshield and side window vents. In
addition, the fan may run at a slower speed
until the engine warms up.
Note: If you select
AUTO during hot
temperatures and the inside of the vehicle
is hot, the system automatically uses
recirculated air to maximize interior cooling.
Fan speed may also reduce until the air
cools.
134
Explorer (TUB) Canada/United States of America, enUSA, Edition date: 201807, Second-Printing Climate Control