2019 FORD EXPLORER buttons
[x] Cancel search: buttonsPage 164 of 571
5. Press and hold the previously
programmed button on the visor for 2
seconds. Repeat this step up to 3 times
until the garage door moves.
Programming is now complete.
Clearing a HomeLink Device
To erase programming from the three
HomeLink buttons press and hold the two
outer HomeLink buttons until the indicator
light begins to flash. The indicator light will
begin flashing in 10 to 20 seconds, at which
time both buttons should be released.
Programming has now been erased, and
the indicator light should blink slowly to
indicate the device is in train mode when
any of the three HomeLink buttons are
pressed.
FCC and RSS-210 Industry Canada
Compliance
This device complies with Part 15 of the
FCC Rules and with RSS-210 of Industry
Canada. Operation is subject to the
following two conditions: (1) this device
may not cause harmful interference, and
(2) this device must accept any
interference received, including
interference that may cause undesired
operation.
Changes or modifications to your device
not expressly approved by the party
responsible for compliance can void the
user ’s authority to operate the equipment.
161
Explorer (TUB) Canada/United States of America, enUSA, Edition date: 201807, Second-Printing Garage Door Opener (If Equipped)
Page 210 of 571

•
The front bumper, rear bumper or the
side sensors are damaged.
• The correct tire size is not in use on your
vehicle. For example, a mini-spare tire.
Using Active Park Assist
Selecting an Active Park Assist Mode Press the button once to
activate parallel parking. Press
the button a second time to
activate perpendicular parking. If you press
the button again the system switches off.
If your vehicle is parked and after you
switch the ignition on, you can use the
information display to toggle through the
modes. Press the button to switch the
system on and open the system menu in
the information display.
Note: If your vehicle is parked, the default
mode is parallel park out assist. However,
if you did not use active park assist to
parallel park your vehicle, use the
information display to select park out assist.
Note: You can repeatedly press the active
park assist button to toggle through the
modes only after moving your vehicle
approximately 33 ft (10 m).
To toggle through the modes, use the
buttons on the information display to
select the following:
• Parallel parking.
• Perpendicular parking.
• Parallel park out assist.
• Switch the system off.
Note: There is no time limit for toggling
through the modes. Parallel Parking
The system detects available parallel
parking spaces and steers your vehicle into
the space. You control the accelerator,
gearshift and brakes. The system visually
and audibly guides you into a parallel
parking space. Press the button once to search
for a parking space.
Note: You can also switch the system on
after you have already driven partially or
completely past a parking space. Press the
active park assist button and the system
informs you if you have recently passed a
suitable parking space.
When the vehicle speed is less than
22 mph (35 km/h), the system scans both
sides of your vehicle for an available
parking space. A message and a graphic
appear in the information display to
indicate the system is searching for a
parking space. Use the direction indicator
lever to search for a parking space on the
driver or passenger side of your vehicle.
Note: The system scans both sides of your
vehicle and offers parking spaces one side
at a time if you do not use the direction
indicator.
Note: The system defaults to the passenger
side if you do not use the direction indicator. Drive your vehicle approximately 3 ft (1 m)
and parallel to the other parked vehicles
when searching for a parking space.
Note:
If you drive your vehicle less than 2 ft
(0.5 m)
or greater than 5 ft (1.5 m) away
from other parked vehicles, the system may
not be able to detect an available parking
space.
207
Explorer (TUB) Canada/United States of America, enUSA, Edition date: 201807, Second-Printing Parking AidsE146186 E146186 E130107
Page 301 of 571
Note:
If you do not allow the engine to
relearn the idle and fuel trim strategy, the
idle quality of your vehicle may be adversely
affected until the engine computer
eventually relearns the idle trim and fuel
trim strategy.
Make sure that you dispose of old batteries
in an environmentally friendly way. Seek
advice from your local authority about
recycling old batteries.
CHECKING THE WIPER
BLADES Run the tip of your fingers over the edge of
the blade to check for roughness.
Clean the wiper blades with washer fluid
or water applied with a soft sponge or
cloth.
CHANGING THE WIPER
BLADES
You can improve poor wiper quality by
cleaning the wiper blades and the
windshield.
Replace the wiper blades at least annually
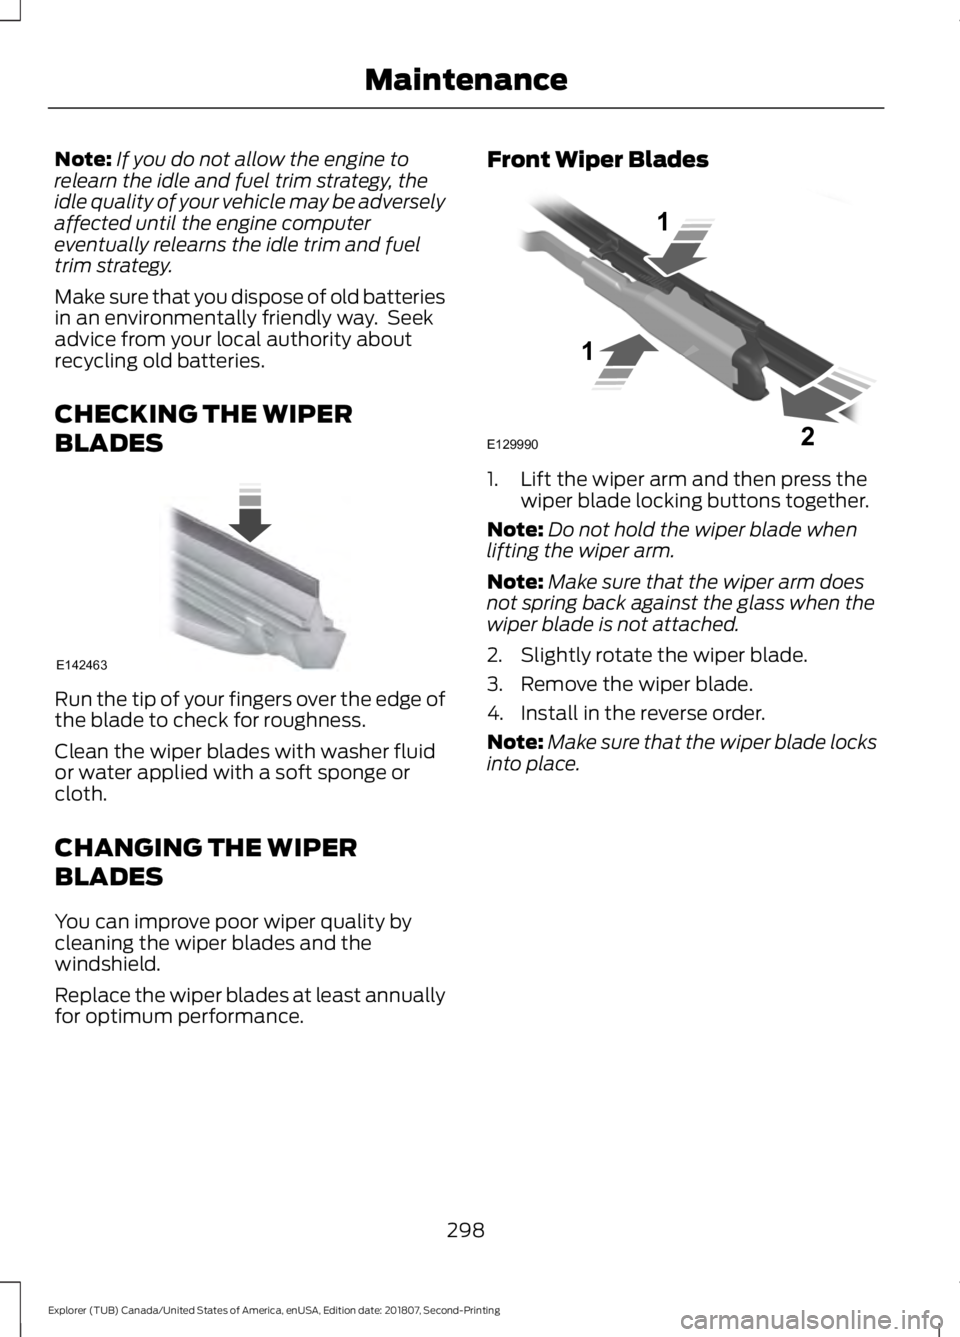
for optimum performance. Front Wiper Blades
1. Lift the wiper arm and then press the
wiper blade locking buttons together.
Note: Do not hold the wiper blade when
lifting the wiper arm.
Note: Make sure that the wiper arm does
not spring back against the glass when the
wiper blade is not attached.
2. Slightly rotate the wiper blade.
3. Remove the wiper blade.
4. Install in the reverse order.
Note: Make sure that the wiper blade locks
into place.
298
Explorer (TUB) Canada/United States of America, enUSA, Edition date: 201807, Second-Printing MaintenanceE142463 E129990
1
1 2
Page 369 of 571
AUDIO UNIT - VEHICLES WITH:
AM/FM/CD/SYNC
WARNING: Driving while
distracted can result in loss of vehicle
control, crash and injury. We strongly
recommend that you use extreme
caution when using any device that may
take your focus off the road. Your
primary responsibility is the safe
operation of your vehicle. We
recommend against the use of any
hand-held device while driving and
encourage the use of voice-operated
systems when possible. Make sure you
are aware of all applicable local laws
that may affect the use of electronic
devices while driving.
Accessing the Clock Settings Press and release the button to
access the clock setting.
Use the center arrow controls to
change the hours and minutes.
Accessing the Media Source Menu Press and release the button to
open the media source menu.
You can press this multiple times to
change to a SYNC-Media device or scroll
through the media sources using the arrow
buttons. Press
OK to select a source.
Accessing the Menu Press and release the button to
access different audio system
features. Accessing the Phone Features Press and release the button to
access the phone features of the
SYNC system. See your SYNC
information.
Accessing the Sound Settings Press and release the button to
access settings for Treble,
Midrange, Bass, Fade and
Balance.
Use the up and down arrow buttons to
select the various settings. Press
OK to
confirm a selection, press the left and right
arrow buttons to change the settings.
Press OK to set or press MENU to exit. You
can set sound settings for each audio
source independently.
Adjusting the Volume Turn to adjust the volume.
366
Explorer (TUB) Canada/United States of America, enUSA, Edition date: 201807, Second-Printing Audio SystemE265036 E265035 E265038 E265037 E142611 E265373
Page 370 of 571
Changing Radio Stations
In radio mode, turn to search through the
radio frequency band.
In satellite radio mode, turn to find the
previous or next available satellite radio
station.
Ejecting the CD
Press and release the button to
eject a CD.
Inserting a CD
Insert a CD into the CD slot.
Listening to a CD Press and release the button to
listen to a CD.
Listening to the Radio Press and release the button to
listen to the radio or change
radio stations. Listening to Satellite Radio Press and release the button to
listen to satellite radio.
Muting the Audio Press and release the button to
mute the playing audio.
Playing or Pausing Media Press and release the button to
either play or pause the audio.
Switching the Audio Unit On and
Off Press and release the button.
Using a Cell Phone Press and release to either
answer an incoming phone call
or to make a phone call.
Press and hold to end a phone
call.
Using the Display Control
Use the up and down arrow buttons to
select the various settings. When you make
your selection, press the left and right
arrow buttons to change the settings. Press and release to confirm a
selection.
Press and release the function buttons
below the display to select different
functions of the audio system depending
on which mode you are in (such as Radio
mode or CD mode).
367
Explorer (TUB) Canada/United States of America, enUSA, Edition date: 201807, Second-Printing Audio SystemE265696 E265032 E265039 E265033 E265034 E265043 E265040 E265041
Page 371 of 571
Using the Number Block
In radio mode, store and recall your favorite
radio stations. To store a favorite station
press and hold until the sound returns. In
phone mode, enter a phone number.
Using Seek, Fast Forward and
Reverse
In radio mode, select a frequency band and
press and release either button. The
system stops at the first station it finds in
that direction.
In CD mode, press and release to select
the next or previous track. Press and hold
to move quickly forward or backward
through the current track.
In satellite radio mode, press and release
to select the next or previous satellite radio
station. If you select a specific category
(such as jazz, rock or news), press to find
the next or previous station in the category
you select.
Menu Structure
Press MENU.
Press the up and down arrow buttons to
scroll through the options.
Press the right arrow to enter a menu.
Press the left arrow to exit a menu.
Press
OK to confirm a selection.
Note: Depending on your system, some
options may appear slightly different. Radio
Use the left and right arrows to go up or down the
frequency band.
Manual Tune
Select for a brief sampling of all available channels.
Scan
Select to store the six strongest local stations on the AM-
AST and FM-AST frequency bands.
AST
Select to have the system search by certain music
categories (such as Rock, Pop or Country).
Set Category for Seek/Scan
Select to view additional broadcast data, if available. This
feature defaults to off. RBDS must be on for you to set a
category.
RDS Text Display
368
Explorer (TUB) Canada/United States of America, enUSA, Edition date: 201807, Second-Printing Audio System
Page 383 of 571

To adjust this setting press the voice button, when prompted say:
Action and Description
Voice Command
voice settings
Then any of the following: When enabled, this feature will prompt you
to confirm any voice initiated call command
prior to the call being placed.
phone confirmation on
The system will make a best guess; you
may still occasionally be asked to confirm
settings.
phone confirmation off
Changing the Voice Settings
In addition to using voice commands to
change the voice settings, you can also use
the menu in the audio display.
To change the voice settings press the
Menu button then select: Menu Item
SYNC-Settings
Voice settings
Note: Depending on the current climate
control settings, the fan speed may
automatically go down while issuing voice
commands or while making and receiving
phone calls via SYNC to reduce the amount
of background noise in the vehicle. The fan
speed will automatically return to normal
operation once the voice session ends. Fan
speed can also be adjusted normally during
a voice session, simply press fan buttons (or
turn fan knob) to increase or decrease fan
speed to desired setting. To disable this automatic fan speed
reduction feature during voice sessions,
press and hold the climate control AC and
Recirculated air buttons simultaneously,
release and then increase fan speed within
2 seconds. To re-enable this feature, repeat
the above sequence.
USING SYNC™ WITH YOUR
PHONE
Hands-free calling is one of the main
features of SYNC. While the system
supports a variety of features, many are
dependent on your cellular phone's
functionality. At a minimum, most cellular
phones with Bluetooth wireless technology
support the following functions:
•
Answering an incoming call.
• Ending a call.
• Using privacy mode.
• Dialing a number.
• Redialing.
• Call waiting notification.
• Caller ID.
380
Explorer (TUB) Canada/United States of America, enUSA, Edition date: 201807, Second-Printing SYNC™ (If Equipped)
Page 391 of 571

Sending a Text Message
Note:
You can only send a text message to
one recipient at a time.
1. Select the send option when the desired selection highlights in the audio
display.
2. Select the confirmation option when the contact appears.
3. Press the OK button again to confirm when the system asks if you want to
send the message. A pre-defined
signature appears on each text
message. Note:
You can send text messages either
by choosing a contact from the phonebook
and selecting the text option from the audio
display or by replying to a received message
in the inbox.
Accessing Your Phone Settings
These are phone-dependent features. Your
phone settings allow you to access and
adjust features such as your ring tone and
text message notification, modify your
phonebook, and set up automatic
download.
1. Press the PHONE button.
2. Scroll until the phone settings option appears, and then press the OK button.
Scroll to select from the following options: Description and action
Menu Item
If this option is checked, the system uses the cellular phone
as the master when there is more than one cellular phone
paired to the system. This option can be changed for all
cellular phones (not only the active phone) using the
Bluetooth Devices menu.
Set as master
See the cellular phone name, provider name, cellular
phone number, and signal level. When done, press the left
arrow buttons to return to the phone status menu.
Phone status
Select which ringtone sounds during an incoming call (one
of the system's tones or your cellular phone's). If your
phone supports in-band ringing, your phone's ringtone
sounds when you choose the cellular phone ringtone
option.
Set ringtone
1. Press the
OK button to select and scroll to hear each
ringtone.
2. Press the
OK button to select a ringtone.
Have the option of hearing an audible tone to notify you
when a text message arrives. Press the
OK button to
switch the audible tone off or on.
Text msg notify
Modify the contents of your phonebook (such as add,
delete or download). Press the
OK button to select and
scroll between the choices in the phonebook preferences
table below.
Phonebook pref.
388
Explorer (TUB) Canada/United States of America, enUSA, Edition date: 201807, Second-Printing SYNC™
(If Equipped)