2019 FORD EXPEDITION tow
[x] Cancel search: towPage 350 of 583
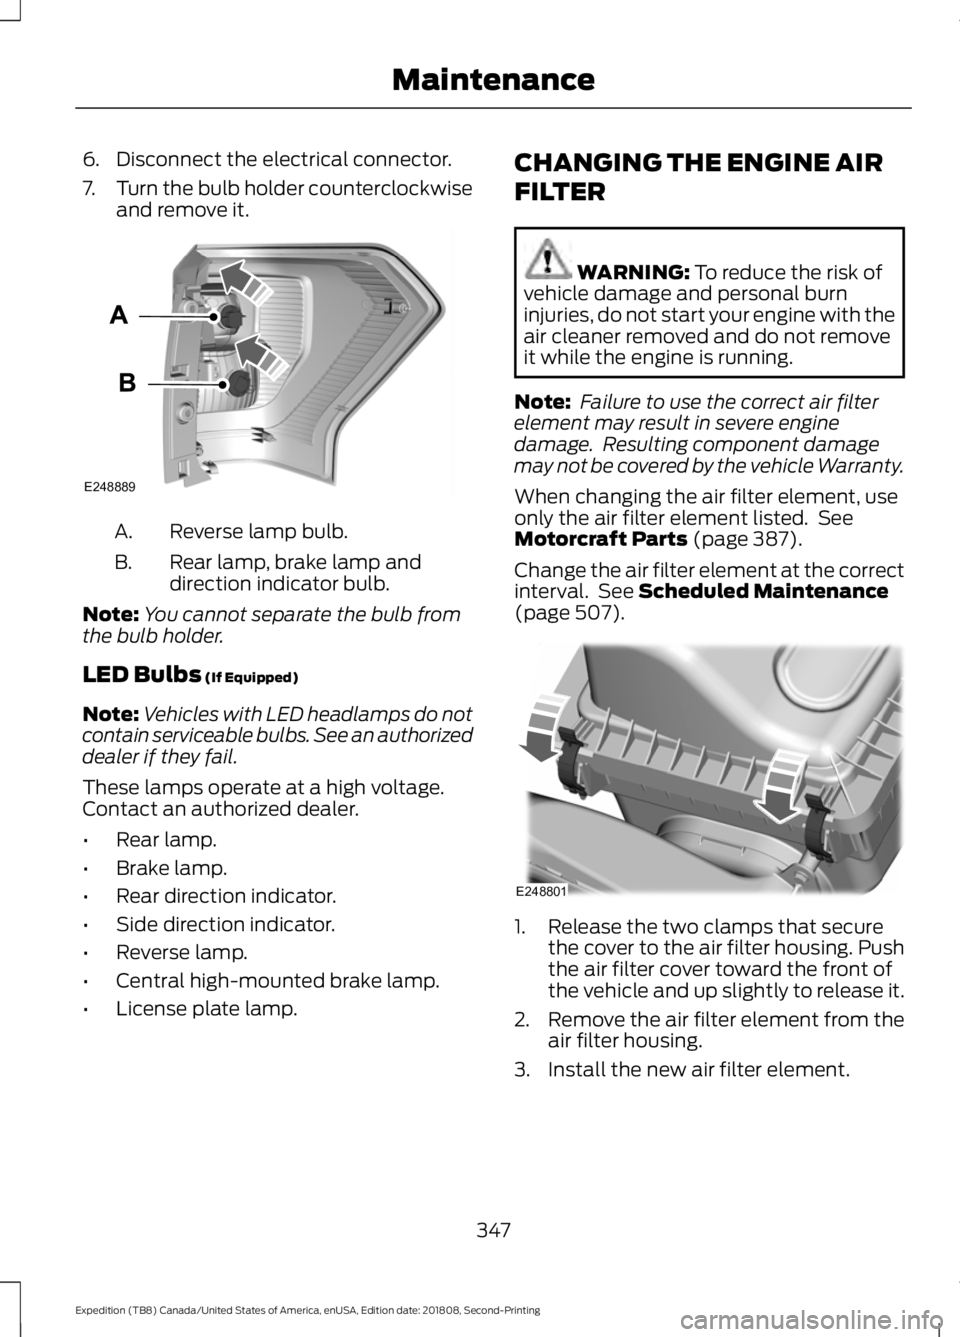
6. Disconnect the electrical connector.
7.
Turn the bulb holder counterclockwise
and remove it. Reverse lamp bulb.
A.
Rear lamp, brake lamp and
direction indicator bulb.
B.
Note: You cannot separate the bulb from
the bulb holder.
LED Bulbs (If Equipped)
Note: Vehicles with LED headlamps do not
contain serviceable bulbs. See an authorized
dealer if they fail.
These lamps operate at a high voltage.
Contact an authorized dealer.
• Rear lamp.
• Brake lamp.
• Rear direction indicator.
• Side direction indicator.
• Reverse lamp.
• Central high-mounted brake lamp.
• License plate lamp. CHANGING THE ENGINE AIR
FILTER WARNING:
To reduce the risk of
vehicle damage and personal burn
injuries, do not start your engine with the
air cleaner removed and do not remove
it while the engine is running.
Note: Failure to use the correct air filter
element may result in severe engine
damage. Resulting component damage
may not be covered by the vehicle Warranty.
When changing the air filter element, use
only the air filter element listed. See
Motorcraft Parts
(page 387).
Change the air filter element at the correct
interval. See
Scheduled Maintenance
(page 507). 1. Release the two clamps that secure
the cover to the air filter housing. Push
the air filter cover toward the front of
the vehicle and up slightly to release it.
2. Remove the air filter element from the
air filter housing.
3. Install the new air filter element.
347
Expedition (TB8) Canada/United States of America, enUSA, Edition date: 201808, Second-Printing MaintenanceE248889 E248801
Page 353 of 583
•
Dry your vehicle with a chamois or soft
terry cloth towel to eliminate water
spotting.
• Immediately remove fuel spillages, bird
droppings, insect deposits and road tar.
These may cause damage to your
vehicle ’s paintwork or trim over time.
We recommend Motorcraft Bug and
Tar Remover.
• Remove any exterior accessories, for
example antennas, before entering a
car wash.
• When filling with AdBlue®, remove any
residue on painted surfaces
immediately.
Note: Suntan lotions and insect repellents
can damage painted surfaces. If these
substances come in contact with your
vehicle, wash the affected area as soon as
possible.
Cleaning the Headlamps
Note: Do not scrape the headlamp lenses
or use abrasives, alcoholic solvents or
chemical solvents to clean them.
Note: Do not wipe the headlamps when
they are dry.
Exterior Chrome Parts
• Apply a high quality-cleaning product
to bumpers and other chrome parts.
Follow the manufacturer ’s instructions.
We recommend Motorcraft Custom
Bright Metal Cleaner.
• Do not apply the cleaning product to
hot surfaces. Do not leave the cleaning
product on chrome surfaces longer
than the time recommended.
• Using non-recommended cleaners can
result in severe and permanent
cosmetic damage.
Note: Never use abrasive materials, for
example steel wool or plastic pads as they
can scratch the chrome surface. Note:
Do not use chrome cleaner, metal
cleaner or polish on wheels or wheel covers.
Exterior Plastic Parts
For routine cleaning we recommend
Motorcraft Detail Wash. If tar or grease
spots are present, we recommend
Motorcraft Bug and Tar Remover.
Stripes or Graphics (If Equipped)
Hand washing your vehicle is preferred
however, pressure washing may be used
under the following conditions:
• Do not use water pressure higher than
2,000 psi (14,000 kPa)
.
• Do not use water hotter than
179°F
(82°C).
• Use a spray with a
40° wide spray
angle pattern.
• Keep the nozzle at a
12 in (305 mm)
distance and 90° angle to your
vehicle's surface.
Note: Holding the pressure washer nozzle
at an angle to the vehicle's surface may
damage graphics and cause the edges to
peel away from the vehicle's surface.
Underbody
Regularly clean the underside of your
vehicle using water. Keep body and door
drain holes free of debris or foreign
material.
Under Hood
For removing black rubber marks from
under the hood we recommend Motorcraft
Wheel and Tire Cleaner or Motorcraft Bug
and Tar Remover.
350
Expedition (TB8) Canada/United States of America, enUSA, Edition date: 201808, Second-Printing Vehicle Care
Page 375 of 583
Safety Practices
WARNING: If your vehicle
is stuck in snow, mud or sand, do
not rapidly spin the tires;
spinning the tires can tear the
tire and cause an explosion. A
tire can explode in as little as
three to five seconds. WARNING: Do not spin the
wheels at over
34 mph
(55 km/h). The tires may fail and
injure a passenger or bystander.
Driving habits have a great deal
to do with your tire mileage and
safety.
*Observe posted speed limits
*Avoid fast starts, stops and turns
*Avoid potholes and objects on
the road
*Do not run over curbs or hit the
tire against a curb when parking
Highway Hazards
No matter how carefully you drive
there ’s always the possibility that
you may eventually have a flat tire
on the highway. Drive slowly to the
closest safe area out of traffic.
This may further damage the flat
tire, but your safety is more
important. If you feel a sudden vibration or
ride disturbance while driving, or
you suspect your tire or vehicle
has been damaged, immediately
reduce your speed. Drive with
caution until you can safely pull
off the road. Stop and inspect the
tires for damage. If a tire is
under-inflated or damaged,
deflate it, remove wheel and
replace it with your spare tire and
wheel. If you cannot detect a
cause, have the vehicle towed to
the nearest repair facility or tire
dealer to have the vehicle
inspected.
Tire and Wheel Alignment
A bad jolt from hitting a curb or
pothole can cause the front end
of your vehicle to become
misaligned or cause damage to
your tires. If your vehicle seems to
pull to one side when you’re
driving, the wheels may be out of
alignment. Have an authorized
dealer check the wheel alignment
periodically.
Wheel misalignment in the front
or the rear can cause uneven and
rapid treadwear of your tires and
should be corrected by an
authorized dealer. Front-wheel
drive vehicles and those with an
independent rear suspension may
require alignment of all four
wheels.
The tires should also be balanced
periodically. An unbalanced tire
and wheel assembly may result in
irregular tire wear.
372
Expedition (TB8) Canada/United States of America, enUSA, Edition date: 201808, Second-Printing Wheels and Tires
Page 384 of 583
The usage of a full-size dissimilar spare
wheel and tire assembly can lead to
impairment of the following:
•
Handling, stability and braking
performance.
• Comfort and noise.
• Ground clearance and parking at curbs.
• Winter weather driving capability.
• Wet weather driving capability.
• Four-wheel driving capability. When driving with the full-size dissimilar
spare wheel and tire assembly additional
caution should be given to:
•
Towing a trailer.
• Driving vehicles equipped with a
camper body.
• Driving vehicles with a load on the
cargo rack.
Drive cautiously when using a full-size
dissimilar spare wheel and tire assembly
and seek service as soon as possible.
Location of the Spare Tire and
Tools
The spare tire is located under the vehicle,
just forward of the rear bumper. The jack,
swivel wrench and lug wrench are in the
following locations: Location
Item
Under the vehicle, just forward of the rearbumper
Spare tire
Under the access panel located in the floorcompartment behind the rear seat
Jack and tool kit bag
Tire Change Procedure WARNING: Only use replacement
tires and wheels that are the same size,
load index, speed rating and type (such
as P-metric versus LT-metric or
all-season versus all-terrain) as those
originally provided by Ford. The
recommended tire and wheel size may
be found on either the Safety
Compliance Certification Label (affixed
to either the door hinge pillar, door-latch
post, or the door edge that meets the
door-latch post, next to the driver's
seating position), or the Tire Label which
is located on the B-Pillar or edge of the driver's door. If this information is not
found on these labels, then you should
contact your authorized dealer as soon
as possible. Use of any tire or wheel not
recommended by Ford can affect the
safety and performance of your vehicle,
which could result in an increased risk of
loss of vehicle control, vehicle rollover,
personal injury and death.
WARNING:
When one of the front
wheels is off the ground, the
transmission alone will not prevent the
vehicle from moving or slipping off the
jack, even if the transmission is in park
(P).
381
Expedition (TB8) Canada/United States of America, enUSA, Edition date: 201808, Second-Printing Wheels and Tires
Page 385 of 583

WARNING: To help prevent your
vehicle from moving when changing a
wheel, shift the transmission into park
(P), set the parking brake and use an
appropriate block or wheel chock to
secure the wheel diagonally opposite to
the wheel being changed. For example,
when changing the front left wheel,
place an appropriate block or wheel
chock on the right rear wheel. WARNING:
Do not attempt to
change a tire on the side of the vehicle
close to moving traffic. Pull far enough
off the road to avoid the danger of being
hit when operating the jack or changing
the wheel. WARNING:
Always use the jack
provided as original equipment with your
vehicle. If using a jack other than the one
provided, make sure the jack capacity is
adequate for the vehicle weight,
including any vehicle cargo or
modifications. If you are unsure if the jack
capacity is adequate, contact the
authorized dealer. WARNING:
Switch off the running
boards before jacking or placing any
object under your vehicle. Never place
your hand between the extended running
board and your vehicle. A moving running
board may cause injury. WARNING:
Only use the spare
wheel carrier to stow the wheel provided
with your vehicle. Other wheel sizes
could cause the spare wheel carrier to
fail if it does not fit securely or is too
heavy. 1. Park the vehicle on firm, level ground
and activate the hazard flashers.
2. Apply the parking brake, place the transmission in park (P) and switch the
ignition off.
3. Block the wheels diagonally opposite the flat tire, for example, if the left front
tire is flat, block the right rear wheel.
Removing the Jack and Tools
Note: Pay close attention to the orientation
of the jack and tool kit bag, because it needs
to be reinstalled after changing the tire.
1. Open the liftgate and lift the load floor
behind the third row seat. If your
vehicle has an access panel, you need
to then unlatch and remove this panel.
2. Remove the wing nut by turning it counterclockwise.
3. Remove the jack and tool kit bag from the bracket, loosen the straps and
remove the tool bag from the jack.
382
Expedition (TB8) Canada/United States of America, enUSA, Edition date: 201808, Second-Printing Wheels and TiresE175447
Page 388 of 583
Rear jacking point
1. Remove the lug nuts with the lug
wrench. Replace the flat tire with the
spare tire, making sure the valve stem
is facing outward.
2. Reinstall the lug nuts until the wheel is
snug against the hub. Do not fully
tighten the lug nuts until the wheel has
been lowered.
3. Completely lower the vehicle by turning
the jack drive counterclockwise.
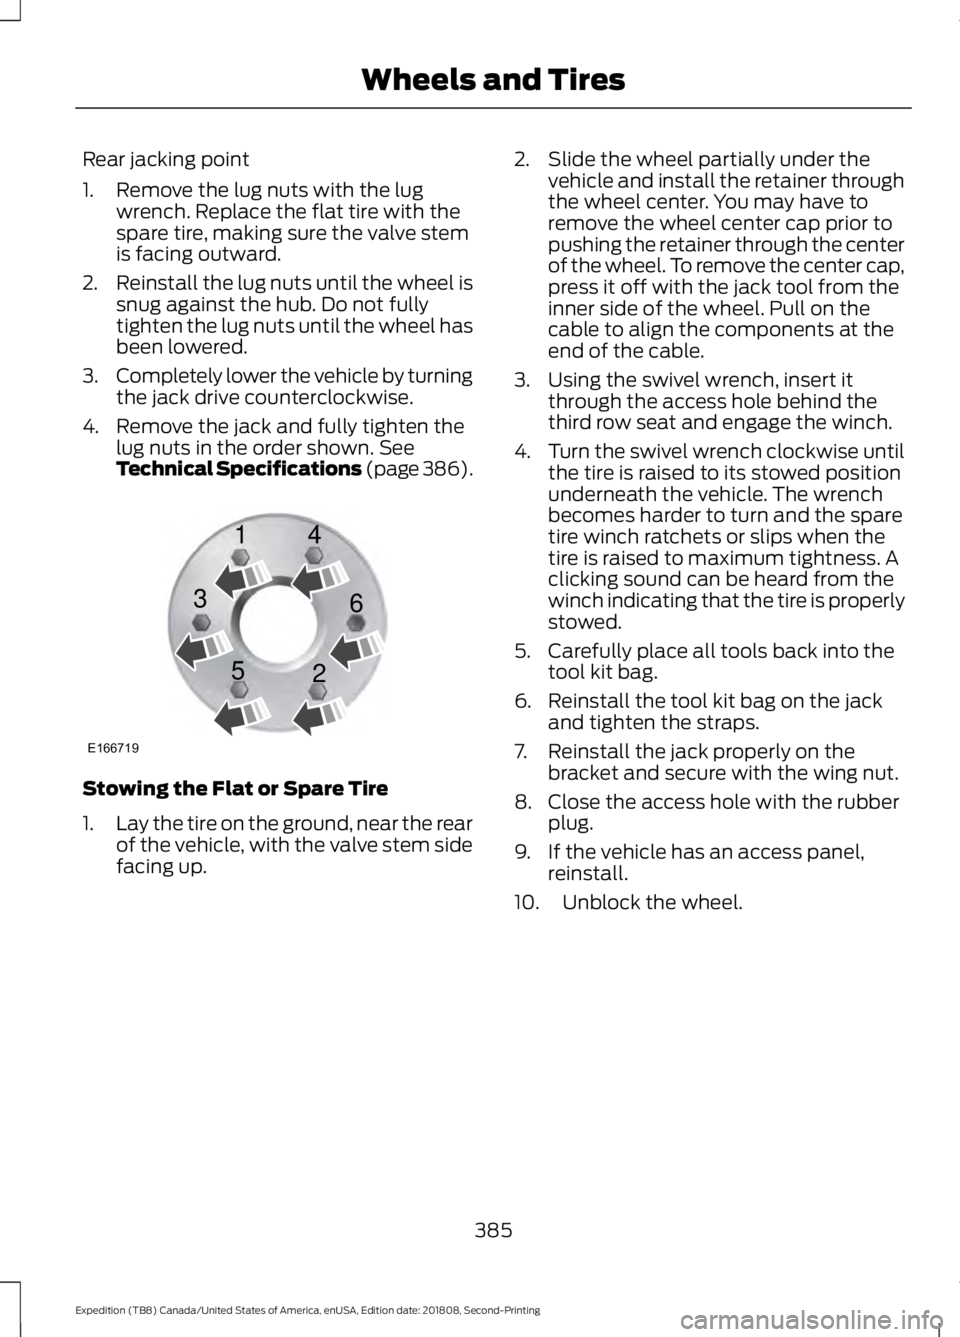
4. Remove the jack and fully tighten the lug nuts in the order shown. See
Technical Specifications (page 386). Stowing the Flat or Spare Tire
1.
Lay the tire on the ground, near the rear
of the vehicle, with the valve stem side
facing up. 2. Slide the wheel partially under the
vehicle and install the retainer through
the wheel center. You may have to
remove the wheel center cap prior to
pushing the retainer through the center
of the wheel. To remove the center cap,
press it off with the jack tool from the
inner side of the wheel. Pull on the
cable to align the components at the
end of the cable.
3. Using the swivel wrench, insert it through the access hole behind the
third row seat and engage the winch.
4. Turn the swivel wrench clockwise until
the tire is raised to its stowed position
underneath the vehicle. The wrench
becomes harder to turn and the spare
tire winch ratchets or slips when the
tire is raised to maximum tightness. A
clicking sound can be heard from the
winch indicating that the tire is properly
stowed.
5. Carefully place all tools back into the tool kit bag.
6. Reinstall the tool kit bag on the jack and tighten the straps.
7. Reinstall the jack properly on the bracket and secure with the wing nut.
8. Close the access hole with the rubber plug.
9. If the vehicle has an access panel, reinstall.
10. Unblock the wheel.
385
Expedition (TB8) Canada/United States of America, enUSA, Edition date: 201808, Second-Printing Wheels and TiresE166719
1
3
5 4
6
2
Page 394 of 583
CAPACITIES AND SPECIFICATIONS
Capacities
WARNING: The air conditioning refrigerant system contains refrigerant under
high pressure. Only qualified personnel should service the air conditioning refrigerant
system. Opening the air conditioning refrigerant system can cause personal injury. Capacity
Item
6.0 qt (5.7 L)
Engine oil (with oil filter)
18.5 qt (17.5 L)
Engine coolant (Base radiator with auxiliary
rear heat)
18.0 qt (17 L)
Engine coolant (Heavy Duty trailer towing
with auxiliary rear heat)
Between MIN and MAX on brake fluidreservoir1
Brake fluid
1.80 qt (1.7 L)
Front axle
2.5 qt (2.4 L)
8.8" Rear axle (Conventional differential) 2
2.5 qt (2.4 L)
9.75" Rear axle (Conventional differential) 2
2.4 qt (2.3 L)3
9.75" Rear axle (Limited-slip differential) 2
13.1 qt (12.4 L)4
Automatic transmission fluid
1.5 qt (1.4 L)
Transfer case fluid (Four Wheel Drive with
Torque on Demand)
1.6–1.8 qt (1.5– 1.7 L)
Transfer case fluid (Four Wheel Drive with
Electronic Shift on the Fly)
Fill as required
Windshield washer fluid
23.6 gal (89.3 L)
Fuel tank
27.8 gal (105.2 L)
Fuel tank (Expedition MAX)
37 oz (1.05 kg)
A/C refrigerant (U.S. and Canada)
391
Expedition (TB8) Canada/United States of America, enUSA, Edition date: 201808, Second-Printing Capacities and Specifications
Page 401 of 583

GENERAL INFORMATION
WARNING: Driving while
distracted can result in loss of vehicle
control, crash and injury. We strongly
recommend that you use extreme
caution when using any device that may
take your focus off the road. Your
primary responsibility is the safe
operation of your vehicle. We
recommend against the use of any
hand-held device while driving and
encourage the use of voice-operated
systems when possible. Make sure you
are aware of all applicable local laws
that may affect the use of electronic
devices while driving. Radio Frequencies and Reception
Factors
AM and FM frequencies are established by
the Federal Communications Commission
(FCC) and the Canadian Radio and
Telecommunications Commission (CRTC).
Those frequencies are:
•
AM: 530-1710 kHz
• FM: 87.9-107.9 MHz
Note: Listening to loud audio for long
periods of time could damage your hearing. Radio Reception Factors
The further you travel from an AM or FM station, the
weaker the signal and the weaker the reception.
Distance and strength
Hills, mountains, tall buildings, bridges, tunnels, freeway
overpasses, parking garages, dense tree foliage and
thunderstorms can interfere with the reception.
Terrain
When you pass a ground-based broadcast repeating
tower, a stronger signal may overtake a weaker one and
result in the audio system muting.
Station overload
CD and CD Player Information
Note: CD units play commercially pressed
4.7 in (12 cm) audio compact discs only. Due
to technical incompatibility, certain
recordable and re-recordable compact discs
may not function correctly when used in the
vehicle ’s CD player. Note:
Do not insert CDs with homemade
paper (adhesive) labels into the CD player
as the label may peel and cause the CD to
become jammed. You should use a
permanent felt tip marker rather than
adhesive labels on your homemade CDs.
Ballpoint pens may damage CDs. Ask an
authorized dealer for more information.
Note: Do not use any irregularly shaped
discs or discs with a scratch protection film
attached.
398
Expedition (TB8) Canada/United States of America, enUSA, Edition date: 201808, Second-Printing Audio System