Page 93 of 490

WARNING!
There is no anti-pinch protection when the window is
almost closed. To avoid personal injury be sure to clear
your arms, hands, fingers and all objects from the
window path before closing.
Auto Up Reset — If Equipped
To reactivate the Auto Up feature, perform the following
steps after vehicle power is restored:
1. Pull the window control up to close the window com- pletely and continue to hold the control up for an
additional two seconds after the window is closed.
2. Push the window control down firmly to the second detent to open the window completely and continue to
hold the control down for an additional two seconds
after the window is fully open.
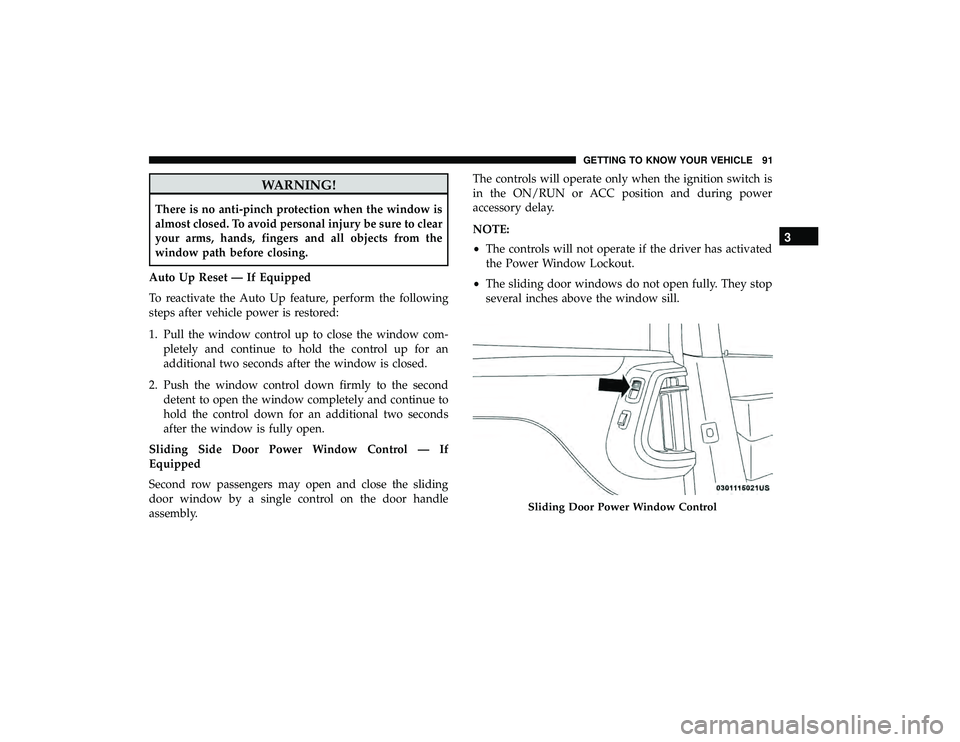
Sliding Side Door Power Window Control — If
Equipped
Second row passengers may open and close the sliding
door window by a single control on the door handle
assembly. The controls will operate only when the ignition switch is
in the ON/RUN or ACC position and during power
accessory delay.
NOTE:
•
The controls will not operate if the driver has activated
the Power Window Lockout.
• The sliding door windows do not open fully. They stop
several inches above the window sill.
Sliding Door Power Window Control
3
GETTING TO KNOW YOUR VEHICLE 91
Page 95 of 490
2. Move to the front of the vehicle and look inside thecenter of the hood opening. Locate, then push the safety
catch downward while raising the hood at the same
time.
Use the hood prop rod to secure the hood in the open
position.
Closing The Hood
WARNING!
Be sure the hood is fully latched before driving your
vehicle. If the hood is not fully latched, it could open
when the vehicle is in motion and block your vision.
Failure to follow this warning could result in serious
injury or death.Safety Lever Location
Hood Prop Rod
3
GETTING TO KNOW YOUR VEHICLE 93
Page 96 of 490
CAUTION!
To prevent possible damage, do not slam the hood to
close it. Lower hood to approximately 12 inches (30 cm)
and drop the hood to close. Make sure hood is fully
closed for both latches. Never drive vehicle unless
hood is fully closed, with both latches engaged.
LIFTGATE
Opening
To Unlock/Enter The Liftgate
The liftgate may be released in several ways:
•Overhead console liftgate button
• Key fob
• Outside handle
Push the liftgate button on the key fob twice within five
seconds to release the liftgate.
Closing
To Close The Liftgate
Grasp the liftgate closing handle and initiate lowering the
liftgate. Release the handle when the liftgate takes over the
closing effort.
The power liftgate may be closed by pushing the button,
located in the upper left trim in the liftgate opening.
Pushing once will only close the liftgate. This button
cannot be used to open the liftgate.
Liftgate Handle
94 GETTING TO KNOW YOUR VEHICLE
Page 104 of 490

the signal during programming. Similar to this Canadian
law, some U.S. gate operators are designed to time-out in
the same manner.
It may be helpful to unplug the device during the cycling
process to prevent possible overheating of the garage door
or gate motor.
1. Cycle the ignition to the ON/RUN position.
2. Place the hand-held transmitter 1 to 3 inches (3 to 8 cm)away from the HomeLink button you wish to program
while keeping the HomeLink indicator light in view.
3. Continue to push and hold the HomeLink button while you push and release (“cycle”) your hand-held trans-
mitter every two seconds until HomeLink has success-
fully accepted the frequency signal. The indicator light
will flash slowly and then rapidly when fully trained.
4. Watch for the HomeLink indicator to change flash rates. When it changes, it is programmed. It may take up to 30
seconds or longer in rare cases. The garage door may
open and close while you are programming.
5. Push and hold the programmed HomeLink button and observe the indicator light. NOTE:
•If the indicator light stays on constantly, programming
is complete and the garage door/device should acti-
vate when the HomeLink button is pushed.
• To program the two remaining HomeLink buttons,
repeat each step for each remaining button. DO NOT
erase the channels.
If you unplugged the garage door opener/device for
programming, plug it back in at this time.
Using HomeLink
To operate, push and release the programmed HomeLink
button. Activation will now occur for the programmed
device (i.e. garage door opener, gate operator, security
system, entry door lock, home/office lighting, etc.) The
hand-held transmitter of the device may also be used at
any time.
Security
It is advised to erase all channels before you sell or turn in
your vehicle.
To do this, push and hold the two outside buttons for 20
seconds until the red indicator flashes.
102 GETTING TO KNOW YOUR VEHICLE
Page 107 of 490
To open the upper compartment, push in the release button
located on the left side of the upper door. The door will
automatically open.
To close the compartment door, push downward on the
door’s surface to latch the door closed.
To open the lower compartment, pull the release handle.NOTE:
The lower compartment is equipped with a lock
that is a part of the compartment handle.
Center Console Features
There are two consoles available: Basic and Super.
WARNING!
Do not operate this vehicle with a console compart-
ment lid in the open position. Driving with the console
compartment lid open may result in injury in a colli-
sion.
Upper Compartment Release Button
Lower Compartment Release Handle
3
GETTING TO KNOW YOUR VEHICLE 105
Page 112 of 490
Driver Seatback Storage — If Equipped
The driver’s seatback has a primary storage pocket on all
models and an optional secondary mesh pocket.
Umbrella Holder
An umbrella holder has been conveniently molded into the
left front door entry scuff molding.
Second Row Seat Storage Bins — If Equipped
The seat storage bins are located on the floor in front of the
second row seats. The area below the covers can be used
for storage when the second row seat is in the upright
position.
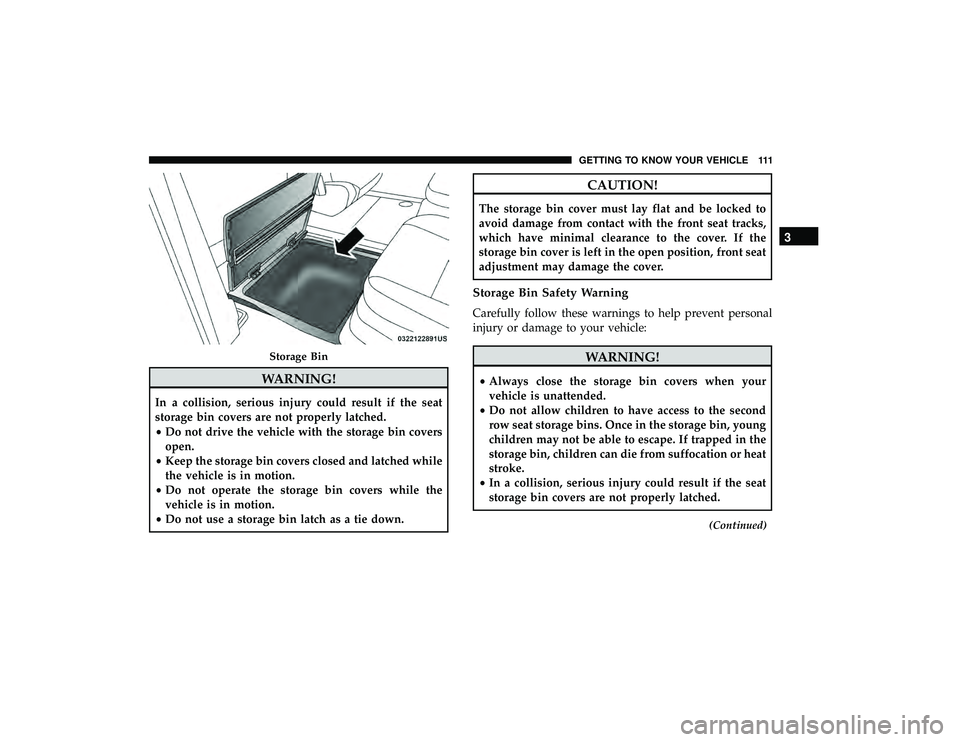
Pull up on the storage bin latch to open the cover. Slide the
storage bin locking mechanism to the�lock�position to
allow greater access to the storage bin.
Driver ’s Seatback Storage
1 — Bag Holder
2 — Standard Pocket
3 — Mesh Pocket
Umbrella Holder
110 GETTING TO KNOW YOUR VEHICLE
Page 113 of 490

WARNING!
In a collision, serious injury could result if the seat
storage bin covers are not properly latched.
•Do not drive the vehicle with the storage bin covers
open.
• Keep the storage bin covers closed and latched while
the vehicle is in motion.
• Do not operate the storage bin covers while the
vehicle is in motion.
• Do not use a storage bin latch as a tie down.
CAUTION!
The storage bin cover must lay flat and be locked to
avoid damage from contact with the front seat tracks,
which have minimal clearance to the cover. If the
storage bin cover is left in the open position, front seat
adjustment may damage the cover.
Storage Bin Safety Warning
Carefully follow these warnings to help prevent personal
injury or damage to your vehicle:
WARNING!
•Always close the storage bin covers when your
vehicle is unattended.
• Do not allow children to have access to the second
row seat storage bins. Once in the storage bin, young
children may not be able to escape. If trapped in the
storage bin, children can die from suffocation or heat
stroke.
• In a collision, serious injury could result if the seat
storage bin covers are not properly latched.
(Continued)
Storage Bin
3
GETTING TO KNOW YOUR VEHICLE 111
Page 114 of 490

WARNING!(Continued)
•Do not drive the vehicle with the storage bin covers
open. Keep the storage bin covers closed and latched
while the vehicle is in motion.
• Do not operate the storage bin covers while the
vehicle is in motion.
• Do not use a storage bin latch as a tie down.
CAUTION!
The storage bin cover must lay flat and be locked to
avoid damage from contact with the front seat tracks,
which have minimal clearance to the cover. If the
storage bin cover is left in the open position, front seat
adjustment may damage the cover.
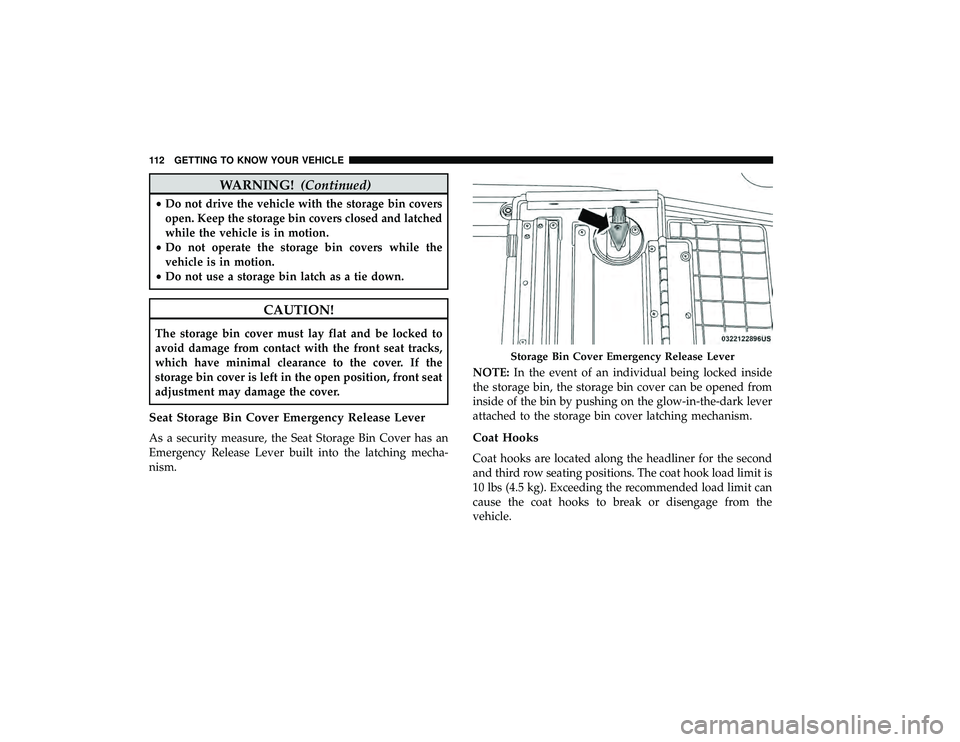
Seat Storage Bin Cover Emergency Release Lever
As a security measure, the Seat Storage Bin Cover has an
Emergency Release Lever built into the latching mecha-
nism. NOTE:
In the event of an individual being locked inside
the storage bin, the storage bin cover can be opened from
inside of the bin by pushing on the glow-in-the-dark lever
attached to the storage bin cover latching mechanism.Coat Hooks
Coat hooks are located along the headliner for the second
and third row seating positions. The coat hook load limit is
10 lbs (4.5 kg). Exceeding the recommended load limit can
cause the coat hooks to break or disengage from the
vehicle.
Storage Bin Cover Emergency Release Lever
112 GETTING TO KNOW YOUR VEHICLE