2019 DODGE CHARGER SRT headlamp
[x] Cancel search: headlampPage 66 of 496

Daytime Running Lights (DRL) — If Equipped
The Daytime Running Lights will turn on when the engine
is started and will remain on unless the headlamps are
turned to the on position, the parking brake is applied, or
the engine is shut OFF.
NOTE:If allowed by law in the country in which the
vehicle was purchased, the Daytime Running Lights can be
turned on and off using the Uconnect System, refer to
“Uconnect Settings” in “Multimedia” for further informa-
tion.
High/Low Beam Switch
Push the multifunction lever away from you to switch the
headlights to high beam. Pull the multifunction lever
toward you to switch the headlights back to low beam.
Automatic High Beam — If Equipped
The Automatic High Beam Headlamp Control system
provides increased forward lighting at night by automat-
ing high beam control through the use of a digital camera
mounted on the inside rearview mirror. This camera de-
tects vehicle specific light and automatically switches from
high beams to low beams until the approaching vehicle is
out of view. NOTE:
•
The Automatic High Beam Headlamp Control can be
turned on or off by selecting “ON” under “Auto High
Beam” within your Uconnect settings, as well as turning
the headlight switch to the AUTO position. Refer to
“Uconnect Settings” in “Multimedia” for further infor-
mation.
• Broken, muddy, or obstructed headlights and taillights
of vehicles in the field of view will cause headlights to
remain on longer (closer to the vehicle). Also, dirt, film,
and other obstructions on the windshield or camera lens
will cause the system to function improperly.
If the windshield or Automatic High Beam Headlamp
Control mirror is replaced, the mirror must be re-aimed to
ensure proper performance. See a local authorized dealer.
To Activate
1. Turn the headlight switch to the AUTO headlight posi- tion.
2. Push the multifunction lever away from you (toward front of vehicle) to engage the high beam mode.
NOTE: This system will not activate until the vehicle is at
or above 15 mph (24 km/h).
64 GETTING TO KNOW YOUR VEHICLE
Page 189 of 496
Your vehicle may also be designed to perform any of these
other functions in response to the Enhanced Accident
Response System:
•Turn off the Fuel Filter Heater, Turn off the HVAC
Blower Motor, Close the HVAC Circulation Door
• Cut off battery power to the:
• Engine
• Electric Motor (if equipped)
• Electric power steering
• Brake booster
• Electric park brake
• Automatic transmission gear selector
• Horn
• Front wiper
• Headlamp washer pump
NOTE:
After an accident, remember to cycle the ignition to
the STOP (OFF/LOCK) position and remove the key from the
ignition switch to avoid draining the battery. Carefully check
the vehicle for fuel leaks in the engine compartment and on
the ground near the engine compartment and fuel tank before
resetting the system and starting the engine. If there are no
fuel leaks or damage to the vehicle electrical devices (e.g.
headlights) after an accident, reset the system by following the procedure described below. If you have any doubt, contact an
authorized dealer.
Enhanced Accident Response System Reset Procedure
In order to reset the Enhanced Accident Response System
functions after an event, the ignition switch must be
changed from ignition START or ON/RUN to ignition OFF.
Carefully check the vehicle for fuel leaks in the engine
compartment and on the ground near the engine compart-
ment and fuel tank before resetting the system and starting
the engine.
Maintaining Your Air Bag System
WARNING!
•
Modifications to any part of the air bag system could
cause it to fail when you need it. You could be
injured if the air bag system is not there to protect
you. Do not modify the components or wiring, in-
cluding adding any kind of badges or stickers to the
steering wheel hub trim cover or the upper passenger
side of the instrument panel. Do not modify the front
bumper, vehicle body structure, or add aftermarket
side steps or running boards.
(Continued)
5
SAFETY 187
Page 292 of 496
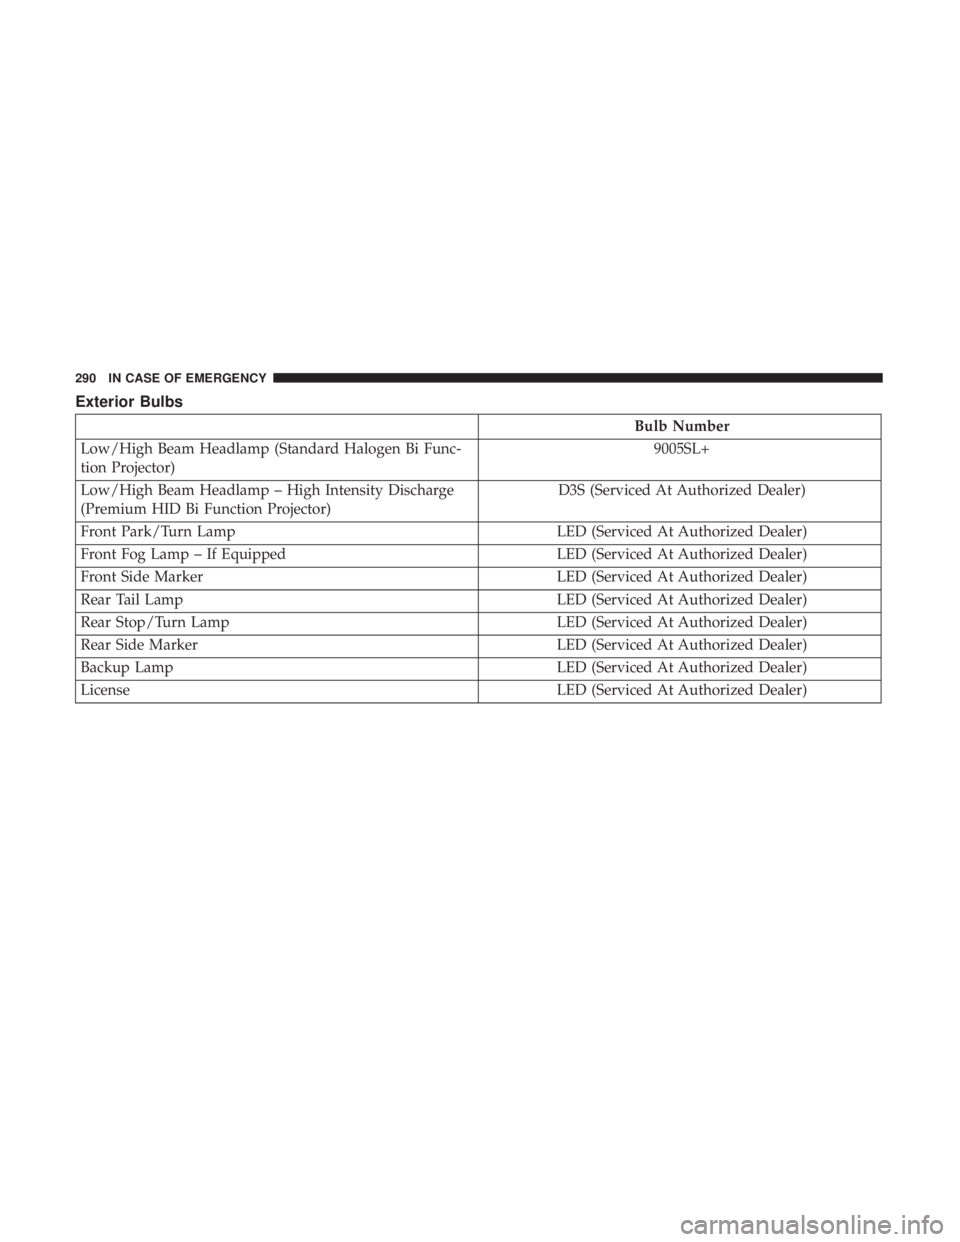
Exterior Bulbs
Bulb Number
Low/High Beam Headlamp (Standard Halogen Bi Func-
tion Projector) 9005SL+
Low/High Beam Headlamp – High Intensity Discharge
(Premium HID Bi Function Projector) D3S (Serviced At Authorized Dealer)
Front Park/Turn Lamp LED (Serviced At Authorized Dealer)
Front Fog Lamp – If Equipped LED (Serviced At Authorized Dealer)
Front Side Marker LED (Serviced At Authorized Dealer)
Rear Tail Lamp LED (Serviced At Authorized Dealer)
Rear Stop/Turn Lamp LED (Serviced At Authorized Dealer)
Rear Side Marker LED (Serviced At Authorized Dealer)
Backup Lamp LED (Serviced At Authorized Dealer)
License LED (Serviced At Authorized Dealer)
290 IN CASE OF EMERGENCY
Page 293 of 496
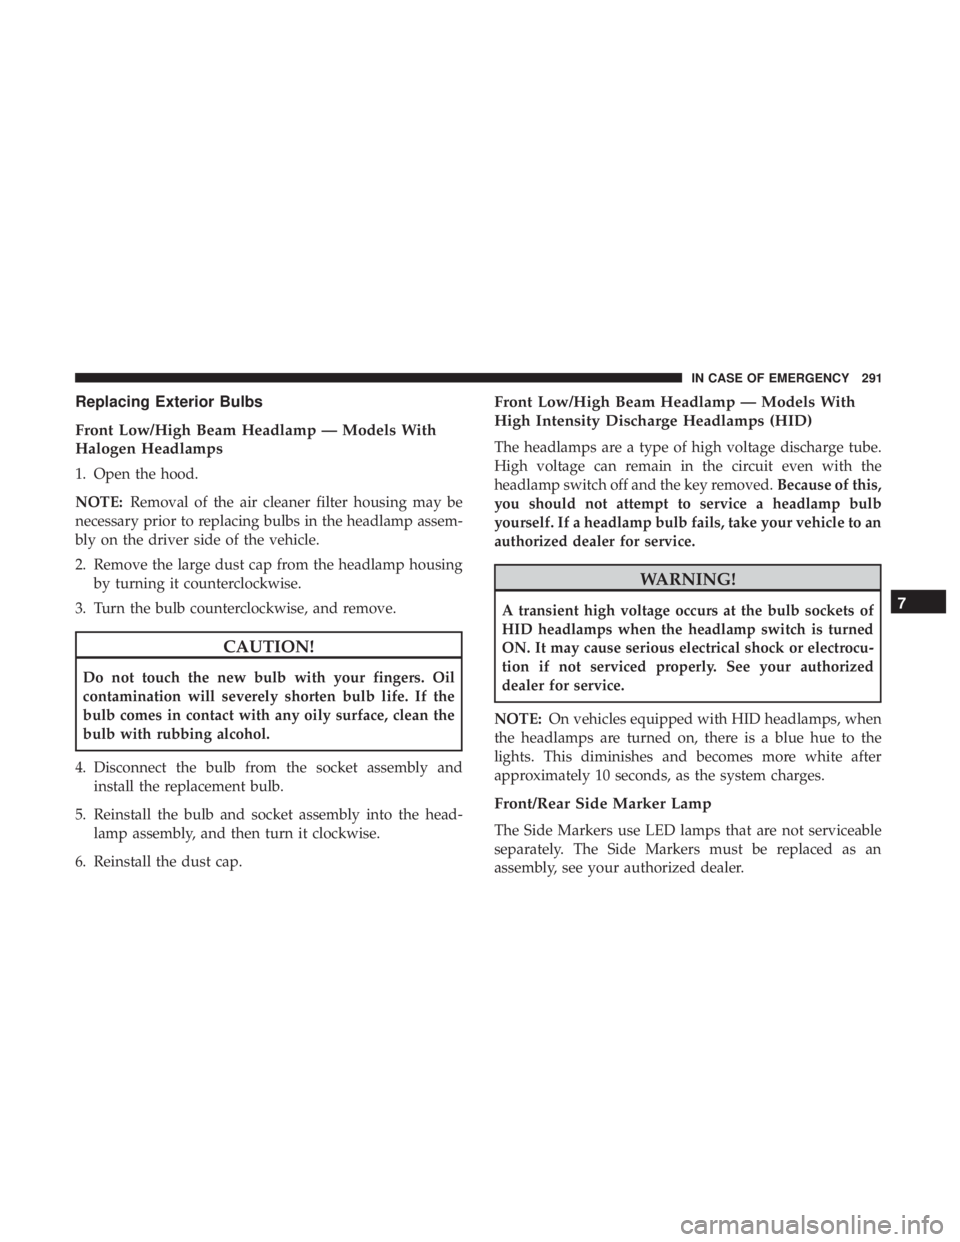
Replacing Exterior Bulbs
Front Low/High Beam Headlamp — Models With
Halogen Headlamps
1. Open the hood.
NOTE:Removal of the air cleaner filter housing may be
necessary prior to replacing bulbs in the headlamp assem-
bly on the driver side of the vehicle.
2. Remove the large dust cap from the headlamp housing by turning it counterclockwise.
3. Turn the bulb counterclockwise, and remove.
CAUTION!
Do not touch the new bulb with your fingers. Oil
contamination will severely shorten bulb life. If the
bulb comes in contact with any oily surface, clean the
bulb with rubbing alcohol.
4. Disconnect the bulb from the socket assembly and install the replacement bulb.
5. Reinstall the bulb and socket assembly into the head- lamp assembly, and then turn it clockwise.
6. Reinstall the dust cap.
Front Low/High Beam Headlamp — Models With
High Intensity Discharge Headlamps (HID)
The headlamps are a type of high voltage discharge tube.
High voltage can remain in the circuit even with the
headlamp switch off and the key removed. Because of this,
you should not attempt to service a headlamp bulb
yourself. If a headlamp bulb fails, take your vehicle to an
authorized dealer for service.
WARNING!
A transient high voltage occurs at the bulb sockets of
HID headlamps when the headlamp switch is turned
ON. It may cause serious electrical shock or electrocu-
tion if not serviced properly. See your authorized
dealer for service.
NOTE: On vehicles equipped with HID headlamps, when
the headlamps are turned on, there is a blue hue to the
lights. This diminishes and becomes more white after
approximately 10 seconds, as the system charges.
Front/Rear Side Marker Lamp
The Side Markers use LED lamps that are not serviceable
separately. The Side Markers must be replaced as an
assembly, see your authorized dealer.
7
IN CASE OF EMERGENCY 291
Page 294 of 496
Front Fog Lamp
The Front Fog Lamps use LED sources that are not
serviceable separately. The Front Fog Lamp must be re-
placed as an assembly; see your authorized dealer.
Front Turn Signal Lamps
The Front Park/Turn function is part of the headlamp
assembly and use LED lamps that are not serviceable
separately. The headlamps must be replaced as an assem-
bly, see your authorized dealer.
Backup Lamps
The Backup Lamps use LED sources that are not service-
able separately. The Applique must be replaced as an
assembly; see your authorized dealer.
License Lamp
The License Lamp uses an LED source that is not service-
able separately. The License Lamp must be replaced as an
assembly; see your authorized dealer.
Center High Mounted Stop Lamp (CHMSL)
The CHMSL Lamp uses LED sources that are not service-
able separately. The CHMSL Lamp must be replaced as an
assembly; see your authorized dealer.
FUSES
WARNING!
•When replacing a blown fuse, always use an appro-
priate replacement fuse with the same amp rating as
the original fuse. Never replace a fuse with another
fuse of higher amp rating. Never replace a blown
fuse with metal wires or any other material. Do not
place a fuse inside a circuit breaker cavity or vice
versa. Failure to use proper fuses may result in
serious personal injury, fire and/or property damage.
• Before replacing a fuse, make sure that the ignition is
off and that all the other services are switched off
and/or disengaged.
• If the replaced fuse blows again, contact an autho-
rized dealer.
• If a general protection fuse for safety systems (air
bag system, braking system), power unit systems
(engine system, transmission system) or steering
system blows, contact an authorized dealer.
292 IN CASE OF EMERGENCY
Page 297 of 496
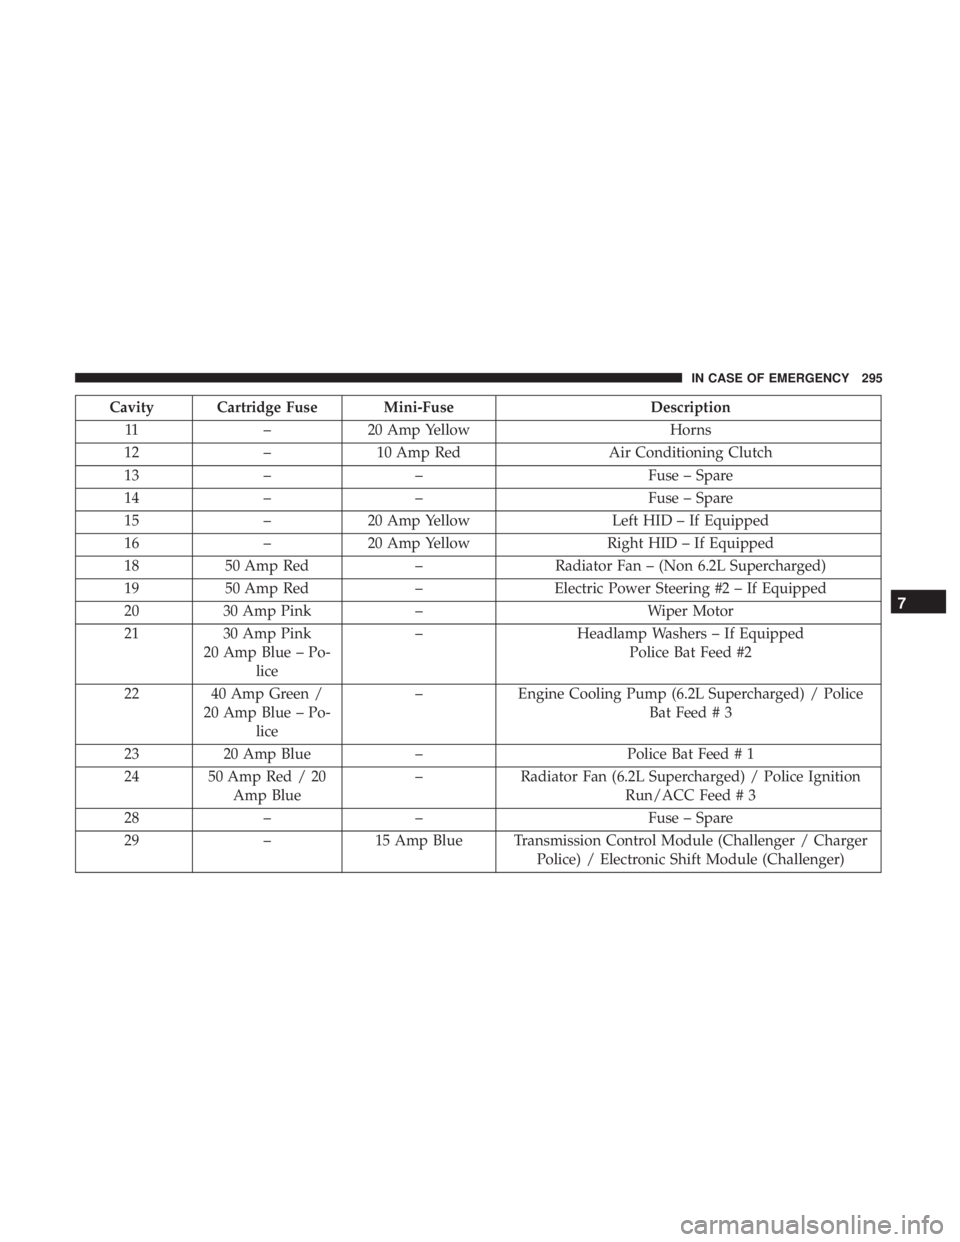
Cavity Cartridge Fuse Mini-FuseDescription
11 –20 Amp Yellow Horns
12 –10 Amp Red Air Conditioning Clutch
13 – – Fuse – Spare
14 – – Fuse – Spare
15 –20 Amp Yellow Left HID – If Equipped
16 –20 Amp Yellow Right HID – If Equipped
18 50 Amp Red –Radiator Fan – (Non 6.2L Supercharged)
19 50 Amp Red –Electric Power Steering #2 – If Equipped
20 30 Amp Pink – Wiper Motor
21 30 Amp Pink
20 Amp Blue – Po- lice –
Headlamp Washers – If Equipped
Police Bat Feed #2
22 40 Amp Green / 20 Amp Blue – Po-lice –
Engine Cooling Pump (6.2L Supercharged) / Police
Bat Feed # 3
23 20 Amp Blue – Police Bat Feed # 1
24 50 Amp Red / 20 Amp Blue –
Radiator Fan (6.2L Supercharged) / Police Ignition
Run/ACC Feed # 3
28 – – Fuse – Spare
29 –15 Amp Blue Transmission Control Module (Challenger / Charger
Police) / Electronic Shift Module (Challenger)
7
IN CASE OF EMERGENCY 295