2019 DODGE CHARGER SRT alarm
[x] Cancel search: alarmPage 40 of 496
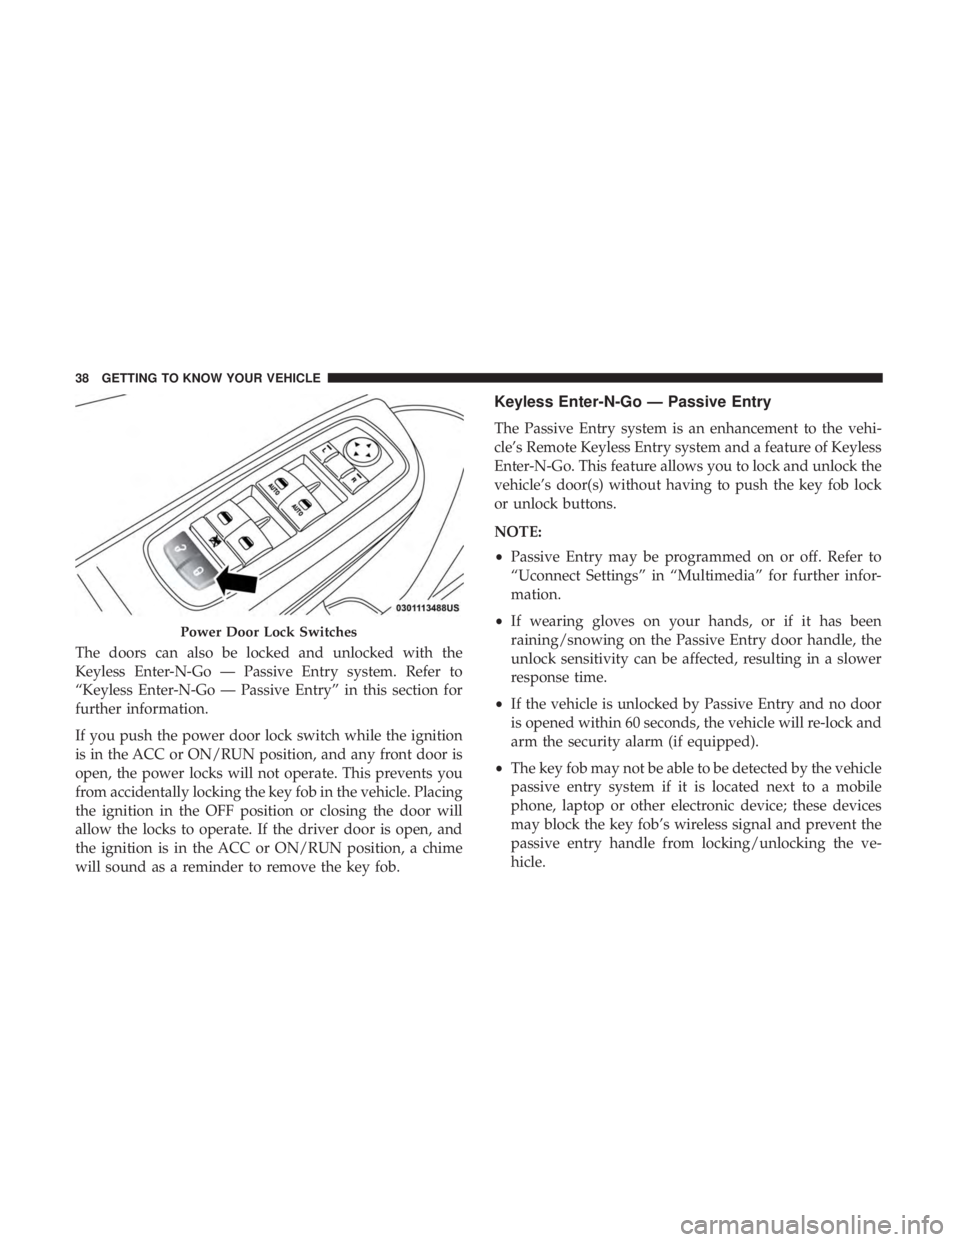
The doors can also be locked and unlocked with the
Keyless Enter-N-Go — Passive Entry system. Refer to
“Keyless Enter-N-Go — Passive Entry” in this section for
further information.
If you push the power door lock switch while the ignition
is in the ACC or ON/RUN position, and any front door is
open, the power locks will not operate. This prevents you
from accidentally locking the key fob in the vehicle. Placing
the ignition in the OFF position or closing the door will
allow the locks to operate. If the driver door is open, and
the ignition is in the ACC or ON/RUN position, a chime
will sound as a reminder to remove the key fob.
Keyless Enter-N-Go — Passive Entry
The Passive Entry system is an enhancement to the vehi-
cle’s Remote Keyless Entry system and a feature of Keyless
Enter-N-Go. This feature allows you to lock and unlock the
vehicle’s door(s) without having to push the key fob lock
or unlock buttons.
NOTE:
•Passive Entry may be programmed on or off. Refer to
“Uconnect Settings” in “Multimedia” for further infor-
mation.
• If wearing gloves on your hands, or if it has been
raining/snowing on the Passive Entry door handle, the
unlock sensitivity can be affected, resulting in a slower
response time.
• If the vehicle is unlocked by Passive Entry and no door
is opened within 60 seconds, the vehicle will re-lock and
arm the security alarm (if equipped).
• The key fob may not be able to be detected by the vehicle
passive entry system if it is located next to a mobile
phone, laptop or other electronic device; these devices
may block the key fob’s wireless signal and prevent the
passive entry handle from locking/unlocking the ve-
hicle.
Power Door Lock Switches
38 GETTING TO KNOW YOUR VEHICLE
Page 95 of 496
NOTE:HomeLink is disabled when the Vehicle Security
Alarm is active.
Before You Begin Programming HomeLink
Be sure that your vehicle is parked outside of the garage
before you begin programming.
For more efficient programming and accurate transmission
of the radio-frequency signal it is recommended that a new
battery be placed in the hand-held transmitter of the device
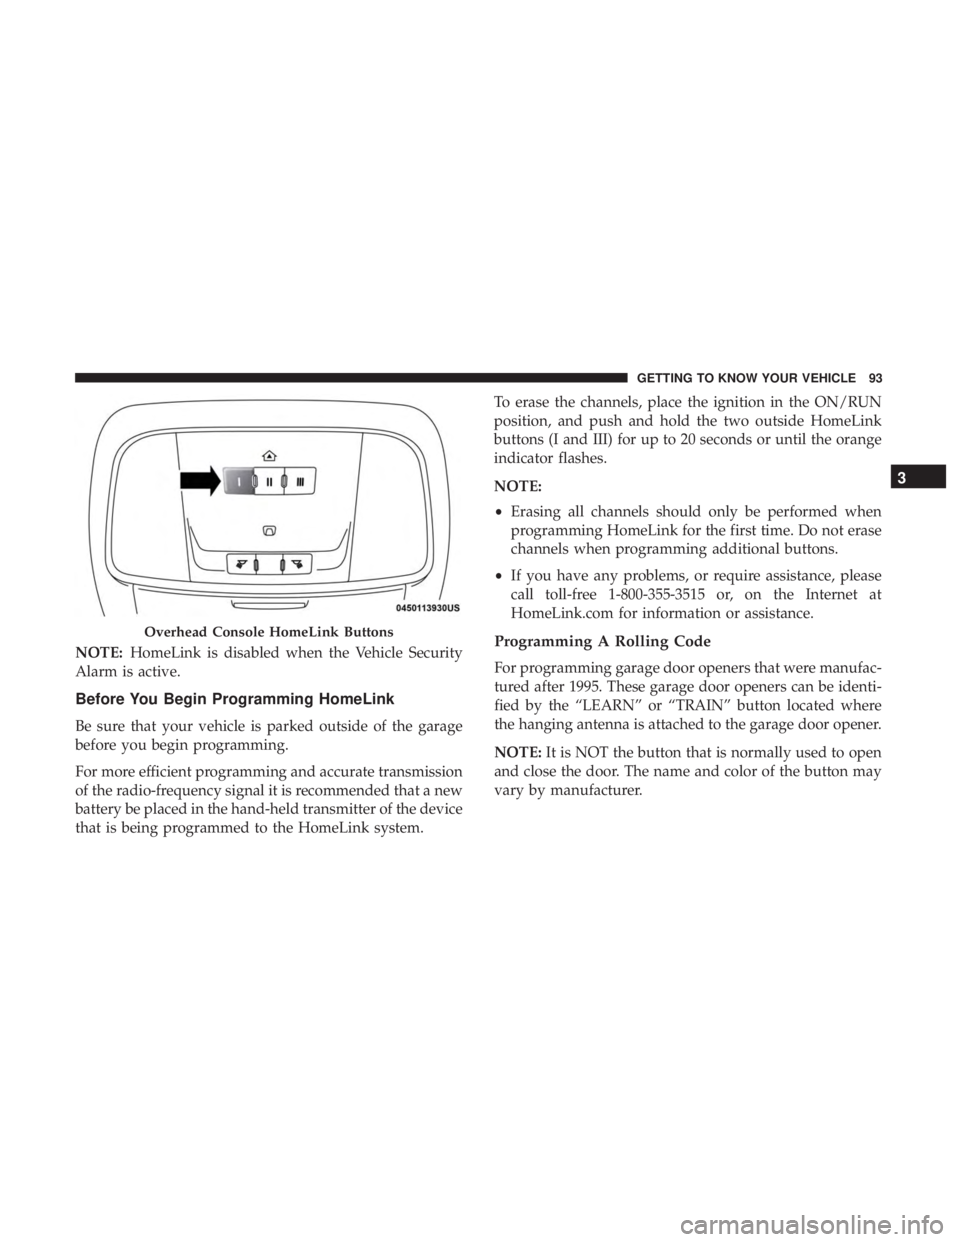
that is being programmed to the HomeLink system. To erase the channels, place the ignition in the ON/RUN
position, and push and hold the two outside HomeLink
buttons (I and III) for up to 20 seconds or until the orange
indicator flashes.
NOTE:
•
Erasing all channels should only be performed when
programming HomeLink for the first time. Do not erase
channels when programming additional buttons.
• If you have any problems, or require assistance, please
call toll-free 1-800-355-3515 or, on the Internet at
HomeLink.com for information or assistance.
Programming A Rolling Code
For programming garage door openers that were manufac-
tured after 1995. These garage door openers can be identi-
fied by the “LEARN” or “TRAIN” button located where
the hanging antenna is attached to the garage door opener.
NOTE: It is NOT the button that is normally used to open
and close the door. The name and color of the button may
vary by manufacturer.
Overhead Console HomeLink Buttons
3
GETTING TO KNOW YOUR VEHICLE 93
Page 99 of 496
NOTE:•If the indicator light stays on constantly, programming
is complete and the garage door/device should acti-
vate when the HomeLink button is pressed.
• To program the two remaining HomeLink buttons,
repeat each step for each remaining button. DO NOT
erase the channels.
If you unplugged the garage door opener/device for
programming, plug it back in at this time.
Reprogramming A Single HomeLink Button (Canadian/
Gate Operator)
To reprogram a channel that has been previously trained,
follow these steps:
1. Cycle the ignition to the ON/RUN position.
2. Press and hold the desired HomeLink button until the indicator light begins to flash after 20 seconds. Do not
release the button.
3. Without releasing the button, proceed with “Canadian/ Gate Operator Programming” step 2 and follow all
remaining steps.Using HomeLink
To operate, push and release the programmed HomeLink
button. Activation will now occur for the programmed
device (i.e. garage door opener, gate operator, security
system, entry door lock, home/office lighting, etc.). The
hand-held transmitter of the device may also be used at
any time.
Security
It is advised to erase all channels before you sell or turn in
your vehicle.
To do this, push and hold the two outside buttons for 20
seconds until the orange indicator flashes. Note that all
channels will be erased. Individual channels cannot be
erased.
The HomeLink Universal Transceiver is disabled when the
Vehicle Security Alarm is active.
3
GETTING TO KNOW YOUR VEHICLE 97
Page 123 of 496
•115V AC Power Inverter System
• Audio and Telematics System
Loss of the battery charge may indicate one or more of the
following conditions:
• The charging system cannot deliver enough electrical
power to the vehicle system because the electrical loads
are larger than the capability of the charging system. The
charging system is still functioning properly.
• Turning on all possible vehicle electrical loads (e.g.
HVAC to max settings, exterior and interior lights,
overloaded power outlets +12V, 115V AC, USB ports)
during certain driving conditions (city driving, towing,
frequent stopping).
• Installing options like additional lights, upfitter electri-
cal accessories, audio systems, alarms and similar de-
vices.
• Unusual driving cycles (short trips separated by long
parking periods).
• The vehicle was parked for an extended period of time
(weeks, months).
• The battery was recently replaced and was not charged
completely. •
The battery was discharged by an electrical load left on
when the vehicle was parked.
• The battery was used for an extended period with the
engine not running to supply radio, lights, chargers,
+12V portable appliances like vacuum cleaners, game
consoles and similar devices.
What to do when an electrical load reduction action
message is present (“Battery Saver On” or “Battery Saver
Mode”)
During a trip:
• Reduce power to unnecessary loads if possible:
– Turn off redundant lights (interior or exterior)
– Check what may be plugged in to power outlets +12V, 115V AC, USB ports
– Check HVAC settings (blower, temperature)
– Check the audio settings (volume)
After a trip:
• Check if any aftermarket equipment was installed (ad-
ditional lights, upfitter electrical accessories, audio sys-
tems, alarms) and review specifications if any (load and
Ignition Off Draw currents).
4
GETTING TO KNOW YOUR INSTRUMENT PANEL 121
Page 128 of 496
Refer to “Occupant Restraint Systems” in “Safety” for
further information.
— Transmission Temperature Warning Light — If
Equipped
This warning light will illuminate to warn of a high
transmission fluid temperature. This may occur with
strenuous usage such as trailer towing. If this light turns
on, stop the vehicle and run the engine at idle or slightly
faster, with the transmission in PARK or NEUTRAL, until
the light turns off. Once the light turns off, you may
continue to drive normally.
WARNING!
If you continue operating the vehicle when the Trans-
mission Temperature Warning Light is illuminated you
could cause the fluid to boil over, come in contact with
hot engine or exhaust components and cause a fire.
CAUTION!
Continuous driving with the Transmission Tempera-
ture Warning Light illuminated will eventually cause
severe transmission damage or transmission failure.
— Trunk Open Warning Light
This indicator will illuminate when the trunk is open and
not fully closed.
NOTE: If the vehicle is moving, there will also be a single
chime.
— Vehicle Security Warning Light — If Equipped
This light will flash at a fast rate for approximately 15
seconds when the vehicle security alarm is arming, and
then will flash slowly until the vehicle is disarmed.
Yellow Warning Lights
— Engine Check/Malfunction Indicator Warning
Light (MIL)
The Engine Check/Malfunction Indicator Light (MIL) is a
part of an Onboard Diagnostic System called OBD II that
monitors engine and automatic transmission control sys-
tems. This warning light will illuminate when the ignition
is in the ON/RUN position before engine start. If the bulb
does not come on when turning the ignition switch from
OFF to ON/RUN, have the condition checked promptly.
Certain conditions, such as a loose or missing gas cap, poor
quality fuel, etc., may illuminate the light after engine start.
The vehicle should be serviced if the light stays on through
126 GETTING TO KNOW YOUR INSTRUMENT PANEL
Page 155 of 496

Rear Cross Path (RCP)
The Rear Cross Path (RCP) feature is intended to aid the
driver when backing out of parking spaces where their
vision of oncoming vehicles may be blocked. Proceed
slowly and cautiously out of the parking space until the
rear end of the vehicle is exposed. The RCP system will
then have a clear view of the cross traffic and if an
oncoming vehicle is detected, alert the driver.
RCP monitors the rear detection zones on both sides of the
vehicle, for objects that are moving toward the side of the
vehicle with a minimum speed of approximately 3 mph(5 km/h), to objects moving a maximum of approximately
20 mph (32 km/h), such as in parking lot situations.
NOTE:
In a parking lot situation, oncoming vehicles can be
obscured by vehicles parked on either side. If the sensors
are blocked by other structures or vehicles, the system will
not be able to alert the driver.
When RCP is on and the vehicle is in REVERSE, the driver
is alerted using both the visual and audible alarms, includ-
ing reducing the radio volume.
WARNING!
Rear Cross Path Detection (RCP) is not a back up aid
system. It is intended to be used to help a driver detect
an oncoming vehicle in a parking lot situation. Drivers
must be careful when backing up, even when using
RCP. Always check carefully behind your vehicle, look
behind you, and be sure to check for pedestrians,
animals, other vehicles, obstructions, and blind spots
before backing up. Failure to do so can result in serious
injury or death.
RCP Detection Zones
5
SAFETY 153
Page 182 of 496
Because air bag sensors measure vehicle deceleration over
time, vehicle speed and damage by themselves are not
good indicators of whether or not an air bag should have
deployed.
Seat belts are necessary for your protection in all collisions,
and also are needed to help keep you in position, away
from an inflating air bag.
When the ORC detects a collision requiring the front air
bags, it signals the inflator units. A large quantity of
non-toxic gas is generated to inflate the front air bags.
The steering wheel hub trim cover and the upper passen-
ger side of the instrument panel separate and fold out of
the way as the air bags inflate to their full size. The front air
bags fully inflate in less time than it takes to blink your
eyes. The front air bags then quickly deflate while helping
to restrain the driver and front passenger.Knee Impact Bolsters
The Knee Impact Bolsters help protect the knees of the
driver and front passenger, and position the front occu-
pants for improved interaction with the front air bags.
WARNING!
•Do not drill, cut, or tamper with the knee impact
bolsters in any way.
• Do not mount any accessories to the knee impact
bolsters such as alarm lights, stereos, citizen band
radios, etc.
Supplemental Driver Knee Air Bag
This vehicle is equipped with a Supplemental Driver Knee
Air Bag mounted in the instrument panel below the
steering column. The Supplemental Driver Knee Air Bag
provides enhanced protection during a frontal impact by
working together with the seat belts, pretensioners, and
front air bags.
180 SAFETY
Page 259 of 496
To change between the different control modes, push the
Adaptive Cruise Control (ACC) on/off button which turns
the ACC and the Normal (Fixed Speed) Cruise Control off.
Pushing the Normal (Fixed Speed) Cruise Control on/off
button will result in turning on (changing to) the Normal
(Fixed Speed) Cruise Control mode.
WARNING!
In the Normal (Fixed Speed) Cruise Control mode, the
system will not react to vehicles ahead. In addition, the
proximity warning does not activate and no alarm will
sound even if you are too close to the vehicle ahead
since neither the presence of the vehicle ahead nor the
vehicle-to-vehicle distance is detected. Be sure to main-
tain a safe distance between your vehicle and the
vehicle ahead. Always be aware which mode is se-
lected.
To Set A Desired Speed
Turn the Normal (Fixed Speed) Cruise Control
on. When the vehicle has reached the desired
speed, push the SET (+) or SET (-) button and
release. Release the accelerator and the vehicle
will operate at the selected speed. Once a speed has been set a message “CRUISE CONTROL SET TO MPH (km/h)”
will appear indicating what speed was set. This light will
turn on when the system is turned on via the on/off
control. It turns green when the cruise control is set.
To Vary The Speed Setting
To Increase Speed
When the Normal (Fixed Speed) Cruise Control is set, you
can increase speed by pushing the SET
(+)button.
The driver’s preferred units can be selected through the
instrument cluster display. Refer to “Getting To Know Your
Instrument Panel” for more information. The speed incre-
ment shown is dependant on the speed of U.S. (mph) or
Metric (km/h) units:
U.S. Speed (mph)
• Pushing the SET (+)button once will result ina1mph
increase in set speed. Each subsequent tap of the button
results in an increase of 1 mph.
• If the button is continually pushed, the set speed will
continue to increase in 5 mph increments until the
button is released. The increase in set speed is reflected
in the instrument cluster display.
6
STARTING AND OPERATING 257