Page 301 of 496
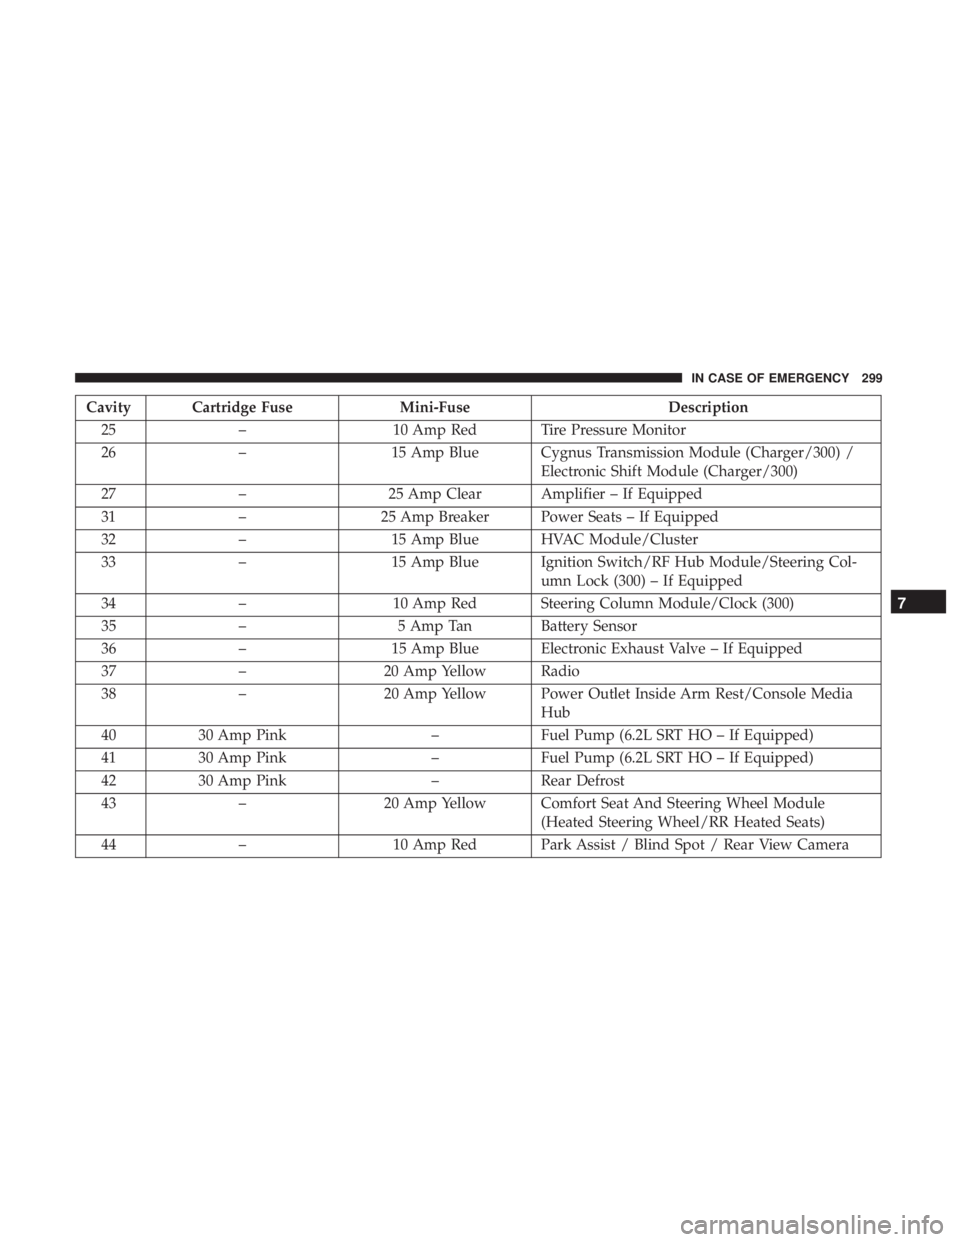
Cavity Cartridge FuseMini-FuseDescription
25 – 10 Amp Red Tire Pressure Monitor
26 – 15 Amp Blue Cygnus Transmission Module (Charger/300) /
Electronic Shift Module (Charger/300)
27 – 25 Amp Clear Amplifier – If Equipped
31 – 25 Amp Breaker Power Seats – If Equipped
32 – 15 Amp Blue HVAC Module/Cluster
33 – 15 Amp Blue Ignition Switch/RF Hub Module/Steering Col-
umn Lock (300) – If Equipped
34 – 10 Amp Red Steering Column Module/Clock (300)
35 – 5 Amp Tan Battery Sensor
36 – 15 Amp Blue Electronic Exhaust Valve – If Equipped
37 – 20 Amp Yellow Radio
38 – 20 Amp Yellow Power Outlet Inside Arm Rest/Console Media
Hub
40 30 Amp Pink –Fuel Pump (6.2L SRT HO – If Equipped)
41 30 Amp Pink –Fuel Pump (6.2L SRT HO – If Equipped)
42 30 Amp Pink –Rear Defrost
43 – 20 Amp Yellow Comfort Seat And Steering Wheel Module
(Heated Steering Wheel/RR Heated Seats)
44 – 10 Amp Red Park Assist / Blind Spot / Rear View Camera
7
IN CASE OF EMERGENCY 299
Page 302 of 496
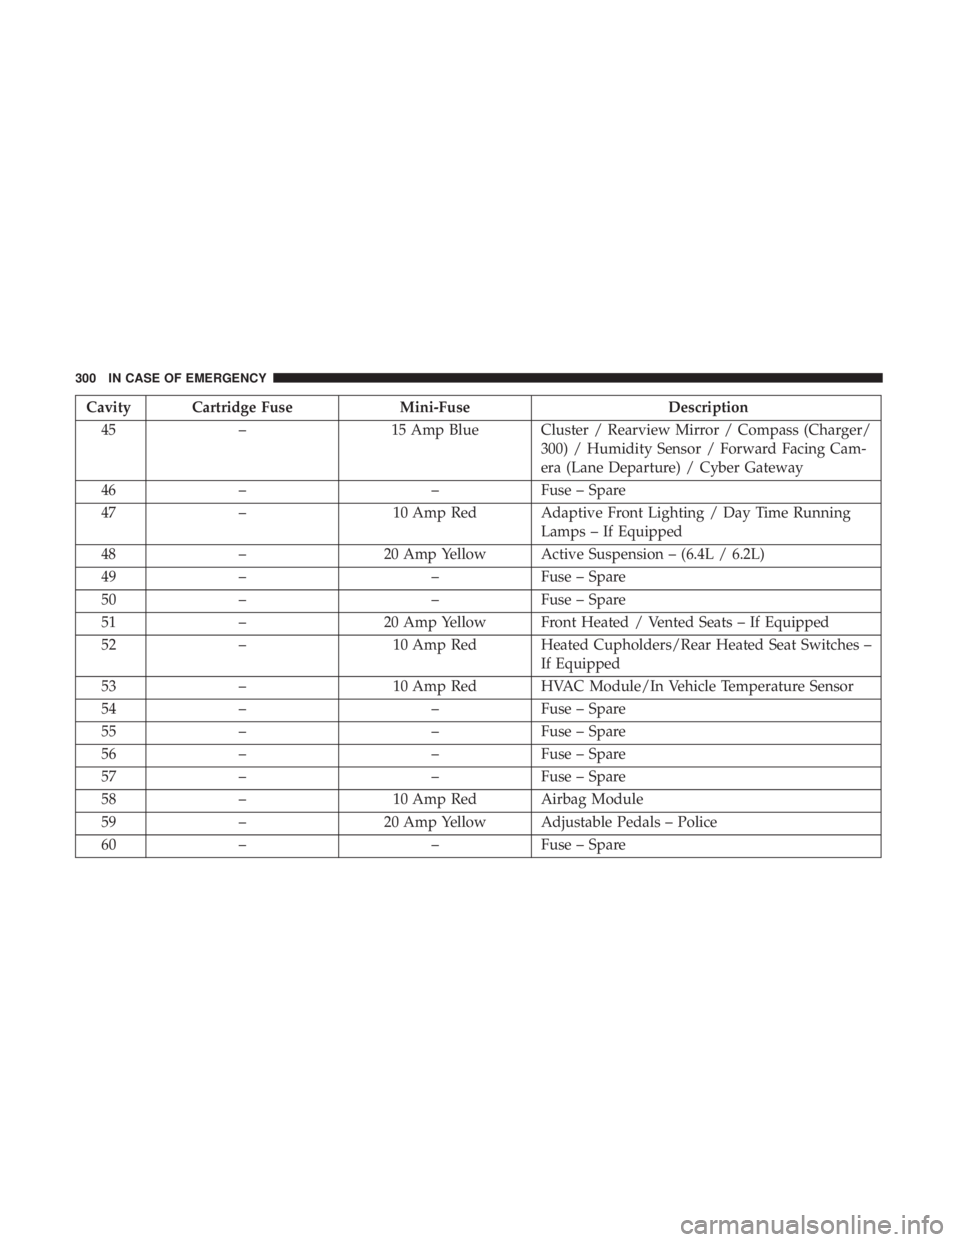
Cavity Cartridge FuseMini-FuseDescription
45 – 15 Amp Blue Cluster / Rearview Mirror / Compass (Charger/
300) / Humidity Sensor / Forward Facing Cam-
era (Lane Departure) / Cyber Gateway
46 – –Fuse – Spare
47 – 10 Amp Red Adaptive Front Lighting / Day Time Running
Lamps – If Equipped
48 – 20 Amp Yellow Active Suspension – (6.4L / 6.2L)
49 – –Fuse – Spare
50 – –Fuse – Spare
51 – 20 Amp Yellow Front Heated / Vented Seats – If Equipped
52 – 10 Amp Red Heated Cupholders/Rear Heated Seat Switches –
If Equipped
53 – 10 Amp Red HVAC Module/In Vehicle Temperature Sensor
54 – –Fuse – Spare
55 – –Fuse – Spare
56 – –Fuse – Spare
57 – –Fuse – Spare
58 – 10 Amp Red Airbag Module
59 – 20 Amp Yellow Adjustable Pedals – Police
60 – –Fuse – Spare
300 IN CASE OF EMERGENCY
Page 404 of 496
Customer Programmable Features — Uconnect
4C/4C NAV Settings
Press the “Apps” button (if equipped), and then
press the “Settings” button on the touchscreen to dis-
play the menu setting screen. In this mode, the
Uconnect system allows you to access programmable
features that may be equipped such as Language, Dis-
play, Units, Voice, Clock & Date, Safety & Driving
Assistance, Mirrors & Wipers, Lights, Doors & Locks,
Auto-On Comfort, Key Off Options, Audio, Phone/
Bluetooth, SiriusXM Setup, Reset, and System Informa-
tion.
NOTE: Depending on the vehicle’s options, feature set-
tings may vary. When making a selection, press the button on the touch-
screen to enter the desired mode. Once in the desired
mode, press and release the preferred setting “option” until
a check-mark appears next to the setting, showing that
setting has been selected. Once the setting is complete,
press the “X” button on the touchscreen to close out of the
settings screen. Pressing the up or down arrow button on
the right side of the screen will allow you to toggle up or
down through the available settings.
Language
After pressing the “Language” button on the touchscreen,
the following settings will be available:
Setting Name
Selectable Options
Set Language EnglishFrançais Español
402 MULTIMEDIA
Page 422 of 496
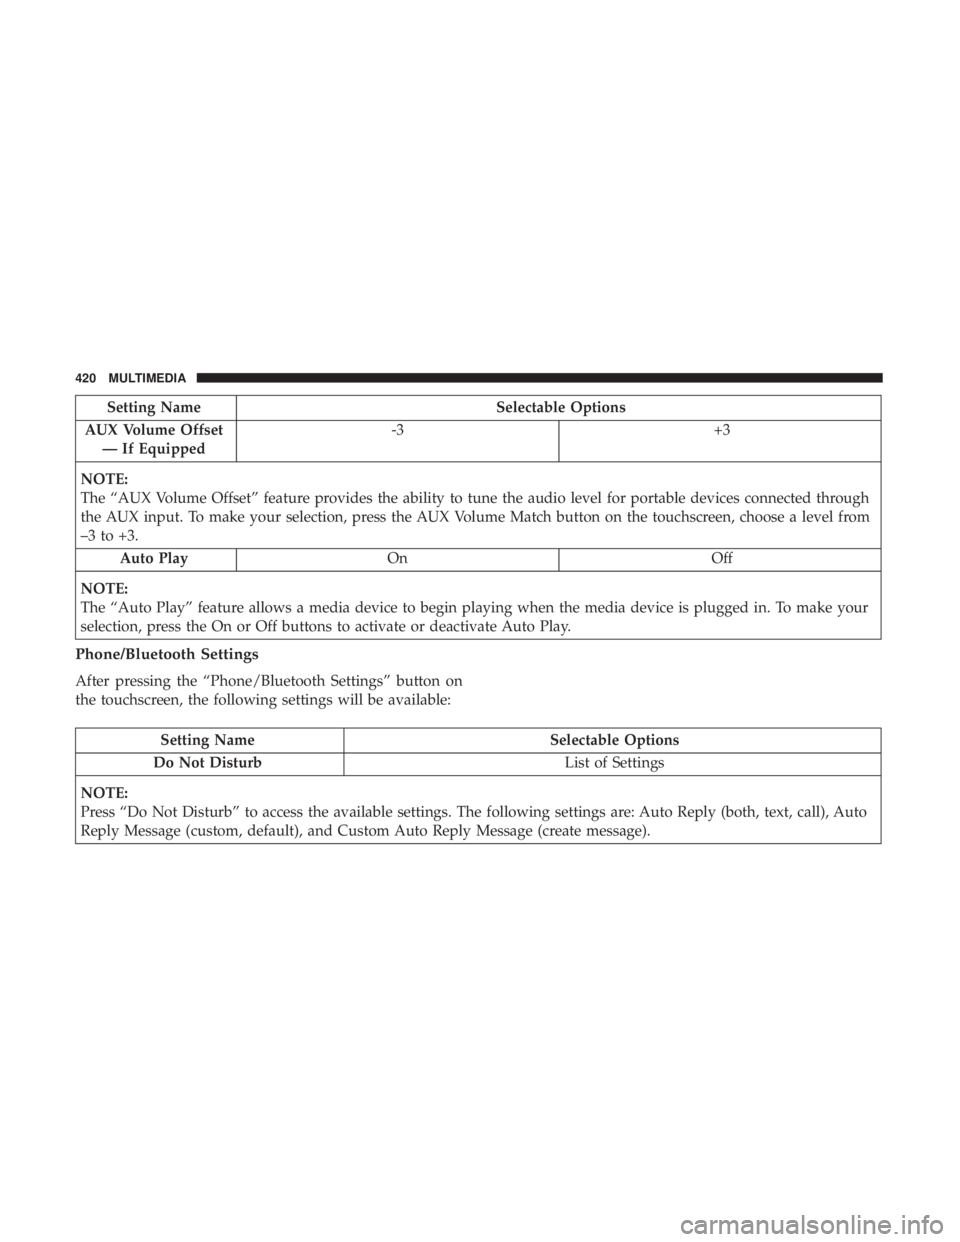
Setting NameSelectable Options
AUX Volume Offset — If Equipped -3
+3
NOTE:
The “AUX Volume Offset” feature provides the ability to tune the audio level for portable devices connected through
the AUX input. To make your selection, press the AUX Volume Match button on the touchscreen, choose a level from
–3 to +3. Auto Play On Off
NOTE:
The “Auto Play” feature allows a media device to begin playing when the media device is plugged in. To make your
selection, press the On or Off buttons to activate or deactivate Auto Play.
Phone/Bluetooth Settings
After pressing the “Phone/Bluetooth Settings” button on
the touchscreen, the following settings will be available:
Setting Name Selectable Options
Do Not Disturb List of Settings
NOTE:
Press “Do Not Disturb” to access the available settings. The following settings are: Auto Reply (both, text, call), Auto
Reply Message (custom, default), and Custom Auto Reply Message (create message).
420 MULTIMEDIA
Page 425 of 496
Setting NameSelectable Options
NOTE:
When this feature is selected, it will reset all of the radio features to their default settings. To restore the settings to
their default setting, press the “Restore Settings” button on the touchscreen. A pop-up will appear asking �Are you
sure you want to reset your settings to default?”
Clear Personal Data OKCancel X
NOTE:
When this feature is selected, it will remove all personal data including Bluetooth devices and presets. To remove per-
sonal information, press the “Clear Personal Data” button and a pop-up will appear asking �Are you sure you want
to clear all personal data?”
Modem Reset OK Cancel
System Information
After pressing the “System Information” button on the
touchscreen, the following settings will be available:
Setting Name Selectable Options
Software License System Software Information Screen
NOTE:
When the “Software License” feature is selected, a “System Software Information” screen will appear, displaying the
system software version. You can also update your maps with a USB device. Please see your authorized dealer for
further information.
10
MULTIMEDIA 423
Page 433 of 496
When G-Force is selected, the following features will be
available:
•Vehicle Speed:
Measures the current speed of the vehicle in either mph
or km/h, starting at zero with no maximum value.
• Front G-Force:
Measures the deceleration force present on the driver
during a braking maneuver.
• Right G-Force:
Measures the force pulling toward the right during a left
turn maneuver.
• Left G-Forces:
Measures the force pulling toward the left during a right
turn maneuver.
• Rear G-Forces:
Measures the acceleration force present on the driver.
NOTE: Front, Right, Left, and Rear G-Froces are all peak
values. These readings can be reset by clearing peak
G-Force on the instrument cluster •
Steering Wheel Angle:
Steering Wheel Angle utilizes the steering angle sensor to
measure the degree of the steering wheel relative to zero.
The zero degree measurement indicates a steering wheel
straight ahead position. When the steering angle value is
negative, this indicates a turn to the left, and when the
steering angle value is positive, a turn to the right.
The friction circle display shows instantaneous G-Force as
a highlight and previous G-Force as dots within the circle.
The system records previous G-Force for three minutes. If
there are multiple samples at a given point, the color of the
dot will darken from blue to red. Vectors more frequent
will show in red; infrequent vectors will show in blue.
10
MULTIMEDIA 431
Page 455 of 496
STEERING WHEEL AUDIO CONTROLS — IF
EQUIPPED
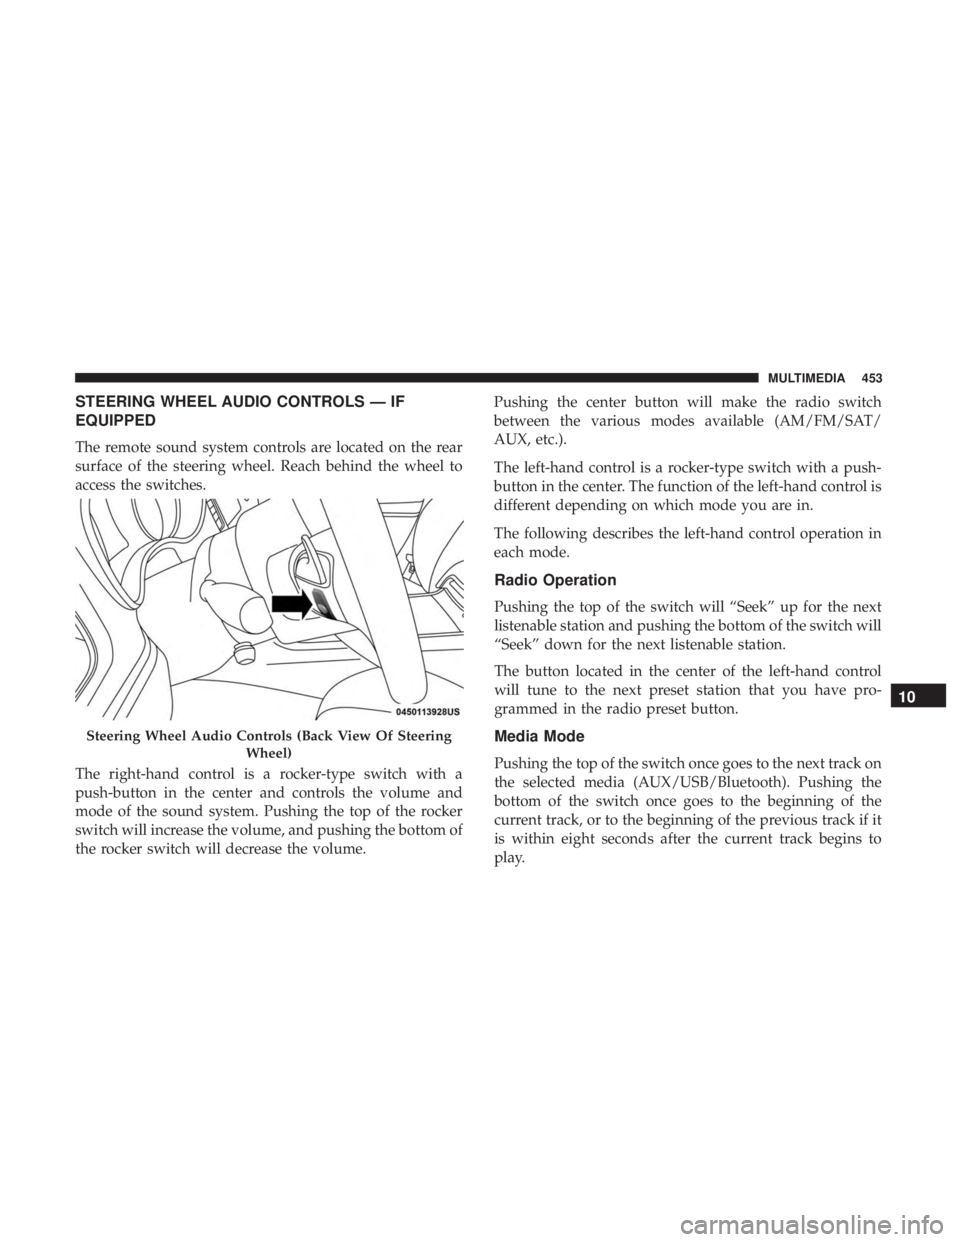
The remote sound system controls are located on the rear
surface of the steering wheel. Reach behind the wheel to
access the switches.
The right-hand control is a rocker-type switch with a
push-button in the center and controls the volume and
mode of the sound system. Pushing the top of the rocker
switch will increase the volume, and pushing the bottom of
the rocker switch will decrease the volume.Pushing the center button will make the radio switch
between the various modes available (AM/FM/SAT/
AUX, etc.).
The left-hand control is a rocker-type switch with a push-
button in the center. The function of the left-hand control is
different depending on which mode you are in.
The following describes the left-hand control operation in
each mode.
Radio Operation
Pushing the top of the switch will “Seek” up for the next
listenable station and pushing the bottom of the switch will
“Seek” down for the next listenable station.
The button located in the center of the left-hand control
will tune to the next preset station that you have pro-
grammed in the radio preset button.
Media Mode
Pushing the top of the switch once goes to the next track on
the selected media (AUX/USB/Bluetooth). Pushing the
bottom of the switch once goes to the beginning of the
current track, or to the beginning of the previous track if it
is within eight seconds after the current track begins to
play.
Steering Wheel Audio Controls (Back View Of Steering
Wheel)
10
MULTIMEDIA 453
Page 461 of 496
Media
Uconnect offers connections via USB, Bluetooth and auxil-
iary ports (if equipped). Voice operation is only available
for connected USB and AUX devices.
Push the VR button
. After the beep, say one of the
following commands and follow the prompts to switch
your media source or choose an artist.
• “Change source to Bluetooth”
• “Change source to AUX”
• “Change source to USB”
• “Play artist Beethoven”; “ Play albumGreatest Hits”;
“ Play song Moonlight Sonata”; “ Play genreClassical”
TIP: Press the Browse button on the touchscreen to see all
of the music on your USB device. Your Voice Command
must match exactlyhow the artist, album, song and genre
information is displayed.
Phone
Making and answering hands-free phone calls is easy with
Uconnect. When the Phonebook button is illuminated on
your touchscreen, your system is ready. Check
UconnectPhone.com for mobile phone compatibility and
pairing instructions.
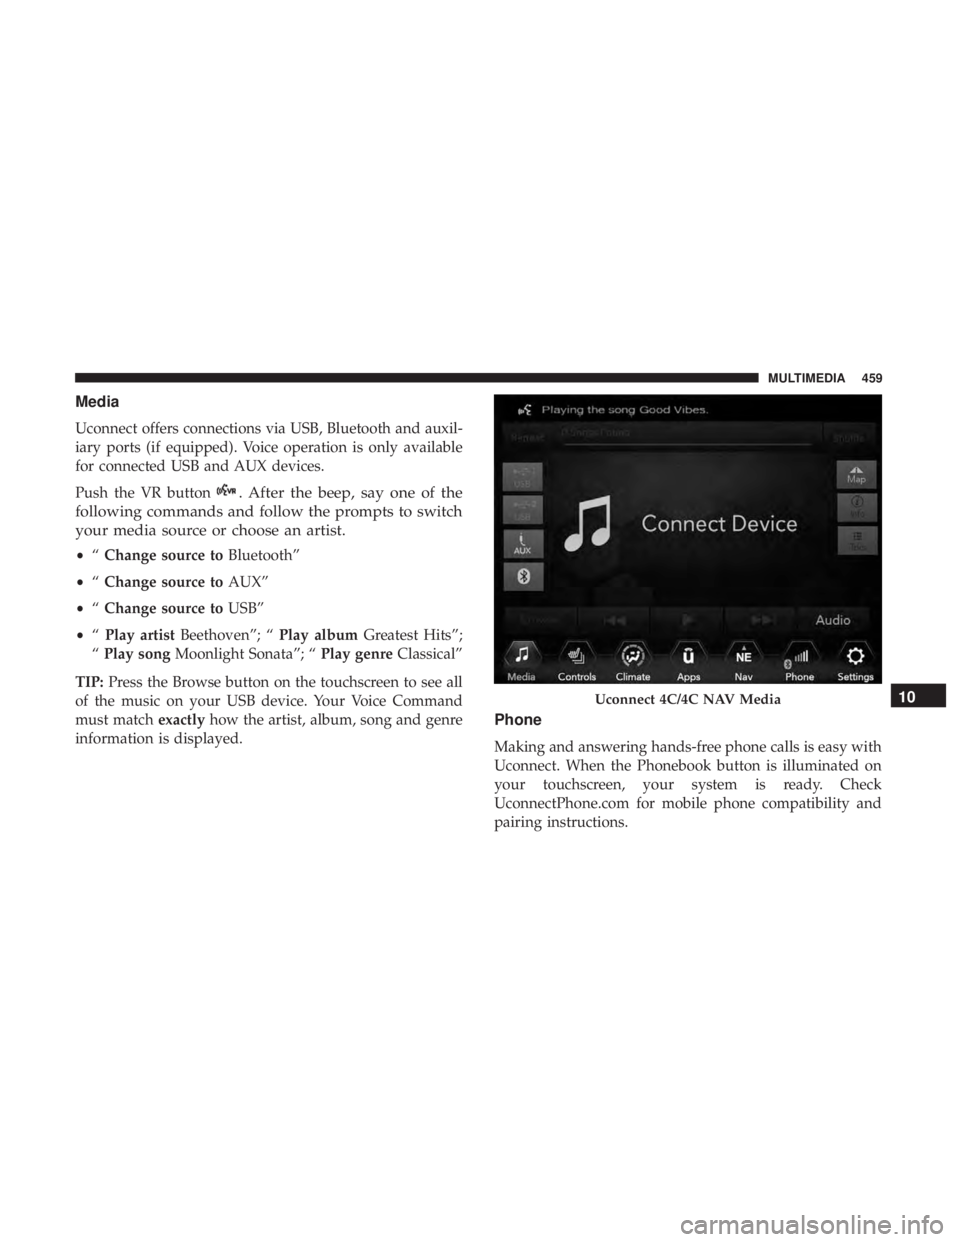
Uconnect 4C/4C NAV Media10
MULTIMEDIA 459