Page 316 of 560

Replacing Exterior Bulbs
Front Low/High Beam Headlamp — Models With
Halogen Headlamps
1. Open the hood.
NOTE:Removal of the air cleaner filter housing may be
necessary prior to replacing bulbs in the headlamp assem-
bly on the driver side of the vehicle.
2. Remove the large dust cap from the headlamp housing by turning it counterclockwise.
3. Turn the bulb counterclockwise, and remove.
CAUTION!
Do not touch the new bulb with your fingers. Oil
contamination will severely shorten bulb life. If the
bulb comes in contact with any oily surface, clean the
bulb with rubbing alcohol.
4. Disconnect the bulb from the socket assembly and install the replacement bulb.
5. Reinstall the bulb and socket assembly into the head- lamp assembly, and then turn it clockwise.
6. Reinstall the dust cap.
Front Low/High Beam Headlamp — Models With
High Intensity Discharge Headlamps (HID)
The headlamps are a type of high voltage discharge tube.
High voltage can remain in the circuit even with the
headlamp switch off and the key removed. Because of this,
you should not attempt to service a headlamp bulb
yourself. If a headlamp bulb fails, take your vehicle to an
authorized dealer for service.
WARNING!
A transient high voltage occurs at the bulb sockets of
HID headlamps when the headlamp switch is turned
ON. It may cause serious electrical shock or electrocu-
tion if not serviced properly. See your authorized
dealer for service.
NOTE: On vehicles equipped with HID headlamps, when
the headlamps are turned on, there is a blue hue to the
lights. This diminishes and becomes more white after
approximately 10 seconds, as the system charges.
Front/Rear Side Marker Lamp
The Side Markers use LED lamps that are not serviceable
separately. The Side Markers must be replaced as an
assembly, see your authorized dealer.
314 IN CASE OF EMERGENCY
Page 359 of 560

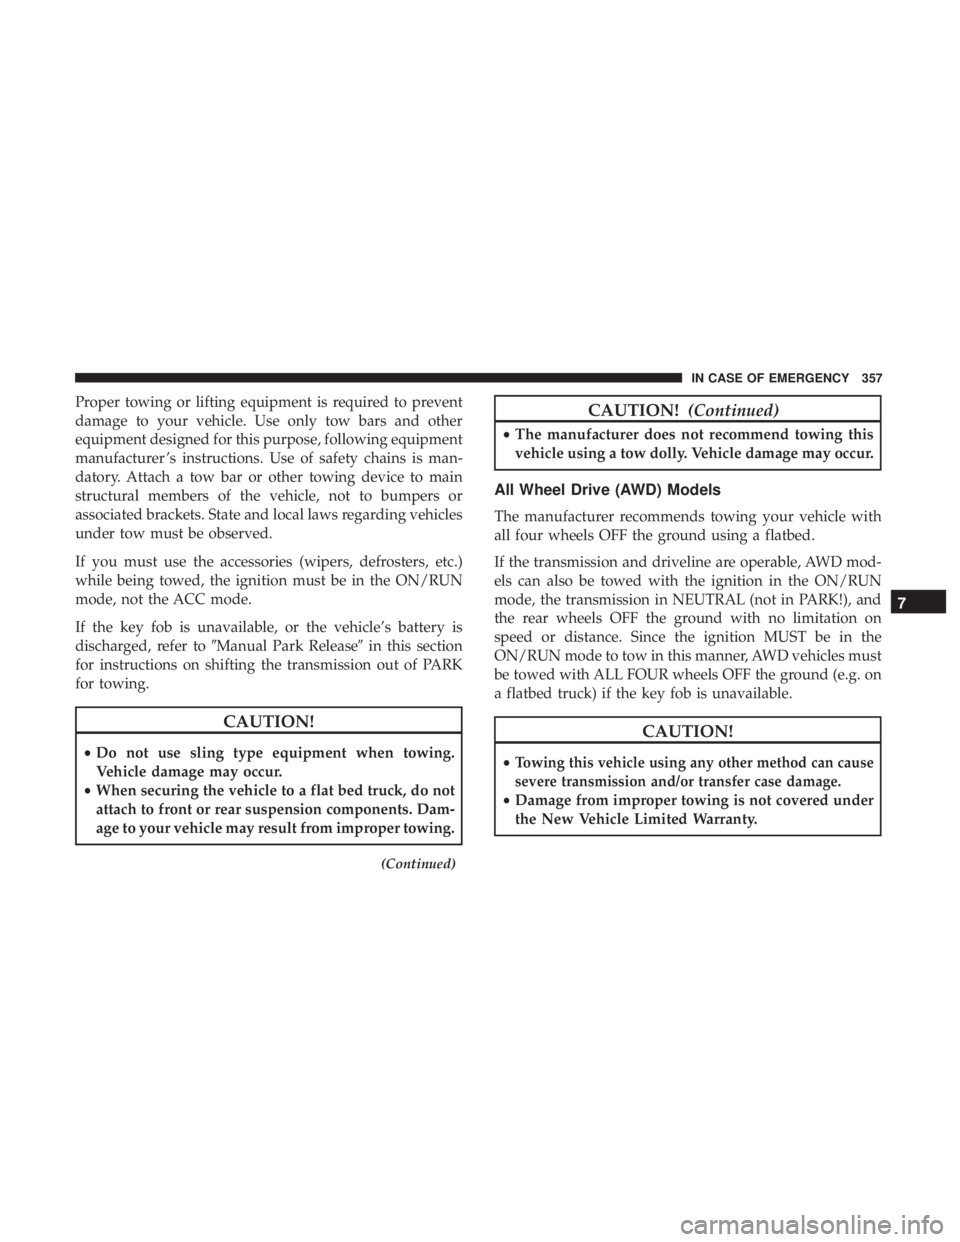
Proper towing or lifting equipment is required to prevent
damage to your vehicle. Use only tow bars and other
equipment designed for this purpose, following equipment
manufacturer ’s instructions. Use of safety chains is man-
datory. Attach a tow bar or other towing device to main
structural members of the vehicle, not to bumpers or
associated brackets. State and local laws regarding vehicles
under tow must be observed.
If you must use the accessories (wipers, defrosters, etc.)
while being towed, the ignition must be in the ON/RUN
mode, not the ACC mode.
If the key fob is unavailable, or the vehicle’s battery is
discharged, refer to�Manual Park Release� in this section
for instructions on shifting the transmission out of PARK
for towing.
CAUTION!
• Do not use sling type equipment when towing.
Vehicle damage may occur.
• When securing the vehicle to a flat bed truck, do not
attach to front or rear suspension components. Dam-
age to your vehicle may result from improper towing.
(Continued)
CAUTION! (Continued)
•The manufacturer does not recommend towing this
vehicle using a tow dolly. Vehicle damage may occur.
All Wheel Drive (AWD) Models
The manufacturer recommends towing your vehicle with
all four wheels OFF the ground using a flatbed.
If the transmission and driveline are operable, AWD mod-
els can also be towed with the ignition in the ON/RUN
mode, the transmission in NEUTRAL (not in PARK!), and
the rear wheels OFF the ground with no limitation on
speed or distance. Since the ignition MUST be in the
ON/RUN mode to tow in this manner, AWD vehicles must
be towed with ALL FOUR wheels OFF the ground (e.g. on
a flatbed truck) if the key fob is unavailable.
CAUTION!
•Towing this vehicle using any other method can cause
severe transmission and/or transfer case damage.
• Damage from improper towing is not covered under
the New Vehicle Limited Warranty.
7
IN CASE OF EMERGENCY 357
Page 457 of 560

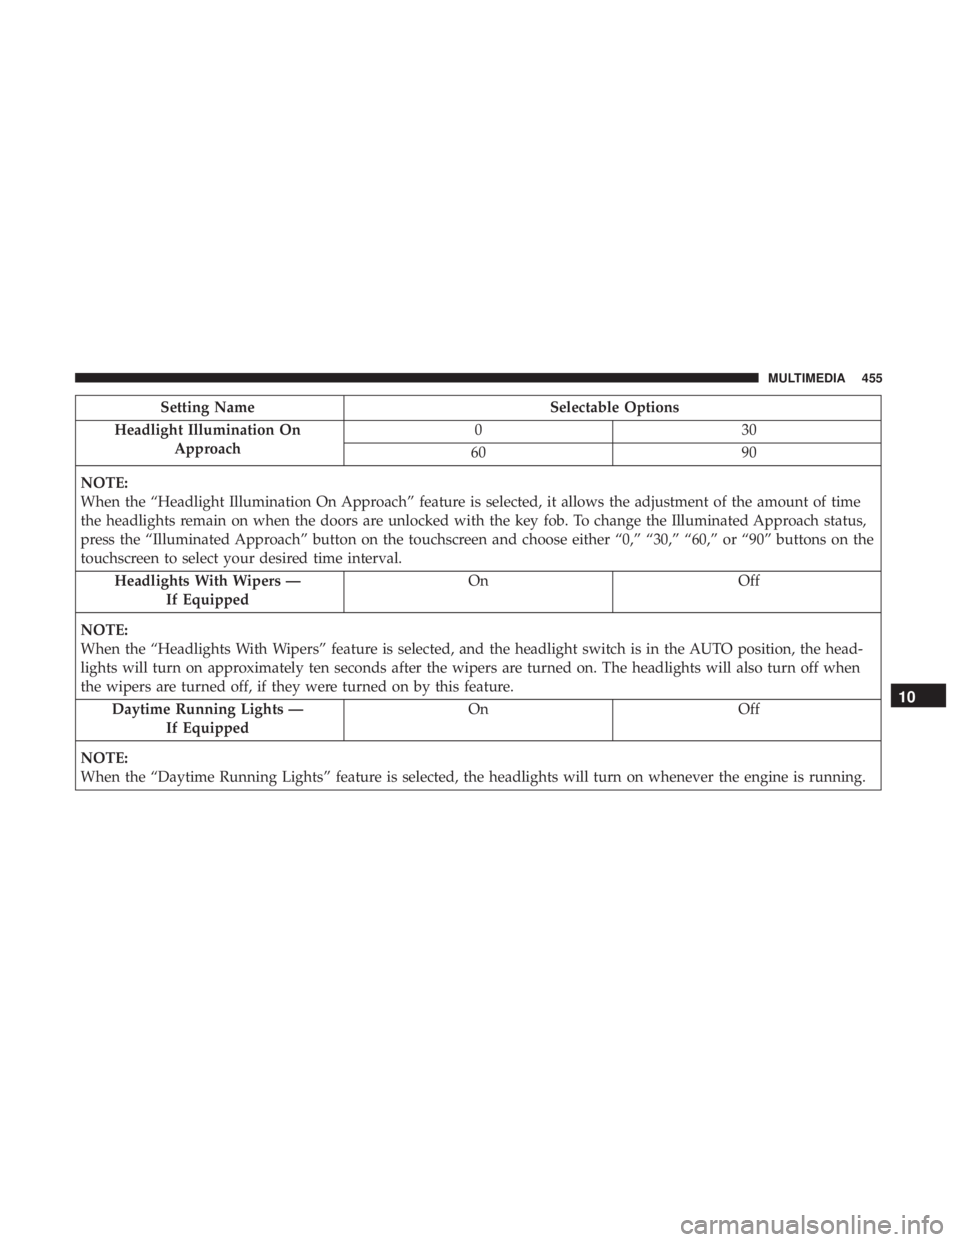
Setting NameSelectable Options
Headlight Illumination On Approach 03
0
60 90
NOTE:
When the “Headlight Illumination On Approach” feature is selected, it allows the adjustment of the amount of time
the headlights remain on when the doors are unlocked with the key fob. To change the Illuminated Approach status,
press the “Illuminated Approach” button on the touchscreen and choose either “0,” “30,” “60,” or “90” buttons on the
touchscreen to select your desired time interval. Headlights With Wipers — If Equipped On
Off
NOTE:
When the “Headlights With Wipers” feature is selected, and the headlight switch is in the AUTO position, the head-
lights will turn on approximately ten seconds after the wipers are turned on. The headlights will also turn off when
the wipers are turned off, if they were turned on by this feature. Daytime Running Lights — If Equipped On
Off
NOTE:
When the “Daytime Running Lights” feature is selected, the headlights will turn on whenever the engine is running.
10
MULTIMEDIA 455
Page 458 of 560
Setting NameSelectable Options
Flash Lights With Lock OnOff
NOTE:
When the “Flash Lights With Locks” feature is selected, the exterior lights will flash when the doors are locked or
unlocked with the key fob. This feature may be selected with or without the sound horn on lock feature selected.
Doors & Locks
After pressing the “Doors & Locks” button on the touch-
screen, the following settings will be available:
Setting Name Selectable Options
Auto Door Locks — If Equipped OnOff
Auto Unlock On Exit OnOff
Flash Lights With Lock OnOff
NOTE:
When this feature is selected, the exterior lights flashes when the doors are locked or unlocked with the key fob.
This feature may be selected with or without the sound horn on lock feature selected. Sound Horn With Lock Off1st Press 2nd Press
Sound Horn With Remote Start OnOff
456 MULTIMEDIA
Page 459 of 560
Setting NameSelectable Options
1st Press of Key Fob Unlocks AllDriver
NOTE:
This feature allows you to program your remote door locks to open “All doors” or only the “Driver door” with the
first push of the key fob or grabbing the Passive Entry door handle. Passive Entry — If Equipped OnOff
NOTE:
This feature allows you to lock and unlock the vehicle’s door(s) without having to push the key fob lock or unlock
buttons. It automatically unlocks the doors when the outside door handle is grabbed. Personal Settings Linked To Key Fob — If Equipped On
Off
NOTE:
•This feature provides automatic recall of all settings stored to a memory location (driver ’s seat, exterior mirrors,
steering column position and radio station pre-sets) to enhance driver mobility when entering and exiting the
vehicle.
•The seat returns to the memorized seat location (if Personal Settings Linked to Key Fob is set to on) when the key
fob is used to unlock the door.
10
MULTIMEDIA 457
Page 468 of 560

Customer Programmable Features — Uconnect
4C/4C NAV Settings
Press the “Apps”button (if equipped), and then press
the “Settings” button on the touchscreen to display the
menu setting screen. In this mode, the Uconnect system
allows you to access programmable features that may be
equipped such as Language, Display, Units, Voice, Clock
& Date, Safety & Driving Assistance, Mirrors & Wipers,
Lights, Doors & Locks, Auto-On Comfort, Key Off
Options, Audio, Phone/Bluetooth, SiriusXM Setup, Reset,
and System Information.
NOTE: Depending on the vehicle’s options, feature set-
tings may vary. When making a selection, press the button on the touch-
screen to enter the desired mode. Once in the desired
mode, press and release the preferred setting “option” until
a check-mark appears next to the setting, showing that
setting has been selected. Once the setting is complete,
press the “X” button on the touchscreen to close out of the
settings screen. Pressing the up or down arrow button on
the right side of the screen will allow you to toggle up or
down through the available settings.
Language
After pressing the “Language” button on the touchscreen,
the following settings will be available:
Setting Name
Selectable Options
Set Language EnglishFrançais Español
Display
After pressing the “Display” button on the touchscreen, the
following settings will be available:
Setting Name Selectable Options
Display Mode AutoManual
466 MULTIMEDIA
Page 480 of 560
Doors & Locks
After pressing the “Doors & Locks” button on the touch-
screen, the following settings will be available:
Setting NameSelectable Options
Auto Door Locks — If Equipped OnOff
Auto Unlock On Exit OnOff
NOTE:
When the “Auto Unlocks On Exit” feature is selected, all doors unlock when the vehicle is stopped, the transmission
is in the PARK or NEUTRAL position and the driver’s door is opened. Flash Lights With Lock OnOff
NOTE:
When the “Flash Lights With Lock” feature is selected, the exterior lights flash when the doors are locked or unlocked
with the key fob, or when using the passive entry feature. This feature may be selected with or without the “Sound Horn
on Lock” feature selected.
Sound Horn With Lock Off 1st Press 2nd Press
Sound Horn With Remote Start — If Equipped On Off
478 MULTIMEDIA
Page 481 of 560

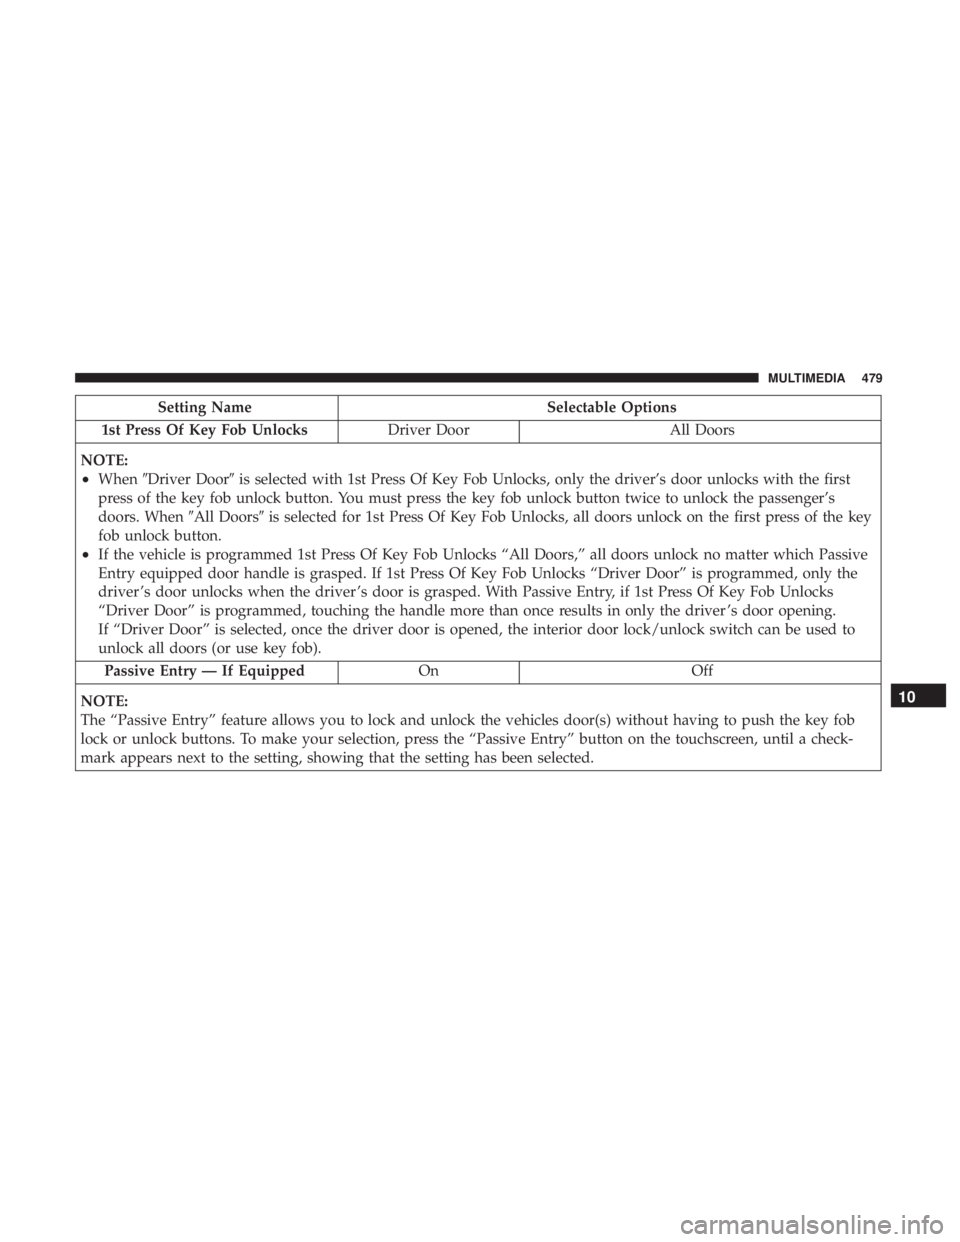
Setting NameSelectable Options
1st Press Of Key Fob Unlocks Driver DoorAll Doors
NOTE:
•When �Driver Door� is selected with 1st Press Of Key Fob Unlocks, only the driver’s door unlocks with the first
press of the key fob unlock button. You must press the key fob unlock button twice to unlock the passenger’s
doors. When �All Doors�is selected for 1st Press Of Key Fob Unlocks, all doors unlock on the first press of the key
fob unlock button.
•If the vehicle is programmed 1st Press Of Key Fob Unlocks “All Doors,” all doors unlock no matter which Passive
Entry equipped door handle is grasped. If 1st Press Of Key Fob Unlocks “Driver Door” is programmed, only the
driver ’s door unlocks when the driver ’s door is grasped. With Passive Entry, if 1st Press Of Key Fob Unlocks
“Driver Door” is programmed, touching the handle more than once results in only the driver ’s door opening.
If “Driver Door” is selected, once the driver door is opened, the interior door lock/unlock switch can be used to
unlock all doors (or use key fob).
Passive Entry — If Equipped OnOff
NOTE:
The “Passive Entry” feature allows you to lock and unlock the vehicles door(s) without having to push the key fob
lock or unlock buttons. To make your selection, press the “Passive Entry” button on the touchscreen, until a check-
mark appears next to the setting, showing that the setting has been selected.
10
MULTIMEDIA 479