Page 348 of 474
Chevrolet Silverado Owner Manual (GMNA-Localizing-U.S./Canada/Mexico-
1500-11698642) - 2019 - CRC - 2/20/19
Vehicle Care 347
Trunk
Liftgate
Headlamp Aiming
Headlamp aim has been preset and
should need no further adjustment.
If the vehicle is damaged in a crash,
the headlamp aim may be affected.
If adjustment to the headlamps is
necessary, see your dealer.
Bulb Replacement
For the proper type of replacement
bulbs, or any bulb changing
procedure not listed in this section,
contact your dealer.
Caution
Do not replace incandescent
bulbs with aftermarket LED
replacement bulbs. This can
cause damage to the vehicle
electrical system.
Halogen Bulbs
{Warning
Halogen bulbs have pressurized
gas inside and can burst if you
drop or scratch the bulb. You or
others could be injured. Be sure
to read and follow the instructions
on the bulb package.
Page 349 of 474

Chevrolet Silverado Owner Manual (GMNA-Localizing-U.S./Canada/Mexico-
1500-11698642) - 2019 - CRC - 2/20/19
348 Vehicle Care
LED Lighting
This vehicle has several LED lamps.
For replacement of any LED lighting
assembly, contact your dealer.
Headlamps, Front Turn
Signal, Sidemarker, and
Parking Lamps
Base Level Headlamp
Assembly
1. Sidemarker lamp
2. Low-Beam Headlamp
3. High-Beam Headlamp
4. Turn Signal/Park Lamps
Midlevel Headlamp Assembly
1. Turn Signal Lamps
Headlamp Replacement
Base Level1. Open the hood.
2. Remove the headlamp bulb cover.
3. Turn the bulb socket counterclockwise to remove it
from the headlamp assembly.
4. Unplug the electrical connector from the bulb by releasing the
clip on the connector. 5. Replace the bulb and reverse
Steps 1–4 to reinstall.
Midlevel and Uplevel
See your dealer for headlamp
replacement.
Uplevel
See your dealer for turn signal
replacement.
Turn Signal Lamp
Replacement
1. Open the hood.
2. Turn the bulb socket counterclockwise to remove it
from the headlamp assembly
and pull it straight out.
3. Remove the bulb by pulling it straight out of the bulb socket.
4. Replace the bulb and reverse Steps 1–3 to reinstall.
Page 352 of 474

Chevrolet Silverado Owner Manual (GMNA-Localizing-U.S./Canada/Mexico-
1500-11698642) - 2019 - CRC - 2/20/19
Vehicle Care 351
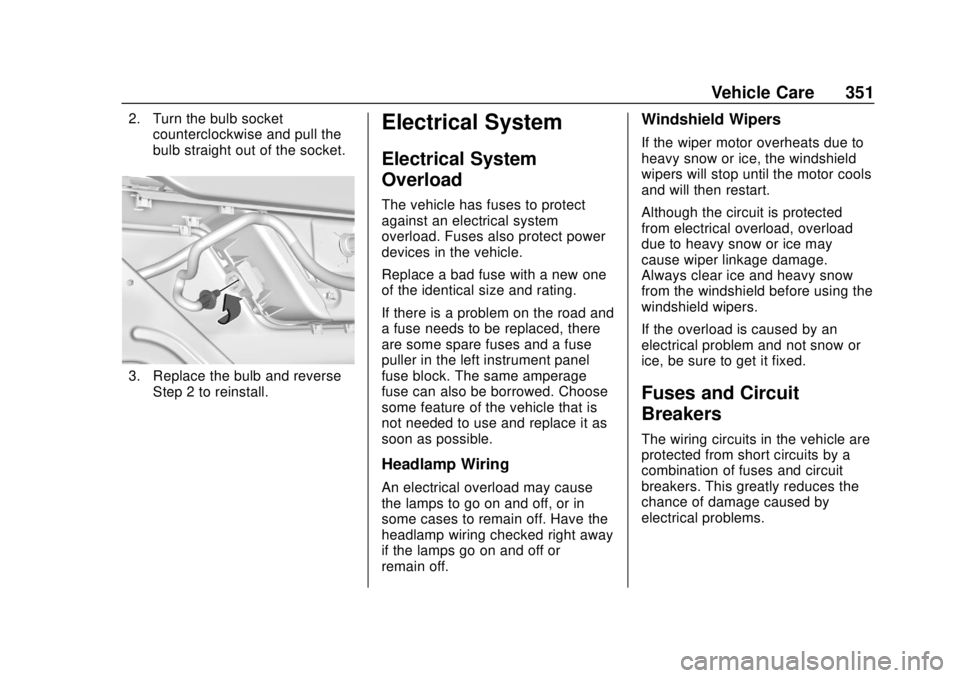
2. Turn the bulb socketcounterclockwise and pull the
bulb straight out of the socket.
3. Replace the bulb and reverse
Step 2 to reinstall.
Electrical System
Electrical System
Overload
The vehicle has fuses to protect
against an electrical system
overload. Fuses also protect power
devices in the vehicle.
Replace a bad fuse with a new one
of the identical size and rating.
If there is a problem on the road and
a fuse needs to be replaced, there
are some spare fuses and a fuse
puller in the left instrument panel
fuse block. The same amperage
fuse can also be borrowed. Choose
some feature of the vehicle that is
not needed to use and replace it as
soon as possible.
Headlamp Wiring
An electrical overload may cause
the lamps to go on and off, or in
some cases to remain off. Have the
headlamp wiring checked right away
if the lamps go on and off or
remain off.
Windshield Wipers
If the wiper motor overheats due to
heavy snow or ice, the windshield
wipers will stop until the motor cools
and will then restart.
Although the circuit is protected
from electrical overload, overload
due to heavy snow or ice may
cause wiper linkage damage.
Always clear ice and heavy snow
from the windshield before using the
windshield wipers.
If the overload is caused by an
electrical problem and not snow or
ice, be sure to get it fixed.
Fuses and Circuit
Breakers
The wiring circuits in the vehicle are
protected from short circuits by a
combination of fuses and circuit
breakers. This greatly reduces the
chance of damage caused by
electrical problems.
Page 353 of 474

Chevrolet Silverado Owner Manual (GMNA-Localizing-U.S./Canada/Mexico-
1500-11698642) - 2019 - CRC - 2/20/19
352 Vehicle Care
{Danger
Fuses and circuit breakers are
marked with their ampere rating.
Do not exceed the
specified amperage rating when
replacing fuses and circuit
breakers. Use of an oversized
fuse or circuit breaker can result
in a vehicle fire. You and others
could be seriously injured or
killed.
To check a fuse, look at the
silver-colored band inside the fuse.
If the band is broken or melted,
replace the fuse. Be sure to replace
a bad fuse with a new one of the
identical size and rating.
Fuses of the same amperage can
be temporarily borrowed from
another fuse location, if a fuse goes
out. Replace the fuse as soon as
possible.
Engine Compartment
Fuse Block
If the vehicle has a diesel engine,
see the Duramax diesel
supplement.
The engine compartment fuse block
is in the engine compartment, on
the passenger side of the vehicle.
Lift the cover to access the fuse
block.
Caution
Spilling liquid on any electrical
component on the vehicle may
damage it. Always keep the
covers on any electrical
component.
A fuse puller is available in the left
instrument panel end cap.
The vehicle may not be equipped
with all of the fuses, relays, and
features shown.
Page 354 of 474
Chevrolet Silverado Owner Manual (GMNA-Localizing-U.S./Canada/Mexico-
1500-11698642) - 2019 - CRC - 2/20/19
Vehicle Care 353
FusesUsage
1 High-beam left Fuses
Usage
2 High-beam right
3 Headlamp left Fuses
Usage
4 Headlamp right
6 TIM
7 –
8 Fog lamp
9 VKM
10 –
11 Police upfitter
12 –
13 Washer front
14 Washer rear
15 MSB driver
16 –
17 IECL 1
19 DC/AC inverter
20 IECR 2
21 MSB pass
22 IECL 2
24 Electric brake booster 1
25 REC
Page 355 of 474
Chevrolet Silverado Owner Manual (GMNA-Localizing-U.S./Canada/Mexico-
1500-11698642) - 2019 - CRC - 2/20/19
354 Vehicle Care
FusesUsage
26 –
27 Horn
28 –
29 –
30 –
31 –
32 Rear window defogger
33 Heated mirror
34 Parking lamp left
37 Euro trailer
38 TIM
39 –
40 Misc ignition
41 Trailer parking lamp
42 Park lamp right
44 –
45 Second fuel pump
46 Engine control module ignition Fuses
Usage
47 Transmission control module
ignition
48 –
49 Transmission control module
50 A/C clutch
51 Transfer case control module
52 Front wiper
53 Center high-mounted
stop lamp
54 Trailer reverse lamp
55 Trailer back-up lamp
56 SADS
57 TTPM
58 Starter motor
60 Active fuel management 1 Fuses
Usage
61 VES
62 Integrated chassis control
module/CVS
63 Trailer battery
65 Auxiliary underhood
electrical center
66 Cooling fan motor left
67 Active fuel management 2
68 –
69 Starter pinion
71 Cooling fan
72 Cooling fan right
73 Trailer stop/turn lamp left
74 TIM
75 DEFC
76 Electric RNG BDS
Page 398 of 474

Chevrolet Silverado Owner Manual (GMNA-Localizing-U.S./Canada/Mexico-
1500-11698642) - 2019 - CRC - 2/20/19
Vehicle Care 397
Warning (Continued)
HANDLING.For more information
go to www.P65Warnings.ca.gov/
passenger-vehicle.
See California Proposition
65 Warning 0314 and the back
cover.
{Warning
Batteries can hurt you. They can
be dangerous because:
. They contain acid that can
burn you.
. They contain gas that can
explode or ignite.
. They contain enough
electricity to burn you.
If you do not follow these steps
exactly, some or all of these
things can hurt you.
Caution
Ignoring these steps could result
in costly damage to the vehicle
that would not be covered by the
vehicle warranty. Trying to start
the vehicle by pushing or pulling it
will not work, and it could damage
the vehicle.
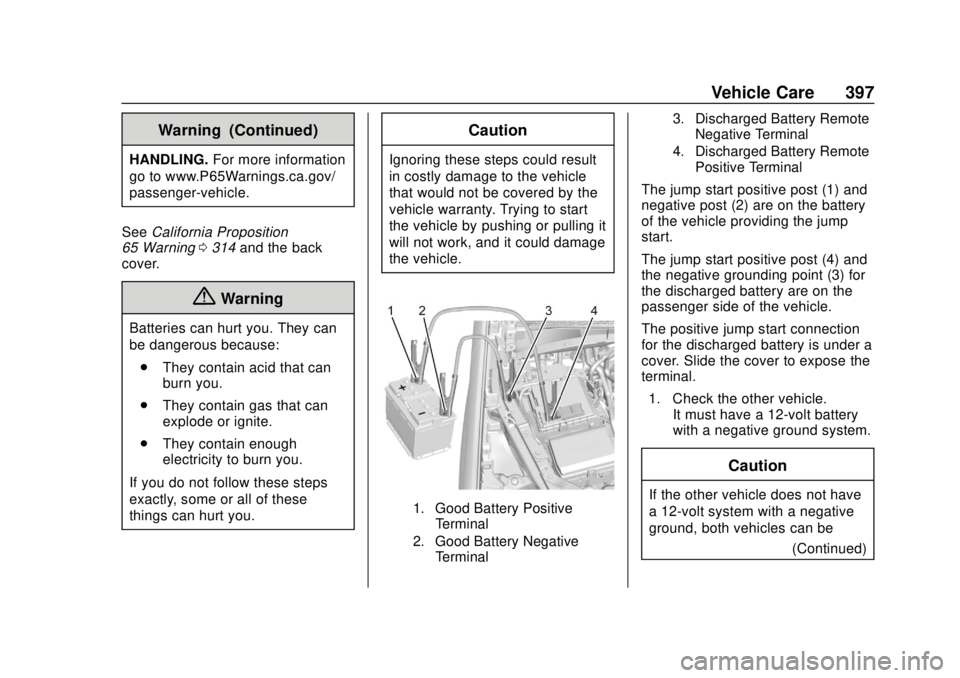
1. Good Battery Positive Terminal
2. Good Battery Negative Terminal 3. Discharged Battery Remote
Negative Terminal
4. Discharged Battery Remote Positive Terminal
The jump start positive post (1) and
negative post (2) are on the battery
of the vehicle providing the jump
start.
The jump start positive post (4) and
the negative grounding point (3) for
the discharged battery are on the
passenger side of the vehicle.
The positive jump start connection
for the discharged battery is under a
cover. Slide the cover to expose the
terminal.
1. Check the other vehicle. It must have a 12-volt battery
with a negative ground system.
Caution
If the other vehicle does not have
a 12-volt system with a negative
ground, both vehicles can be
(Continued)
Page 399 of 474

Chevrolet Silverado Owner Manual (GMNA-Localizing-U.S./Canada/Mexico-
1500-11698642) - 2019 - CRC - 2/20/19
398 Vehicle Care
Caution (Continued)
damaged. Only use a vehicle that
has a 12-volt system with a
negative ground for jump starting.
2. If you have a vehicle with a diesel engine with two
batteries, you should know
before you begin that,
especially in cold weather, you
may not be able to get enough
power from a single battery in
another vehicle to start your
diesel engine. If your vehicle
has more than one battery,
using the battery that is closer
to the starter will reduce
electrical resistance. This is
located on the passenger side,
in the rear of the engine
compartment.
3. Get the vehicles close enough so the jumper cables can
reach, but be sure the vehicles
are not touching each other.
If they are, it could cause an
unwanted ground connection. You would not be able to start
your vehicle, and the bad
grounding could damage the
electrical systems.
To avoid the possibility of the
vehicles rolling, set the parking
brake firmly on both vehicles
involved in the jump start
procedure. Put the automatic
transmission in P (Park) before
setting the parking brake. If you
have a four-wheel-drive
vehicle, be sure the transfer
case is in a drive gear, not in
N (Neutral).
Caution
If any accessories are left on or
plugged in during the jump
starting procedure, they could be
damaged. The repairs would not
be covered by the vehicle
warranty. Whenever possible, turn
off or unplug all accessories on
either vehicle when jump starting.
4. Turn the ignition off on both
vehicles. Unplug unnecessary
accessories plugged into the
accessory power outlets. Turn
off the radio and all the lamps
that are not needed. This will
avoid sparks and help save
both batteries. And it could
save the radio!
5. Open the hood on the other vehicle and locate the
positive (+) and negative (−)
terminal locations on that
vehicle.
The positive (+) terminal is
under a red plastic cover at the
positive battery post. To
uncover the positive (+)
terminal, open the red plastic
cover.
For more information on the
location of the remote
positive (+) and remote
negative (−) terminals, see
Engine Compartment Overview
0317.