2019 CHEVROLET SILVERADO fluids
[x] Cancel search: fluidsPage 315 of 474

Chevrolet Silverado Owner Manual (GMNA-Localizing-U.S./Canada/Mexico-
1500-11698642) - 2019 - CRC - 2/20/19
314 Vehicle Care
California Proposition
65 Warning
{Warning
Most motor vehicles, including
this one, as well as many of its
service parts and fluids, contain
and/or emit chemicals known to
the State of California to cause
cancer and birth defects or other
reproductive harm. Engine
exhaust, many parts and
systems, many fluids, and some
component wear by-products
contain and/or emit these
chemicals. For more information
go to www.P65Warnings.ca.gov/
passenger-vehicle.
See Battery - North America 0338
and
Jump Starting - North America
0 396 and the back cover.
California Perchlorate
Materials Requirements
Certain types of automotive
applications, such as airbag
initiators, seat belt pretensioners,
and lithium batteries contained in
Remote Keyless Entry transmitters,
may contain perchlorate materials.
Special handling may be necessary.
For additional information, see
www.dtsc.ca.gov/hazardouswaste/
perchlorate.
Accessories and
Modifications
Adding non-dealer accessories or
making modifications to the vehicle
can affect vehicle performance and
safety, including such things as
airbags, braking, stability, ride and
handling, emissions systems,
aerodynamics, durability, and
electronic systems like antilock
brakes, traction control, and stability
control. These accessories or
modifications could even cause
malfunction or damage not covered
by the vehicle warranty. Damage to suspension components
caused by modifying vehicle height
outside of factory settings will not be
covered by the vehicle warranty.
Damage to vehicle components
resulting from modifications or the
installation or use of non-GM
certified parts, including control
module or software modifications, is
not covered under the terms of the
vehicle warranty and may affect
remaining warranty coverage for
affected parts.
GM Accessories are designed to
complement and function with other
systems on the vehicle. See your
dealer to accessorize the vehicle
using genuine GM Accessories
installed by a dealer technician.
Also, see
Adding Equipment to the
Airbag-Equipped Vehicle 097.
Page 316 of 474

Chevrolet Silverado Owner Manual (GMNA-Localizing-U.S./Canada/Mexico-
1500-11698642) - 2019 - CRC - 2/20/19
Vehicle Care 315
Vehicle Checks
Doing Your Own
Service Work
{Warning
It can be dangerous to work on
your vehicle if you do not have
the proper knowledge, service
manual, tools, or parts. Always
follow owner’s manual procedures
and consult the service manual
for your vehicle before doing any
service work.
If doing some of your own service
work, use the proper service
manual. It tells you much more
about how to service the vehicle
than this manual can. To order the
proper service manual, see
Publication Ordering Information
0 444.
This vehicle has an airbag system.
Before attempting to do your own
service work, see Servicing the
Airbag-Equipped Vehicle 096. If equipped with remote vehicle
start, open the hood before
performing any service work to
prevent remote starting the vehicle
accidentally. See
Remote Vehicle
Start 044.
Keep a record with all parts receipts
and list the mileage and the date of
any service work performed. See
Maintenance Records 0430.
Caution
Even small amounts of
contamination can cause damage
to vehicle systems. Do not allow
contaminants to contact the fluids,
reservoir caps, or dipsticks.
Hood
{Warning
Turn the vehicle off before
opening the hood. If the vehicle is
on, the engine will start when the
hood is opened. You or others
could be injured.
{Warning
Components under the hood can
get hot from running the engine.
To help avoid the risk of burning
unprotected skin, never touch
these components until they have
cooled, and always use a glove or
towel to avoid direct skin contact.
Clear any snow from the hood
before opening.
To open the hood: 1. Pull the hood release lever with the
isymbol. It is on the
lower left side of the instrument
panel.
2. Go to the front of the vehicle and locate the secondary
release lever under the front
center of the hood. Push the
secondary hood release lever
to the right to release.
Page 324 of 474

Chevrolet Silverado Owner Manual (GMNA-Localizing-U.S./Canada/Mexico-
1500-11698642) - 2019 - CRC - 2/20/19
Vehicle Care 323
Follow these guidelines:
.To get an accurate reading, park
the vehicle on level ground.
Check the engine oil level after
the engine has been off for at
least two hours. Checking the
engine oil level on steep grades
or too soon after engine shutoff
can result in incorrect readings.
Accuracy improves when
checking a cold engine prior to
starting. Remove the dipstick
and check the level.
. If unable to wait two hours, the
engine must be off for at least
15 minutes if the engine is
warm, or at least 30 minutes if
the engine is not warm. Pull out
the dipstick, wipe it with a clean
paper towel or cloth, then push it
back in all the way. Remove it
again, keeping the tip down, and
check the level.When to Add Engine Oil
If the oil is below the cross-hatched
area at the tip of the dipstick and
the engine has been off for at least
15 minutes, add 1 L (1 qt) of the
recommended oil and then recheck
the level. See “Selecting the Right
Engine Oil” later in this section for
an explanation of what kind of oil to
use. For engine oil crankcase
capacity, see Capacities and
Specifications 0432.
Caution
Do not add too much oil. Oil
levels above or below the
acceptable operating range
shown on the dipstick are harmful
to the engine. If the oil level is
(Continued)
Caution (Continued)
above the operating range (i.e.,
the engine has so much oil that
the oil level gets above the
cross-hatched area that shows
the proper operating range), the
engine could be damaged. Drain
the excess oil or limit driving of
the vehicle, and seek a service
professional to remove the
excess oil.
See Engine Compartment Overview
0 317 for the location of the engine
oil fill cap.
Add enough oil to put the level
somewhere in the proper operating
range. Push the dipstick all the way
back in when through.
Selecting the Right Engine Oil
Selecting the right engine oil
depends on both the proper oil
specification and viscosity grade.
See Recommended Fluids and
Lubricants 0427.
Page 327 of 474

Chevrolet Silverado Owner Manual (GMNA-Localizing-U.S./Canada/Mexico-
1500-11698642) - 2019 - CRC - 2/20/19
326 Vehicle Care
Automatic Transmission
Fluid
When to Check and Change
Automatic Transmission Fluid
It is usually not necessary to check
the transmission fluid level. The only
reason for fluid loss is a
transmission leak or overheated
transmission. This vehicle is not
equipped with a transmission fluid
level dipstick. There is a special
procedure for checking and
changing the transmission fluid in
these vehicles. Because this
procedure is difficult, this should be
done at the dealer. Contact the
dealer for additional information or
the procedure can be found in the
service manual. SeePublication
Ordering Information 0444.
Caution
Use of the incorrect automatic
transmission fluid may damage
the vehicle, and the damage may
(Continued)
Caution (Continued)
not be covered by the vehicle
warranty. Always use the correct
automatic transmission fluid. See
Recommended Fluids and
Lubricants0427.
Change the fluid and filter at the
scheduled maintenance intervals
listed in Maintenance Schedule
0 417. Be sure to use the
transmission fluid listed in
Recommended Fluids and
Lubricants 0427.
Engine Air Filter Life
System
If equipped, this feature provides
the engine air filter ’s remaining life
and best timing for a change. The
timing to change an engine air filter
depends on driving and
environmental conditions.
When to Change the Engine
Air Filter
When the Driver Information Center
(DIC) displays a message to replace
the engine air filter at the next oil
change, follow this timing.
When the DIC displays a message
to replace the engine air filter soon,
replace the engine air filter at the
earliest convenience.
The system must be reset after the
engine air filter is changed.
If the DIC displays a message to
check the engine air filter system,
see your dealer.
How to Reset the Engine Air
Filter Life System
To reset:
1. Place the vehicle in P (Park).
2. Display the Air Filter Life on the DIC. See Driver Information
Center (DIC) (Base Level)
0 160 or
Driver Information Center (DIC)
(Midlevel and Uplevel) 0161.
Page 339 of 474

Chevrolet Silverado Owner Manual (GMNA-Localizing-U.S./Canada/Mexico-
1500-11698642) - 2019 - CRC - 2/20/19
338 Vehicle Care
.A fluid leak in the brake
hydraulic system. Have the
brake hydraulic system fixed.
With a leak, the brakes will not
work well.
Always clean the brake fluid
reservoir cap and the area around
the cap before removing it.
Do not top off the brake fluid.
Adding fluid does not correct a leak.
If fluid is added when the linings are
worn, there will be too much fluid
when new brake linings are
installed. Add or remove fluid, as
necessary, only when work is done
on the brake hydraulic system.
{Warning
If too much brake fluid is added, it
can spill on the engine and burn,
if the engine is hot enough. You
or others could be burned, and
the vehicle could be damaged.
Add brake fluid only when work is
done on the brake hydraulic
system. When the brake fluid falls to a low
level, the brake warning light comes
on. See
Brake System Warning
Light 0152.
Brake fluid absorbs water over time
which degrades the effectiveness of
the brake fluid. Replace brake fluid
at the specified intervals to prevent
increased stopping distance. See
Maintenance Schedule 0417.
What to Add
Use only GM approved DOT 4
brake fluid from a clean, sealed
container. See Recommended
Fluids and Lubricants 0427.
{Warning
The wrong or contaminated brake
fluid could result in damage to the
brake system. This could result in
the loss of braking leading to a
possible injury. Always use the
proper GM approved brake fluid.
Caution
If brake fluid is spilled on the
vehicle's painted surfaces, the
paint finish can be damaged.
Immediately wash off any painted
surface.
Battery - North America
The original equipment battery is
maintenance free. Do not remove
the cap and do not add fluid.
Refer to the replacement number
shown on the original battery label
when a new battery is needed. See
Engine Compartment Overview
0317 for battery location.
Stop/Start System
Vehicles equipped with a 2.7L L3B,
3.0L LM2, 5.3L L84 or 6.2L L87 are
equipped with a Stop/Start system
to shut off the engine to help
conserve fuel. See Stop/Start
System 0223.
Page 342 of 474

Chevrolet Silverado Owner Manual (GMNA-Localizing-U.S./Canada/Mexico-
1500-11698642) - 2019 - CRC - 2/20/19
Vehicle Care 341
For vehicles equipped with the Stop/
Start system:1. Install the negative battery cable to the battery
sensor stud.
2. Install the negative battery cable nut to the battery sensor
stud and tighten.
3. Turn the ignition on.
For vehicles not equipped with the
Stop/Start system: 1. Install the negative battery cable clamp to the negative
battery post.
2. Tighten the negative battery cable nut.
3. Turn the ignition on.
Four-Wheel Drive
Transfer Case
When to Check Lubricant
Refer to Maintenance Schedule
0 417 to determine when to check
the lubricant.
1. Fill Plug
2. Drain Plug
To get an accurate reading, the
vehicle should be on a level
surface.
If the level is below the bottom of
the fill plug (1) hole, located on the
transfer case, some lubricant will
need to be added. Add enough
lubricant to raise the level to the
bottom of the fill plug (1) hole. Use
care not to overtighten the plug. When to Change Lubricant
Refer to
Maintenance Schedule
0 417 to determine how often to
change the lubricant.
What to Use
Refer to Recommended Fluids and
Lubricants 0427 to determine what
kind of lubricant to use.
Front Axle
When to Check and Change
Lubricant
It is not necessary to regularly
check front axle fluid unless a leak
is suspected, or an unusual noise is
heard. A fluid loss could indicate a
problem. Have it inspected and
repaired.
How to Check Lubricant
To get an accurate reading, the
vehicle should be on a level
surface.
Page 343 of 474

Chevrolet Silverado Owner Manual (GMNA-Localizing-U.S./Canada/Mexico-
1500-11698642) - 2019 - CRC - 2/20/19
342 Vehicle Care
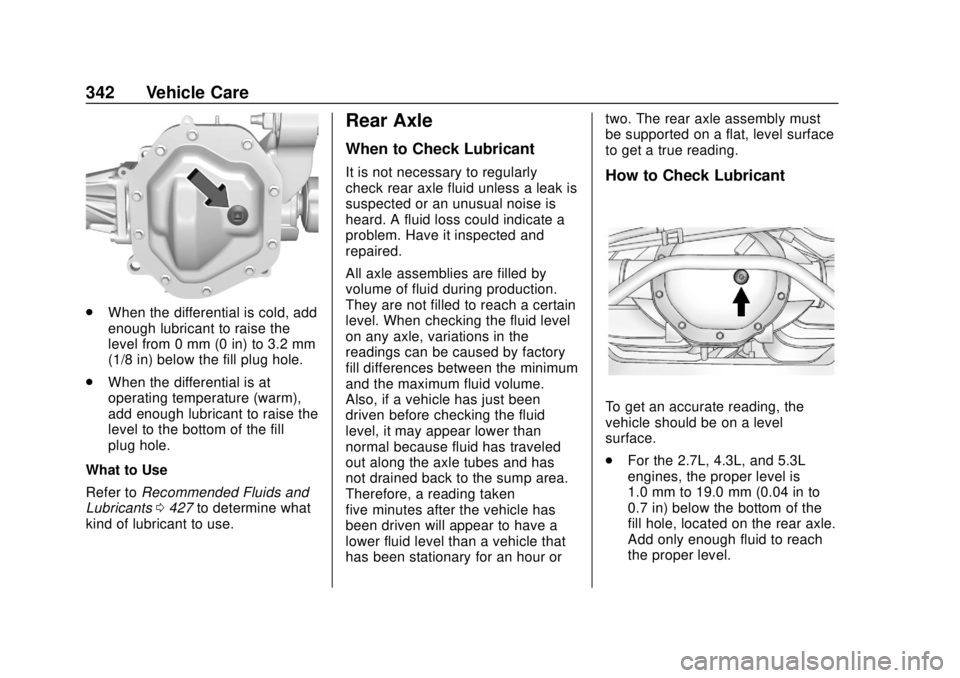
.When the differential is cold, add
enough lubricant to raise the
level from 0 mm (0 in) to 3.2 mm
(1/8 in) below the fill plug hole.
. When the differential is at
operating temperature (warm),
add enough lubricant to raise the
level to the bottom of the fill
plug hole.
What to Use
Refer to Recommended Fluids and
Lubricants 0427 to determine what
kind of lubricant to use.
Rear Axle
When to Check Lubricant
It is not necessary to regularly
check rear axle fluid unless a leak is
suspected or an unusual noise is
heard. A fluid loss could indicate a
problem. Have it inspected and
repaired.
All axle assemblies are filled by
volume of fluid during production.
They are not filled to reach a certain
level. When checking the fluid level
on any axle, variations in the
readings can be caused by factory
fill differences between the minimum
and the maximum fluid volume.
Also, if a vehicle has just been
driven before checking the fluid
level, it may appear lower than
normal because fluid has traveled
out along the axle tubes and has
not drained back to the sump area.
Therefore, a reading taken
five minutes after the vehicle has
been driven will appear to have a
lower fluid level than a vehicle that
has been stationary for an hour or two. The rear axle assembly must
be supported on a flat, level surface
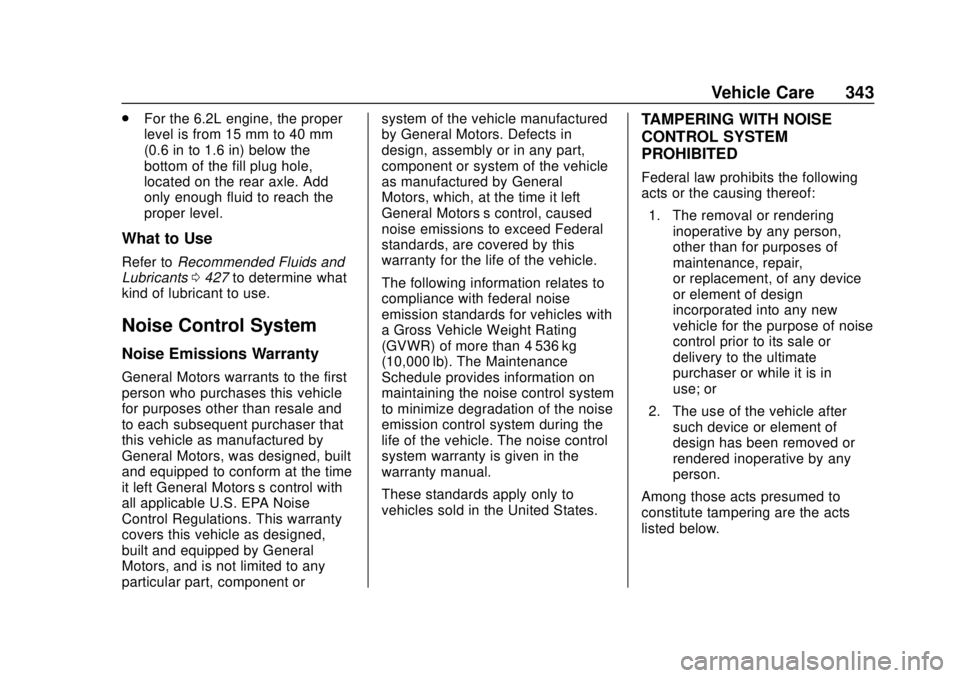
to get a true reading.How to Check Lubricant
To get an accurate reading, the
vehicle should be on a level
surface.
.
For the 2.7L, 4.3L, and 5.3L
engines, the proper level is
1.0 mm to 19.0 mm (0.04 in to
0.7 in) below the bottom of the
fill hole, located on the rear axle.
Add only enough fluid to reach
the proper level.
Page 344 of 474

Chevrolet Silverado Owner Manual (GMNA-Localizing-U.S./Canada/Mexico-
1500-11698642) - 2019 - CRC - 2/20/19
Vehicle Care 343
.For the 6.2L engine, the proper
level is from 15 mm to 40 mm
(0.6 in to 1.6 in) below the
bottom of the fill plug hole,
located on the rear axle. Add
only enough fluid to reach the
proper level.
What to Use
Refer to Recommended Fluids and
Lubricants 0427 to determine what
kind of lubricant to use.
Noise Control System
Noise Emissions Warranty
General Motors warrants to the first
person who purchases this vehicle
for purposes other than resale and
to each subsequent purchaser that
this vehicle as manufactured by
General Motors, was designed, built
and equipped to conform at the time
it left General Motors’ s control with
all applicable U.S. EPA Noise
Control Regulations. This warranty
covers this vehicle as designed,
built and equipped by General
Motors, and is not limited to any
particular part, component or system of the vehicle manufactured
by General Motors. Defects in
design, assembly or in any part,
component or system of the vehicle
as manufactured by General
Motors, which, at the time it left
General Motors’s control, caused
noise emissions to exceed Federal
standards, are covered by this
warranty for the life of the vehicle.
The following information relates to
compliance with federal noise
emission standards for vehicles with
a Gross Vehicle Weight Rating
(GVWR) of more than 4 536 kg
(10,000 lb). The Maintenance
Schedule provides information on
maintaining the noise control system
to minimize degradation of the noise
emission control system during the
life of the vehicle. The noise control
system warranty is given in the
warranty manual.
These standards apply only to
vehicles sold in the United States.
TAMPERING WITH NOISE
CONTROL SYSTEM
PROHIBITED
Federal law prohibits the following
acts or the causing thereof:
1. The removal or rendering inoperative by any person,
other than for purposes of
maintenance, repair,
or replacement, of any device
or element of design
incorporated into any new
vehicle for the purpose of noise
control prior to its sale or
delivery to the ultimate
purchaser or while it is in
use; or
2. The use of the vehicle after such device or element of
design has been removed or
rendered inoperative by any
person.
Among those acts presumed to
constitute tampering are the acts
listed below.