2019 CHEVROLET SILVERADO electric
[x] Cancel search: electricPage 223 of 474

Chevrolet Silverado Owner Manual (GMNA-Localizing-U.S./Canada/Mexico-
1500-11698642) - 2019 - CRC - 2/20/19
222 Driving and Operating
Service Mode
This power mode is available for
service and diagnostics, and to
verify the proper operation of the
malfunction indicator lamp as may
be required for emission inspection
purposes. With the vehicle off, and
the brake pedal not applied,
pressing and holding the button for
more than five seconds will place
the vehicle in Service Mode. The
instruments and audio systems will
operate as they do when the ignition
is on, but the vehicle will not be able
to be driven. The engine will not
start in Service Mode. Press the
button again to turn the ignition off.
Starting the Engine
If the vehicle has a diesel engine,
see the Duramax diesel
supplement.
Caution
If you add electrical parts or
accessories, you could change
the way the engine operates. Any
resulting damage would not be
covered by the vehicle warranty.
SeeAdd-On Electrical Equipment
0 307.
Move the shift lever to P (Park) or
N (Neutral). To restart the engine
when the vehicle is already moving,
use N (Neutral) only.
Caution
Do not try to shift to P (Park) if the
vehicle is moving. If you do, you
could damage the transmission.
Shift to P (Park) only when the
vehicle is stopped.
Starting Procedure
1. For Key Access vehicles, turn the ignition key to START.
When the engine starts, let go
of the key.
For Keyless Access vehicles,
the RKE transmitter must be in
the vehicle. Press ENGINE
START/STOP with the brake
pedal applied. When the
engine begins cranking, let go
of the button.
The idle speed will go down as
the engine gets warm. Do not
race the engine immediately
after starting it. Operate the
engine and transmission gently
to allow the oil to warm up and
lubricate all moving parts.
When the low fuel warning light
is on and the FUEL LEVEL
LOW message is displayed in
the Driver Information Center
(DIC), hold the ignition switch
in the START position to
continue engine cranking.
Page 226 of 474
Chevrolet Silverado Owner Manual (GMNA-Localizing-U.S./Canada/Mexico-
1500-11698642) - 2019 - CRC - 2/20/19
Driving and Operating 225
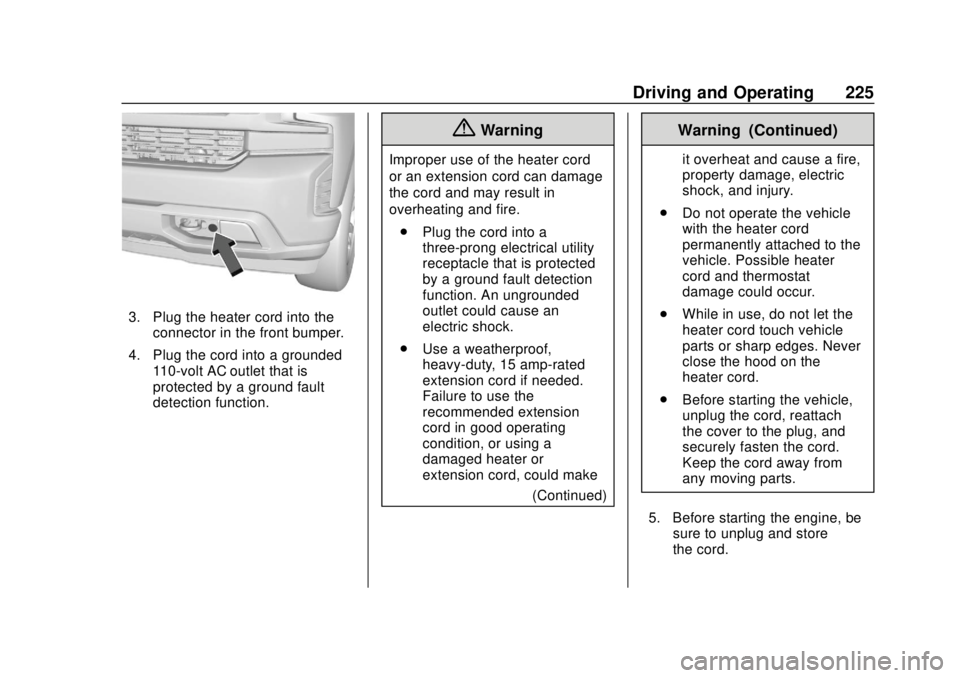
3. Plug the heater cord into theconnector in the front bumper.
4. Plug the cord into a grounded 110-volt AC outlet that is
protected by a ground fault
detection function.
{Warning
Improper use of the heater cord
or an extension cord can damage
the cord and may result in
overheating and fire.
. Plug the cord into a
three-prong electrical utility
receptacle that is protected
by a ground fault detection
function. An ungrounded
outlet could cause an
electric shock.
. Use a weatherproof,
heavy-duty, 15 amp-rated
extension cord if needed.
Failure to use the
recommended extension
cord in good operating
condition, or using a
damaged heater or
extension cord, could make
(Continued)
Warning (Continued)
it overheat and cause a fire,
property damage, electric
shock, and injury.
. Do not operate the vehicle
with the heater cord
permanently attached to the
vehicle. Possible heater
cord and thermostat
damage could occur.
. While in use, do not let the
heater cord touch vehicle
parts or sharp edges. Never
close the hood on the
heater cord.
. Before starting the vehicle,
unplug the cord, reattach
the cover to the plug, and
securely fasten the cord.
Keep the cord away from
any moving parts.
5. Before starting the engine, be sure to unplug and store
the cord.
Page 227 of 474
Chevrolet Silverado Owner Manual (GMNA-Localizing-U.S./Canada/Mexico-
1500-11698642) - 2019 - CRC - 2/20/19
226 Driving and Operating
The length of time the heater should
remain plugged in depends on
several factors. Ask a dealer in the
area where you will be parking the
vehicle for the best advice on this.
Retained Accessory
Power (RAP)
Some vehicle accessories may be
used after the ignition is turned off.
The power windows and sunroof,
if equipped, will continue to work for
up to 10 minutes or until any door is
opened.
The infotainment system will
continue to work for 10 minutes,
until the driver door is opened,
or until the ignition is turned on or
placed in ACC/ACCESSORY.
Shifting Into Park
{Warning
It can be dangerous to get out of
the vehicle if the shift lever is not
fully in P (Park) with the parking
brake firmly set. The vehicle can
roll. If you have left the engine
running, the vehicle can move
suddenly. You or others could be
injured. To be sure the vehicle will
not move, even when you are on
fairly level ground, use the steps
that follow. With four-wheel drive,
if the transfer case is in
N (Neutral), the vehicle will be
free to roll, even if the shift lever
is in P (Park). Be sure the transfer
case is in a drive gear. If towing a
trailer, seeDriving Characteristics
and Towing Tips 0277.
1. Hold the brake pedal down, then set the parking brake. See
Electric Parking Brake 0242. 2. Move the shift lever into the
P (Park) position by pulling the
shift lever toward you and
moving it up as far as it will go.
3. Be sure the transfer case (if equipped) is in a drive
gear –not in N (Neutral).
4. Turn the ignition off. For Key Access, push the ignition key
in, towards the steering column
and then turn the ignition off.
5. For Key Access, remove the key and take it with you. If you
can leave the vehicle with the
ignition key in your hand, the
vehicle is in P (Park).
For Keyless Access, take the
Remote Keyless Entry (RKE)
transmitter with you.
Page 229 of 474
Chevrolet Silverado Owner Manual (GMNA-Localizing-U.S./Canada/Mexico-
1500-11698642) - 2019 - CRC - 2/20/19
228 Driving and Operating
2. Release the parking brake if itis applied. See Electric Parking
Brake 0242.
3. Pull the shift lever toward you, then move it to the desired
position, and release.
If the vehicle still cannot be shifted
out of P (Park): 1. Ease the pressure on, or release the shift lever.
2. While holding the brake pedal, push the shift lever all the way
into P (Park).
3. Pull the shift lever toward you, then move it to the desired
position, and release.
If there is still a problem shifting,
have the vehicle serviced soon.Parking over Things
That Burn
{Warning
Things that can burn could touch
hot exhaust parts under the
vehicle and ignite. Do not park
over papers, leaves, dry grass,
or other things that can burn.
Active Fuel Management
If equipped, Active Fuel
Management allows a V8, V6, or L4
gasoline engine to operate on either
all of its cylinders, or a reduced
number of cylinders, depending on
the driving conditions.
When less power is required, such
as cruising at a constant vehicle
speed, the system will enable
reduced cylinder operation, allowing
the vehicle to achieve better fuel
economy. When greater power is
required, such as accelerating from a stop, passing, or merging onto a
freeway, the system will maintain
full-cylinder operation.
Dynamic Fuel Management
If equipped, Dynamic Fuel
Management calculates the number
of cylinders needed to maximize
fuel economy and meet the driving
demands. Dynamic Fuel
Management allows the engine to
operate in multiple possible
configurations ranging from
1-cylinder up to the full 8-cylinder
operation.
Extended Parking
It is best not to park with the vehicle
running. If the vehicle is left running,
be sure it will not move and there is
adequate ventilation.
See
Shifting Into Park 0226 and
Engine Exhaust 0229.
If the vehicle is left parked and
running with the RKE transmitter
outside the vehicle, it will continue
to run for up to half an hour.
Page 239 of 474

Chevrolet Silverado Owner Manual (GMNA-Localizing-U.S./Canada/Mexico-
1500-11698642) - 2019 - CRC - 2/20/19
238 Driving and Operating
automatically based on driving
conditions. This setting provides
slightly lower fuel economy than 2
m.
4
m(Four-Wheel Drive High) : Use
this setting when extra traction is
needed, such as when driving on
snowy or icy roads, when
off-roading, or when plowing snow.
4
n(Four-Wheel Drive Low) : This
setting engages the front axle and
delivers extra torque. Choose 4
n
when driving off-road in deep sand,
deep mud, or deep snow, and while
climbing or descending steep hills.
While driving in 4
n, keep vehicle
speed below 72 km/h (45 mph).
Shifting into 4
nwill turn Traction
Control and StabiliTrak/ESC off.
See Traction Control/Electronic
Stability Control 0244.
Shifts between 2
m, 4m, and AUTO
Any of these shifts can be made at
normal driving speed. The actual 4x4 shift request is only
made after the button is released.
The 4x4 graphic will remain flashing
until the shift request has
completed. A DIC message displays
to indicate that the 4x4 transfer case
has been requested to shift to the
new desired state.
Once the 4x4 shift has completed,
the DIC message disappears, the
4x4 graphic stops flashing, and the
current setting is indicated.
When a shift to 2
mis completed
successfully while in P (Park), the
parking brake will engage. To
resume driving, shift the
transmission to the desired gear
and manually release the parking
brake or press the accelerator pedal
to begin driving. See Electric
Parking Brake 0242.
If equipped, use 4
n, AUTO, or 4mto
provide additional traction when
parking on a steep grade with poor
traction such as ice, snow, mud,
or gravel. Shifting Into 4
n
1. The ignition must be on and
the vehicle must be stopped or
moving less than 5 km/h
(3 mph) with the transmission
in N (Neutral). It is best for the
vehicle to be moving
1.6 to 3.2 km/h (1 to 2 mph).
2. Press 4
n. The actual 4x4 shift
request is only made after the
button is released. The 4x4
graphic will remain flashing
until the shift request has
completed. A DIC message
displays to indicate that the 4x4
transfer case has been
requested to shift to the new
desired state.
Once the 4x4 shift has
completed, the DIC message
disappears, the 4x4 graphic
stops flashing and the current
setting is indicated.
If vehicle speed is higher when shift
request occurs, a DIC message
displays. Reduce vehicle speed.
Page 241 of 474

Chevrolet Silverado Owner Manual (GMNA-Localizing-U.S./Canada/Mexico-
1500-11698642) - 2019 - CRC - 2/20/19
240 Driving and Operating
Shifting Into N (Neutral)
To shift into N (Neutral):1. Start the vehicle.
2. Shift the transmission to N (Neutral).
3. Shift the transfer case to 2
m.
4. Apply the parking brake and/or brake pedal.
5. Press 2
mfive times in
10 seconds until the N (Neutral)
graphic starts flashing in the
instrument cluster. When the
shift is complete, the graphic
stops flashing. If the parking
brake and/or brake pedal is not
applied within 20 seconds, the
transfer case will remain in the
original state.
6. If the transmission is not shifted into N (Neutral) or the
vehicle has not slowed to
5 km/h (3 mph) within
20 seconds, the transfer case
will remain in its original state.
This will be indicated in the
instrument cluster. Shifting Out of N (Neutral)
To shift out of N (Neutral):
1. Turn the ignition on with the engine off. See Ignition
Positions (Key Access) 0218
or
Ignition Positions (Keyless
Access) 0220.
2. Set the parking brake. See Electric Parking Brake 0242.
3. Shift the transmission to N (Neutral).
4. Shift the transfer case to 2
m.
Transfer case shifts out of
N (Neutral) can only be made
into 2
m. When the shift to 2mis
complete, the graphic in the
instrument cluster will stop
flashing. If the transfer case
cannot complete a shift, the
graphic will return to the
previously selected setting. Single Speed Transfer Case
If equipped, the transfer case
controls are used to shift into and
out of four-wheel drive.
To shift the transfer case, press the
desired button. The graphic in the
instrument cluster will flash while a
shift is in progress. The graphic
displayed will change to indicate the
setting requested.
When the shift is complete the
graphic will stop flashing. The DIC
message turns off once the shift is
complete. If the transfer case
Page 243 of 474
Chevrolet Silverado Owner Manual (GMNA-Localizing-U.S./Canada/Mexico-
1500-11698642) - 2019 - CRC - 2/20/19
242 Driving and Operating
ABS can change the brake pressure
to each wheel, as required, faster
than any driver could. This can help
you steer around the obstacle while
braking hard.
As the brakes are applied, the
computer keeps receiving updates
on wheel speed and controls
braking pressure accordingly.
Remember: ABS does not change
the time needed to get a foot up to
the brake pedal or always decrease
stopping distance. If you get too
close to the vehicle in front of you,
there will not be enough time to
apply the brakes if that vehicle
suddenly slows or stops. Always
leave enough room up ahead to
stop, even with ABS.
Using ABS
Do not pump the brakes. Just hold
the brake pedal down firmly and let
ABS work. You may hear noise or
feel vibration while the ABS is
operating.
The Traction Control System (TCS)/
StabiliTrak indicator light will flash to
indicate that ABS is active. WhenABS is active, it may indicate that
road surfaces are slippery. Braking
sooner may be required for driving
conditions.
Braking in Emergencies
ABS allows you to steer and brake
at the same time. In many
emergencies, steering can help
more than even the very best
braking.
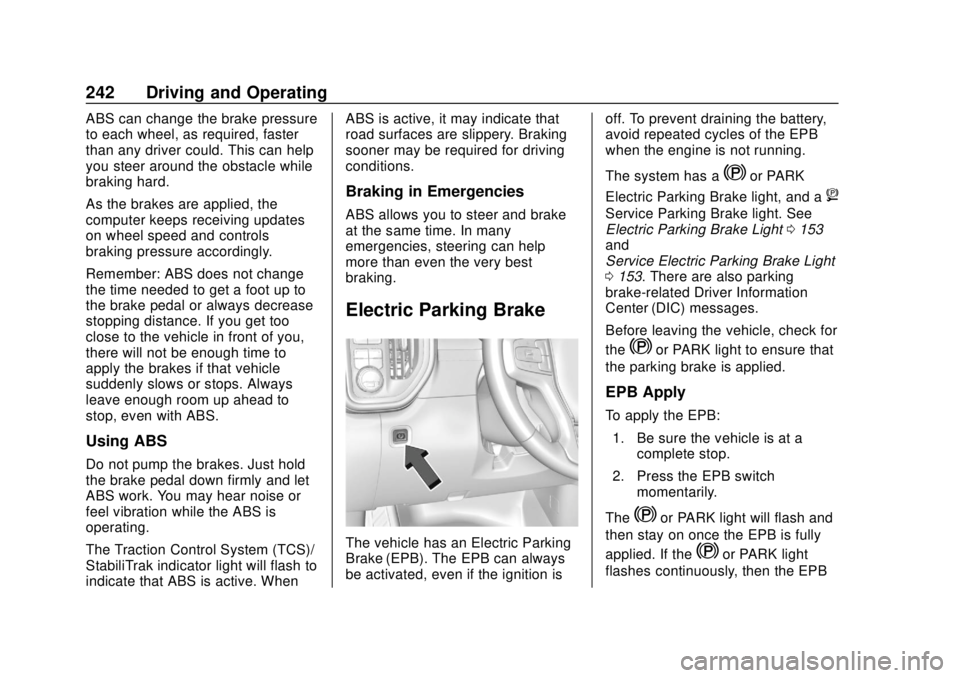
Electric Parking Brake
The vehicle has an Electric Parking
Brake (EPB). The EPB can always
be activated, even if the ignition is
off. To prevent draining the battery,
avoid repeated cycles of the EPB
when the engine is not running.
The system has a
Yor PARK
Electric Parking Brake light, and a
8
Service Parking Brake light. See
Electric Parking Brake Light 0153
and
Service Electric Parking Brake Light
0 153. There are also parking
brake-related Driver Information
Center (DIC) messages.
Before leaving the vehicle, check for
the
Yor PARK light to ensure that
the parking brake is applied.
EPB Apply
To apply the EPB:
1. Be sure the vehicle is at a complete stop.
2. Press the EPB switch momentarily.
The
Yor PARK light will flash and
then stay on once the EPB is fully
applied. If the
Yor PARK light
flashes continuously, then the EPB
Page 244 of 474
Chevrolet Silverado Owner Manual (GMNA-Localizing-U.S./Canada/Mexico-
1500-11698642) - 2019 - CRC - 2/20/19
Driving and Operating 243
is only partially applied or there is a
problem with the EPB. A DIC
message will display. Release the
EPB and try to apply it again. If the
light does not come on, or keeps
flashing, have the vehicle serviced.
Do not drive the vehicle if the
Yor
PARK light is flashing. See your
dealer. See Electric Parking Brake
Light 0153.
If the
8light is on, press the EPB
switch and hold it. Continue to hold
the switch until the
Yor PARK
light remains on. If the
8light
remains on, see your dealer.
If the EPB is applied while the
vehicle is moving, the vehicle will
decelerate as long as the switch is
pressed. If the switch is pressed
until the vehicle comes to a stop,
the EPB will remain applied.
The vehicle may automatically apply
the EPB in some situations when
the vehicle is not moving. This is
normal, and is done to periodically
check the correct operation of the
EPB system. If the EPB fails to apply, block the
rear wheels to prevent vehicle
movement.
EPB Release
To release the EPB:
1. Turn the ignition on or to ACC/ ACCESSORY.
2. Apply and hold the brake pedal.
3. Press the EPB switch momentarily.
The EPB is released when the
Y
or PARK light is off.
If the
8light is on, release the EPB
by pressing and holding the EPB
switch. Continue to hold the switch
until the
Yor PARK light is off.
If either light stays on after release
is attempted, see your dealer.
Caution
Driving with the parking brake on
can overheat the brake system
and cause premature wear or
damage to brake system parts.
Make sure that the parking brake
is fully released and the brake
warning light is off before driving.
Automatic EPB Release
The EPB will automatically release if
the vehicle is running, placed into
gear, and an attempt is made to
drive away. Avoid rapid acceleration
when the EPB is applied, to
preserve parking brake lining life.
Brake Assist
The Brake Assist feature assists in
stopping or decreasing vehicle
speed in emergency driving
conditions. This feature uses the
Electronic Brake Control Module
(EBCM) which controls the hydraulic
brake circuits to detect when the
driver has quickly and forcefully