2019 CHEVROLET SILVERADO 3500 clock
[x] Cancel search: clockPage 26 of 489
Chevrolet Silverado LD 1500 and Silverado 2500/3500 Owner Manual (GMNA-
Localizing-U.S./Canada-12162993) - 2019 - crc - 4/4/18
In Brief 25
Setting the Clock
SeeClock 0130.
Satellite Radio
Vehicles with a SiriusXM satellite
radio tuner and a valid SiriusXM
satellite radio subscription can
receive SiriusXM programming.
SiriusXM Satellite Radio
Service
SiriusXM is a satellite radio service
based in the 48 contiguous United
States and 10 Canadian provinces.
SiriusXM satellite radio has a wide
variety of programming and
commercial-free music, coast to
coast, and in digital-quality sound.
A fee is required to receive the
SiriusXM service.
For more information refer to:
.
www.siriusxm.com or call
1-888-601-6296 (U.S.).
. www.siriusxm.ca or call
1-877-438-9677 (Canada).
See Satellite Radio 0187.
Portable Audio Devices
This vehicle may have a 3.5 mm
(1/8 in) auxiliary input jack and USB
ports in the center console or
armrest. There may be USB ports in
the center stack below the climate
controls. External devices such as
iPods, laptop computers, MP3
players, and USB storage devices
may be connected, depending on
the audio system.
See USB Port 0190 andAuxiliary
Jack 0195.
Bluetooth
The Bluetooth system allows users
with a Bluetooth-enabled cell phone
to make and receive hands-free
calls using the vehicle audio system
and controls.
The Bluetooth-enabled cell phone
must be paired with the in-vehicle
Bluetooth system before it can be
used in the vehicle. Not all phones
will support all functions. See
Bluetooth (Overview) 0203 or
Bluetooth (Infotainment Controls)
0 205.
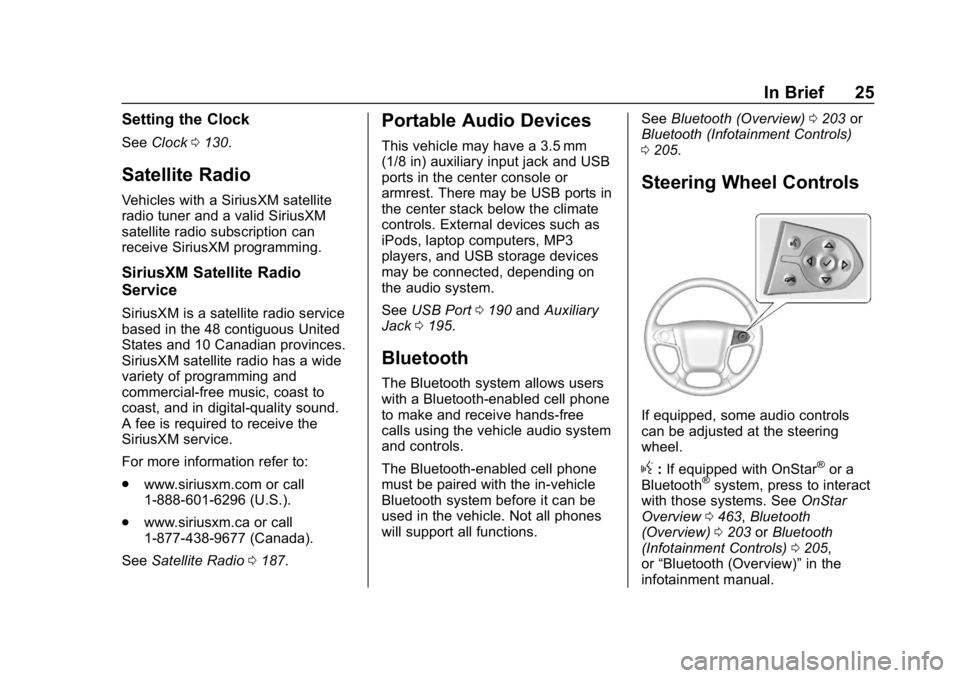
Steering Wheel Controls
If equipped, some audio controls
can be adjusted at the steering
wheel.
g:If equipped with OnStar®or a
Bluetooth®system, press to interact
with those systems. See OnStar
Overview 0463, Bluetooth
(Overview) 0203 orBluetooth
(Infotainment Controls) 0205,
or “Bluetooth (Overview)” in the
infotainment manual.
Page 126 of 489
Chevrolet Silverado LD 1500 and Silverado 2500/3500 Owner Manual (GMNA-
Localizing-U.S./Canada-12162993) - 2019 - crc - 4/6/18
Storage 125
Caution
The truck bed walls will collapse if
the tie-downs are overloaded.
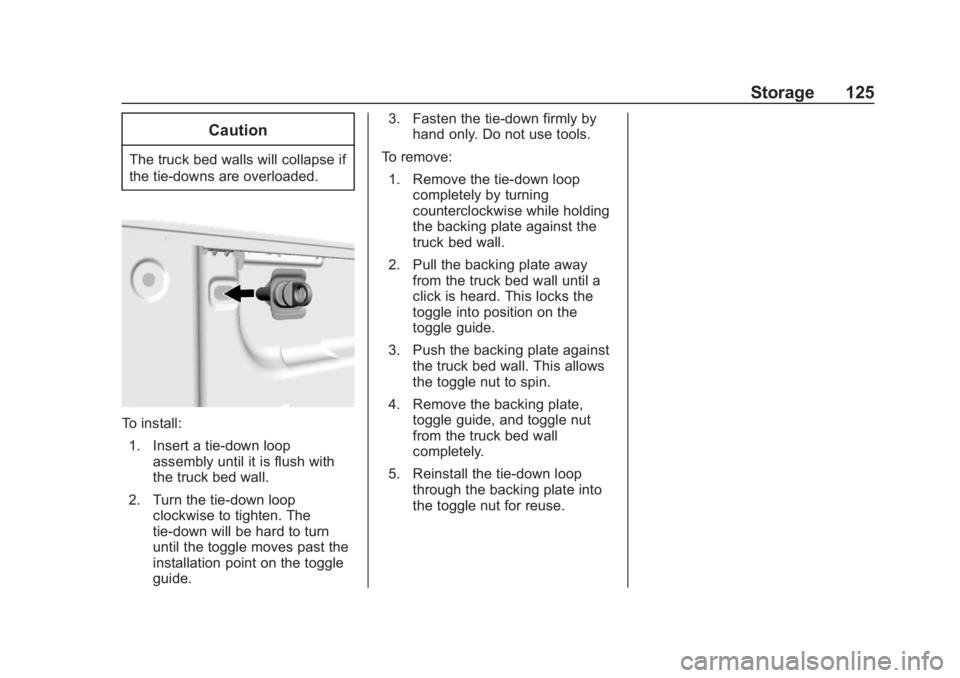
To install:1. Insert a tie-down loop assembly until it is flush with
the truck bed wall.
2. Turn the tie-down loop clockwise to tighten. The
tie-down will be hard to turn
until the toggle moves past the
installation point on the toggle
guide. 3. Fasten the tie-down firmly by
hand only. Do not use tools.
To remove: 1. Remove the tie-down loop completely by turning
counterclockwise while holding
the backing plate against the
truck bed wall.
2. Pull the backing plate away from the truck bed wall until a
click is heard. This locks the
toggle into position on the
toggle guide.
3. Push the backing plate against the truck bed wall. This allows
the toggle nut to spin.
4. Remove the backing plate, toggle guide, and toggle nut
from the truck bed wall
completely.
5. Reinstall the tie-down loop through the backing plate into
the toggle nut for reuse.
Page 127 of 489

Chevrolet Silverado LD 1500 and Silverado 2500/3500 Owner Manual (GMNA-
Localizing-U.S./Canada-12162993) - 2019 - crc - 4/4/18
126 Instruments and Controls
Instruments and
Controls
Controls
Steering Wheel Adjustment . . . 127
Steering Wheel Controls . . . . . . 127
Heated Steering Wheel . . . . . . . 128
Horn . . . . . . . . . . . . . . . . . . . . . . . . . . 128
Windshield Wiper/Washer . . . . 128
Compass . . . . . . . . . . . . . . . . . . . . . 129
Clock . . . . . . . . . . . . . . . . . . . . . . . . . 130
Power Outlets . . . . . . . . . . . . . . . . 130
Wireless Charging . . . . . . . . . . . . 132
Warning Lights, Gauges, and
Indicators
Warning Lights, Gauges, andIndicators . . . . . . . . . . . . . . . . . . . 135
Instrument Cluster . . . . . . . . . . . . 136
Speedometer . . . . . . . . . . . . . . . . . 139
Odometer . . . . . . . . . . . . . . . . . . . . . 139
Trip Odometer . . . . . . . . . . . . . . . . 139
Tachometer . . . . . . . . . . . . . . . . . . . 139
Fuel Gauge . . . . . . . . . . . . . . . . . . . 139
Engine Oil Pressure Gauge . . . . . . . . . . . . . . . . . . . . . . 140
Engine Coolant Temperature Gauge . . . . . . . . . . . . . . . . . . . . . . 141 Voltmeter Gauge . . . . . . . . . . . . . 142
Seat Belt Reminders . . . . . . . . . 143
Airbag Readiness Light . . . . . . . 143
Airbag On-Off Light . . . . . . . . . . . 144
Passenger Airbag Status
Indicator . . . . . . . . . . . . . . . . . . . . 145
Charging System Light . . . . . . . 146
Malfunction Indicator Lamp . . . 146
Brake System Warning Light . . . . . . . . . . . . . . . . . . . . . . . . 148
Antilock Brake System (ABS) Warning Light . . . . . . . . . . . . . . . 149
Four-Wheel-Drive Light . . . . . . . 150
Tow/Haul Mode Light . . . . . . . . . 150
Hill Descent Control Light . . . . 150
Lane Departure Warning (LDW) Light (2500/3500
Series) . . . . . . . . . . . . . . . . . . . . . . 150
Lane Keep Assist (LKA) Light (1500 Series) . . . . . . . . . . . . . . . 151
Vehicle Ahead Indicator . . . . . . 151
Traction Off Light . . . . . . . . . . . . . 151
StabiliTrak OFF Light . . . . . . . . . 151
Traction Control System (TCS)/ StabiliTrak Light . . . . . . . . . . . . . 152
Tire Pressure Light . . . . . . . . . . . 152
Low Fuel Warning Light . . . . . . 153
Security Light . . . . . . . . . . . . . . . . . 153
High-Beam On Light . . . . . . . . . . 153
Front Fog Lamp Light . . . . . . . . . 153 Lamps On Reminder . . . . . . . . . 154
Cruise Control Light . . . . . . . . . . 154
Information Displays
Driver Information Center (DIC)
(Base Level) . . . . . . . . . . . . . . . . 154
Driver Information Center (DIC) (Uplevel) . . . . . . . . . . . . . . . . . . . . 156
Vehicle Messages
Vehicle Messages . . . . . . . . . . . . 159
Engine Power Messages . . . . . 159
Vehicle Speed Messages . . . . . 159
Vehicle Personalization
Vehicle Personalization . . . . . . . 160
Universal Remote System
Universal Remote System . . . . 167
Universal Remote SystemProgramming . . . . . . . . . . . . . . . 167
Universal Remote System Operation . . . . . . . . . . . . . . . . . . . 170
Page 131 of 489

Chevrolet Silverado LD 1500 and Silverado 2500/3500 Owner Manual (GMNA-
Localizing-U.S./Canada-12162993) - 2019 - crc - 4/4/18
130 Instruments and Controls
Clock
Setting the Time and Date
To set the time:1. Touch SETTINGS from the Home Page, then touch Time
and Date.
2. Touch Set Time and touch
«
orªto increase or decrease
hours, minutes, and AM or PM.
Touch 12–24 Hr for 12 or
24 hour clock.
3. Touch the
}or0screen
button to go back to the
previous menu.
Auto Set requires an active OnStar
or connected service plan.
If auto timing is set, the time
displayed on the clock may not
update immediately when driving
into a new time zone.
To set the date: 1. Touch SETTINGS from the Home Page, then touch Time
and Date. 2. Touch Set Date and touch
«
orªto increase or decrease
month, day, or year.
3. Touch the
}or0screen
button to go back to the
previous menu.
To set the clock display: 1. Touch SETTINGS and touch Time and Date.
2. Touch Clock Display and touch OFF or ON to turn the clock
display off or on.
3. Touch the
}or0screen
button to go back to the
previous menu.
Power Outlets
Power Outlets 12-Volt Direct
Current
Accessory power outlets can be
used to plug in electrical equipment,
such as a cell phone or MP3 player.
The vehicle may have up to four
accessory power outlets. Vehicles with a Center Console
.
One or two in front of the
cupholders on the center
console
. One inside the center console
. One on the rear of the center
console
Vehicles with Bench Seats
. One on the center stack below
the climate control system
. One or two in the storage area
on the bench seat
Lift the cover to access and replace
when not in use.
The power outlets on the center
stack and in front of the cupholders
are powered at all times. The power
outlets inside the storage area and
on the rear of the console are
powered when the ignition is on or
in ACC/ACCESSORY, or when
Retained Accessory Power (RAP) is
active.
Page 161 of 489
Chevrolet Silverado LD 1500 and Silverado 2500/3500 Owner Manual (GMNA-
Localizing-U.S./Canada-12162993) - 2019 - crc - 4/4/18
160 Instruments and Controls
Vehicle
Personalization
Use the audio system controls to
access the personalization menus
for customizing vehicle features.
The following are all possible
personalization features. Depending
on the vehicle, some may not be
available.
Base Radio Audio System
Controls
{:Press to access the Home
Page Menu.
QorR: Touch to scroll through the
menus or setup items.
0: Touch to exit or return to the
previous screen or menu.
Uplevel Radio Audio System
Controls
1. Touch the desired feature to display a list of available
options.
2. Select the desired feature setting. 3. Press
oBACK on the center
stack or touch
0to return to
the previous menu or exit.
Turn the ignition on to access the
Settings menu, then select
SETTINGS from the Home Page on
the infotainment display.
Personalization Menus
The following list of menu items may
be available:
. Time and Date
. Rear Seat Reminder
. Language
. Video Voice-Over
. Valet Mode
. Teen Driver
. Radio
. Vehicle
. Bluetooth
. Apple CarPlay
. Android Auto
. USB Auto Launch .
Voice
. Display
. Rear Camera
. Return to Factory Settings
. Software Information
. Wi-Fi
Detailed information for each menu
follows.
Time and Date
Manually set the time and date. See
Clock 0130.
Rear Seat Reminder
This allows for a chime and a
message when the rear door has
been opened before or during
operation of the vehicle.
Select Off or On.
Language
Select Language, then select from
the available language(s).
Page 196 of 489
Chevrolet Silverado LD 1500 and Silverado 2500/3500 Owner Manual (GMNA-
Localizing-U.S./Canada-12162993) - 2019 - crc - 4/4/18
Infotainment System 195
2. Touch the desired music.
Tone Settings
. Touch Tone Settings. The Tone
Settings menu is displayed. See
“Tone Settings” inAM-FM Radio
0 185.
Auto Volume
. Touch Auto Volume. The Auto
Volume menu is displayed. See
“Auto Volume” inAM-FM Radio
0 185.
Picture System Information
The infotainment system can view
picture files stored on a USB
storage device and devices that
support Media Transfer
Protocol (MTP).
.
Supported file extensions: .jpg,
.bmp, .png, .gif.
. Animated GIF files are not
supported.
. Some files may not operate due
to a different recording format or
the condition of the file. Viewing Pictures
1. Connect the USB device to the USB port.
2. Touch the screen to open to full screen. Touch the screen again
to return to the previous
screen.
If the USB device is already
connected:
1. Press
{.
2. Touch GALLERY.
Some features are disabled while
the vehicle is in motion.
Viewing a Slide Show
1. Touch
zfrom the picture
screen.
2. Touch the screen to cancel the slide show during the slide
show playback.
Viewing a Previous or Next
Picture
Touch
SorTfrom the picture
screen. Rotating a Picture
Touch
wfrom the picture screen.
Enlarging a Picture
Touch
xfrom the picture screen.
Using the USB Picture Menu 1. Touch MENU from the picture screen.
2. Touch the appropriate menu: .Slide Show Time: Allows
selection of the slide show
interval.
. Clock, Temp. Display:
Allows selection of On or
Off to show the clock and
temperature on the full
screen.
. Display Settings: Adjusts
for Brightness and Contrast.
3. Touch
0to exit.
Auxiliary Jack
This vehicle may have an AUX jack
in the center console storage. See
Center Console Storage 0123.
Page 217 of 489
Chevrolet Silverado LD 1500 and Silverado 2500/3500 Owner Manual (GMNA-
Localizing-U.S./Canada-12162993) - 2019 - crc - 4/4/18
216 Climate Controls
Climate Controls
Climate Control Systems
Climate Control Systems (withHeater Only) . . . . . . . . . . . . . . . . 216
Climate Control Systems (with Air Conditioning) . . . . . . . . . . . . 218
Dual Automatic Climate Control System . . . . . . . . . . . . . 220
Air Vents
Air Vents . . . . . . . . . . . . . . . . . . . . . 223
Maintenance
Passenger Compartment AirFilter . . . . . . . . . . . . . . . . . . . . . . . . 223
Service . . . . . . . . . . . . . . . . . . . . . . . 224
Climate Control Systems
Climate Control Systems (with Heater Only)
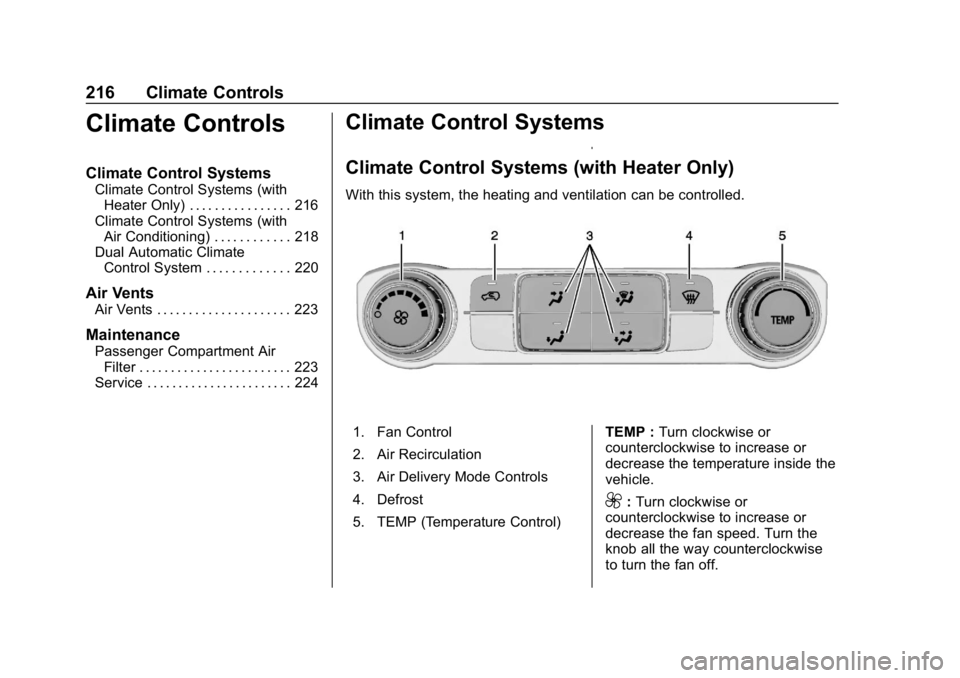
With this system, the heating and ventilation can be controlled.
1. Fan Control
2. Air Recirculation
3. Air Delivery Mode Controls
4. Defrost
5. TEMP (Temperature Control) TEMP :
Turn clockwise or
counterclockwise to increase or
decrease the temperature inside the
vehicle.
9: Turn clockwise or
counterclockwise to increase or
decrease the fan speed. Turn the
knob all the way counterclockwise
to turn the fan off.
Page 219 of 489
Chevrolet Silverado LD 1500 and Silverado 2500/3500 Owner Manual (GMNA-
Localizing-U.S./Canada-12162993) - 2019 - crc - 4/4/18
218 Climate Controls
Climate Control Systems (with Air Conditioning)
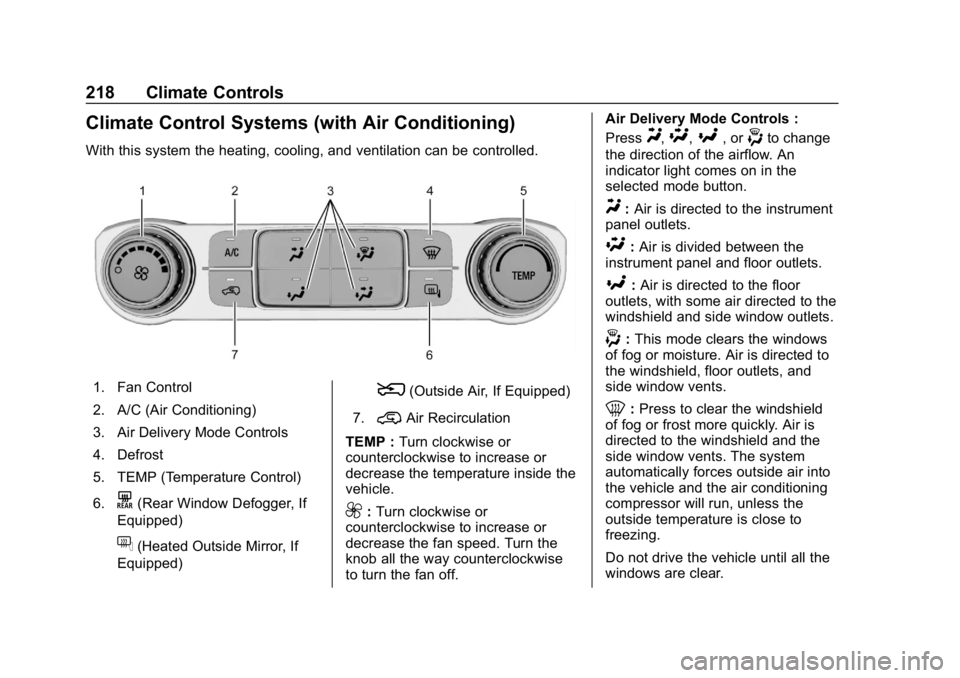
With this system the heating, cooling, and ventilation can be controlled.
1. Fan Control
2. A/C (Air Conditioning)
3. Air Delivery Mode Controls
4. Defrost
5. TEMP (Temperature Control)
6.
K(Rear Window Defogger, If
Equipped)
f(Heated Outside Mirror, If
Equipped)
8(Outside Air, If Equipped)
7.
@Air Recirculation
TEMP : Turn clockwise or
counterclockwise to increase or
decrease the temperature inside the
vehicle.
9: Turn clockwise or
counterclockwise to increase or
decrease the fan speed. Turn the
knob all the way counterclockwise
to turn the fan off. Air Delivery Mode Controls :
Press
Y,\,[, or-to change
the direction of the airflow. An
indicator light comes on in the
selected mode button.
Y: Air is directed to the instrument
panel outlets.
\: Air is divided between the
instrument panel and floor outlets.
[: Air is directed to the floor
outlets, with some air directed to the
windshield and side window outlets.
-: This mode clears the windows
of fog or moisture. Air is directed to
the windshield, floor outlets, and
side window vents.
0: Press to clear the windshield
of fog or frost more quickly. Air is
directed to the windshield and the
side window vents. The system
automatically forces outside air into
the vehicle and the air conditioning
compressor will run, unless the
outside temperature is close to
freezing.
Do not drive the vehicle until all the
windows are clear.