2019 CHEVROLET SILVERADO 3500 ignition
[x] Cancel search: ignitionPage 324 of 489

Chevrolet Silverado LD 1500 and Silverado 2500/3500 Owner Manual (GMNA-
Localizing-U.S./Canada-12162993) - 2019 - crc - 4/4/18
Vehicle Care 323
Vehicle Care
General Information
General Information . . . . . . . . . . 324
California Proposition65 Warning . . . . . . . . . . . . . . . . . 325
California Perchlorate Materials Requirements . . . . . 325
Accessories and Modifications . . . . . . . . . . . . . . . . 325
Vehicle Checks
Doing Your OwnService Work . . . . . . . . . . . . . . . 326
Hood . . . . . . . . . . . . . . . . . . . . . . . . . 326
Engine Compartment Overview . . . . . . . . . . . . . . . . . . . . 328
Engine Oil . . . . . . . . . . . . . . . . . . . . 331
Engine Oil Life System . . . . . . . 333
Automatic Transmission Fluid (6-Speed Transmission) . . . . . 335
Automatic Transmission Fluid (8-Speed Transmission) . . . . . 337
Engine Air Cleaner/Filter . . . . . . 338
Cooling System . . . . . . . . . . . . . . 339
Engine Overheating . . . . . . . . . . 343
Overheated Engine Protection Operating Mode . . . . . . . . . . . . . 344
Engine Fan . . . . . . . . . . . . . . . . . . . 345 Power Steering Fluid (1500
Series) . . . . . . . . . . . . . . . . . . . . . . 345
Power Steering Fluid (2500/ 3500 Series) . . . . . . . . . . . . . . . . 345
Washer Fluid . . . . . . . . . . . . . . . . . 346
Brakes . . . . . . . . . . . . . . . . . . . . . . . 347
Brake Fluid . . . . . . . . . . . . . . . . . . . 348
Battery - North America . . . . . . 349
Four-Wheel Drive . . . . . . . . . . . . . 350
Front Axle . . . . . . . . . . . . . . . . . . . . 350
Rear Axle . . . . . . . . . . . . . . . . . . . . 351
Noise Control System . . . . . . . . 352
Starter Switch Check . . . . . . . . . 354
Automatic Transmission Shift
Lock Control Function
Check . . . . . . . . . . . . . . . . . . . . . . . 354
Ignition Transmission Lock Check . . . . . . . . . . . . . . . . . . . . . . . 354
Park Brake and P (Park) Mechanism Check . . . . . . . . . . 354
Wiper Blade Replacement . . . . 355
Windshield Replacement . . . . . 356
Gas Strut(s) . . . . . . . . . . . . . . . . . . 356
Headlamp Aiming
Headlamp Aiming . . . . . . . . . . . . 357
Bulb Replacement
Bulb Replacement . . . . . . . . . . . . 357
Halogen Bulbs . . . . . . . . . . . . . . . . 357 High Intensity Discharge (HID)
Lighting . . . . . . . . . . . . . . . . . . . . . 358
LED Lighting . . . . . . . . . . . . . . . . . 358
Headlamps, Front Turn Signal, Sidemarker, and Parking
Lamps . . . . . . . . . . . . . . . . . . . . . . 358
Fog Lamps . . . . . . . . . . . . . . . . . . . 359
Taillamps (Chassis Cab Models) . . . . . . . . . . . . . . . . . . . . . 359
Taillamps, Turn Signal, Stoplamps, and Back-Up
Lamps . . . . . . . . . . . . . . . . . . . . . . 359
Center High-Mounted Stoplamp (CHMSL) and
Cargo Lamp . . . . . . . . . . . . . . . . . 361
Electrical System
Electrical System Overload . . . 361
Fuses and Circuit Breakers . . . 362
Engine Compartment FuseBlock . . . . . . . . . . . . . . . . . . . . . . . . 362
Instrument Panel Fuse Block (Right) . . . . . . . . . . . . . . . . . . . . . . 366
Instrument Panel Fuse Block (Left) . . . . . . . . . . . . . . . . . 367
Wheels and Tires
Tires . . . . . . . . . . . . . . . . . . . . . . . . . . 370
All-Season Tires . . . . . . . . . . . . . . 370
Winter Tires . . . . . . . . . . . . . . . . . . 371
Low-Profile Tires . . . . . . . . . . . . . 371
Page 347 of 489

Chevrolet Silverado LD 1500 and Silverado 2500/3500 Owner Manual (GMNA-
Localizing-U.S./Canada-12162993) - 2019 - crc - 4/4/18
346 Vehicle Care
Wait for the power steering system
to cool, with the engine off, before
checking the fluid.
How to Check Power Steering
Fluid
To check the power steering fluid:1. Turn the ignition off and let the engine compartment
cool down.
2. Wipe the cap and the top of the reservoir clean.
3. Unscrew the cap and wipe the dipstick with a clean rag.
4. Replace the cap and completely tighten it.
5. Remove the cap again and look at the fluid level on the
dipstick.
The level should be between the
ADD and FULL marks. If necessary,
add only enough fluid to bring the
level up to the hashed area between
the ADD and FULL marks.
What to Use
To determine what kind of fluid to
use, see Recommended Fluids and
Lubricants 0440. Always use the
proper fluid.
Caution
Use of the incorrect fluid may
damage the vehicle and the
damages may not be covered by
the vehicle warranty. Always use
the correct fluid listed in
Recommended Fluids and
Lubricants 0440.
Washer Fluid
What to Use
When windshield washer fluid needs
to be added, be sure to read the
manufacturer's instructions before
use. Use a fluid that has sufficient
protection against freezing in an
area where the temperature may fall
below freezing.
Adding Washer Fluid
The vehicle has a low washer fluid
message on the DIC that comes on
when the washer fluid is low. The
message is displayed for
15 seconds at the start of each
ignition cycle. When the WASHER
FLUID LOW ADD FLUID message
displays, washer fluid will need to
be added to the windshield washer
fluid reservoir.
Open the cap with the washer
symbol on it. Add washer fluid until
the tank is full. See Engine
Compartment Overview 0328 for
reservoir location.
Page 355 of 489

Chevrolet Silverado LD 1500 and Silverado 2500/3500 Owner Manual (GMNA-
Localizing-U.S./Canada-12162993) - 2019 - crc - 4/4/18
354 Vehicle Care
Starter Switch Check
{Warning
When you are doing this
inspection, the vehicle could
move suddenly. If the vehicle
moves, you or others could be
injured.
1. Before starting this check, be sure there is enough room
around the vehicle.
2. Apply both the parking brake and the regular brake.
Do not use the accelerator
pedal, and be ready to turn off
the engine immediately if it
starts.
3. Try to start the engine in each gear. The vehicle should start
only in P (Park) or N (Neutral).
If the vehicle starts in any other
position, contact your dealer for
service.
Automatic Transmission
Shift Lock Control
Function Check
{Warning
When you are doing this
inspection, the vehicle could
move suddenly. If the vehicle
moves, you or others could be
injured.
1. Before starting this check, be sure there is enough room
around the vehicle. It should be
parked on a level surface.
2. Apply the parking brake. Be ready to apply the regular
brake immediately if the vehicle
begins to move.
3. With the engine off, turn the ignition on, but do not start the
engine. Without applying the
regular brake, try to move the
shift lever out of P (Park) with normal effort. If the shift lever
moves out of P (Park), contact
your dealer for service.
Ignition Transmission
Lock Check
While parked and with the parking
brake set, try to turn the ignition off
in each shift lever position.
.
The ignition should turn off only
when the shift lever is in
P (Park).
. The ignition key should come
out only when the ignition is off.
Contact your dealer if service is
required.
Park Brake and P (Park)
Mechanism Check
{Warning
When you are doing this check,
the vehicle could begin to move.
You or others could be injured (Continued)
Page 365 of 489

Chevrolet Silverado LD 1500 and Silverado 2500/3500 Owner Manual (GMNA-
Localizing-U.S./Canada-12162993) - 2019 - crc - 4/4/18
364 Vehicle Care
FusesUsage
3 Antilock brake system pump
4 Instrument panel BEC 1
5 Passenger motorized seat belt
6 4WD transfer case electronic control
7 Electric parking brake
8 Instrument panel BEC 2
9 Driver motorized seat belt
10 Rear window defogger
11 Starter
12 Cooling fan 1
13 Cooling fan 2
14 Left trailer stop/ Turn signal lamps
15 Trailer parking lamps Fuses
Usage
16 Trailer reverse lamps
17 Right trailer stop/ Turn signal lamps
18 Fuel pump
19 Integrated chassis control module
20 Electronic suspension control
module
21 Fuel pump power module
22 Upfitter 1
23 Upfitter 2
24 Front wiper
25 Antilock brake system valve
26 Upfitter 2
27 Upfitter 3
28 Right parking lamps
29 Left parking lamps Fuses
Usage
30 Upfitter 3
31 Upfitter 4
32 Upfitter 4
33 Reverse lamps
34 Engine control module/Ignition
35 Air conditioning clutch
36 Heated mirrors
37 Upfitter 1
38 Center high-mounted
stoplamp
39 Miscellaneous/ Ignition
40 Transmission/ Ignition
41 Fuel pump 2
42 Cooling fan clutch
43 Engine
44 Fuel injectors A –
odd
Page 369 of 489

Chevrolet Silverado LD 1500 and Silverado 2500/3500 Owner Manual (GMNA-
Localizing-U.S./Canada-12162993) - 2019 - crc - 4/4/18
368 Vehicle Care
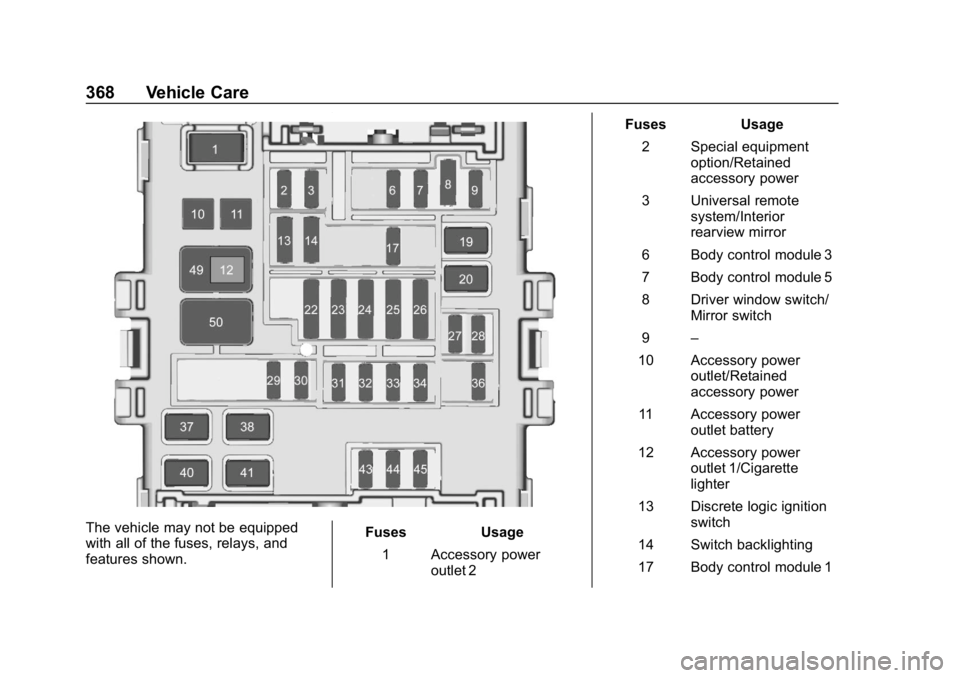
The vehicle may not be equipped
with all of the fuses, relays, and
features shown.Fuses Usage
1 Accessory power outlet 2 Fuses Usage
2 Special equipment option/Retained
accessory power
3 Universal remote system/Interior
rearview mirror
6 Body control module 3
7 Body control module 5
8 Driver window switch/ Mirror switch
9 –
10 Accessory power outlet/Retained
accessory power
11 Accessory power outlet battery
12 Accessory power outlet 1/Cigarette
lighter
13 Discrete logic ignition switch
14 Switch backlighting
17 Body control module 1
Page 370 of 489

Chevrolet Silverado LD 1500 and Silverado 2500/3500 Owner Manual (GMNA-
Localizing-U.S./Canada-12162993) - 2019 - crc - 4/4/18
Vehicle Care 369
FusesUsage
19 –
20 –
22 Heating, ventilation, and air conditioning/
Auxiliary heating,
ventilation, and air
conditioning/Ignition
23 Instrument cluster/ Ignition sensing
diagnostic module/
Ignition
24 –
25 Data link connector/ Driver seat module
26 Passive entry/Passive start/Heating,
ventilation, and air
conditioning
27 –
28 –
29 Park enable/ Electrically adjustable
pedals Fuses
Usage
30 Special equipment option
31 Accessory/Run/Crank
32 Heated steering wheel
33 –
34 Instrument cluster
36 –
37 –
38 4WD transfer case electronic control
40 Left doors
41 Driver power seat
43 Left heated, cooled or ventilated seats (if
equipped)
44 Right heated, cooled or ventilated seats (if
equipped)
45 – Relays
Usage
49 Retained accessory power
50 Run/Crank
Page 382 of 489

Chevrolet Silverado LD 1500 and Silverado 2500/3500 Owner Manual (GMNA-
Localizing-U.S./Canada-12162993) - 2019 - crc - 4/4/18
Vehicle Care 381
pressure, even if under-inflation has
not reached the level to trigger
illumination of the TPMS low tire
pressure telltale.
Your vehicle has also been
equipped with a TPMS malfunction
indicator to indicate when the
system is not operating properly.
The TPMS malfunction indicator is
combined with the low tire pressure
telltale. When the system detects a
malfunction, the telltale will flash for
approximately one minute and then
remain continuously illuminated.
This sequence will continue upon
subsequent vehicle start-ups as
long as the malfunction exists.
When the malfunction indicator is
illuminated, the system may not be
able to detect or signal low tire
pressure as intended. TPMS
malfunctions may occur for a variety
of reasons, including the installation
of replacement or alternate tires or
wheels on the vehicle that prevent
the TPMS from functioning properly.
Always check the TPMS malfunction
telltale after replacing one or more
tires or wheels on your vehicle toensure that the replacement or
alternate tires and wheels allow the
TPMS to continue to function
properly.
See
Tire Pressure Monitor
Operation 0381.
See Radio Frequency Statement
0 459.
Tire Pressure Monitor
Operation
This vehicle may have a Tire
Pressure Monitor System (TPMS).
The TPMS is designed to warn the
driver when a low tire pressure
condition exists. TPMS sensors are
mounted onto each tire and wheel
assembly, excluding the spare tire
and wheel assembly. The TPMS
sensors monitor the air pressure in
the tires and transmit the tire
pressure readings to a receiver
located in the vehicle.
When a low tire pressure condition
is detected, the TPMS illuminates
the low tire pressure warning light
located on the instrument cluster.
If the warning light comes on, stop
as soon as possible and inflate the
tires to the recommended pressure
shown on the Tire and Loading
Information label. See Vehicle Load
Limits 0238.
A message to check the pressure in
a specific tire displays in the Driver
Information Center (DIC). The low
tire pressure warning light and the
DIC warning message come on at
each ignition cycle until the tires are
inflated to the correct inflation
pressure. If the vehicle has DIC
buttons, tire pressure levels can be
viewed. For additional information
and details about the DIC operation
Page 383 of 489

Chevrolet Silverado LD 1500 and Silverado 2500/3500 Owner Manual (GMNA-
Localizing-U.S./Canada-12162993) - 2019 - crc - 4/4/18
382 Vehicle Care
and displays, seeDriver Information
Center (DIC) (Base Level) 0154 or
Driver Information Center (DIC)
(Uplevel) 0156.
The low tire pressure warning light
may come on in cool weather when
the vehicle is first started, and then
turn off as the vehicle is driven. This
could be an early indicator that the
air pressure is getting low and
needs to be inflated to the proper
pressure.
A Tire and Loading Information label
shows the size of the original
equipment tires and the correct
inflation pressure for the tires when
they are cold. See Vehicle Load
Limits 0238, for an example of the
Tire and Loading Information label
and its location. Also see Tire
Pressure 0378.
The TPMS can warn about a low
tire pressure condition but it does
not replace normal tire
maintenance. See Tire Inspection
0 385, Tire Rotation 0386 andTires
0 370.Caution
Tire sealant materials are not all
the same. A non-approved tire
sealant could damage the TPMS
sensors. TPMS sensor damage
caused by using an incorrect tire
sealant is not covered by the
vehicle warranty. Always use only
the GM approved tire sealant
available through your dealer or
included in the vehicle.
TPMS Malfunction Light and
Message
The TPMS will not function properly
if one or more of the TPMS sensors
are missing or inoperable. When the
system detects a malfunction, the
low tire pressure warning light
flashes for about one minute and
then stays on for the remainder of
the ignition cycle. A DIC warning
message also displays. The
malfunction light and DIC warning
message come on at each ignition cycle until the problem is corrected.
Some of the conditions that can
cause these to come on are:
.
One of the road tires has been
replaced with the spare tire. The
spare tire does not have a
TPMS sensor. The malfunction
light and the DIC message
should go off after the road tire
is replaced and the sensor
matching process is performed
successfully. See "TPMS Sensor
Matching Process" later in this
section.
. The TPMS sensor matching
process was not done or not
completed successfully after
rotating the tires. The
malfunction light and the DIC
message should go off after
successfully completing the
sensor matching process. See
"TPMS Sensor Matching
Process" later in this section.
. One or more TPMS sensors are
missing or damaged. The
malfunction light and the DIC
message should go off when the
TPMS sensors are installed and