2019 CHEVROLET SILVERADO 3500 ignition
[x] Cancel search: ignitionPage 385 of 489
Chevrolet Silverado LD 1500 and Silverado 2500/3500 Owner Manual (GMNA-
Localizing-U.S./Canada-12162993) - 2019 - crc - 4/4/18
384 Vehicle Care
.There is interference from an
external device or transmitter.
. The air pressure from the
inflation device is not sufficient
to inflate the tire.
. There is a malfunction in
the TPMS.
. There is a malfunction in the
horn or turn signal lamps.
. The identification code of the
TPMS sensor is not registered to
the system.
. The battery of the TPMS sensor
is low.
If the tire fill alert does not operate
due to TPMS interference, move the
vehicle about 1 m (3 ft) back or
forward and try again. If the tire fill
alert feature is not working, use a
tire pressure gauge.
TPMS Sensor Matching
Process
Each TPMS sensor has a unique
identification code. The identification
code needs to be matched to a new
tire/wheel position after rotating the vehicle’s tires or replacing one or
more of the TPMS sensors. Also,
the TPMS sensor matching process
should be performed after replacing
a spare tire with a road tire
containing the TPMS sensor. The
malfunction light and the DIC
message should go off at the next
ignition cycle. The sensors are
matched to the tire/wheel positions,
using a TPMS relearn tool, in the
following order: driver side front tire,
passenger side front tire, passenger
side rear tire, and driver side rear.
See your dealer for service or to
purchase a relearn tool. A TPMS
relearn tool can also be purchased.
See Tire Pressure Monitor Sensor
Activation Tool at
www.gmtoolsandequipment.com or
call 1-800-GM TOOLS
(1-800-468-6657).
There are two minutes to match the
first tire/wheel position, and
five minutes overall to match all four
tire/wheel positions. If it takes
longer, the matching process stops
and must be restarted.
The TPMS sensor matching
process is:
1. Set the parking brake.
2. Turn the ignition on without starting the vehicle.
3. Uplevel DIC Only: Make sure the Tire Pressure info page
option is turned on. The info
pages on the DIC can be
turned on and off through the
Settings menu.
See Driver Information Center
(DIC) (Base Level) 0154 or
Driver Information Center (DIC)
(Uplevel) 0156.
4. If the vehicle has an uplevel DIC, use the DIC controls on
the right side of the steering
wheel to scroll to the Tire
Pressure screen under the DIC
info page.
If the vehicle has a base level
DIC, use the trip odometer
reset stem to scroll to the Tire
Pressure screen.
Page 398 of 489
Chevrolet Silverado LD 1500 and Silverado 2500/3500 Owner Manual (GMNA-
Localizing-U.S./Canada-12162993) - 2019 - crc - 4/4/18
Vehicle Care 397
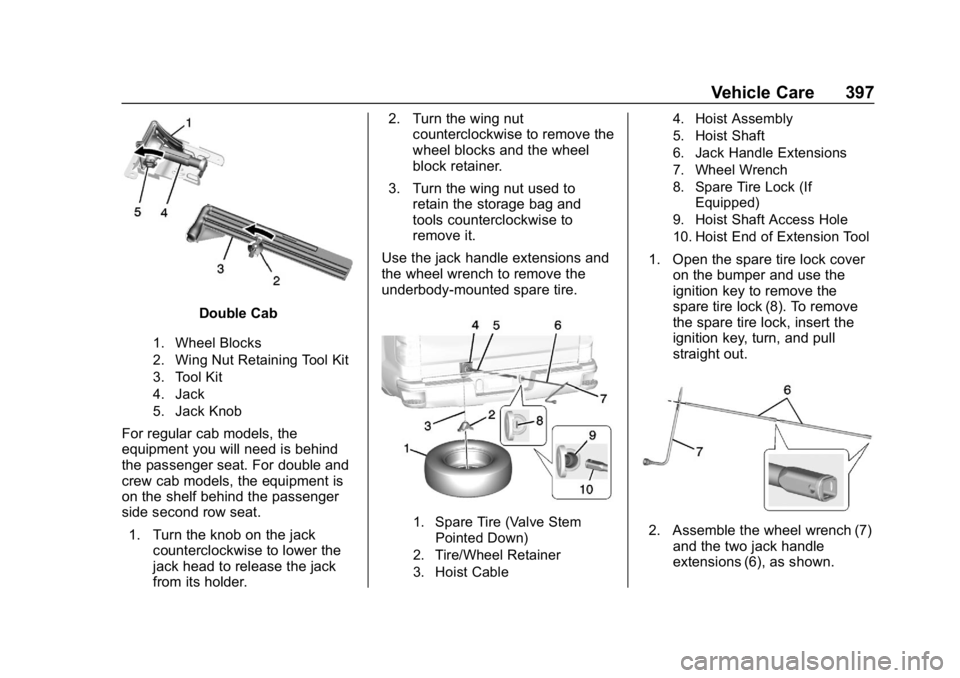
Double Cab
1. Wheel Blocks
2. Wing Nut Retaining Tool Kit
3. Tool Kit
4. Jack
5. Jack Knob
For regular cab models, the
equipment you will need is behind
the passenger seat. For double and
crew cab models, the equipment is
on the shelf behind the passenger
side second row seat.1. Turn the knob on the jack counterclockwise to lower the
jack head to release the jack
from its holder. 2. Turn the wing nut
counterclockwise to remove the
wheel blocks and the wheel
block retainer.
3. Turn the wing nut used to retain the storage bag and
tools counterclockwise to
remove it.
Use the jack handle extensions and
the wheel wrench to remove the
underbody-mounted spare tire.
1. Spare Tire (Valve Stem Pointed Down)
2. Tire/Wheel Retainer
3. Hoist Cable 4. Hoist Assembly
5. Hoist Shaft
6. Jack Handle Extensions
7. Wheel Wrench
8. Spare Tire Lock (If
Equipped)
9. Hoist Shaft Access Hole
10. Hoist End of Extension Tool
1. Open the spare tire lock cover on the bumper and use the
ignition key to remove the
spare tire lock (8). To remove
the spare tire lock, insert the
ignition key, turn, and pull
straight out.
2. Assemble the wheel wrench (7)and the two jack handle
extensions (6), as shown.
Page 410 of 489

Chevrolet Silverado LD 1500 and Silverado 2500/3500 Owner Manual (GMNA-
Localizing-U.S./Canada-12162993) - 2019 - crc - 4/4/18
Vehicle Care 409
may not be able to get enough
power from a single battery in
another vehicle to start your
diesel engine. If your vehicle
has more than one battery,
using the battery that is closer
to the starter will reduce
electrical resistance. This is
located on the passenger side,
in the rear of the engine
compartment.
3. Get the vehicles close enough so the jumper cables can
reach, but be sure the vehicles
are not touching each other.
If they are, it could cause an
unwanted ground connection.
You would not be able to start
your vehicle, and the bad
grounding could damage the
electrical systems.
To avoid the possibility of the
vehicles rolling, set the parking
brake firmly on both vehicles
involved in the jump start
procedure. Put the automatic
transmission in P (Park) or a
manual transmission in Neutral
before setting the parking brake. If you have a
four-wheel-drive vehicle, be
sure the transfer case is in a
drive gear, not in N (Neutral).
Caution
If any accessories are left on or
plugged in during the jump
starting procedure, they could be
damaged. The repairs would not
be covered by the vehicle
warranty. Whenever possible, turn
off or unplug all accessories on
either vehicle when jump starting.
4. Turn the ignition off on both vehicles. Unplug unnecessary
accessories plugged into the
accessory power outlets. Turn
off the radio and all the lamps
that are not needed. This will
avoid sparks and help save
both batteries. And it could
save the radio! 5. Open the hood on the other
vehicle and locate the
positive (+) and negative (−)
terminal locations on that
vehicle.
The positive (+) terminal is
under a red plastic cover at the
positive battery post. To
uncover the positive (+)
terminal, open the red plastic
cover.
For more information on the
location of the remote
positive (+) and remote
negative (−) terminals, see
Engine Compartment Overview
0328.
{Warning
An electric fan can start up even
when the engine is not running
and can injure you. Keep hands,
clothing, and tools away from any
underhood electric fan.
Page 416 of 489
Chevrolet Silverado LD 1500 and Silverado 2500/3500 Owner Manual (GMNA-
Localizing-U.S./Canada-12162993) - 2019 - crc - 4/4/18
Vehicle Care 415
9. With a foot on the brake pedal,release the parking brake.
Keep the ignition key in the
towed vehicle in ACC/
ACCESSORY to prevent the
steering column from locking.
Disconnecting the Towed Vehicle
Before disconnecting the towed
vehicle: 1. Park on a level surface.
2. Set the parking brake, then shift the transmission to
P (Park), and move the ignition
key to OFF.
3. Connect the battery.
4. Apply the brake pedal.
5. Turn the ignition on with the engine off. Shift the transfer
case out of N (Neutral) to
Two-Wheel Drive High. See
“Shifting out of N (Neutral)”
under Four-Wheel Drive 0262.
See your dealer if the transfer
case cannot be shifted out of
N (Neutral). 6. Check that the vehicle is in
Two-Wheel Drive High by
shifting the transmission to
R (Reverse) and then to D
(Drive). There should be
movement of the vehicle while
shifting.
7. Shift the transmission to P (Park) and turn off the
ignition.
8. Disconnect the vehicle from the tow vehicle.
9. Release the parking brake.
10. Reset any lost presets. The outside temperature
display will default to 0 °C
(32 °F) but will reset with
normal usage.Dolly Towing
Front Towing (Front Wheels Off
the Ground) –Two-Wheel-Drive
Vehicles
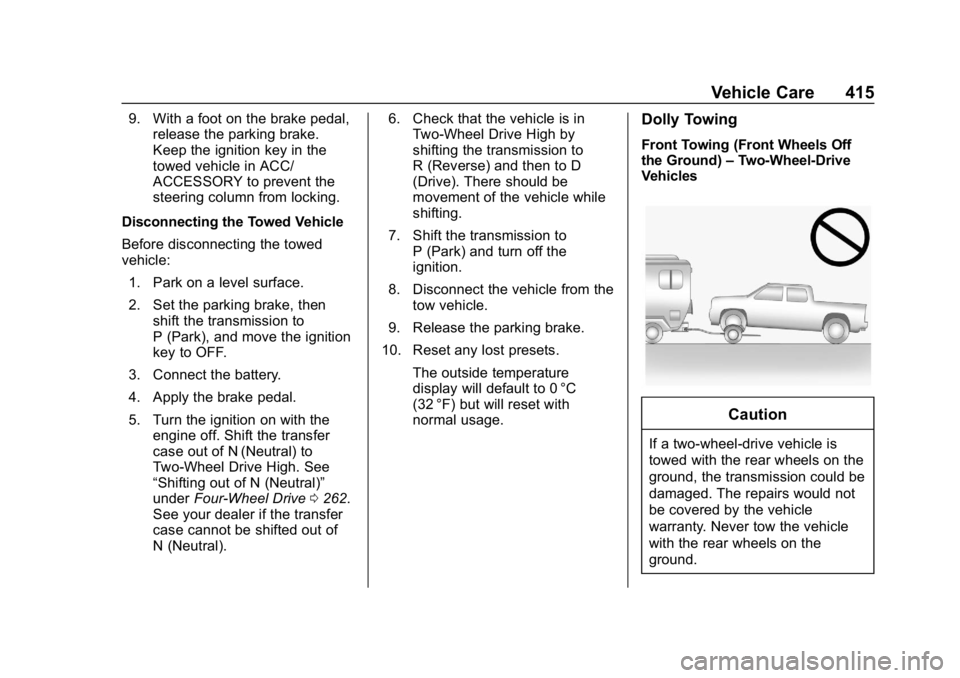
Caution
If a two-wheel-drive vehicle is
towed with the rear wheels on the
ground, the transmission could be
damaged. The repairs would not
be covered by the vehicle
warranty. Never tow the vehicle
with the rear wheels on the
ground.
Page 417 of 489
Chevrolet Silverado LD 1500 and Silverado 2500/3500 Owner Manual (GMNA-
Localizing-U.S./Canada-12162993) - 2019 - crc - 4/4/18
416 Vehicle Care
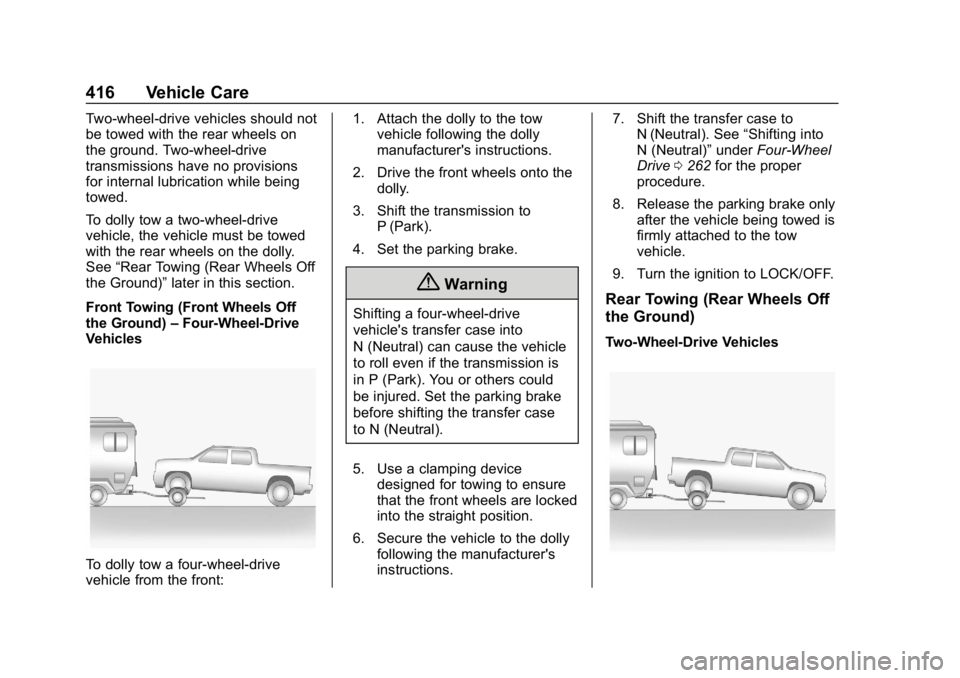
Two-wheel-drive vehicles should not
be towed with the rear wheels on
the ground. Two-wheel-drive
transmissions have no provisions
for internal lubrication while being
towed.
To dolly tow a two-wheel-drive
vehicle, the vehicle must be towed
with the rear wheels on the dolly.
See“Rear Towing (Rear Wheels Off
the Ground)” later in this section.
Front Towing (Front Wheels Off
the Ground) –Four-Wheel-Drive
Vehicles
To dolly tow a four-wheel-drive
vehicle from the front: 1. Attach the dolly to the tow
vehicle following the dolly
manufacturer's instructions.
2. Drive the front wheels onto the dolly.
3. Shift the transmission to P (Park).
4. Set the parking brake.
{Warning
Shifting a four-wheel-drive
vehicle's transfer case into
N (Neutral) can cause the vehicle
to roll even if the transmission is
in P (Park). You or others could
be injured. Set the parking brake
before shifting the transfer case
to N (Neutral).
5. Use a clamping device designed for towing to ensure
that the front wheels are locked
into the straight position.
6. Secure the vehicle to the dolly following the manufacturer's
instructions. 7. Shift the transfer case to
N (Neutral). See “Shifting into
N (Neutral)” underFour-Wheel
Drive 0262 for the proper
procedure.
8. Release the parking brake only after the vehicle being towed is
firmly attached to the tow
vehicle.
9. Turn the ignition to LOCK/OFF.Rear Towing (Rear Wheels Off
the Ground)
Two-Wheel-Drive Vehicles
Page 418 of 489
Chevrolet Silverado LD 1500 and Silverado 2500/3500 Owner Manual (GMNA-
Localizing-U.S./Canada-12162993) - 2019 - crc - 4/4/18
Vehicle Care 417
To dolly tow a two-wheel-drive
vehicle from the rear:1. Drive the rear wheels onto the dolly.
2. Set the parking brake. See Parking Brake 0271.
3. Put the transmission in P (Park).
4. Secure the vehicle to the dolly following the manufacturer's
instructions.
5. Use a clamping device designed for towing to ensure
that the front wheels are locked
into the straight position.
6. Turn the ignition to LOCK/OFF.
Four-Wheel-Drive Vehicles
{Warning
Shifting a four-wheel-drive
vehicle's transfer case into
N (Neutral) can cause the vehicle
to roll even if the transmission is
in P (Park). You or others could (Continued)
Warning (Continued)
be injured. Set the parking brake
before shifting the transfer case
to N (Neutral).
To dolly tow a four-wheel-drive
vehicle from the rear: 1. Drive the rear wheels onto the dolly.
2. Set the parking brake. See Parking Brake 0271.
3. Put the transmission in P (Park).
4. Secure the vehicle to the dolly following the manufacturer's
instructions.
5. Use a clamping device designed for towing to ensure
that the front wheels are locked
into the straight position.
6. Shift the transfer case to N (Neutral). See “Shifting into
N (Neutral)” underFour-Wheel
Drive 0262 for the proper
procedure. 7. Turn the ignition to LOCK/OFF.
Page 432 of 489

Chevrolet Silverado LD 1500 and Silverado 2500/3500 Owner Manual (GMNA-
Localizing-U.S./Canada-12162993) - 2019 - crc - 4/4/18
Service and Maintenance 431
Tire Rotation and Required
Services Every 12 000 km/
7,500 mi
Rotate the tires, if recommended for
the vehicle, and perform the
following services. SeeTire
Rotation 0386.
. Check engine oil level and oil
life percentage. If needed,
change engine oil and filter, and
reset oil life system.
See Engine Oil 0331 and
Engine Oil Life System 0333.
. Check engine coolant level. See
Cooling System 0339.
. Check windshield washer fluid
level. See Washer Fluid 0346.
. Check tire inflation pressures,
including the spare. See Tire
Pressure 0378.
. Inspect tire wear. See Tire
Inspection 0385.
. Visually check for fluid leaks.
. Inspect engine air cleaner filter.
See Engine Air Cleaner/Filter
0 338. .
Inspect brake system. See
Exterior Care 0418.
. Visually inspect steering,
suspension, and chassis
components for damage,
including cracks or tears in the
rubber boots, loose or missing
parts, or signs of wear at least
once a year. See Exterior Care
0 418. Lubricate the suspension
and steering components at
least every other oil change.
(If equipped with grease fittings)
. Inspect power steering for
proper attachment, connections,
binding, leaks, cracks,
chafing, etc.
. Visually inspect halfshafts and
drive shafts for excessive wear,
lubricant leaks, and/or damage
including: tube dents or cracks,
constant velocity joint or
universal joint looseness,
cracked or missing boots, loose
or missing boot clamps, center
bearing excessive looseness,
loose or missing fasteners, and
axle seal leaks. .
Check restraint system
components. See Safety System
Check 074.
. Visually inspect fuel system for
damage or leaks.
. Visually inspect exhaust system
and nearby heat shields for
loose or damaged parts.
. Lubricate body components. See
Exterior Care 0418.
. Check starter switch. See Starter
Switch Check 0354.
. Check automatic transmission
shift lock control function. See
Automatic Transmission Shift
Lock Control Function Check
0354.
. Check ignition transmission lock.
See Ignition Transmission Lock
Check 0354.
. Check parking brake and
automatic transmission park
mechanism. See Park Brake and
P (Park) Mechanism Check
0 354.
Page 466 of 489
Chevrolet Silverado LD 1500 and Silverado 2500/3500 Owner Manual (GMNA-
Localizing-U.S./Canada-12162993) - 2019 - crc - 4/4/18
OnStar 465
Security
If equipped, OnStar provides these
services:
.With Stolen Vehicle Assistance,
OnStar Advisors can use GPS to
pinpoint the vehicle and help
authorities quickly recover it.
. With Remote Ignition Block,
if equipped, OnStar can block
the engine from being restarted.
. With Stolen Vehicle Slowdown,
if equipped, OnStar can work
with law enforcement to
gradually slow the vehicle down.
Theft Alarm Notification
If equipped, if the doors are locked
and the vehicle alarm sounds, a
notification by text, e-mail, or phone
call will be sent. If the vehicle is
stolen, an OnStar Advisor can work
with authorities to recover the
vehicle.
OnStar Additional
Information
In-Vehicle Audio Messages
Audio messages may play important
information at the following times:
.Prior to vehicle purchase. Press
Qto set up an account.
. After change in ownership and
at 90 days.
Transferring Service
PressQto request account transfer
eligibility information. The Advisor
can cancel or change account
information.
Selling/Transferring the
Vehicle
Call 1-888-4ONSTAR
(1-888-466-7827) immediately to
terminate your OnStar or connected
services if the vehicle is disposed
of, sold, transferred, or if the
lease ends.
Reactivation for Subsequent
Owners
PressQand follow the prompts to
speak to an Advisor as soon as
possible. The Advisor will update
vehicle records and explain OnStar
or connected service options.
How OnStar Service Works
Automatic Crash Response,
Emergency Services, Crisis Assist,
Stolen Vehicle Assistance, Remote
Services, Roadside Assistance, and
Hands-Free Calling are available on
most vehicles. Not all OnStar
services are available everywhere
or on all vehicles. For more
information, a full description of
OnStar services, system limitations,
and OnStar User Terms, Privacy
Statement, and Software Terms:
. Call 1-888-4ONSTAR
(1-888-466-7827).
. See www.onstar.com (U.S.).
. See www.onstar.ca (Canada).
. Call TTY 1-877-248-2080.