2019 CHEVROLET MALIBU tow
[x] Cancel search: towPage 298 of 382
Chevrolet Malibu Owner Manual (GMNA-Localizing-U.S./Canada/Mexico-
12461813) - 2019 - crc - 12/11/18
298 Vehicle Care
Caution (Continued)
inner sidewall. Use chains that
are the proper size for the tires.
Install them on the tires of the
front axle. Don't use chains on the
tires of the rear axle. Tighten
them as tightly as possible with
the ends securely fastened. Drive
slowly and follow the chain
manufacturer's instructions. If the
chains contact the vehicle, stop
and retighten them. If the contact
continues, slow down until it
stops. Driving too fast or spinning
the wheels with chains on will
damage the vehicle.
If a Tire Goes Flat
It is unusual for a tire to blow out
while driving, especially if the tires
are maintained properly. SeeTires
0276. If air goes out of a tire, it is
much more likely to leak out slowly.
But if there is ever a blowout, here
are a few tips about what to expect
and what to do:If a front tire fails, the flat tire
creates a drag that pulls the vehicle
toward that side. Take your foot off
the accelerator pedal and grip the
steering wheel firmly. Steer to
maintain lane position, and then
gently brake to a stop, well off the
road, if possible.
A rear blowout, particularly on a
curve, acts much like a skid and
may require the same correction as
used in a skid. Stop pressing the
accelerator pedal and steer to
straighten the vehicle. It may be
very bumpy and noisy. Gently brake
to a stop, well off the road,
if possible.
{Warning
Driving on a flat tire will cause
permanent damage to the tire.
Re-inflating a tire after it has been
driven on while severely
underinflated or flat may cause a
blowout and a serious crash.
Never attempt to re-inflate a tire
(Continued)
Warning (Continued)
that has been driven on while
severely underinflated or flat.
Have your dealer or an authorized
tire service center repair or
replace the flat tire as soon as
possible.
{Warning
Lifting a vehicle and getting under
it to do maintenance or repairs is
dangerous without the
appropriate safety equipment and
training. If a jack is provided with
the vehicle, it is designed only for
changing a flat tire. If it is used for
anything else, you or others could
be badly injured or killed if the
vehicle slips off the jack. If a jack
is provided with the vehicle, only
use it for changing a flat tire.
Page 306 of 382
Chevrolet Malibu Owner Manual (GMNA-Localizing-U.S./Canada/Mexico-
12461813) - 2019 - crc - 12/11/18
306 Vehicle Care
12. Turn the air only hose (10)
counterclockwise to remove it
from the tire valve stem.
13. Replace the tire valve
stem cap.
14. Return the air only hose (10)
and power plug (9) back to
their original storage location.
15. Return the equipment to its
original storage location in the
vehicle.
The tire sealant and compressor kit
has accessory adapters located in a
compartment on the bottom of its
housing that can be used to inflate
air mattresses, balls, etc.
Storing the Tire Sealant
and Compressor Kit
To access the tire sealant and
compressor kit:
1. Open the trunk. SeeTrunk
043.
2. Lift the cover.
3. Turn the wing nut
counterclockwise to remove the
tire sealant and compressor
kit bag.
4. Remove the tire sealant and
compressor kit from the bag.
To store the tire sealant and
compressor kit, reverse the steps.
Tire Changing
Removing the Spare Tire and
Tools
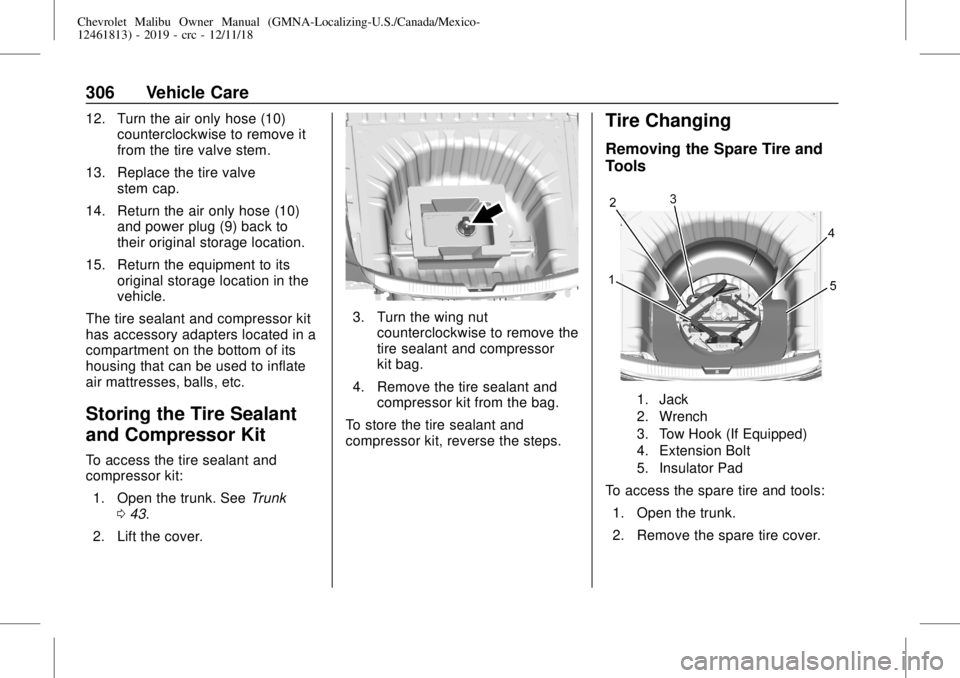
1. Jack
2. Wrench
3. Tow Hook (If Equipped)
4. Extension Bolt
5. Insulator Pad
To access the spare tire and tools:
1. Open the trunk.
2. Remove the spare tire cover.
Page 309 of 382

Chevrolet Malibu Owner Manual (GMNA-Localizing-U.S./Canada/Mexico-
12461813) - 2019 - crc - 12/11/18
Vehicle Care 309
11. Remove all of the wheel nuts.
12. Remove the flat tire.
{Warning
Rust or dirt on a wheel, or on the
parts to which it is fastened, can
make wheel nuts become loose
after time. The wheel could come
off and cause a crash. When
changing a wheel, remove any
rust or dirt from places where the
wheel attaches to the vehicle. In
an emergency, a cloth or a paper
(Continued)
Warning (Continued)
towel can be used; however, use
a scraper or wire brush later to
remove all rust or dirt.
13. Remove any rust or dirt from
the wheel bolts, mounting
surfaces, and spare wheel.
14. Place the compact spare tire
on the wheel-mounting surface.
{Warning
Never use oil or grease on bolts
or nuts because the nuts might
come loose. The vehicle's wheel
could fall off, causing a crash.
15. Reinstall the wheel nuts.
Tighten each nut by hand until
the wheel is held against
the hub.
16. Lower the vehicle by turning
the jack handle
counterclockwise.
{Warning
Wheel nuts that are improperly or
incorrectly tightened can cause
the wheels to become loose or
come off. The wheel nuts should
be tightened with a torque wrench
to the proper torque specification
after replacing. Follow the torque
specification supplied by the
aftermarket manufacturer when
(Continued)
Page 311 of 382
Chevrolet Malibu Owner Manual (GMNA-Localizing-U.S./Canada/Mexico-
12461813) - 2019 - crc - 12/11/18
Vehicle Care 311
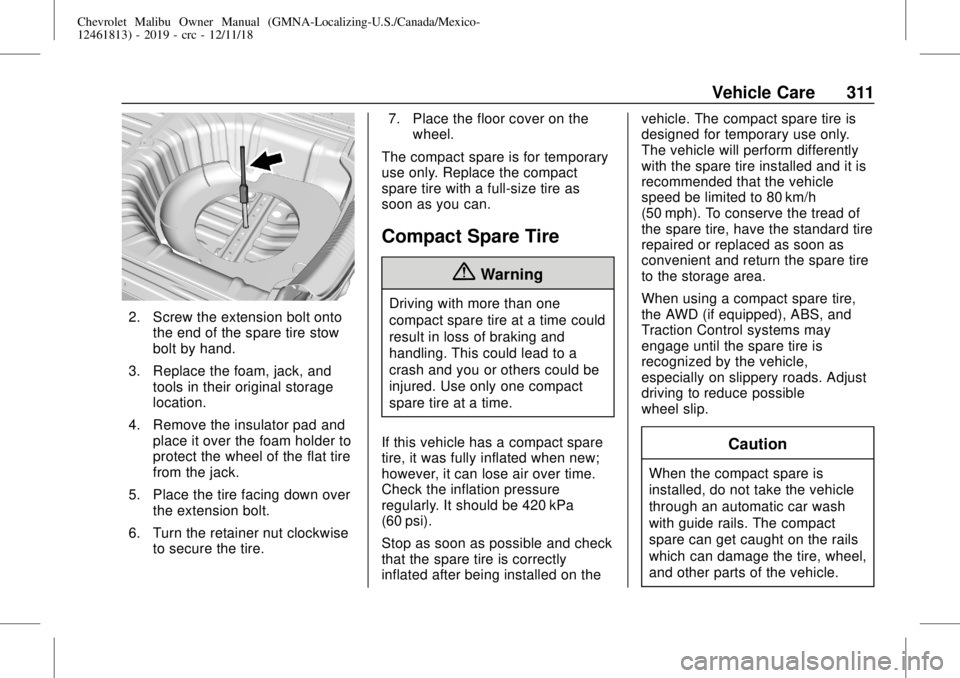
2. Screw the extension bolt onto
the end of the spare tire stow
bolt by hand.
3. Replace the foam, jack, and
tools in their original storage
location.
4. Remove the insulator pad and
place it over the foam holder to
protect the wheel of the flat tire
from the jack.
5. Place the tire facing down over
the extension bolt.
6. Turn the retainer nut clockwise
to secure the tire.7. Place the floor cover on the
wheel.
The compact spare is for temporary
use only. Replace the compact
spare tire with a full-size tire as
soon as you can.
Compact Spare Tire
{Warning
Driving with more than one
compact spare tire at a time could
result in loss of braking and
handling. This could lead to a
crash and you or others could be
injured. Use only one compact
spare tire at a time.
If this vehicle has a compact spare
tire, it was fully inflated when new;
however, it can lose air over time.
Check the inflation pressure
regularly. It should be 420 kPa
(60 psi).
Stop as soon as possible and check
that the spare tire is correctly
inflated after being installed on thevehicle. The compact spare tire is
designed for temporary use only.
The vehicle will perform differently
with the spare tire installed and it is
recommended that the vehicle
speed be limited to 80 km/h
(50 mph). To conserve the tread of
the spare tire, have the standard tire
repaired or replaced as soon as
convenient and return the spare tire
to the storage area.
When using a compact spare tire,
the AWD (if equipped), ABS, and
Traction Control systems may
engage until the spare tire is
recognized by the vehicle,
especially on slippery roads. Adjust
driving to reduce possible
wheel slip.
Caution
When the compact spare is
installed, do not take the vehicle
through an automatic car wash
with guide rails. The compact
spare can get caught on the rails
which can damage the tire, wheel,
and other parts of the vehicle.
Page 313 of 382

Chevrolet Malibu Owner Manual (GMNA-Localizing-U.S./Canada/Mexico-
12461813) - 2019 - crc - 12/11/18
Vehicle Care 313
Caution
Ignoring these steps could result
in costly damage to the vehicle
that would not be covered by the
vehicle warranty. Trying to start
the vehicle by pushing or pulling it
will not work, and it could damage
the vehicle.
1.5L L4 Engine Shown, 2.0L L4
Engine Similar
1. Discharged Battery Remote
Positive Terminal2. Discharged Battery Remote
Negative Terminal
3. Good Battery Remote
Negative Terminal
4. Good Battery Remote
Positive Terminal
1.8L Hybrid L4 Engine
1. Discharged Battery Remote
Positive Terminal
2. Discharged Battery Remote
Negative Terminal
3. Good Battery Remote
Negative Terminal
4. Good Battery Remote
Positive Terminal
The vehicle has a remote
positive (+) terminal under a trim
cover. It is under the cover of the
engine compartment fuse block on
the driver side of the engine
compartment. SeeEngine
Compartment Overview0237. You
should always use this remote
positive (+) terminal.
The jump start negative ground
terminal for the discharged battery
is on the shock tower on the driver
side of the engine compartment.
1. Check the other vehicle.
It must have a 12-volt battery
with a negative ground system.
Caution
If the other vehicle does not have
a 12-volt system with a negative
ground, both vehicles can be
damaged. Only use a vehicle that
has a 12-volt system with a
negative ground for jump starting.
2. Position the two vehicles so
that they are not touching.
Page 315 of 382
Chevrolet Malibu Owner Manual (GMNA-Localizing-U.S./Canada/Mexico-
12461813) - 2019 - crc - 12/11/18
Vehicle Care 315
10. Start the vehicle with the good
battery and run the engine at
idle speed for at least
four minutes.
11. Try to start the vehicle that had
the dead battery. If it will not
start after a few tries, it
probably needs service.
For hybrid vehicles, the engine will
only start if needed after pressing
ENGINE START/STOP. The vehicle
ready light will come on when the
propulsion system is on and ready.
In cold temperatures, the engine will
not run with the hood open. Close
the hood.
Caution
For hybrid vehicles, repeatedly
trying to start the vehicle can
drain and damage the high
voltage battery, requiring
replacement. This would not be
covered by the vehicle warranty.
Caution
If the jumper cables are
connected or removed in the
wrong order, electrical shorting
may occur and damage the
vehicle. The repairs would not be
covered by the vehicle warranty.
Always connect and remove the
jumper cables in the correct order,
making sure that the cables do
not touch each other or other
metal.
Jumper Cable Removal
Reverse the sequence exactly when
removing the jumper cables.
After starting the disabled vehicle
and removing the jumper cables,
allow it to idle for several minutes.
Towing the Vehicle
Caution
Incorrectly towing a disabled
vehicle may cause damage. The
damage would not be covered by
the vehicle warranty. Do not lash
or hook to suspension
components. Use the proper
straps around the tires to secure
the vehicle. Do not drag a locked
wheel/tire while loading the
vehicle. Do not use a sling type
lift to tow the vehicle. This could
damage the vehicle.
GM recommends a flatbed tow truck
to transport a disabled vehicle. Use
ramps to help reduce approach
angles, if necessary. A towed
vehicle should have its drive wheels
off the ground. Contact Roadside
Assistance or a professional towing
service if the disabled vehicle must
be towed.
Page 316 of 382

Chevrolet Malibu Owner Manual (GMNA-Localizing-U.S./Canada/Mexico-
12461813) - 2019 - crc - 12/11/18
316 Vehicle Care
Front Attachment Points
The vehicle is equipped with
specific attachment points to be
used by the towing provider. These
holes may be used to pull the
vehicle from a flat road surface onto
the flatbed tow truck.
Recreational Vehicle
Towing
Recreational vehicle towing means
towing the vehicle behind another
vehicle–such as behind a motor
home. The two most common types
of recreational vehicle towing areknown as dinghy towing and dolly
towing. Dinghy towing is towing the
vehicle with all four wheels on the
ground. Dolly towing is towing the
vehicle with two wheels on the
ground and two wheels up on a
device known as a dolly.
Here are some important things to
consider before recreational vehicle
towing:
.
Before towing the vehicle,
become familiar with the local
laws that apply to recreational
vehicle towing. These laws may
vary by region.
.
What is the towing capacity of
the towing vehicle? Be sure to
read the tow vehicle
manufacturer's
recommendations.
.
How far will the vehicle be
towed? Some vehicles have
restrictions on how far and how
long they can tow.
.
Does the vehicle have the
proper towing equipment? See
your dealer or traileringprofessional for additional advice
and equipment
recommendations.
.
Is the vehicle ready to be
towed? Just as preparing the
vehicle for a long trip, make sure
the vehicle is prepared to be
towed.
Dinghy Towing
Page 317 of 382
Chevrolet Malibu Owner Manual (GMNA-Localizing-U.S./Canada/Mexico-
12461813) - 2019 - crc - 12/11/18
Vehicle Care 317
Caution
If the vehicle is towed with all four
wheels on the ground, the drive
unit could be damaged. Repairs
would not be covered by the
vehicle warranty. Do not tow the
vehicle with all four wheels on the
ground.
This vehicle is not designed to be
towed with all four wheels on the
ground.
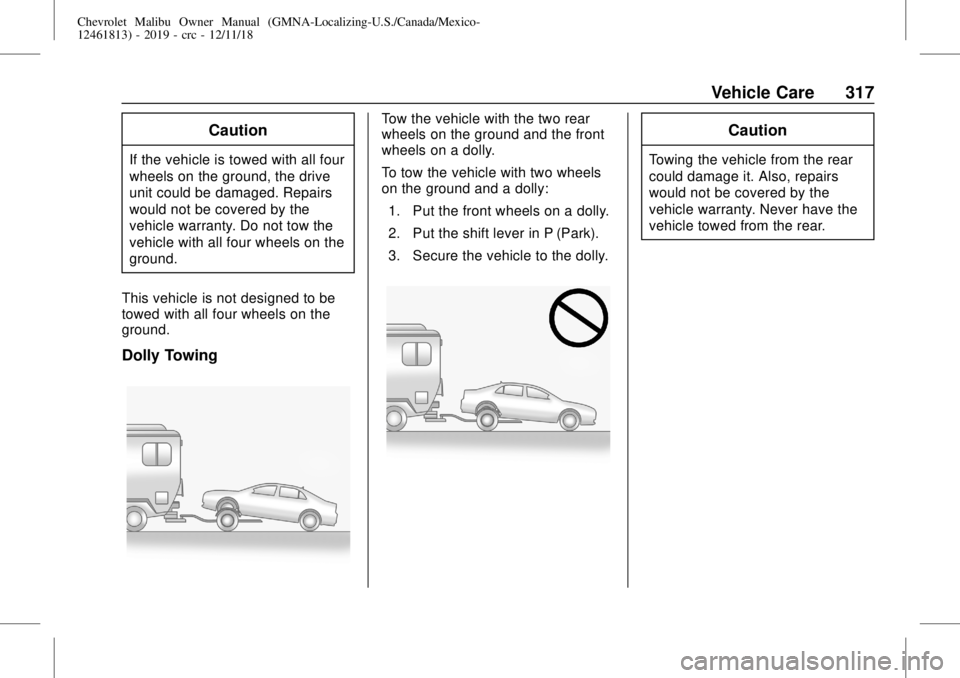
Dolly Towing
Tow the vehicle with the two rear
wheels on the ground and the front
wheels on a dolly.
To tow the vehicle with two wheels
on the ground and a dolly:
1. Put the front wheels on a dolly.
2. Put the shift lever in P (Park).
3. Secure the vehicle to the dolly.Caution
Towing the vehicle from the rear
could damage it. Also, repairs
would not be covered by the
vehicle warranty. Never have the
vehicle towed from the rear.