2019 CHEVROLET MALIBU tow
[x] Cancel search: towPage 230 of 382

Chevrolet Malibu Owner Manual (GMNA-Localizing-U.S./Canada/Mexico-
12461813) - 2019 - crc - 12/11/18
230 Driving and Operating
State or local regulations may
require trailers to have their own
braking system if the loaded weight
of the trailer exceeds certain
minimums that can vary from state
to state. Read and follow the
instructions for the trailer brakes so
they are installed, adjusted, and
maintained properly. Never attempt
to tap into your vehicle's hydraulic
brake system. If you do, both the
vehicle anti-lock brakes and the
trailer brakes may not function,
which could result in a crash.
Trailer Lamps
Always check all trailer lamps are
working at the beginning of each
trip, and periodically on longer trips.
Turn Signals When Towing a
Trailer
When properly connected, the trailer
turn signals will illuminate to indicate
the vehicle is turning, changing
lanes, or stopping. When towing a
trailer, the arrows on the instrument
cluster will illuminate even if the
trailer is not properly connected or
the bulbs are burned out.
Trailer Tires
Special Trailer (ST) tires differ from
vehicle tires. Trailer tires are
designed with stiff sidewalls to help
prevent sway and to support heavy
loads. These features can make it
difficult to determine if the trailer tire
pressures are low only based on a
visual inspection.
Always check all trailer tire
pressures before each trip when the
tires are cool. Low trailer tire
pressure is a leading cause of trailer
tire blow-outs.
Trailer tires deteriorate over time.
The trailer tire sidewall will show the
week and year the tire was
manufactured. Many trailer tire
manufacturers recommend
replacing tires more than six
years old.
Overloading is another leading
cause of trailer tire blow-outs. Never
load your trailer with more weight
than the tires are designed to
support. The load rating is located
on the trailer tire sidewall.Always know the maximum speed
rating for the trailer tires before
driving. This may be significantly
lower than the vehicle tire speed
rating. The speed rating may be on
the trailer tire sidewall. If the speed
rating is not shown, the default
trailer tire speed rating is 105 km/h
(65 mph).
Page 233 of 382

Chevrolet Malibu Owner Manual (GMNA-Localizing-U.S./Canada/Mexico-
12461813) - 2019 - crc - 12/11/18
Vehicle Care 233
When It Is Time for New
Tires . . . . . . . . . . . . . . . . . . . . . . . . 292
Buying New Tires . . . . . . . . . . . . . 293
Different Size Tires and
Wheels . . . . . . . . . . . . . . . . . . . . . . 294
Uniform Tire Quality
Grading . . . . . . . . . . . . . . . . . . . . . 294
Wheel Alignment and Tire
Balance . . . . . . . . . . . . . . . . . . . . . 296
Wheel Replacement . . . . . . . . . . 296
Tire Chains . . . . . . . . . . . . . . . . . . . 297
If a Tire Goes Flat . . . . . . . . . . . . 298
Tire Sealant and
Compressor Kit . . . . . . . . . . . . . 299
Storing the Tire Sealant and
Compressor Kit . . . . . . . . . . . . . 306
Tire Changing . . . . . . . . . . . . . . . . 306
Compact Spare Tire . . . . . . . . . . 311
Jump Starting
Jump Starting - North
America . . . . . . . . . . . . . . . . . . . . . 312
Towing the Vehicle
Towing the Vehicle . . . . . . . . . . . 315
Recreational Vehicle
Towing . . . . . . . . . . . . . . . . . . . . . . 316
Appearance Care
Exterior Care . . . . . . . . . . . . . . . . . 318
Interior Care . . . . . . . . . . . . . . . . . . 322
Floor Mats . . . . . . . . . . . . . . . . . . . . 326General Information
For service and parts needs, visit
your dealer. You will receive
genuine GM parts and GM-trained
and supported service people.
Genuine GM parts have one of
these marks:
Page 235 of 382
Chevrolet Malibu Owner Manual (GMNA-Localizing-U.S./Canada/Mexico-
12461813) - 2019 - crc - 12/11/18
Vehicle Care 235
Vehicle Checks
Doing Your Own
Service Work
{Warning
It can be dangerous to work on
your vehicle if you do not have
the proper knowledge, service
manual, tools, or parts. Always
follow owner’s manual procedures
and consult the service manual
for your vehicle before doing any
service work.
If doing some of your own service
work, use the proper service
manual. It tells you much more
about how to service the vehicle
than this manual can. To order the
proper service manual, see
Publication Ordering Information
0355.
This vehicle has an airbag system.
Before attempting to do your own
service work, seeServicing the
Airbag-Equipped Vehicle084.If equipped with remote vehicle
start, open the hood before
performing any service work to
prevent remote starting the vehicle
accidentally. SeeRemote Vehicle
Start037.
Keep a record with all parts receipts
and list the mileage and the date of
any service work performed. See
Maintenance Records0341.
Caution
Even small amounts of
contamination can cause damage
to vehicle systems. Do not allow
contaminants to contact the fluids,
reservoir caps, or dipsticks.
Hood
To open the hood:
1. Pull the hood release handle
with this symbol on it. It is
inside the vehicle to the left of
the steering column.
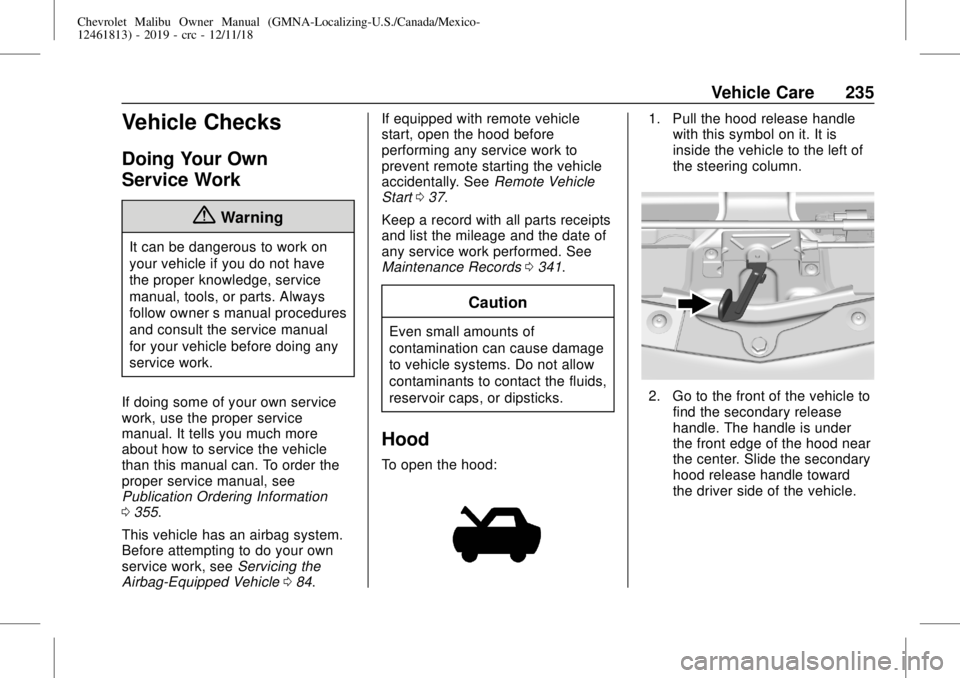
2. Go to the front of the vehicle to
find the secondary release
handle. The handle is under
the front edge of the hood near
the center. Slide the secondary
hood release handle toward
the driver side of the vehicle.
Page 242 of 382
Chevrolet Malibu Owner Manual (GMNA-Localizing-U.S./Canada/Mexico-
12461813) - 2019 - crc - 12/11/18
242 Vehicle Care
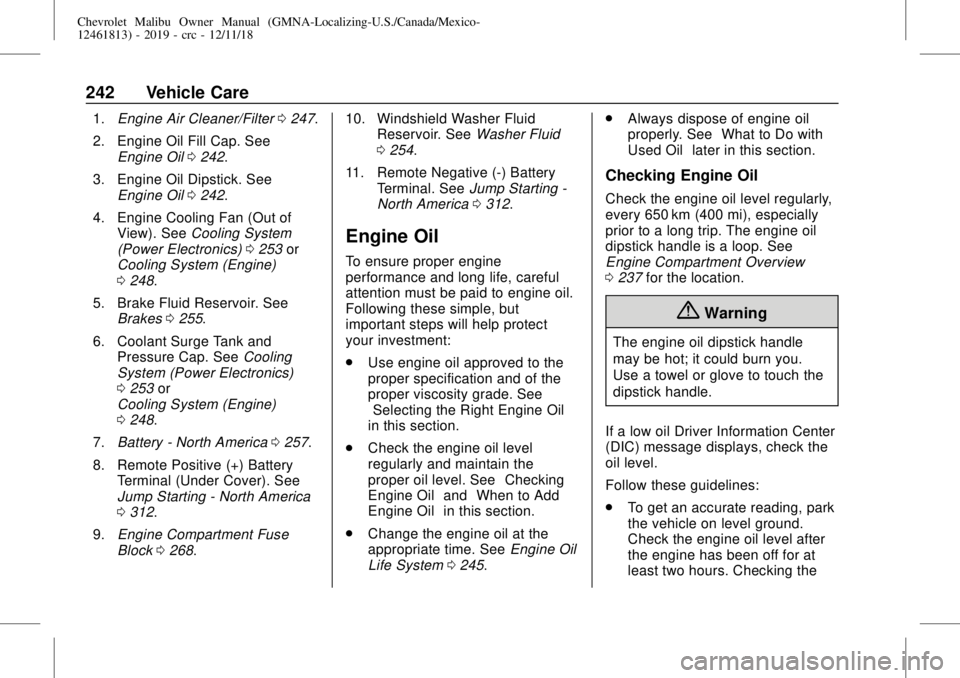
1.Engine Air Cleaner/Filter0247.
2. Engine Oil Fill Cap. See
Engine Oil0242.
3. Engine Oil Dipstick. See
Engine Oil0242.
4. Engine Cooling Fan (Out of
View). SeeCooling System
(Power Electronics)0253or
Cooling System (Engine)
0248.
5. Brake Fluid Reservoir. See
Brakes0255.
6. Coolant Surge Tank and
Pressure Cap. SeeCooling
System (Power Electronics)
0253or
Cooling System (Engine)
0248.
7.Battery - North America0257.
8. Remote Positive (+) Battery
Terminal (Under Cover). See
Jump Starting - North America
0312.
9.Engine Compartment Fuse
Block0268.10. Windshield Washer Fluid
Reservoir. SeeWasher Fluid
0254.
11. Remote Negative (-) Battery
Terminal. SeeJump Starting -
North America0312.
Engine Oil
To ensure proper engine
performance and long life, careful
attention must be paid to engine oil.
Following these simple, but
important steps will help protect
your investment:
.
Use engine oil approved to the
proper specification and of the
proper viscosity grade. See
“Selecting the Right Engine Oil”
in this section.
.
Check the engine oil level
regularly and maintain the
proper oil level. See“Checking
Engine Oil”and“When to Add
Engine Oil”in this section.
.
Change the engine oil at the
appropriate time. SeeEngine Oil
Life System0245..
Always dispose of engine oil
properly. See“What to Do with
Used Oil”later in this section.
Checking Engine Oil
Check the engine oil level regularly,
every 650 km (400 mi), especially
prior to a long trip. The engine oil
dipstick handle is a loop. See
Engine Compartment Overview
0237for the location.
{Warning
The engine oil dipstick handle
may be hot; it could burn you.
Use a towel or glove to touch the
dipstick handle.
If a low oil Driver Information Center
(DIC) message displays, check the
oil level.
Follow these guidelines:
.
To get an accurate reading, park
the vehicle on level ground.
Check the engine oil level after
the engine has been off for at
least two hours. Checking the
Page 243 of 382

Chevrolet Malibu Owner Manual (GMNA-Localizing-U.S./Canada/Mexico-
12461813) - 2019 - crc - 12/11/18
Vehicle Care 243
engine oil level on steep grades
or too soon after engine shutoff
can result in incorrect readings.
Accuracy improves when
checking a cold engine prior to
starting. Remove the dipstick
and check the level.
.
If unable to wait two hours, the
engine must be off for at least
15 minutes if the engine is
warm, or at least 30 minutes if
the engine is not warm. Pull out
the dipstick, wipe it with a clean
paper towel or cloth, then push it
back in all the way. Remove it
again, keeping the tip down, and
check the level.When to Add Engine Oil
1.5L L4 Turbo Engine
1.8L L4 Hybrid Engine
2.0L L4 Turbo Engine
If the oil is below the cross-hatched
area at the tip of the dipstick and
the engine has been off for at least
15 minutes, add 1 L (1 qt) of the
recommended oil and then recheck
the level. See“Selecting the Right
Engine Oil”later in this section for
an explanation of what kind of oil to
use. For engine oil crankcase
capacity, seeCapacities and
Specifications0343.
Caution
Do not add too much oil. Oil
levels above or below the
acceptable operating range
shown on the dipstick are harmful
to the engine. If you find that you
have an oil level above the
(Continued)
Page 261 of 382
Chevrolet Malibu Owner Manual (GMNA-Localizing-U.S./Canada/Mexico-
12461813) - 2019 - crc - 12/11/18
Vehicle Care 261
Park on a fairly steep hill, with the
vehicle facing downhill. Keeping
your foot on the regular brake, set
the parking brake.
.
To check the parking brake's
holding ability: With the engine
running and the transmission in
N (Neutral), slowly remove foot
pressure from the regular brake
pedal. Do this until the vehicle is
held by the parking brake only.
.
To check the P (Park)
mechanism's holding ability:
With the engine running, shift to
P (Park). Then release the
parking brake followed by the
regular brake.
Contact your dealer if service is
required.
Wiper Blade Replacement
Windshield wiper blades should be
inspected for wear or cracking.
It is a good idea to clean the wiper
blade assembly on a regular basis.
When worn, or when cleaning is
ineffective, replace the wiper blade.For proper windshield wiper blade
length and type, seeMaintenance
Replacement Parts0339.
Caution
Allowing the wiper arm to touch
the windshield when no wiper
blade is installed could damage
the windshield. Any damage that
occurs would not be covered by
the vehicle warranty. Do not allow
the wiper arm to touch the
windshield.
To replace the wiper blade:
1. Pull the wiper assembly away
from the windshield.
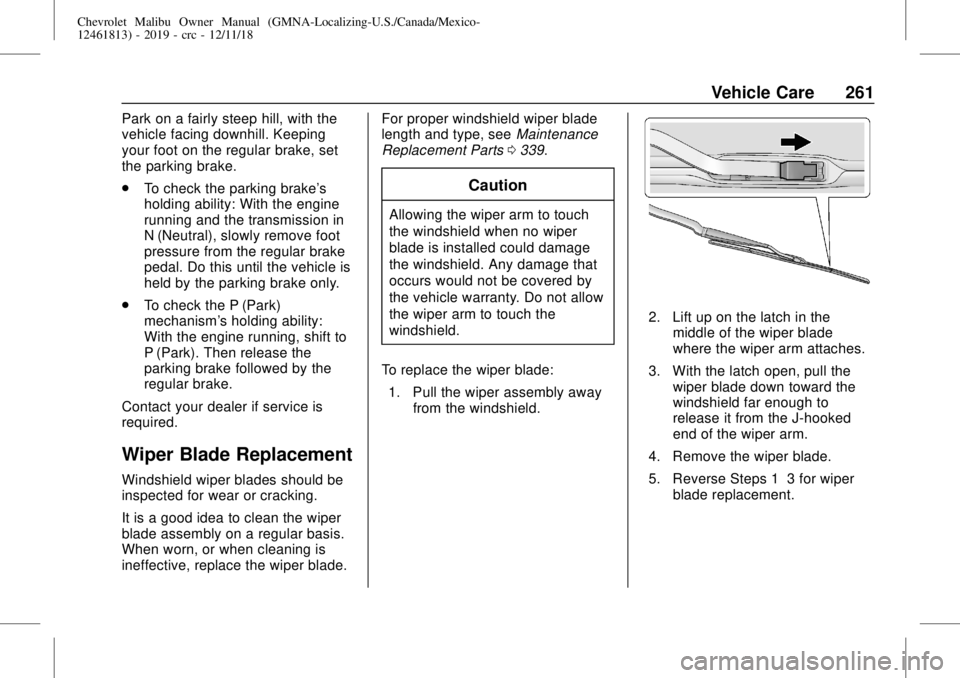
2. Lift up on the latch in the
middle of the wiper blade
where the wiper arm attaches.
3. With the latch open, pull the
wiper blade down toward the
windshield far enough to
release it from the J-hooked
end of the wiper arm.
4. Remove the wiper blade.
5. Reverse Steps 1–3 for wiper
blade replacement.
Page 266 of 382
Chevrolet Malibu Owner Manual (GMNA-Localizing-U.S./Canada/Mexico-
12461813) - 2019 - crc - 12/11/18
266 Vehicle Care
Taillamps, Turn Signal,
Stoplamps, and Back-Up
Lamps (LT and Premier)
Caution
Improper lamp assembly removal
and installation can cause leaks
and water intrusion which may
cause damage to the taillamp. Do
not remove the taillamp assembly
to replace a bulb. Use the trunk
opening to access the bulb.
The stoplamp/taillamp and trunk
deck inboard taillamp are LEDs. To
replace, see your dealer.
Back-Up Lamp
1. Open the trunk. SeeTrunk
043.
2. Remove the push pins and pull
back the trunk deck trim.
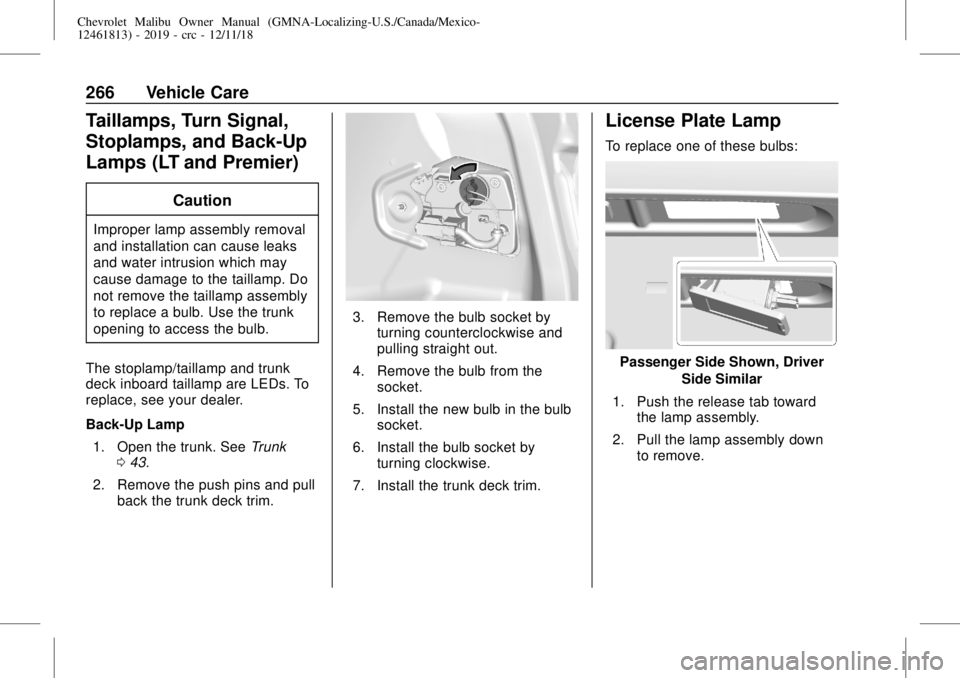
3. Remove the bulb socket by
turning counterclockwise and
pulling straight out.
4. Remove the bulb from the
socket.
5. Install the new bulb in the bulb
socket.
6. Install the bulb socket by
turning clockwise.
7. Install the trunk deck trim.
License Plate Lamp
To replace one of these bulbs:
Passenger Side Shown, Driver
Side Similar
1. Push the release tab toward
the lamp assembly.
2. Pull the lamp assembly down
to remove.
Page 292 of 382

Chevrolet Malibu Owner Manual (GMNA-Localizing-U.S./Canada/Mexico-
12461813) - 2019 - crc - 12/11/18
292 Vehicle Care
Check that all wheel nuts are
properly tightened. See“Wheel
Nut Torque”underCapacities
and Specifications0343.
{Warning
Rust or dirt on a wheel, or on the
parts to which it is fastened, can
make wheel nuts become loose
after time. The wheel could come
off and cause a crash. When
changing a wheel, remove any
rust or dirt from places where the
wheel attaches to the vehicle. In
an emergency, a cloth or a paper
towel can be used; however, use
a scraper or wire brush later to
remove all rust or dirt.
Lightly coat the center of the
wheel hub with wheel bearing
grease after a wheel change or
tire rotation to prevent corrosion
or rust build-up. Do not get
grease on the flat wheel
mounting surface or on the
wheel nuts or bolts.
When It Is Time for New
Tires
Factors such as maintenance,
temperatures, driving speeds,
vehicle loading, and road conditions
affect the wear rate of the tires.
Treadwear indicators are one way to
tell when it is time for new tires.
Treadwear indicators appear when
the tires have only 1.6 mm (1/16 in)
or less of tread remaining. SeeTire
Inspection0291and
Tire Rotation0291.The rubber in tires ages over time.
This also applies to the spare tire,
if the vehicle has one, even if it is
never used. Multiple factors
including temperatures, loading
conditions, and inflation pressure
maintenance affect how fast aging
takes place. GM recommends that
tires, including the spare if
equipped, be replaced after six
years, regardless of tread wear. The
tire manufacture date is the last four
digits of the DOT Tire Identification
Number (TIN) which is molded into
one side of the tire sidewall. The
first two digits represent the week
(01–52) and the last two digits, the
year. For example, the third week of
the year 2010 would have a
four-digit DOT date of 0310.Vehicle Storage
Tires age when stored normally
mounted on a parked vehicle. Park
a vehicle that will be stored for at
least a month in a cool, dry, clean
area away from direct sunlight to
slow aging. This area should be free