Page 1 of 16
2019 CORVETTE
GETTING TO KNOW YOUR
chevrolet.com
Review this Quick Reference Guide for an overview of some important feat\
ures in your Chevrolet Corvette. Some optional equipment described in this guide may \
not be included in your vehicle. More information can be found in your Owner’s Manual and at \
my.chevrolet.com/learn. For easy reference, keep this guide with your Owner’s Manual in your \
glove box.
Certain restrictions, precautions, and safety procedures apply to your v\
ehicle. Please read your Owner’s Manual for complete instructions.
Page 2 of 16
2
Turn Signal Lever/ Exterior Lamps Control
Engine Start/Stop Button
INSTRUMENT PANEL
Stability Control Off
Low Tire Pressure
Brake System
Antilock Brake System
Stability Control Active
Door Ajar
Cruise Control Set
BRAKE Electric Parking Brake Set
Charging System
Oil Pressure
Engine Coolant Temperature
Tilt/Telescopic Steering Wheel Control
Audio Next/Previous Favorite Station Controls
Interior Lighting Control
Head-Up Display ControlsFWindshield Wipers Lever
Trunk/Hatch Release Button/Advanced Theft Protection ButtonF
Audio Volume Controls
Bluetooth Controls/Driver Information Center Controls
Cruise Control Buttons
Manual Shift Paddles or Active Rev Match On/Off
Power Mirror Controls
SYMBOLS
Page 3 of 16
3
Hazard Warning Flashers Button
Infotainment System Touch Screen
Driver Mode Selector/Stability Control Button
Automatic Climate Controls/Heated & Ventilated Seat ControlsF
Passenger’s Temperature Control/Heated & Ventilated Seat ControlF
Refer to your Owner’s Manual to learn about the information being relayed by the lights and gauges of the instrument cluster.
See In Brief in your Owner’s Manual.
Accessory Power OutletElectric Parking Brake Switch
Service Electric Parking Brake
Traction Control Off
Low Fuel
Screen Storage Compartment (with USB port) Button
Performance Data Recorder SD Card SlotF (in glove box)
F Optional equipment
Airbag Readiness
Check Engine
Safety Belt Reminder
Security
Page 4 of 16
 at the rear edge of the door to unlock and open the door.
EXITING THE VEHIC")
4
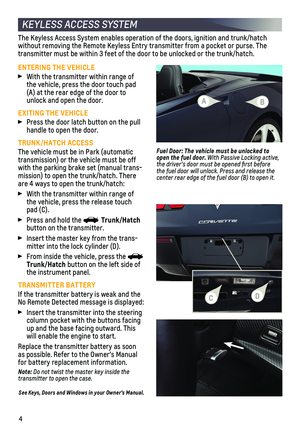
KEYLESS ACCESS SYSTEM
ENTERING THE VEHICLE
With the transmitter within range of the vehicle, press the door touch pad (A) at the rear edge of the door to unlock and open the door.
EXITING THE VEHICLE
Press the door latch button on the pull handle to open the door.
TRUNK/HATCH ACCESS
The vehicle must be in Park (automatic transmission) or the vehicle must be off with the parking brake set (manual trans-mission) to open the trunk/hatch. There are 4 ways to open the trunk/hatch:
With the transmitter within range of the vehicle, press the release touch pad (C).
Press and hold the Trunk/Hatch button on the transmitter.
Insert the master key from the trans-mitter into the lock cylinder (D).
From inside the vehicle, press the Trunk/Hatch button on the left side of the instrument panel.
TRANSMITTER BATTERY
If the transmitter battery is weak and the No Remote Detected message is displayed:
Insert the transmitter into the steering column pocket with the buttons facing up and the base facing outward. This will enable the engine to start.
Replace the transmitter battery as soon as possible. Refer to the Owner’s Manual for battery replacement information.
Note: Do not twist the master key inside the transmitter to open the case.
See Keys, Doors and Windows in your Owner’s Manual.
The Keyless Access System enables operation of the doors, ignition and t\
runk/hatch
without removing the Remote Keyless Entry transmitter from a pocket or p\
urse. The transmitter must be within 3 feet of the door to be unlocked or the trun\
k/hatch.
Fuel Door: The vehicle must be unlocked to open the fuel door. With Passive Locking active, the driver’s door must be opened first before the fuel door will unlock. Press and release the
center rear edge of the fuel door (B) to open it.
A
CD
B
Page 5 of 16

5
AUXILIARY RELEASES
OUTSIDE THE VEHICLE
1. Insert the master key from the trans-mitter into the lock cylinder above the license plate and turn it to open the hatch/trunk.
2. Pull the Door Release handle on the driver’s side of the hatch/trunk.
If the vehicle battery is weak or disconnected, the driver’s door can\
be opened manually.
BATTERY CARE TIPS
BATTERY CHARGERF
If the vehicle is not driven weekly or the battery is disconnected or dr\
ained, use the
optional battery maintainer to charge the battery. To operate the batter\
y maintainer, plug it into a standard electrical outlet and into the vehicle’s rear\
accessory power outlet.
See Vehicle Care in your Owner’s Manual.
WINDOW INDEXING
To provide a tight seal, window indexing automatically lowers the window\
slightly when the door is opened and then automatically raises the window when the doo\
r is closed.
If battery power is disconnected, reset the indexing feature:
1. Close the doors.
2. Start the vehicle.
3. Hold up the window switch to the fully closed position.
Note: The power windows’ express-up feature and the power convertible topF will not operate until the window indexing feature is reset.
See Keys, Doors and Windows in your Owner’s Manual.
INSIDE THE VEHICLE
Pull the Door Release handle on the floor next to the driver’s or passenger’s seat.
See Keys, Doors and Windows in your Owner’s Manual.
F Optional equipment
Page 6 of 16

6
A. Seat Adjustment
Move the front control to move the seat forward or rearward, or to tilt, raise or lower the seat.
B. Seatback Recline Adjustment
Move the top of the vertical control to recline or raise the seatback.
C. Lumbar/Side Bolster AdjustmentF
Move the rear control forward or rearward to adjust the lumbar support a\
nd up or down to adjust the side bolsters.
MEMORY SEATSF
To set the memory position, adjust the driver’s seat, outside mirrors\
and steering wheel to the desired positions. Press and release the SET button. A beep will sound. Immediately press and hold button 1 or 2 until two beeps sound.
To set the exit position, adjust the driver’s seat and steering wheel\
to the desired
positions. Press and release the SET button. A beep will sound. Immediately press and hold the EXIT button until two beeps sound.
To recall the setting at any time, press and hold button 1 or 2 or the EXIT button until the stored position is reached.
To set the Auto Memory Recall (Driver Door Open or At Ignition On) or \
Easy Exit Recall (Vehicle Off and Driver Door Open), go to Settings > Vehicle > Comfort\
and Convenience > Auto Memory Recall or Easy Exit Options.
Note: On vehicles with a manual transmission, the parking brake must be applied in order for the memory seats to be recalled automatically.
If the stored position is not recalled, move the seat forward and press \
button 1 or 2 or the EXIT button again.
POWER SEATS
KEYLESS (PUSHBUTTON) START
STARTING THE ENGINE
With the vehicle in Park or Neutral, press the brake pedal (automatic transmission) or the clutch pedal (manual transmission) and then press the ENGINE START/STOP button.
STOPPING THE ENGINE/OFF
Shift to Park (automatic transmission only) and press the ENGINE START/STOP button.
The Remote Keyless Entry transmitter must be in the vehicle to turn on t\
he ignition.
SEAT CONTROLS
See Driving and Operating in your Owner’s Manual.
F Optional equipmentSee Seats and Restraints in your Owner’s Manual.
ABC
Page 7 of 16

DIC CONTROLS
Press the button to view the main menu or the button to view a selected submenu.
Press the or button to move through the menus")
7
INSTRUMENT CLUSTER/DRIVER INFORMATION CENTER (DIC)
DIC CONTROLS
Press the button to view the main menu or the button to view a selected submenu.
Press the or button to move through the menus.
Press SEL to open a menu or select/deselect a setting.
RESET AN ITEM
1. Use the control pad to display the item.
2. Press and hold SEL to reset the item.
The DIC on the instrument cluster displays a variety of vehicle messages\
and system information. Use the control pad on the right side of the steering wheel\
to view the main menus: Info (includes trip odometers, fuel information and tire pressures), Performance (includes G-force, friction bubble, timers, and operating temperatures)\
, Audio, Phone, NavigationF, and Settings.
RECONFIGURABLE INSTRUMENT CLUSTER
The instrument cluster also features four display themes: Link to Drive Mode (matches the Driver Mode Control setting), Tour, Sport, and Track. The style of the center of the instrument cluster will change depending on the selected theme.
1. Use the control pad to display the Settings menu.
2. Select Display Theme.
3. Select the desired cluster theme.
HEAD-UP DISPLAYF (HUD)
HUD HUD
Press down or lift up to adjust the position of the image. It cannot be adjusted side-to-side.
INFO
Press to select from the display views of Tour, Sport, and Track. Also displays Link to Drive Mode when selected in the DIC.
Press down or lift up to dim or brighten the display.
Press down and hold to turn off the HUD.
The HUD projects some operating information on the windshield. Temporary\
information, such as audio changes and navigation maneuvers, also will be displayed.
See Instruments and Controls in your Owner’s Manual.
See Instruments and Controls in your Owner’s Manual.
F Optional equipment
Page 8 of 16

SCREEN Access hidden storage compartment with USB port
ApplicationsF: Touch a scre")
8
INFOTAINMENT SYSTEM
Power/ Volume
Additional Pages: Touch to view additional pages of applications (if available)
SCREEN Access hidden storage compartment with USB port
ApplicationsF: Touch a screen icon to access an application
SEEK Previous/Next radio station or track
BACK Return to the previous menu screen
MEDIASelect the media sourceHome page
TUNE/MENUTune radio stations/Open and select menus
Favorite Pages: Display the favorites lists
RADIO Select AM, FM, SiriusXMF
PORTABLE AUDIO DEVICES – MEDIA
An accessory power outlet, two USB ports and a 3.5-mm auxiliary input jack are located in the center console.
An iPod®, iPhone®, MP3 Player, a USB flash drive or a USB mass storage device can be connected to the USB port.
Press the MEDIA button to select a
portable device as the audio source.
F Optional equipment
Refer to your Owner’s Manual for important information about using the infotainment system while driving.
The infotainment system uses a Bluetooth or USB connection to link to a \
compatible smartphone, cell phone, USB flash drive or portable audio player/iPod®\
. For assistance, call 1-855-4-SUPPORT (1-855-478-7767) or visit my.chevrolet.com/learn.