Page 9 of 20

9
CADILLAC USER EXPERIENCE MENUS
See your Cadillac User Experience Manual.♦ Optional equipment
Your CTS offers a variety of entertainment, communication and vehicle system options. You can use simple gestures on the touch screen just as you would on a smartphone, such as tap, drag, pinch and spread, to in\
teract with the infotainment system. Touch an application icon on the touch screen to access the following items.
Audio
• Most Recent Audio Sources
• More Audio Sources
• Seek Up/Down
• Tune
• HD Radio
• Browse
• Sound
• Station Favorites
Navigation♦
• Search
• Favorite
• Recent
• Cancel
• Map Menu
• Zoom Out
• Zoom In
• Destination
• Vehicle Icon
Phone • Favorites
• Keypad
• Recent
• Contacts
• Devices
Note: Press and hold the Push to Talk steering wheel button to activate Bluetooth Speech Recognition. See page 11.
Climate • Front/Rear Settings♦
• Driver/Vehicle Set Temperature
• Passenger Set Temperature
• Fan Speed
• Air Distribution Settings
• On/Off
• A/C Mode
• Automatic Setting
• Recirculation Setting
• Sync Temperature Settings
Settings • System
• Apps
• Vehicle
• Personal
Page 10 of 20

10
CADILLAC USER EXPERIENCE FEATURES
APPS♦
Connected apps linking to music, news, weather, travel information, sports, entertainment and more are available for download to the infotainment system through the Apps icon on the Home page. Downloading and using the apps requires inter-net connectivity, and may require a data plan, accessed through the vehicle’s 4G LTE Wi-Fi hotspot, if active, or a mobile device hotspot.
PORTABLE AUDIO DEVICES
Two USB ports and an auxiliary audio input jack are located in the center console storage compartment.
Connect an iPod®, iPhone®, MP3 player, a USB flash drive or a USB mass storage device to the USB port.
Touch Audio, and then touch More and select the USB device. Search for music on-screen or by voice commands.
Refer to your Owner's Manual for important information about using the infotainment system while driving.
Use a Bluetooth or USB connection to link a compatible smart-phone, cell phone, USB flash drive or portable audio player/iPod® to the touch screen infotainment display. For assistance, call 1-855-428-3669 or visit my.cadillac.com/learn.
SETTING THE TIME
1. Touch Settings on the Home page, and then touch System.
2. Touch Time/Date.
3. Touch Set Time.
4. Touch or to adjust the hours, minutes, and AM or PM.
5. Touch to exit the menu.
If the Auto Set feature is enabled, the time will be updated
automatically as the system obtains time information from the cellular network.
STORING STATION FAVORITES
Radio stations from all bands (AM, FM or SiriusXM♦) can be stored in any order.
1. Display the desired radio station.
2. Touch and hold a favorite screen button. Favorites also can be saved by touching the in a station or channel list.
3. Repeat the steps to store another favorite item.
Page 11 of 20

APPLE CARPLAY
Apple CarPlay capability is available through a compatible smart-phone using the Apple CarPlay icon on the Home page of the info-tainment system. No app is required.
1. Connect your compatible phone by plugging the Lightning cable into a USB data port. Use your device’s factory-provided Lightning cable. Aftermarket cables may not work.
2. The Apple CarPlay icon will illuminate. Touch the Apple CarPlay icon to have your apps displayed.
ANDROID AUTO
Android Auto capability is available through a compatible smart-phone using the Android Auto icon on the Home page of the info-tainment system.
1. Download the Android Auto app to your phone from the Google Play Store.
2. Connect your compatible phone by plugging the phone USB cable into a USB data port. Use your device’s factory-provided USB cable. Aftermarket cables may not work.
3. The Android Auto icon will illuminate. Touch the Android Auto icon to have your apps displayed.
11♦ Optional equipment
VOICE RECOGNITION
Control the music source and navigation destination♦, and make phone calls hands-free, using the natural voice recognition system.
1. Press the Push to Talk button on the steering wheel.
2. The system will play a prompt followed by a beep.
3. After the beep, say what you want it to do.
• Hands-free calling – Example command: “Call Amanda” or “Dial 555-1212”
• Connected music device search – Example command: “Play artist [name]” or “Play song [name]”
• Radio control – Example command: “Tune FM 104.3” or “Tune XM Classic Vinyl”
• Help – Say “Help” for voice recognition assistance
BLUETOOTH SPEECH RECOGNITION
Bluetooth Speech Recognition allows access to the voice recogni-tion commands on a compatible, paired cell phone; e.g. Siri® Eyes Free or Voice Command.
To activate Bluetooth Speech Recognition, press and hold the Push to Talk steering wheel button.
See your Cadillac User Experience Manual.
CADILLAC USER EXPERIENCE FEATURES
Page 12 of 20

12
BLUETOOTH® SYSTEM
Refer to your Owner's Manual for important information about using the Bluetooth system while driving.
Before using a Bluetooth-enabled device in the vehicle, it must be paired with the in-vehicle Bluetooth system. Not all devices will
support all functions. The pairing process is disabled when the vehi-cle is moving. For more information, visit my.cadillac.com/learn.
PAIR A PHONE
1. To use voice recognition, press the Push to Talk button; after the tone, say "Pair Phone." To use the infotainment screen, select Phone > Add Device.
2. Start the pairing process on the phone. From your phone's Bluetooth settings, select the name shown on the infotainment screen.
3. Confirm the codes that appear on the infotainment screen and the phone.
4. When pairing is complete, the phone screen is displayed. Your phone book may be downloaded depending on the phone.
See your Cadillac User Experience Manual.
VALET MODE
To lock/unlock the infotainment screen and the glove box, go to Settings > Vehicle > Valet Mode and enter a passcode. It can be used when it’s desired that only an authorized user has access to personalized features.Note: For added security, the rear seat pass-through door can be locked \
by turning the knob on the pass-through door and the folding rear seatbacks\
can be locked using the door key.
See your Cadillac User Experience Manual and Seats and Restraints in your Owner's Manual.
WIRELESS CHARGING
With the vehicle's available built-in 4G LTE Wi-Fi hotspot, up to 7 devices (smartphones, tablets and laptops) can be connected to high-speed internet.
To retrieve the SSID and password for the hotspot, go to Settings > System > Wi-Fi Hotspot.
Note: For more information on use and system limitations, visit my.cadillac.com/learn.
See your Cadillac User Experience Manual.
The Wireless Charging system for mobile devices is located in the storage compartment behind the climate controls. To check mobile device com patibility, visit my.cadillac.com/learn.
1. The vehicle must be On, or Retained Accessory Power must be active.
2. Remove all objects from the charging pad.
3. Place the mobile device, face up, on the symbol on the
charging pad.
4. Move the device slowly until the battery charging symbol dis-plays by the phone icon on the infotainment screen, indicating the device is charging.
See Instruments and Controls in your Owner's Manual.
4G LTE WI-FI® HOTSPOT
Page 13 of 20

TEEN DRIVERSURROUND VISION♦
Teen Driver allows multiple keys to be registered for beginning
drivers. When active, the system automatically activates certain safety systems, allows setting of some features, and limits the use of others. An in-vehicle Report Card records vehicle data about driving behavior. When the vehicle is started with a registered key, a Driver Information Center message displays that Teen Driver is active.
To create a Personal Identification Number, register a key, change Teen Driver settings, or access the Report Card, go to Settings > Vehicle > Teen Driver.
See your Cadillac User Experience Manual.
When the vehicle is in Reverse, the Surround Vision System displays a rear or front camera view along with a view of the area surrounding the vehicle on the info-tainment screen.
To switch to the front or rear camera view, touch the front or rear camera screen
button at the bottom of the infotainment screen.
To turn the guidelines on or off, touch the guidelines screen
button at the bottom of the infotainment screen.
See Driving and Operating in your Owner's Manual.
13
The rear camera mirror provides a wide angle camera view of the area behind the vehicle.
Pull or push the lever (A) at the
bottom of the
mirror to turn the video
display on or off.
To adjust the bright-ness of the display, press and release the button (B) on the top back of the mirror without covering the light sensor. There are 5 brightness
settings.
See Keys, Doors and Windows in your Owner's Manual.
REAR CAMERA MIRROR♦
♦ Optional equipment
The Universal Remote System on the overhead console enables your vehicle to control 3 differ-ent devices, ranging from garage doors and gates to home lighting. Go to www.homelink.com for detailed videos and instructions on how to program the Universal Remote System. For additional assistance, call 1-800-355-3515.
See Instruments and Controls in your Owner’s Manual.
UNIVERSAL REMOTE SYSTEM
B
A
Page 14 of 20
 to express-open or express-close the front sunshade.
Press the Rear Sunshade s")
14
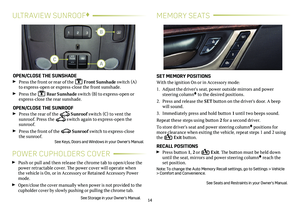
MEMORY SEATSULTRAVIEW SUNROOF♦
OPEN/CLOSE THE SUNSHADE
Press the front or rear of the Front Sunshade switch (A) to express-open or express-close the front sunshade.
Press the Rear Sunshade switch (B) to express-open or express-close the rear sunshade.
OPEN/CLOSE THE SUNROOF
Press the rear of the Sunroof switch (C) to vent the
sunroof. Press the switch again to express-open the sunroof.
Press the front of the Sunroof switch to express-close the sunroof.See Keys, Doors and Windows in your Owner's Manual.
POWER CUPHOLDERS COVER
Push or pull and then release the chrome tab to open/close the power retractable cover. The power cover will operate when the vehicle is On, or in Accessory or Retained Accessory Power mode.
Open/close the cover manually when power is not provided to the cupholder cover by slowly pushing or pulling the chrome tab.
See Storage in your Owner's Manual.
SET MEMORY POSITIONS
With the ignition On or in Accessory mode:
1. Adjust the driver's seat, power outside mirrors and power steering column♦ to the desired positions.
2. Press and release the SET button on the driver's door. A beep will sound.
3. Immediately press and hold button 1 until two beeps sound.
Repeat these steps using button 2 for a second driver.
To store driver's seat and power steering column♦ positions for more clearance when exiting the vehicle, repeat steps 1 and 2 using the Exit button.
RECALL POSITIONS Press button 1, 2 or Exit. The button must be held down until the seat, mirrors and power steering column♦ reach the set position.
Note: To change the Auto Memory Recall settings, go to Settings > Vehicle > Comfort and Convenience.
See Seats and Restraints in your Owner's Manual.
A
B
C
Page 15 of 20
 or the headlamps and other exterior lamps depending on outside lig")
15
EXTERIOR LIGHTINGWINDSHIELD WIPERS
Off/On
AUTO Automatic Light Control
Automatically activates the Daytime Running Lamps (DRLs) or the headlamps and other exterior lamps depending on outside light conditions, including the IntelliBeam® automatic high-beam system♦.
Parking Lamps
Headlamps
ADAPTIVE FORWARD LIGHTING (INCLUDED WITH HID HEADLAMPS)♦
The Adaptive Forward Lighting (AFL) system pivots the headlamps left or right in the direction of travel.
Note: The AFL system operates only when the exterior lamps control knob is in the AUTO position, at speeds greater than 2 mph, and after driving\
a short distance to calibrate the system.
See Lighting in your Owner's Manual.
HI Fast Wipes
LO Slow Wipes
INT Intermittent (Rainsense™ Sensitivity)When in Rainsense mode, rotate the band to adjust the delay between wipes. The wipers activate more often as the band is rotated upward.
Note: When entering an automatic car wash, turn off the Rainsense windshield wipers.
OFF
1x Single Wipe
Washer Fluid
Pull the lever toward you to spray washer fluid on the windshield.
Rear Camera Mirror Washer♦
Push the lever away from you to spray washer fluid on the rear camera mirror lens.
See Instruments and Controls in your Owner's Manual.
Wipers with Rear Camera Mirror Washer♦ shown
♦ Optional equipment
Page 16 of 20

16
DRIVER ASSISTANCE SYSTEMS♦
Safety or driver assistance features are no substitute for the driver’s responsibility to operate the vehicle in a safe manner. The driver should remain attentive to traffic, surroundings and road conditions at all times. Read your Owner’s Manual for important feature limitations and information\
.
SAFETY ALERT SEAT♦
The driver’s seat pulses — left side, right side, or simultaneously — to alert the driver of potential hazards.
Audible alerts may be selected instead of Safety Alert Seat
pulsing alerts. To change the alert setting, go to Settings > Vehicle > Collision/Detection Systems > Alert Type.
FORWARD COLLISION ALERT♦
The Vehicle Ahead Indicator is green when a vehicle is detected and is amber when following a vehicle ahead much too closely. When approaching a vehicle directly ahead too rapidly, a red alert flashes on the windshield and the Safety Alert Seat pulses or beeps sound (if selected).
To set the alert timing, press the Following Gap button on the left side of the steering wheel.
FOLLOWING DISTANCE INDICATOR♦
The following distance to the vehicle ahead is indicated in seconds on the Driver Information Center. If no vehicle is detected ahead, dashes are displayed.
ADAPTIVE CRUISE CONTROL–ADVANCED♦
The system maintains the set speed and a following gap – the time between your vehicle and a vehicle detected directly ahead – by accelerating or braking automatically while you continue to steer.
To set a following gap, press the Following Gap button on the left side of the steering wheel.
LANE KEEP ASSIST WITH LANE DEPARTURE WARNING♦
The system may help you avoid collisions due to unintentional lane departures. The Lane Keep Assist Indicator is green if the
system is available to assist. If the vehicle approaches a detected lane marking without using a turn signal in that direction, the sys-tem may assist by gently turning the steering wheel and displaying an amber . If active driver steering is not detected, the amber may flash and the Safety Alert Seat may pulse or beeps may sound (if selected) on the side of the departure direction as the lan\
e marking is crossed. The Lane Keep Assist system does not continu-ously steer the vehicle; the driver needs to steer and be in complete control of the vehicle.
To turn the
system on or off, press the Lane Keep Assist button on the left side of the infotainment screen.
FORWARD/REVERSE AUTOMATIC BRAKING♦
In potential front- and rear-end imminent collision situations with vehicles directly ahead or behind, and with some objects behind your vehicle, the brakes may be applied, if you have not already done so, to help reduce the collision's severity or help avoid collisions at very\
low speeds.
To set Forward Automatic Braking to Alert and Brake, Alert, or Off, go to Settings > Vehicle > Collision/Detection Systems > Forward Collision System.
To set Reverse Automatic Braking to on or off, press the Park Assist button on the left side of the instrument panel. This will also turn on/off the Park Assist and Rear Cross Traffic Alert systems.
AUTOMATIC SAFETY BELT TIGHTENING♦
The front safety belts automatically tighten during emergency
braking or steering maneuvers, and release when driving conditions return to normal.