2019 AUDI TT ROADSTER light
[x] Cancel search: lightPage 91 of 304

8S8012721BA
Intelligent Technology
@) Note
— Never let the brakes “rub” by pressing the
pedal lightly when braking is not actually
necessary. This can cause the brakes to over-
heat and increases braking distance and
causes wear.
— Before driving on long stretches with steep
hills, reduce the vehicle speed and shift to a
lower gear to use the engine braking effect.
This reduces the load on the brakes. If you
need to brake additionally, brake in intervals
and not continuously.
@) Tips
— If you retrofit your vehicle with a front spoil-
er, wheel covers or similar items, make sure
that the air flow to the brakes is not ob-
structed. Otherwise the brake system can
overheat.
— Also refer to the information about brake
fluid > page 235.
Steering
Electromechanical steering supports the driver's
steering movements by electronically adapting
the power steering depending on the vehicle
speed. The settings depend on the selected Audi
drive select* mode.
a Steering: malfunction! Please stop vehicle
The power steering may have failed. Adapt your
driving style immediately to compensate for the
fact that it may be more difficult to turn the
steering wheel, and stop your vehicle in a safe lo-
cation as soon as possible. Do not continue driv-
ing. See an authorized Audi dealer or authorized
Audi Service Facility for assistance.
a Steering: malfunction! You can continue
driving
There is a malfunction. Steering may be more dif-
ficult or more sensitive. Adapt your driving style.
Have the steering system checked immediately
by an authorized Audi dealer or authorized Audi
Service Facility. Please note that the red indicator
light may turn on after restarting the engine. Do
not continue driving if it does.
G@) Tips
If the 12 or al indicator light only stays on
for a short time, you may continue driving.
ALL wheel drive (quattro)
Applies to: vehicles with all wheel drive
In all wheel drive, all four wheels are powered.
General information
In all wheel drive, the driving power is divided be-
tween all four wheels. This happens automatical-
ly depending on your driving behavior as well as
the current road conditions. Also see > page 86,
Electronic stabilization control (ESC).
The all wheel drive concept is designed for high
engine power. Your vehicle is exceptionally pow-
erful and has excellent driving characteristics
both under normal driving conditions and on
snow and ice. Always read and follow safety pre-
cautions > A\.
Winter tires
By using all wheel drive, your vehicle has good
forward motion with standard tires in winter con-
ditions. However, in winter we recommend using
winter or all season tires on all four wheels, be-
cause this will improve the braking effect.
Snow chains
If there are snow chain laws, snow chains must
also be used on vehicles with all wheel drive
=> page 255, Snow chains.
Replacing tires
For vehicles with all wheel drive, only wheels with
the same rolling circumference should be used.
Avoid using tires with different tread depths
=> page 247, New tires or wheels.
89
Page 92 of 304
Intelligent Technology
Is this an offroad vehicle?
Your Audi is not an offroad vehicle - there is not
enough ground clearance. For this reason, avoid
difficult terrain.
ZA\ WARNING
— Also, in vehicles with all wheel drive, adapt
your driving style to the current road and
traffic conditions. Do not let the increased
safety provided tempt you into taking risks,
because this increases the risk of an acci-
dent.
— The braking ability of your vehicle is limited
to the traction of the wheels. In this way, it
is not different from a two wheel drive vehi-
cle. Do not be tempted to accelerate to a
high speed when the road is slippery, be-
cause this increases the risk of an accident.
— Note that on wet streets, the front wheels
can “hydroplane’” if driving at speeds that
are too high. Unlike front wheel drive vehi-
cles, the engine RPM does not increase sud-
denly when the vehicle begins hydroplaning.
For this reason, adapt your speed to the
road conditions to reduce the risk of an acci-
dent.
Rear spoiler
Applies to: vehicles with retractable rear spoiler
The extendable rear spoiler increases driving sta-
bility.
a
g| = z
a.
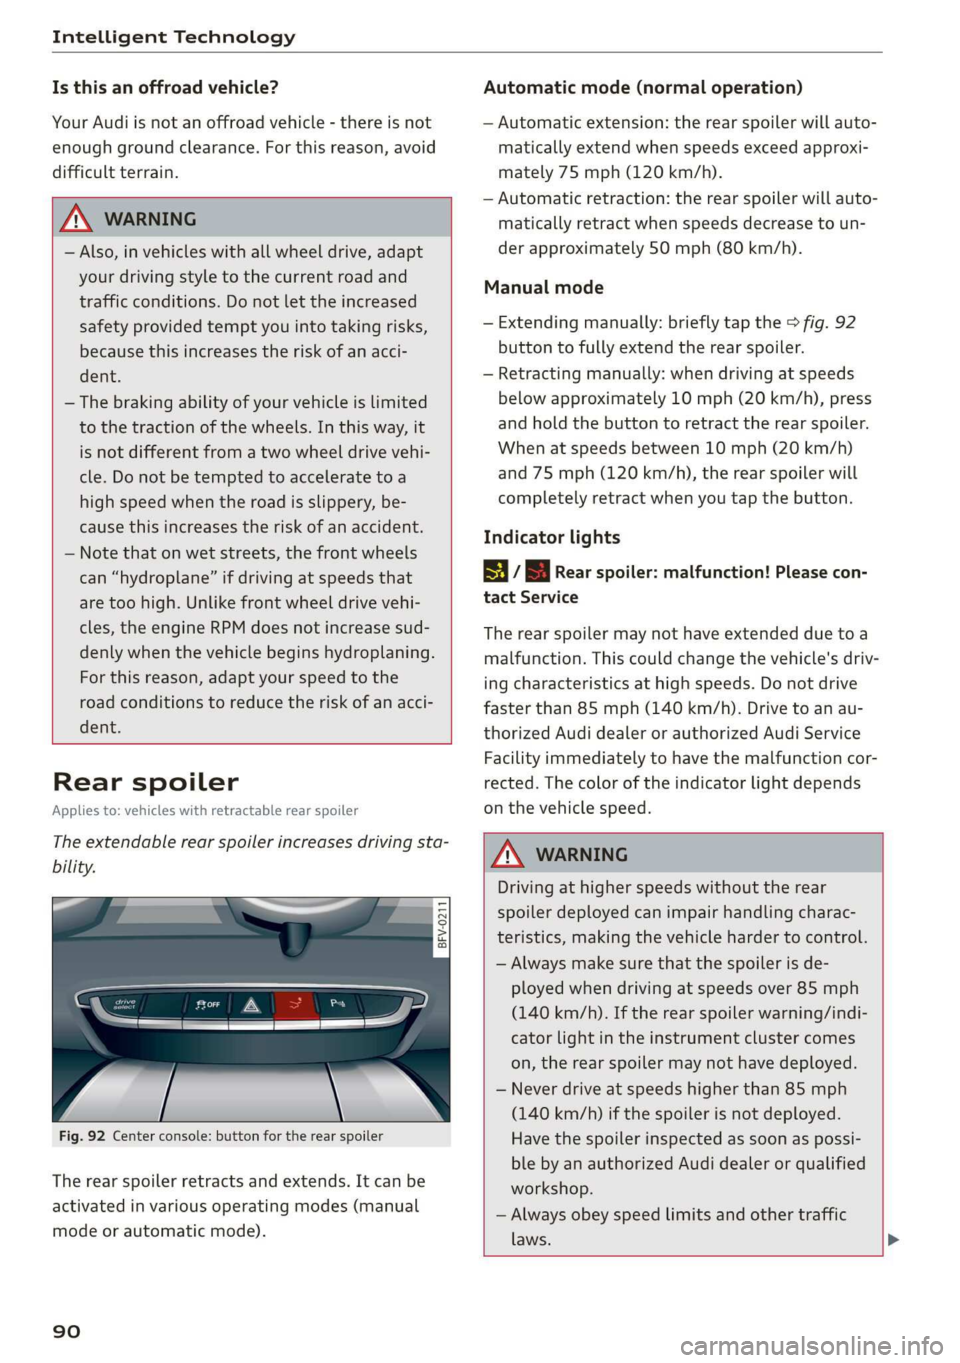
Fig. 92 Center console: button for the rear spoiler
The rear spoiler retracts and extends. It can be
activated in various operating modes (manual
mode or automatic mode).
90
Automatic mode (normal operation)
— Automatic extension: the rear spoiler will auto-
matically extend when speeds exceed approxi-
mately 75 mph (120 km/h).
— Automatic retraction: the rear spoiler will auto-
matically retract when speeds decrease to un-
der approximately 50 mph (80 km/h).
Manual mode
— Extending manually: briefly tap the > fig. 92
button to fully extend the rear spoiler.
— Retracting manually: when driving at speeds
below approximately 10 mph (20 km/h), press
and hold the button to retract the rear spoiler.
When at speeds between 10 mph (20 km/h)
and 75 mph (120 km/h), the rear spoiler will
completely retract when you tap the button.
Indicator lights
8 / | Rear spoiler: malfunction! Please con-
tact Service
The rear spoiler may not have extended due toa
malfunction. This could change the vehicle's driv-
ing characteristics at high speeds. Do not drive
faster than 85 mph (140 km/h). Drive to an au-
thorized Audi dealer or authorized Audi Service
Facility immediately to have the malfunction cor-
rected. The color of the indicator light depends
on the vehicle speed.
ZA WARNING
Driving at higher speeds without the rear
spoiler deployed can impair handling charac-
teristics, making the vehicle harder to control.
— Always make sure that the spoiler is de-
ployed when driving at speeds over 85 mph
(140 km/h). If the rear spoiler warning/indi-
cator light in the instrument cluster comes
on, the rear spoiler may not have deployed.
— Never drive at speeds higher than 85 mph
(140 km/h) if the spoiler is not deployed.
Have the spoiler inspected as soon as possi-
ble by an authorized Audi dealer or qualified
workshop.
— Always obey speed limits and other traffic
laws.
Page 101 of 304
8S58012721BA
Multi Media Interface
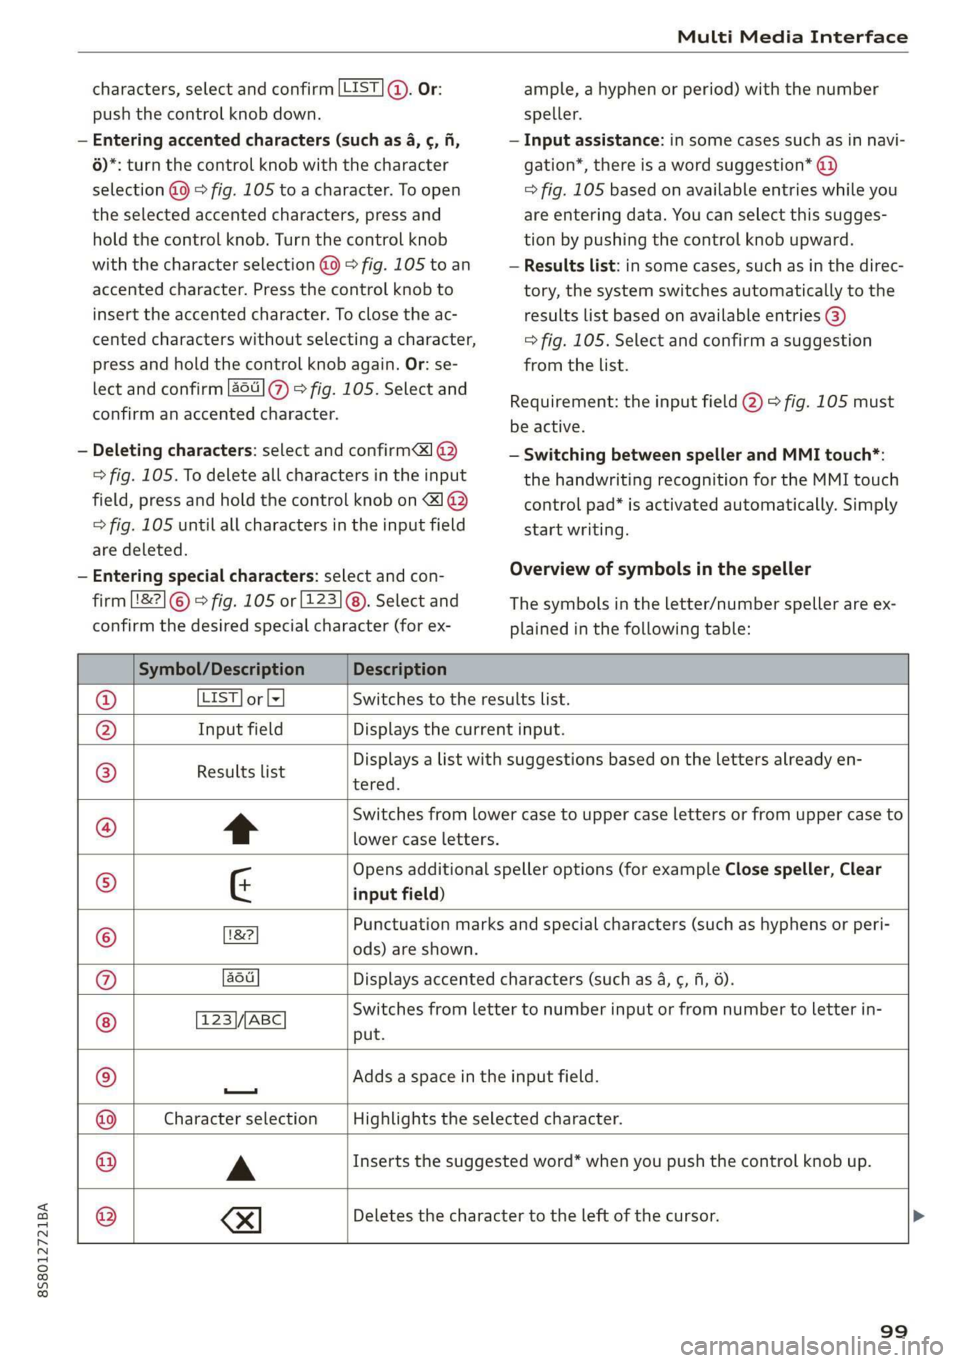
characters, select and confirm [LIST ©. Or:
push the control knob down.
— Entering accented characters (such as 4, ¢, fi,
6)*: turn the control knob with the character
selection @9 > fig. 105 to a character. To open
the selected accented characters, press and
hold the control knob. Turn the control knob
with the character selection @0 > fig. 105 to an
accented character. Press the control knob to
insert the accented character. To close the ac-
cented characters without selecting a character,
press and hold the control knob again. Or: se-
lect and confirm [a6t] 7) > fig. 105. Select and
confirm an accented character.
— Deleting characters: select and confirm] @
=> fig. 105. To delete all characters in the input
field, press and hold the control knob on &] ®
> fig. 105 until all characters in the input field
are deleted.
— Entering special characters: select and con-
firm [82] © © fig. 105 or [123]@). Select and
confirm the desired special character (for ex-
ample, a hyphen or period) with the number
speller.
— Input assistance: in some cases such as in navi-
gation*, there is a word suggestion* @)
=> fig. 105 based on available entries while you
are entering data. You can select this sugges-
tion by pushing the control knob upward.
— Results list: in some cases, such as in the direc-
tory, the system switches automatically to the
results list based on available entries @)
=> fig. 105. Select and confirm a suggestion
from the list.
Requirement: the input field @) > fig. 105 must
be active.
— Switching between speller and MMI touch*:
the handwriting recognition for the MMI touch
control pad* is activated automatically. Simply
start writing.
Overview of symbols in the speller
The symbols in the letter/number speller are ex-
plained in the following table:
Symbol/Description Description
LIST] or lz Switches to the results list.
Input field Displays the current input.
Results list
tered.
Displays a list with suggestions based on the letters already en-
t
Switches from lower case to upper case letters or from upper case to
lower case letters.
G
Opens additional speller options (for example Close speller, Clear
input field)
Punctuation marks and special characters (such as hyphens or peri-
©
|O}
©}
@}]O)]
©
EO
18?
ods) are shown.
au Displays accented characters (such as 4, ¢, fi, 6).
TSS/ABC Switches from letter to number input or from number to letter in-
put.
Adds a space in the input field.
—
Character selection Highlights the selected character.
A
Inserts the suggested word* when you push the control knob up.
®
|
©
|O|
©
se)
Deletes the character to the left of the cursor.
99
Page 105 of 304
8S58012721BA
Voice recognition system
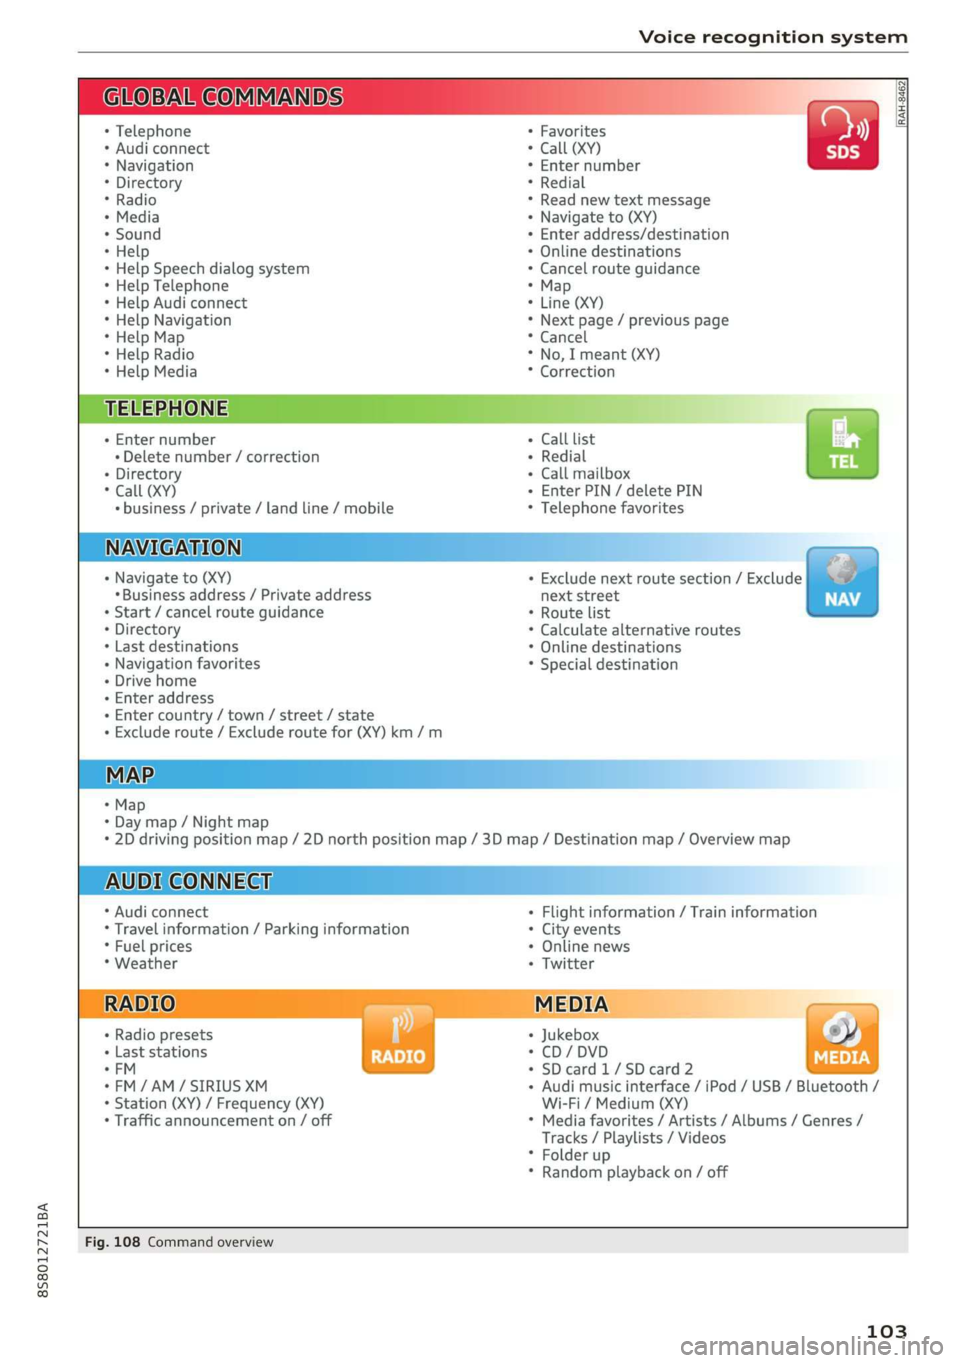
BAR COMMANDS
RAH-8462|
* Telephone + Favorites a)
+ Audi connect * Call (XY) SDS
* Navigation + Enter number
* Directory * Redial
* Radio * Read new text message
+ Media + Navigate to (XY)
* Sound + Enter address/destination
* Help + Online destinations
+ Help Speech dialog system * Cancel route guidance
* Help Telephone * Map
* Help Audi connect + Line (XY)
* Help Navigation * Next page / previous page
* Help Map * Cancel
* Help Radio * No, I meant (XY)
* Help Media * Correction
TELEPHONE: a
+ Enter number Call list a.
+ Delete number / correction Redial sie
+ Directory Call mailbox
* Call (XY) Enter PIN / delete PIN
* business / private / land line / mobile Telephone favorites
NAVIGATION i
+ Navigate to (XY) + Exclude next route section / Exclude
«Business address / Private address next street
+ Start / cancel route guidance * Route list
+ Directory * Calculate alternative routes
+ Last destinations * Online destinations
+ Navigation favorites * Special destination
+ Drive home
- Enter address
+ Enter country / town / street / state
+ Exclude route / Exclude route for (XY) km /m
MAP.
* Map
* Day map / Night map
* 2D driving position map / 2D north position map / 3D map / Destination map / Overview map
AUDI CONNECT
* Audi connect * Flight information / Train information
* Travel information / Parking information + City events
* Fuel prices * Online news
* Weather + Twitter
+ Radio presets « Jukebox rs}
+ Last stations * CD/DVD MEDIA
*FM + SDcard1/SDcard2
*FM/AM/ SIRIUS XM « Audi music interface / iPod / USB / Bluetooth /
+ Station (XY) / Frequency (XY) Wi-Fi / Medium (XY)
* Traffic announcement on / off * Media favorites / Artists / Albums / Genres /
Tracks / Playlists / Videos
* Folder up
* Random playback on / off
Fig. 108 Command overview
103
Page 106 of 304
Voice recognition system
Voice recognition system
Operating
Applies to: vehicles with voice recognition system
You can operate many Infotainment functions
conveniently by speaking.
Requirement: the ignition and the MMI must be
switched on. A system language supported by
the voice recognition system must be set. There
must be no phone calls in progress and the park-
ing aid must not be active.
> Switching on: briefly press the [2] button @)
=> page 14, fig. 10 on the multifunction steer-
ing wheel and say the desired command after
the Beep.
> Switching off: press and hold the |™] button.
Or: say the command Cancel.
> Pausing: say the command Pause. To resume,
press the |] button.
> Correcting: press the [>] button one time ©
=> page 12, fig. 6. Or: say the command Correc-
tion.
Input assistance
The system guides you through the input with
visual and audio feedback.
— Visual input assistance: after switching on
voice recognition, a display with a selection of
possible commands appears. The command
display can be switched on/off under [MENU] >
Settings > left control button > MMI settings >
Speech dialog system.
— Audio input assistance: to have the possible
commands read, press the [2] button on the
multifunction steering wheel briefly and say
Help.
For the system to understand you:
Speak clearly and distinctly at a normal volume.
Speak louder when driving faster.
Emphasize the words in the commands evenly
and do not leave long pauses.
Do not speak a command when the voice recogni-
tion system is making an announcement.
104
Close the doors, the windows, and the sunroof*
to reduce background noise. Make sure that pas-
sengers are not speaking when you are giving a
voice command.
Do not direct the vents toward the handsfree mi-
crophone, which is near the front interior lights
on the roof headliner or on the driver's safety
belt*. For additional information on the safety
belt microphone, see > page 123.
Only
use the system from the driver's seat be-
cause the hands-free microphone is directed to-
ward that seat.
Additional settings
See > page 176, Voice recognition system.
ZA\ WARNING
— Direct your full attention to driving. As the
driver, you have complete responsibility for
safety in traffic. Only use the functions in
such a way that you always maintain com-
plete control over your vehicle in all traffic
situations.
— Do not use the voice recognition system in
emergencies because your voice may change
in stressful situations. The system may take
longer to dial the number or may not be
able to dial it at all. Dial the emergency
number manually.
G) Tips
—The dialog pauses when there is an incom-
ing phone call and will continue if you ig-
nore the call. The dialog ends if you answer
the call.
— There are no voice guidance* prompts when
a dialog is active.
— You can select an item in the list using ei-
ther the voice recognition system or the
control knob.
Page 134 of 304

Navigation
Navigation
Opening navigation
Applies to: vehicles with navigation system
The navigation system directs you to your destination, around traffic incidents, and on alternative
routes, if desired.
ae 2
Fig. 118 Diagram: Enter destination menu
> Press the [NAV/MAP] button.
The Enter destination menu is displayed after
opening navigation > fig. 118. The following in-
formation can be displayed in the Infotainment
system display:
@ Input field for free text search > page 133
@ Home address > page 134
Last destinations > page 133 pag
Stored favorites > page 134 pag
As soon as you select an entry from the list (de-
pending on the vehicle equipment), the corre-
sponding destination displays as a map preview*
© ° fig. 118.
If you have connected a mobile device to the
MMI, your directory contacts will also be listed if
they have navigation data assigned to them.
The Favorites (4) menu item as well as the direc-
tory/contacts are only shown in the Enter desti-
nation menu if you have entered one or more
characters using the input field.
Switching between the destination entry and
the map
132
— Press the [NAV/MAP] button repeatedly until
the map is displayed. Or: select the left control
button > Switch to map.
ZA\ WARNING
— The demands of traffic require your full at-
tention. Always read the chapter > page 92,
Traffic safety information.
— Obey all traffic laws when driving.
— The route calculated by the navigation sys-
tem is a recommendation for reaching your
destination. Obey traffic lights, stopping re-
strictions, one-way streets, lane change re-
strictions, etc.
— Adjust the volume of the audio system so
that signals from outside the vehicle, such
as police and fire sirens, can be heard easily
at all times.
) Note
If the driving directions conflict with traffic
laws, obey the traffic laws.
Page 144 of 304
![AUDI TT ROADSTER 2019 Owners Manual Navigation
Additional options on the map
Applies to: vehicles with navigation system
> Press the LNAV/MAP] button repeatedly until
the map is displayed > page 140, fig. 124.
> Press AUDI TT ROADSTER 2019 Owners Manual Navigation
Additional options on the map
Applies to: vehicles with navigation system
> Press the LNAV/MAP] button repeatedly until
the map is displayed > page 140, fig. 124.
> Press](/manual-img/6/57667/w960_57667-143.png)
Navigation
Additional options on the map
Applies to: vehicles with navigation system
> Press the LNAV/MAP] button repeatedly until
the map is displayed > page 140, fig. 124.
> Press the right control button.
Depending on the function selected, the follow-
ing options can also be selected under the Map
menu:
Cancel route guidance: see > page 137.
Map settings: see > page 142.
Route criteria: see > page 139.
Voice guidance: see > page 139.
Navigation settings: see > page 138.
Online traffic data*: see > page 143.
Show alternative routes: see > page 139.
Parking along the route: parking options near
the vehicle are displayed.
Save current position: you can save your current
vehicle position as a favorite > page 138 or save
it as a contact in the directory > page 138.
Audi connect at this location*: allows you to
search for City Events or Weather at the entered
location.
Country information: you can display the appli-
cable urban and rural speed limits for any coun-
try/state. This information will be automatically
shown to you in the route information @)
=> page 140, fig. 124 when the speed limit is ex-
ceeded, if this function is activated > page 142.
Avoid route*: when route guidance is active, the
calculated route will avoid the area you have
specified (maximum: 12 mi (20 km)), if possible.
The navigation system calculates an alternative
route. The route to be avoided that you have en-
tered applies only to the current route and must
be set again, if needed. The areas you have se-
lected to avoid will appear with red and white
shading on the map.
2) AUDI AG provides access to services from third party pro-
viders. Permanent availability cannot be guaranteed, be-
cause that depends on the third party provider.
142
Map settings
Applies to: vehicles with navigation system
> Press the [NAV/MAP] button repeatedly until
the map is displayed > page 140, fig. 124.
> Select: right control button > Map settings.
Depending on the selected function, the follow-
ing settings can be selected:
Map colors
Day/Night: the map is displayed with a light/
dark background.
Automatic: when the lights switch on, the map
colors switch from day to night.
Map display
Standard > page 140, fig. 123.
Satellite map*)) > page 143, fig. 125.
Traffic > page 143.
Map orientation
Destination map: the map indicates the destina-
tion and is oriented to the north.
2D heading-up map/2D north-up map: the cur-
rent vehicle position is displayed. The map is ori-
ented in the direction of travel or to the north.
3D heading-up map: when this function is
switched on, the current vehicle position is
shown on a three-dimensional map and oriented
in the direction of travel. At a scale of 62 mi
(100 km) and larger, the map orientation is to
the north.
Overview map: the entire route from the vehicle
position to the destination or the next stopover is
displayed on the map. The map scale depends on
the length of the route and adapts automatically.
The map is oriented to the north.
Route information
The display of route information such as the cur-
rent road being driven on, upcoming maneuvers, >
Page 154 of 304
Media
Media
Introduction
There are various media drives and connections
available in the MMI. You can play, for example,
audio/video files from the Jukebox* or connect
your mobile device to the Audi music interface*
and operate it through the MMI.
Notes
Media and format restrictions: the MMI (includ-
ing the SD card reader and the USB storage de-
vice connection*) was tested with a variety of
products and media available in the market.
However, there may be cases where individual de-
vices or media and audio/video” files may not be
recognized, may play only with restrictions or
may not play at all.
Digital Rights Management: please note that
the audio/video files are subject to copyright pro-
tection.
The media drives do not play files that are pro-
tected by DRM and that are identified with the
symbol fi.
Data security: never store important data on SD
cards, the Jukebox*, CDs/DVDs or mobile devices.
Audi AG is not responsible for damaged or lost
files and media.
Loading times: the more files/folders/playlists
that are on a storage medium, the longer it will
take to load the audio/video* files. Audi recom-
mends using storage media that only contain au-
dio/video files*. To decrease the time it takes to
load audio/video files*, create subfolders (for ex-
ample, for the artist or album). The loading time
will also increase when importing files.
Additional information: when playing, audio
files are automatically displayed with any addi-
tional information that is stored (such as the ar-
tist, track and album cover). If this information is
not available on the storage medium, the MMI
will check the Gracenote metadata database.
152
However, in some cases, the additional informa-
tion may not be displayed.
Restricted functionality: reset the Media set-
tings to the factory default settings if functional-
ity is restricted > page 172.
If functionality is restricted, reset the Jukebox* to
the factory default settings > page 172.
For information about the properties of support-
ed media and file formats, see > page 166.
@) Note
Always follow the information found in >@ in
General information on page 125.
CD/DVD operation
CD/DVD and format restrictions: the functionali-
ty of individual storage media may be limited due
to the variety of blank CDs/DVDs available and
the various capacities. Audio CDs or video DVDs
with copy protection, CDs/DVDs that do not con-
form to the standard, and multisession CDs may
have limited playback or may not play at all. Audi
recommends finalizing the recording process
when creating multisession CDs. Multisession
DVDs are not supported.
Using CDs/DVDs, the CD drive or the DVD drive:
to ensure correct, high-quality playback and to
prevent damage to the drive or disc reading er-
rors, always store CDs/DVDs in a protective
sleeve and do not expose them to direct sunlight.
Do not use:
— Damaged, dirty or scratched CDs/DVDs
— Single CDs/DVDs with 3 in (8 cm) diameter
— CD/DVDs that are not round
— CDs/DVDs with labels
— Protective rings
— Cleaning CDs
Thermal protection switch: CD/DVD playback
may be temporarily unavailable if outside tem-
peratures
are extremely hot or cold. A thermal
protection switch is installed to protect the
CD/DVD and the laser.
Laser devices: laser devices are divided into safe-
ty classes 1 to 4 in accordance with DIN IEC 76 >