2019 AUDI TT ROADSTER infotainment
[x] Cancel search: infotainmentPage 139 of 304

8S8012721BA
Navigation
Adding a stopover
Applies to: vehicles with navigation system
You can enter an additional destination when
route guidance is active.
& Bear Valley Rd
Ss i
Delete destination
@x Cae eal acre
in am) it
Delete stopover
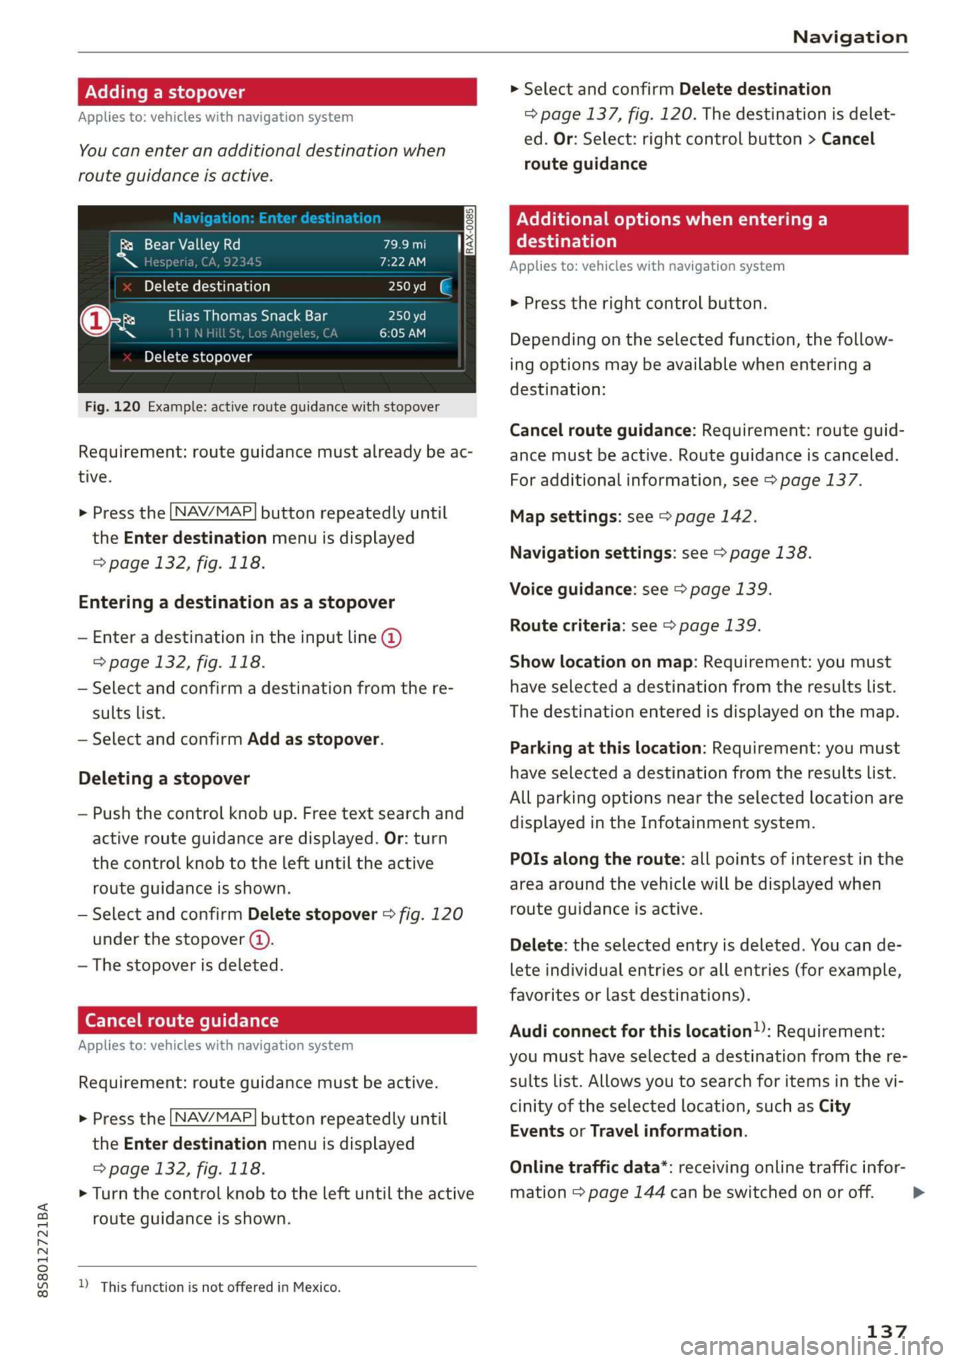
Fig. 120 Example: active route guidance with stopover
Requirement: route guidance must already be ac-
tive.
> Press the [NAV/MAP| button repeatedly until
the Enter destination menu is displayed
=> page 132, fig. 118.
Entering a destination as a stopover
— Enter a destination in the input line @
=> page 132, fig. 118.
— Select and confirm a destination from the re-
sults list.
— Select and confirm Add as stopover.
Deleting a stopover
— Push the control knob up. Free text search and
active route guidance are displayed. Or: turn
the control knob to the left until the active
route guidance is shown.
— Select and confirm Delete stopover > fig. 120
under the stopover (4).
— The stopover is deleted.
Ce Te mlm Tia
Applies to: vehicles with navigation system
Requirement: route guidance must be active.
> Press the [NAV/MAP| button repeatedly until
the Enter destination menu is displayed
=> page 132, fig. 118.
> Turn the control knob to the left until the active
route guidance is shown.
D_ This function is not offered in Mexico.
> Select and confirm Delete destination
=> page 137, fig. 120. The destination is delet-
ed. Or: Select: right control button > Cancel
route guidance
Nellie me) eee Cela lal Be)
eaten)
Applies to: vehicles with navigation system
> Press the right control button.
Depending on the selected function, the follow-
ing options may be available when entering a
destination:
Cancel route guidance: Requirement: route guid-
ance must be active. Route guidance is canceled.
For additional information, see > page 137.
Map settings: see > page 142.
Navigation settings: see > page 138.
Voice guidance: see > page 139.
Route criteria: see > page 139.
Show location on map: Requirement: you must
have selected a destination from the results list.
The destination entered is displayed on the map.
Parking at this location: Requirement: you must
have selected a destination from the results list.
All parking options near the selected location are
displayed in the Infotainment system.
POIs along the route: all points of interest in the
area around the vehicle will be displayed when
route guidance is active.
Delete: the selected entry is deleted. You can de-
lete individual entries or all entries (for example,
favorites or last destinations).
Audi connect for this location): Requirement:
you must have selected a destination from the re-
sults list. Allows you to search for items in the vi-
cinity of the selected location, such as City
Events or Travel information.
Online traffic data*: receiving online traffic infor-
mation > page 144 can be switched on or off.
137
>
Page 146 of 304

Navigation
Online traffic information
Applies to: vehicles with navigation system and Audi connect
The MMI can receive real-time online traffic information about congestion, accidents, road construc-
tion, and other incidents.
[RAH-8613]
Ky Ricca better route is available. —@
along the route O min
Nogales St, Northbound
Northbound
Northbound
eeu
.
Cerys
@
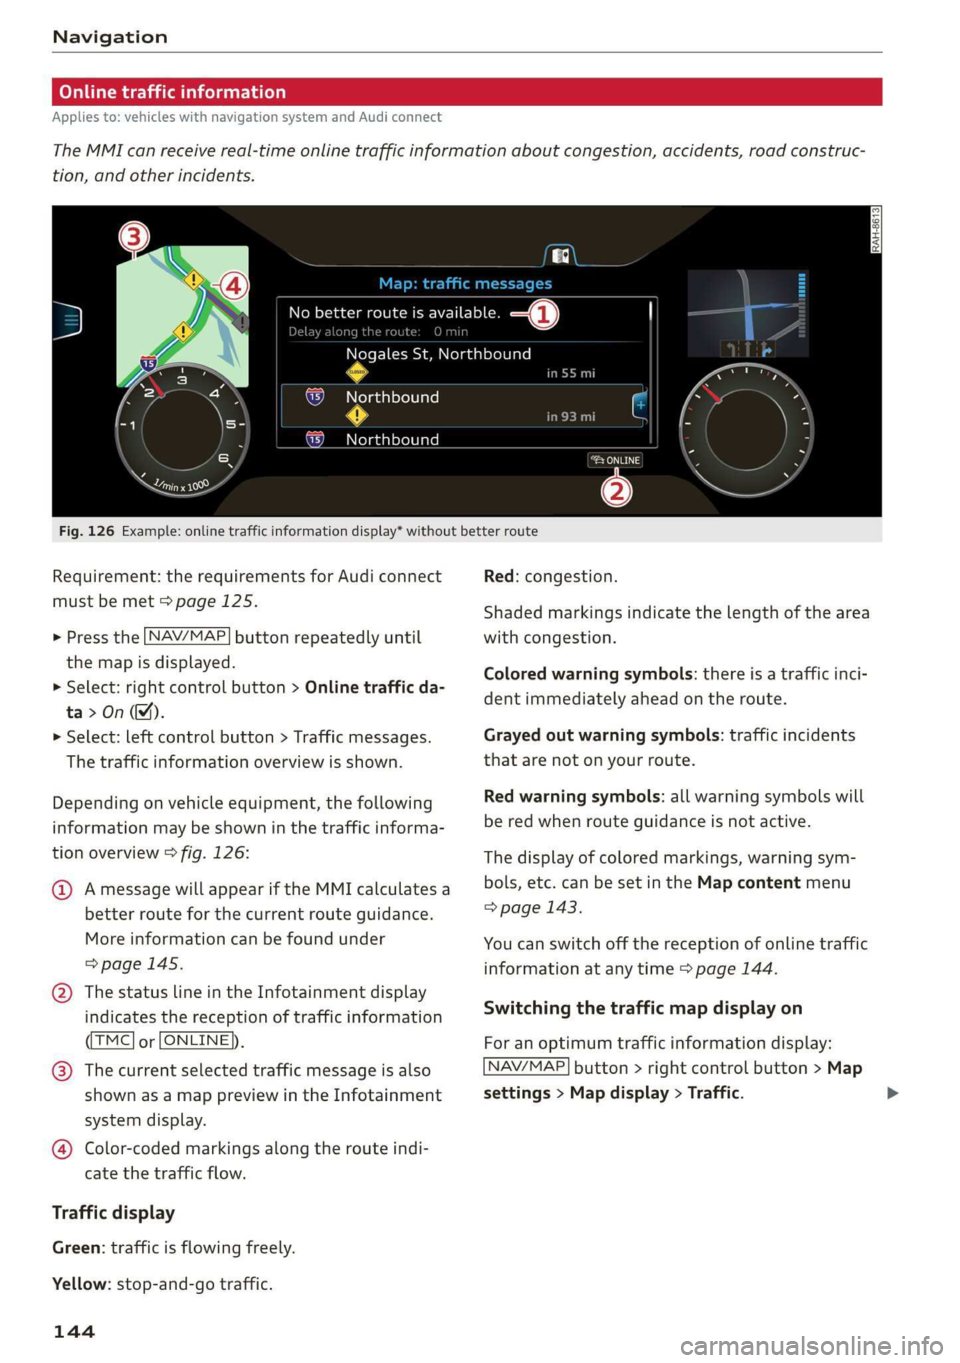
Fig. 126 Example: online traffic information display* without better route
Requirement: the requirements for Audi connect
must be met > page 125.
> Press the [NAV/MAP
the map is displayed.
> Select: right control button > Online traffic da-
ta>On(M).
> Select: left control button > Traffic messages.
The traffic information overview is shown.
button repeatedly until
Depending on vehicle equipment, the following
information may be shown in the traffic informa-
tion overview > fig. 126:
@ Amessage will appear if the MMI calculates a
better route for the current route guidance.
More
information can be found under
=> page 145.
@ The status line in the Infotainment display
indicates the reception of traffic information
TMC] or [ONLINE]).
@® The current selected traffic message is also
shown as a map preview in the Infotainment
system display.
@ Color-coded markings along the route indi-
cate the traffic flow.
Traffic display
Green: traffic is flowing freely.
Yellow: stop-and-go traffic.
144
Red: congestion.
Shaded markings indicate the length of the area
with congestion.
Colored warning symbols: there is a traffic inci-
dent immediately ahead on the route.
Grayed out warning symbols: traffic incidents
that are not on your route.
Red warning symbols: all warning symbols will
be red when route guidance is not active.
The display of colored markings, warning sym-
bols, etc. can be set in the Map content menu
> page 143.
You can switch off the reception of online traffic
information at any time > page 144.
Switching the traffic map display on
For an optimum traffic information display:
NAV/MAP] button > right control button > Map
settings > Map display > Traffic.
Page 152 of 304
![AUDI TT ROADSTER 2019 Owners Manual Radio
— Displaying the presets list: select: [RADIO] but-
ton > Presets.
Requirement: the favorites list must be dis-
played.
— Listening to presets: select and confirm a pre-
AUDI TT ROADSTER 2019 Owners Manual Radio
— Displaying the presets list: select: [RADIO] but-
ton > Presets.
Requirement: the favorites list must be dis-
played.
— Listening to presets: select and confirm a pre-](/manual-img/6/57667/w960_57667-151.png)
Radio
— Displaying the presets list: select: [RADIO] but-
ton > Presets.
Requirement: the favorites list must be dis-
played.
— Listening to presets: select and confirm a pre-
set from the list.
— Move preset: select a preset from the list >
right control button > Move preset. Or: press
and hold the control knob for several seconds.
Select and confirm the location of the selected
preset.
— Deleting presets: select a preset from the list >
right control button > Delete preset > Delete
this preset or Delete all presets.
Additional settings
Radio settings
> Select: [RADIO] button > right control button >
Radio settings.
The following settings can be selected, depend-
ing on the band that is selected:
Station names (FM)
Variable: scrolling text transmitted by the FM
stations is shown in the Infotainment system dis-
play.
Fixed: scrolling text transmitted by the FM sta-
tions is not shown in the Infotainment system
display. Only the current section of the scrolling
text is displayed.
FM/AM HD Radio*
You can switch HD Radio reception on or off.
Channel sorting (SiriusXM*)
You can set the channel sorting for SiriusXM sta-
tion lists* by:
— Channel number: the channels are sorted in as-
cending order according to their channel num-
ber.
— Channel name: the channels are listed in alpha-
betical order.
— First category, then channel number: the chan-
nels are sorted by their category and then by
their channel numbers.
150
— First category, then channel name: the sta-
tions are sorted by their category and then by
their channel names.
Category filter (SiriusXM*)
The stations shown in the station list can be fil-
tered by your personal preferences and by pro-
gram type. The program categories that you can
select depend on what is offered by your provid-
er. Select the All categories option to deactivate
all filter options and display all available stations
in the satellite station list.
Show "Now Playing" screen
When the function is switched on ¥ and the sta-
tions or presets list is open, the display will
switch to the Show "Now Playing" screen view
after approximately five seconds > page 149. De-
pending on availability, information about the set
station (such as station name, artist and station
logo) may be displayed in this view.
Preferred picture view
You can set your preferred screen view for the
Show "Now Playing" screen > page 149.
— Station logo: the station logo is displayed, de-
pending on availability.
— Cover art: the album cover or genre cover is dis-
played, depending on availability.
Gracenote online database*
Requirement: the MMI must be connected to the
Internet. The Cover art option must be selected
= page 150, Preferred picture view.
When the function is switched on (¥, the album
cover or genre cover for the song that is playing is
loaded from the Gracenote online database, de-
pending on availability.
Subscription status (SiriusXM)*
This option is available when your subscription is
about to expire or has already expired. The expi-
ration date for your license is displayed.
Call to SiriusXM”*: the contact information for
your satellite radio provider is displayed. To call
your satellite radio provider using the MMI, press
Call to SiriusXM”*.
Page 167 of 304

8S58012721BA
Media
Audio track!)
You can manually set the audio track (language
and audio format). The language and audio for-
mat options depend on the video DVD.
Subtitles!)
You can manually select subtitles for playback.
The languages available depend on the DVD.
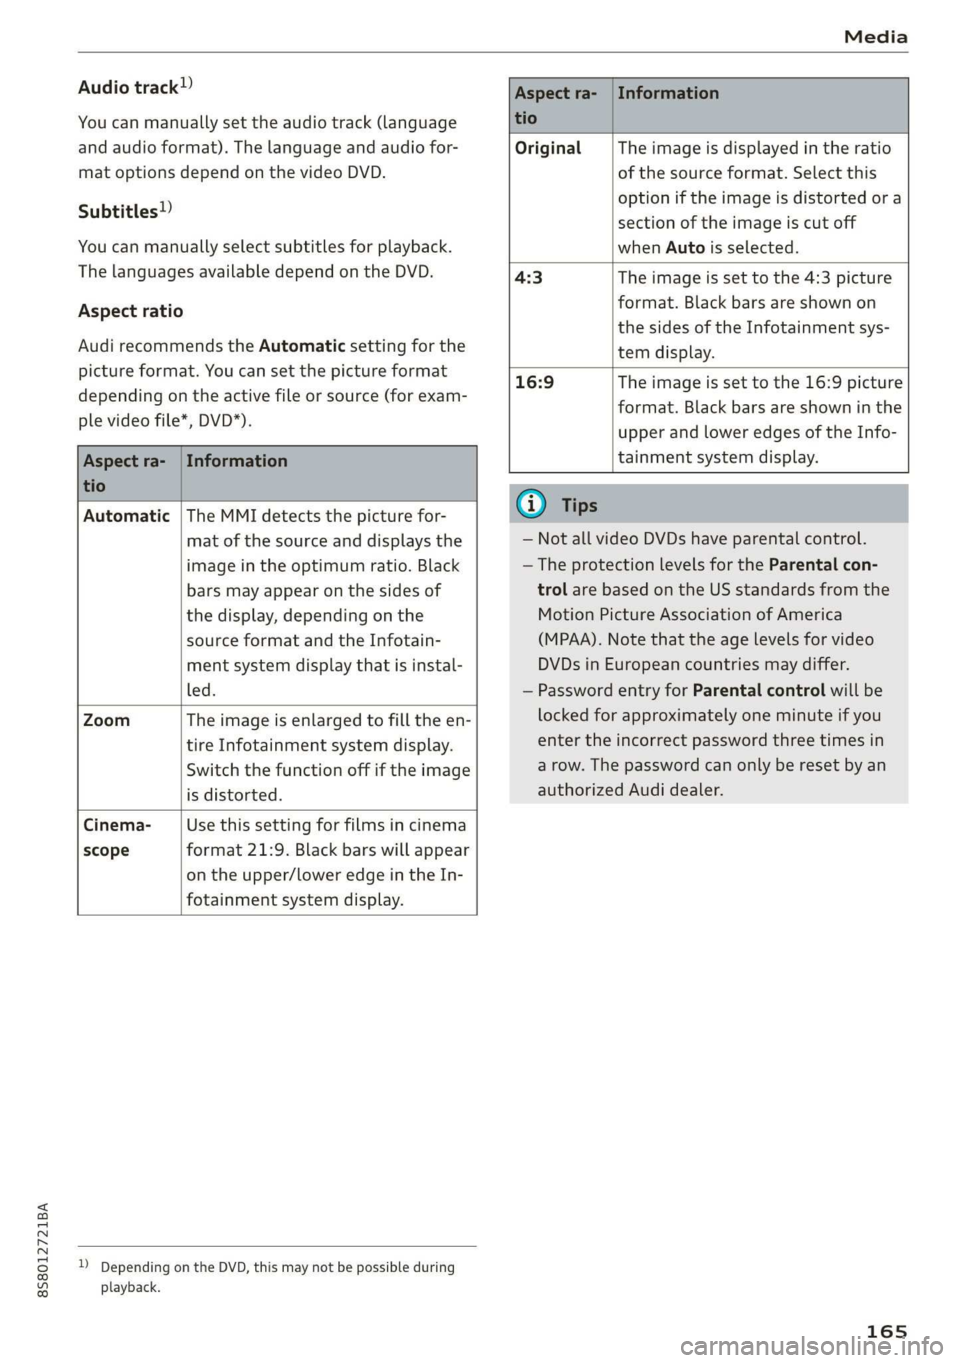
Aspect ratio
Audi recommends the Automatic setting for the
picture format. You can set the picture format
depending on the active file or source (for exam-
ple video file*, DVD*).
Aspect ra- | Information
tio
Original The image is displayed in the ratio
of the source format. Select this
option if the image is distorted ora
section of the image is cut off
when Auto is selected.
4:3 The image is set to the 4:3 picture
format. Black bars are shown on
the sides of the Infotainment sys-
tem display.
Aspect ra- | Information
tio
16:9 The image is set to the 16:9 picture
format. Black bars are shown in the
upper and lower edges of the Info-
tainment system display.
Automatic |The MMI detects the picture for-
mat of the source and displays the
image in the optimum ratio. Black
bars may appear on the sides of
the display, depending on the
source format and the Infotain-
ment system display that is instal-
led.
Zoom The image is enlarged to fill the en-
tire Infotainment system display.
Switch the function off if the image
is distorted.
Cinema- Use this setting for films in cinema
scope format 21:9. Black bars will appear
on the upper/lower edge in the In-
fotainment system display.
D Depending on the DVD, this may not be possible during
playback.
@ Tips
— Not all video DVDs have parental control.
— The protection levels for the Parental con-
trol are based on the US standards from the
Motion Picture Association of America
(MPAA). Note that the age levels for video
DVDs in European countries may differ.
— Password entry for Parental control will be
locked for approximately one minute if you
enter the incorrect password three times in
a row. The password can only be reset by an
authorized Audi dealer.
165
Page 173 of 304
![AUDI TT ROADSTER 2019 Owners Manual 8S8012721BA
System settings
System settings
Setting the date and
time
You can set the clock time manually or using the
GPS.
> Select: [MENU] button > Settings > left control
button AUDI TT ROADSTER 2019 Owners Manual 8S8012721BA
System settings
System settings
Setting the date and
time
You can set the clock time manually or using the
GPS.
> Select: [MENU] button > Settings > left control
button](/manual-img/6/57667/w960_57667-172.png)
8S8012721BA
System settings
System settings
Setting the date and
time
You can set the clock time manually or using the
GPS.
> Select: [MENU] button > Settings > left control
button > MMI settings > Date & time.
> Or: select: [MENU] button > Vehicle > left con-
trol button > Vehicle settings > Date & time.
Automatic setting
When this function is switched on ¥, the time
and date are automatically set.
Time
Requirement: the Automatic setting must be
switched off.
Press the control knob. You can set the Time
manually by turning and pressing the control
knob.
Date
Requirement: the Automatic setting must be
switched off.
Press the control knob. You can set the Date
manually by turning and pressing the control
knob.
Time zone
When selecting the appropriate time zone, a
sampling of countries in this zone will be listed.
Automatic time zone*
When this function is switched on @, the time
will automatically adjust to the corresponding
time zone.
Time format
If you select 24h, the clock will display, for exam-
ple, 13:00. If you select AM/PM, the clock will
display, for example, 1:00 PM.
D_ The Qi standard makes it possible to charge your mobile
device wirelessly.
Date format
If you select DD.MM.YYYY, the date display will
show, for example, 31.08.2017. If you select
MM/DD/YYVY, the date display will show, for ex-
ample, 08/31/2017. If you select YYYY-MM-DD,
the date display will show, for example,
2017-08-31.
MMI settings
> Select: [MENU] button > Settings > left control
button > MMI settings.
Language
You can change the display language as well as
the language for the voice guidance* and voice
recognition system*.
The number of languages available depends on
the market.
Measurement units
The following measurement units can be set de-
pending on availability: Speed, Distance, Tem-
perature, Fuel consumption, Volume, Pressure.
Mobile device reminder signal
Applies to: vehicles with Audi phone box
Requirement: your cell phone must be Qi-capa-
ble ) or connected to the Audi music interface @
with a USB adapter cable > page 113, fig. 110.
When the device reminder signal is switched on,
you will be notified that your mobile device is still
in the Audi phone box* when you leave the vehi-
cle. You can select between Spoken cue, Signal
tone
and Off.
Mobile device reminder signal volume: you can
adjust the reminder signal volume by turning the
control knob.
Switch off pop-up: when the function is switched
on [M, the messages in the Infotainment system
display regarding the charging status of your cell
phone in the Audi phone box* are hidden. The re-
minder not to forget your cell phone when leav-
ing the vehicle is likewise switched off.
171
Page 241 of 304

8S8012721BA
Checking and Filling
@) Note
— The concentration of anti-freezing agent
must be adjusted to the vehicle operating
conditions and the climate. A concentration
that is too high can lead to vehicle damage.
— Never add radiator anti-freeze or other addi-
tives to the washer fluid.
— Do not use a glass cleaner that contains
paint solvents, because this could damage
the paint.
Service interval display
The service interval display detects when your ve-
hicle is due for service.
The service interval display works in two stages:
— Inspection or oil change reminder: after a cer-
tain distance driven, a message appears in the
Infotainment system display each time the ig-
nition is switched on or off. The remaining dis-
tance or time is displayed briefly.
— Inspection or oil change due: if your vehicle
has reached an inspection or oil change interval
or both intervals at the same time, the mes-
sage Inspection due! or Oil change due! or Oil
change and inspection due! appears briefly af-
ter switching the ignition on/off.
Checking service intervals
You can check the remaining distance or time un-
til the next oil change or next inspection. Select
in the Infotainment system: the [MENU] button >
Vehicle > left control button > Service & checks >
Service intervals.
Resetting the indicator
An authorized Audi dealer or authorized Audi
Service Facility will reset the service interval dis-
play after performing service.
If you have changed the oil yourself, you must re-
set the oil change interval.
To reset the display, select in the Infotainment
system: the [MENU] button > Vehicle > left con-
trol button > Service & checks > Service intervals
> Reset oil change interval.
CG) Note
— Only reset the oil change indicator if the oil
was changed.
— Following the service intervals is critical to
maintaining the service life and value of
your vehicle, especially the engine. Even if
the mileage on the vehicle is low, do not ex-
ceed the time for the next service.
239
Page 259 of 304

8S8012721BA
Wheels
overheat and can lead to tire failure. Under-infla-
tion also reduces fuel efficiency and tire tread
life, and may affect the vehicle's handling and
stopping ability.
Please note that the TPMS is not a substitute for
proper tire maintenance, and it is the driver's re-
sponsibility to maintain correct tire pressure,
even if under-inflation has not reached the level
to trigger illumination of the TPMS low tire pres-
sure telltale.
Your vehicle has also been equipped with a TPMS
malfunction indicator to indicate when the sys-
tem is not operating properly. The TPMS mal-
function indicator is combined with the low tire
pressure telltale. When the system detects a
malfunction, the telltale will flash for approxi-
mately one minute and then remain continuously
illuminated. This sequence will continue upon
subsequent vehicle start-ups as long as the mal-
function exists.
When the malfunction indicator is illuminated,
the system may not be able to detect or signal
low tire pressure as intended. TPMS malfunctions
may occur for a variety of reasons, including the
installation of replacement or alternate tires or
wheels on the vehicle that prevent the TPMS
from functioning properly. Always check the
TPMS malfunction telltale after replacing one or
more tires or wheels on your vehicle to ensure
that the replacement or alternate tires and
wheels allow the TPMS to continue to function
properly.
If the Tire Pressure Monitoring System
indicator appears
Applies to: vehicles with Tire Pressure Monitoring System in-
dicator
The tire pressure indicator in the instrument
cluster informs you if the tire pressure is too low
or if there is a system malfunction.
Using the ABS sensors, the tire pressure monitor-
ing system compares the tire tread circumference
and vibration characteristics of the individual
tires. If the pressure changes in one or more
tires, this is indicated in the Infotainment system
display with an indicator light @ and a message.
If only one tire is affected, the location of that
tire will be indicated.
The tire pressures must be stored in the Infotain-
ment system again each time the pressures
change (switching between partial and full load
pressure) or after changing or replacing a tire on
your vehicle > page 258. The tire pressure moni-
toring system only monitors the tire pressure you
have stored. Refer to the tire pressure label for
the recommended tire pressure for your vehicle
=> page 250, fig. 184.
Tire tread circumference and vibration character-
istics can change and cause a tire pressure warn-
ing if:
— The tire pressure in one or more tires is too low
— The tire has structural damage
— The tire was replaced or the tire pressure was
changed and it was not stored > page 258
— The spare tire* is installed
Indicator lights
@® - Loss of pressure in at least one tire > A\.
Check the tires and replace or repair if necessary.
Check/correct the pressures of all four tires and
store the pressure again in the Infotainment sys-
tem > page 258.
ia (Tire Pressure Monitoring System) Tire pres-
sure: malfunction! See owner's manual - if io
appears after switching on the ignition or while
driving and then the @) indicator light in the in-
strument cluster also starts to blink for about
one minute and then stays on permanently, there
is a system malfunction. Try to store the correct
tire pressures > page 258. If the indicator light
does turn off or turns on again after a short peri-
od of time, drive to an authorized Audi dealer or
authorized Audi Service Facility immediately to
have the malfunction corrected.
ZA WARNING
— If the tire pressure indicator appears in the
display, reduce your speed immediately and
avoid any hard steering or braking maneu-
vers. Stop as soon as possible and check the
tires and their pressure.
257
Page 260 of 304

Wheels
— The driver is responsible for maintaining the
correct tire pressures. You must check the
tire pressures regularly.
— Under certain conditions (such as a sporty
driving style, winter conditions or unpaved
roads), the pressure monitor indicator may
be delayed.
— Do not use run-flat tires on your vehicle. Us-
ing them when not permitted can lead to ve-
hicle damage or accidents.
G) Tips
— The tire pressure monitoring system can al-
so stop working when there is an ESC mal-
function.
— Using snow chains may result in a system
malfunction.
— The tires with the identification “AO”
= page 247 have been matched with your
Audi tire pressure monitoring system. Using
these tires is recommended.
Storing tire pressures
Applies to: vehicles with Tire Pressure Monitoring System in-
dicator
If the tire pressure changes or a tire is replaced,
it must be confirmed in the Infotainment sys-
tem.
> Before storing the tire pressures, make sure the
tire pressures in all four tires meet the speci-
fied values and are adapted to the load
=> page 248.
> Switch the ignition on.
> Select in the Infotainment system: the
button > Vehicle > left control button > Service
& checks > Tire pressure monitoring.
G) Tips
Do not store the tire pressures if snow chains
are installed.
MENU
258
Tire pressure monitoring
system
(1) General notes
Each tire, including the spare (if provided),
should be checked monthly when cold and inflat-
ed to the inflation pressure recommended by the
vehicle manufacturer on the vehicle placard or
tire inflation pressure label. (If your vehicle has
tires of a different size than the size indicated on
the vehicle placard or tire inflation pressure la-
bel, you should determine the proper tire infla-
tion pressure for those tires).
As an added safety feature, your vehicle has been
equipped with a tire pressure monitoring system
(TPMS) that illuminates a low tire pressure tell-
tale when one or more of your tires is significant-
ly under-inflated. Accordingly, when the low tire
pressure telltale illuminates, you should stop and
check your tires as soon as possible, and inflate
them to the proper pressure. Driving on a signifi-
cantly under-inflated tire causes the tire to over-
heat and can lead to tire failure. Under-inflation
also reduces fuel efficiency and tire tread life,
and may affect the vehicle's handling and stop-
ping ability.
Please note that the TPMS is not a substitute for
proper tire maintenance, and it is the driver's re-
sponsibility to maintain correct tire pressure,
even if under-inflation has not reached the level
to trigger illumination of the TPMS low tire pres-
sure telltale.
Your vehicle has also been equipped with a TPMS
malfunction indicator to indicate when the sys-
tem is not operating properly. The TPMS mal-
function indicator is combined with the low tire
pressure telltale. When the system detects a
malfunction, the telltale will flash for approxi-
mately one minute and then remain continuously
illuminated. This sequence will continue upon
subsequent vehicle start-ups as long as the mal-
function exists.
When the malfunction indicator is illuminated,
the system may not be able to detect or signal
low
tire pressure as intended. TPMS malfunctions
may occur for a variety of reasons, including the >