2019 AUDI TT ROADSTER radio
[x] Cancel search: radioPage 107 of 304
8S58012721BA
Voice recognition system
Command overview Sequences of commands used to perform an ac-
ucn information tion are identified with a “>”, for example say:
: . . , Enter address > (then) Enter country/state.
Applies to: vehicles with voice recognition system
The majority shown are main commands. This
system also recognizes synonyms in certain cas-
es. For a business address, you can also say busi-
ness, work, office or at the office.
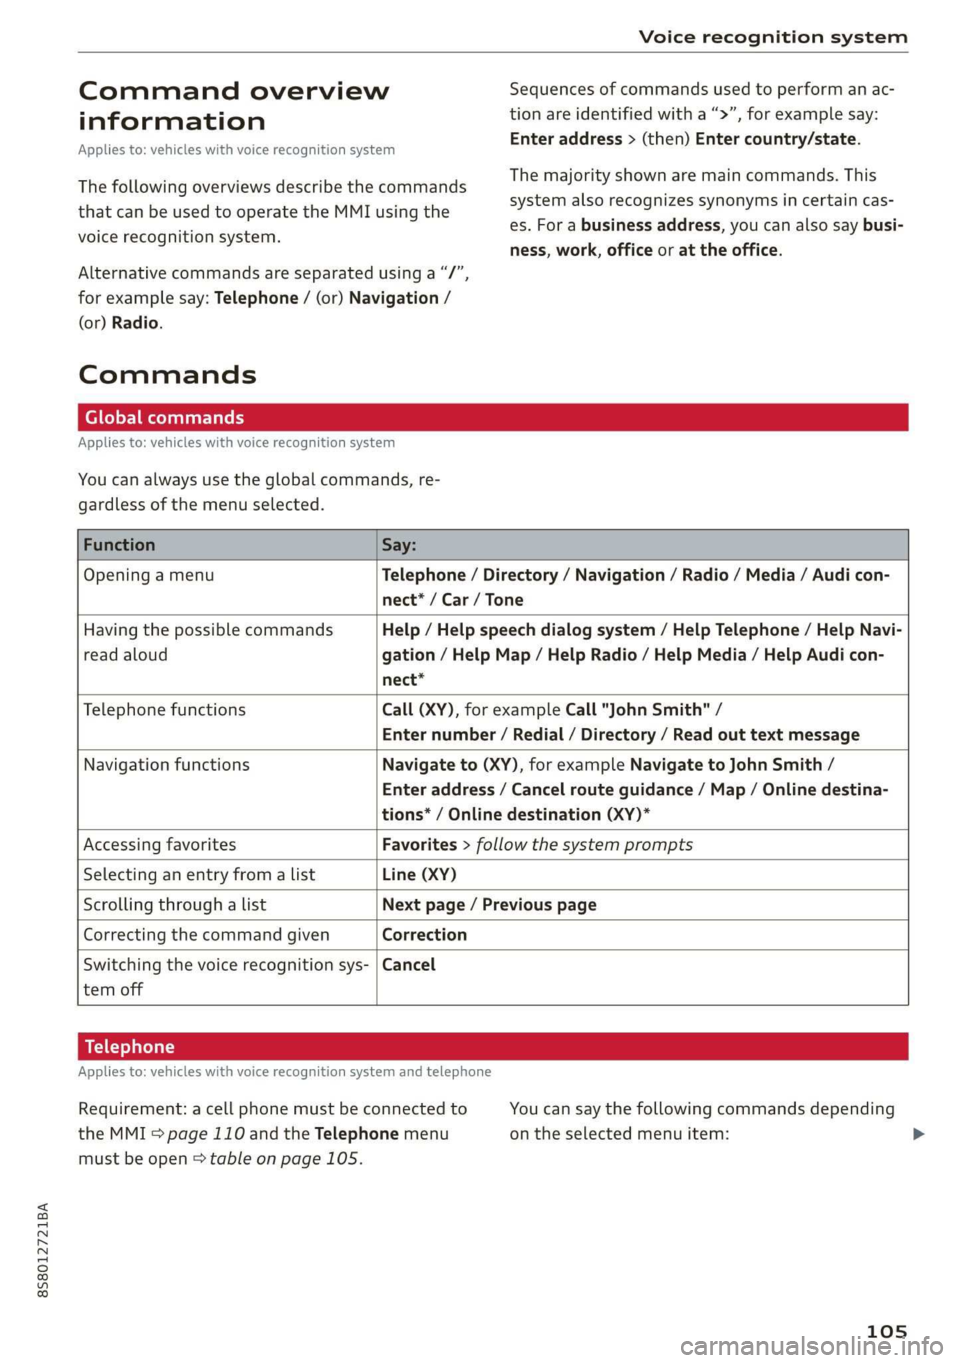
The following overviews describe the commands
that can be used to operate the MMI using the
voice recognition system.
Alternative commands are separated using a “/”,
for example say: Telephone / (or) Navigation /
(or) Radio.
Commands
Global commands
Applies to: vehicles with voice recognition system
You can always use the global commands, re-
gardless of the menu selected.
Function Say:
Opening a menu Telephone / Directory / Navigation / Radio / Media / Audi con-
nect* / Car / Tone
Having the possible commands Help / Help speech dialog system / Help Telephone / Help Navi-
read aloud gation / Help Map / Help Radio / Help Media / Help Audi con-
nect*
Telephone functions Call (XY), for example Call "John Smith" /
Enter number / Redial / Directory / Read out text message
Navigation functions Navigate to (XY), for example Navigate to John Smith /
Enter address / Cancel route guidance / Map / Online destina-
tions* / Online destination (XY)*
Accessing favorites Favorites > follow the system prompts
Selecting an entry from a list Line (XY)
Scrolling through a list Next page / Previous page
Correcting the command given Correction
Switching the voice recognition sys- | Cancel
tem off
Telephone
Applies to: vehicles with voice recognition system and telephone
Requirement: a cell phone must be connected to You can say the following commands depending
the MMI > page 110 and the Telephone menu on the selected menu item: >
must be open > table on page 105.
105
Page 110 of 304
Voice recognition system
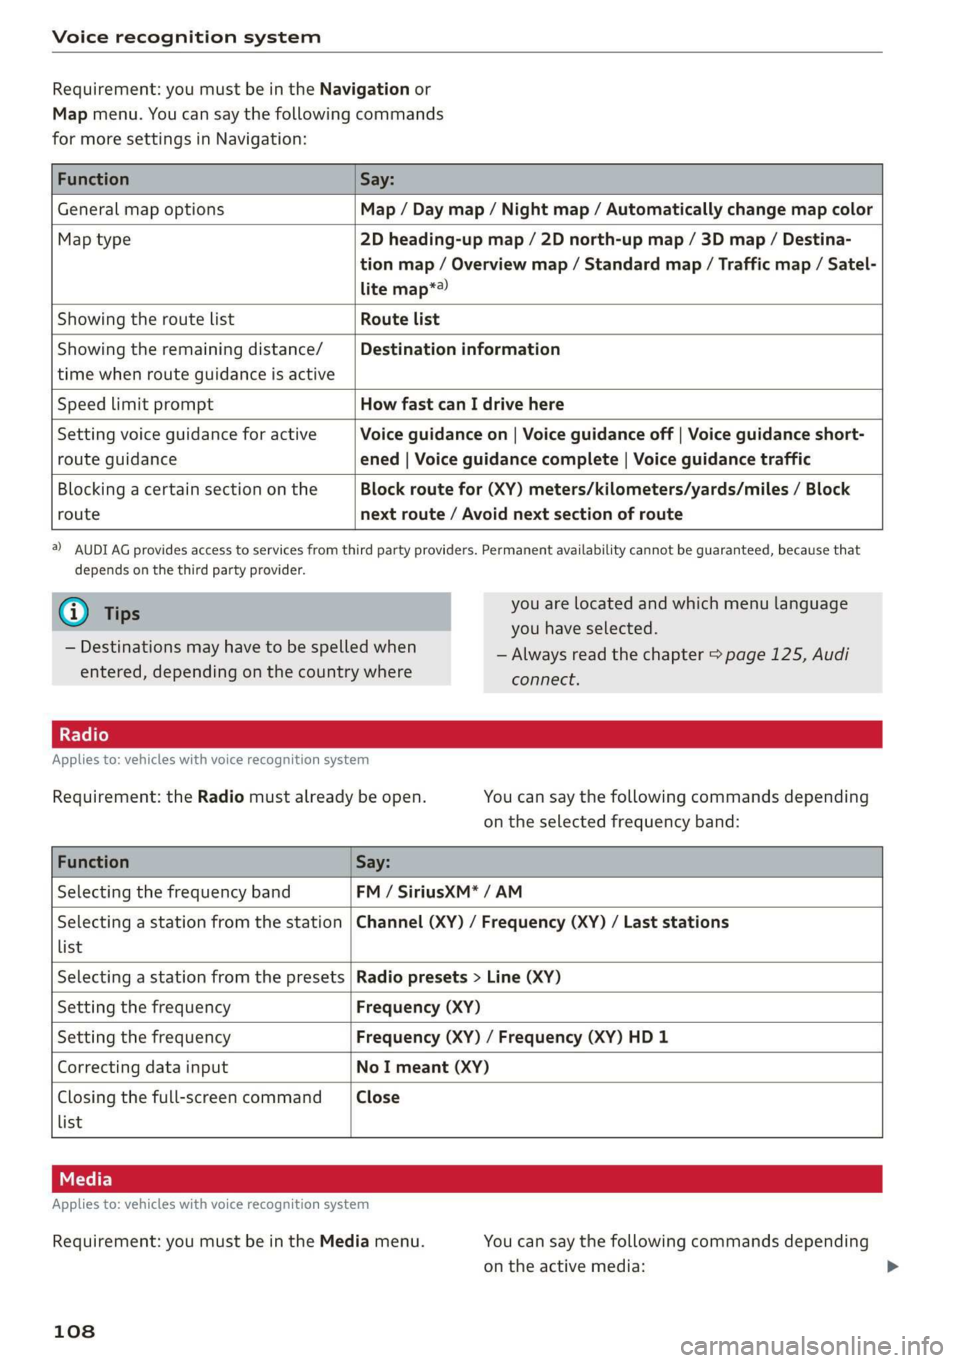
Requirement: you must be in the Navigation or
Map menu. You can say the following commands
for more settings in Navigation:
Function Say:
General map options Map / Day map / Night map / Automatically change map color
Map type 2D heading-up map / 2D north-up map / 3D map / Destina-
tion map / Overview map / Standard map / Traffic map / Satel-
lite map*?
Showing the route list Route list
Showing the remaining distance/ Destination information
time when route guidance is active
Speed limit prompt How fast can I drive here
Setting voice guidance for active Voice guidance on | Voice guidance off | Voice guidance short-
route guidance ened | Voice guidance complete | Voice guidance traffic
Blocking a certain section on the Block route for (XY) meters/kilometers/yards/miles / Block
route next route / Avoid next section of route
a) AUDI AG provides access to services from third party providers. Permanent availability cannot be guaranteed, because that
depends on the third party provider.
@) Tips you are located and which menu language
= you have selected.
— Always read the chapter > page 125, Audi
connect.
— Destinations may have to be spelled when
entered, depending on the country where
Applies to: vehicles with voice recognition system
Requirement: the Radio must already be open. You can say the following commands depending
on the selected frequency band:
Function Say:
Selecting the frequency band FM / SiriusXM* / AM
Selecting a station from the station | Channel (XY) / Frequency (XY) / Last stations
list
Selecting a station from the presets | Radio presets > Line (XY)
Setting the frequency Frequency (XY)
Setting the frequency Frequency (XY) / Frequency (XY) HD 1
Correcting data input No I meant (XY)
Closing the full-screen command Close
list
Applies to: vehicles with voice recognition system
Requirement: you must be in the Media menu. You can say the following commands depending
on the active media:
108
Page 118 of 304
Telephone
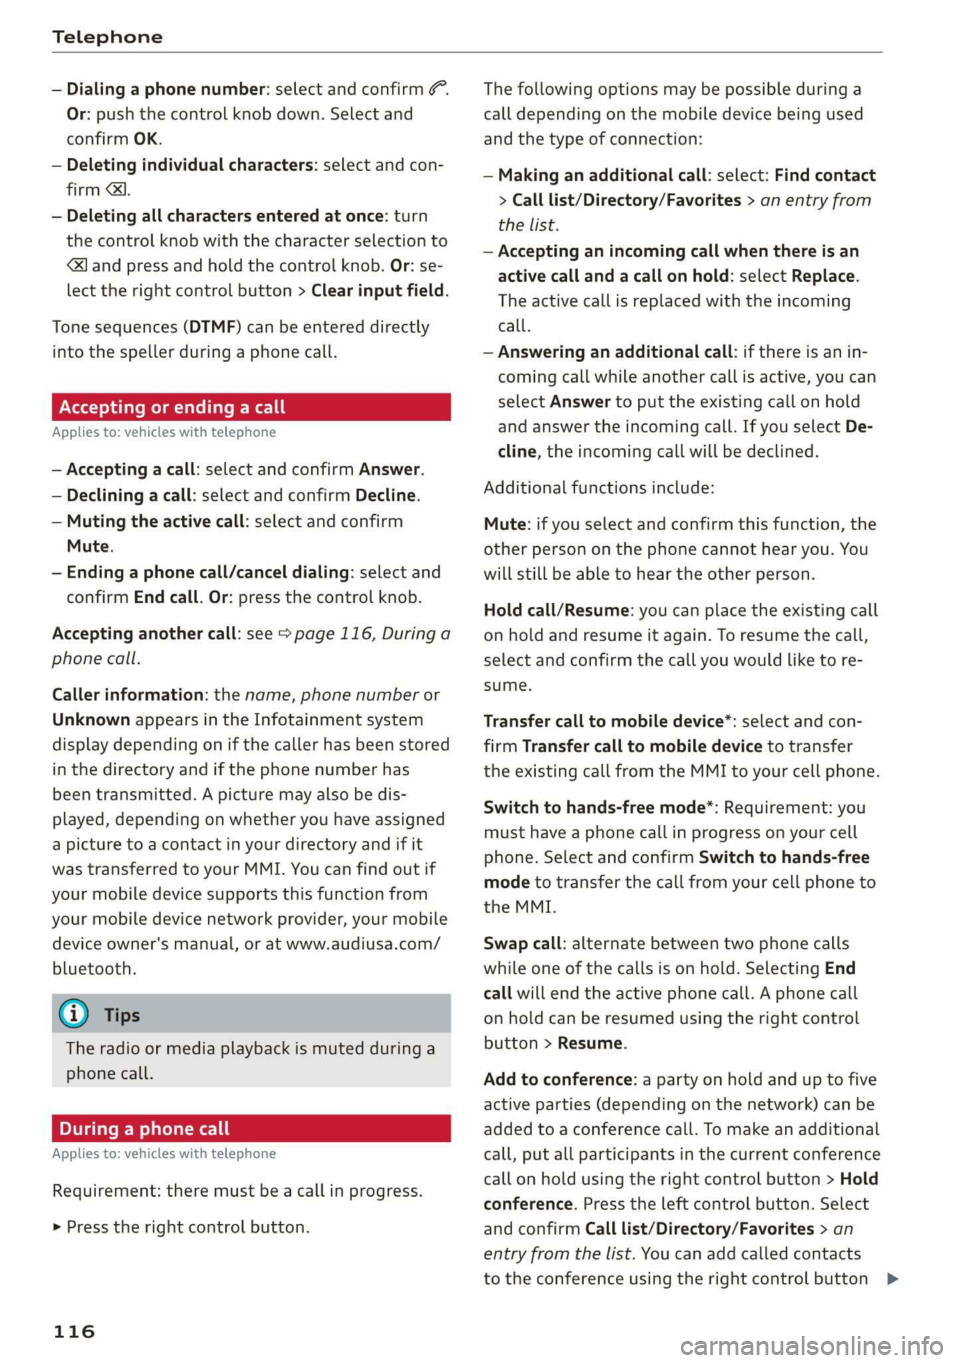
— Dialing a phone number: select and confirm &.
Or: push the control knob down. Select and
confirm OK.
— Deleting individual characters: select and con-
firm &l.
— Deleting all characters entered at once: turn
the control knob with the character selection to
land press and hold the control knob. Or: se-
lect the right control button > Clear input field.
Tone sequences (DTMF) can be entered directly
into the speller during a phone call.
Accepting or ending a call
Applies to: vehicles with telephone
— Accepting a call: select and confirm Answer.
— Declining a call: select and confirm Decline.
— Muting the active call: select and confirm
Mute.
— Ending a phone call/cancel dialing: select and
confirm End call. Or: press the control knob.
Accepting another call: see > page 116, During a
phone call.
Caller information: the name, phone number or
Unknown appears in the Infotainment system
display depending on if the caller has been stored
in the directory and if the phone number has
been transmitted. A picture may also be dis-
played, depending on whether you have assigned
a picture to a contact in your directory and if it
was transferred to your MMI. You can find out if
your mobile device supports this function from
your mobile device network provider, your mobile
device owner's manual, or at www.audiusa.com/
bluetooth.
@) Tips
The radio or media playback is muted during a
phone call.
During a phone call
Applies to: vehicles with telephone
Requirement: there must be a call in progress.
> Press the right control button.
116
The following options may be possible during a
call depending on the mobile device being used
and the type of connection:
— Making an additional call: select: Find contact
> Call list/Directory/Favorites > an entry from
the list.
— Accepting an incoming call when there is an
active call and a call on hold: select Replace.
The active call is replaced with the incoming
call.
— Answering an additional call: if there is an in-
coming call while another call is active, you can
select Answer to put the existing call on hold
and answer the incoming call. If you select De-
cline, the incoming call will be declined.
Additional functions include:
Mute: if you select and confirm this function, the
other person on the phone cannot hear you. You
will still be able to hear the other person.
Hold call/Resume: you can place the existing call
on hold and resume it again. To resume the call,
select and confirm the call you would like to re-
sume.
Transfer call to mobile device*: select and con-
firm
Transfer call to mobile device to transfer
the existing call from the MMI to your cell phone.
Switch to hands-free mode*: Requirement: you
must have a phone call in progress on your cell
phone. Select and confirm Switch to hands-free
mode to transfer the call from your cell phone to
the MMI.
Swap call: alternate between two phone calls
while one of the calls is on hold. Selecting End
call will end the active phone call. A phone call
on hold can be resumed using the right control
button > Resume.
Add to conference: a party on hold and up to five
active parties (depending on the network) can be
added to a conference call. To make an additional
call, put all participants in the current conference
call on hold using the right control button > Hold
conference. Press the left control button. Select
and confirm Call list/Directory/Favorites > an
entry from the list. You can add called contacts
to the conference using the right control button >
Page 122 of 304
Telephone
E-mail settings*
To display when a new e-mail is received, activate
the E-mail notifications. New e-mails are indicat-
ed with an envelope & in the Infotainment sys-
tem display status line.
Connection manager
See > page 172.
Bluetooth settings
See > page 174.
Online settings
See > page 174.
Wi-Fi settings
See > page 130, Wi-Fi settings.
Telephone settings
See > page 122.
G) Tips
Messages that are deleted in the MMI are also
automatically deleted in the connected cell
phone.
Listening to voicemail
Applies to: vehicles with telephone
MENU > Select: button > Telephone > left con-
trol button. Select and confirm Call list/Direc-
tory/Favorites > Voicemail.
— Entering the voicemail number: enter the de-
sired number. Select and confirm OK.
— Dialing the voicemail number: select and con-
firm
Voicemail.
@ Tips
— This service must be set up and activated in
advance by the cell phone service provider.
You can obtain more information from your
cell phone service provider.
— The voicemail number depends on the cell
phone service provider.
120
Emergency call functions
Applies to: vehicles with telephone
MENU > Select: button > Telephone > left con-
trol button > Dial number > Enter emergency
call number (for example, 911) > OK.
ZA WARNING
— Because your phone works with radio sig-
nals, a connection cannot be guaranteed un-
der all circumstances. Do not rely on only
your phone when it comes to essential com-
munication (such as a medical emergency).
— Always follow the instructions given by the
emergency personnel during an emergency
call and only end the call when they instruct
you to do so.
@) Tips
Emergency numbers are not
the same every-
where. Find out which emergency number is
used in your current location.
Directory
Opening the directory
Applies to: vehicles with telephone
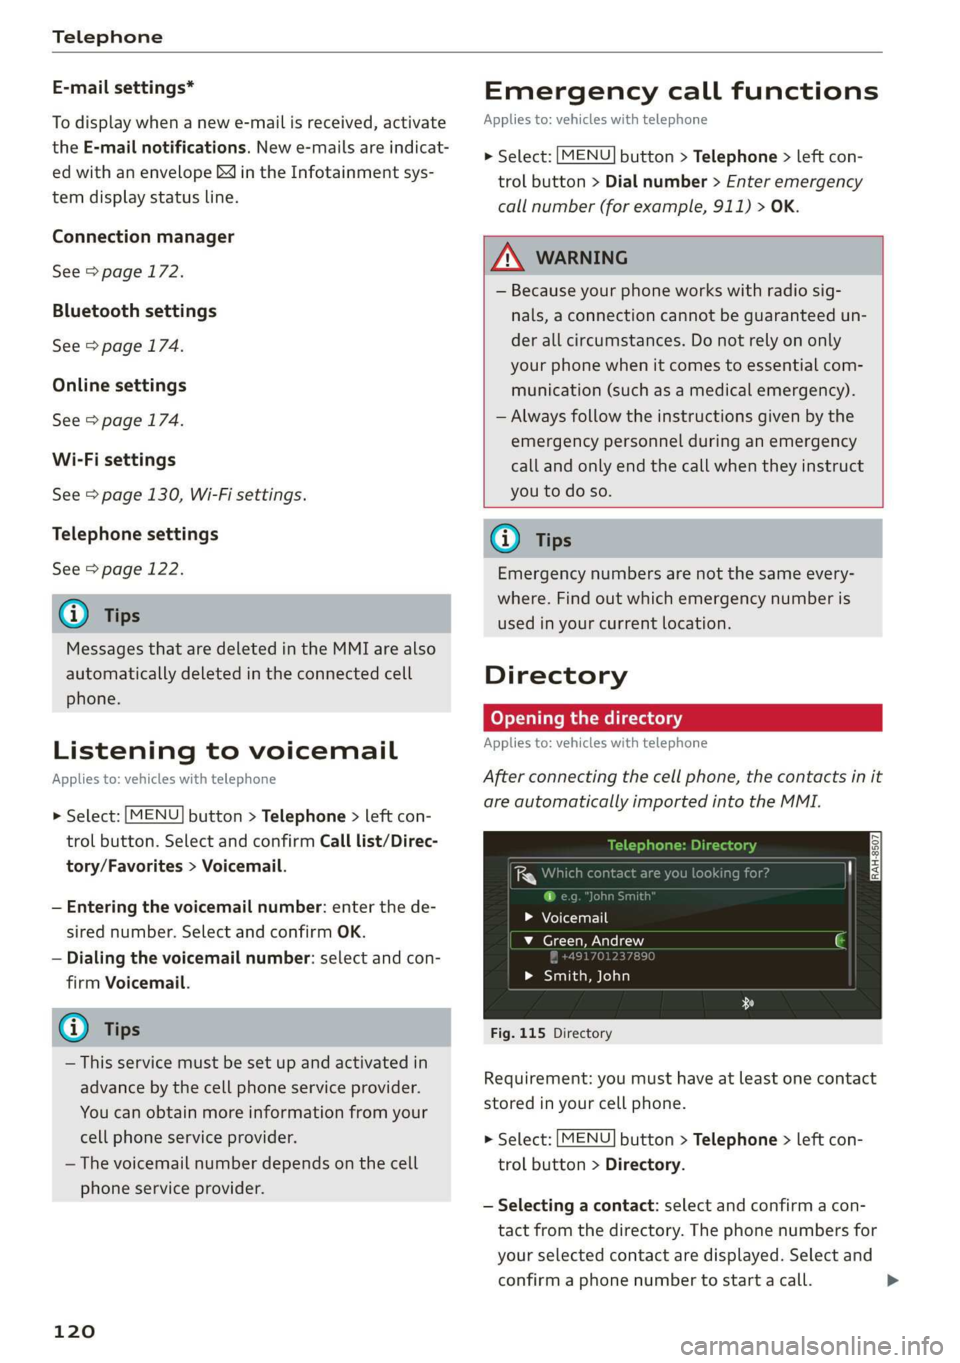
After connecting the cell phone, the contacts in it
are automatically imported into the MMI.
uno
i ce h
> Voicemail
v_ Green, Andrew
> Smith, John
Fig. 115 Directory
Requirement: you must have at least one contact
stored in your cell phone.
> Select: [MENU] button > Telephone > left con-
trol button > Directory.
— Selecting a contact: select and confirm a con-
tact from the directory. The phone numbers for
your selected contact are displayed. Select and
confirm a phone number to start a call. >
Page 149 of 304
8S8012721BA
Radio
Radio
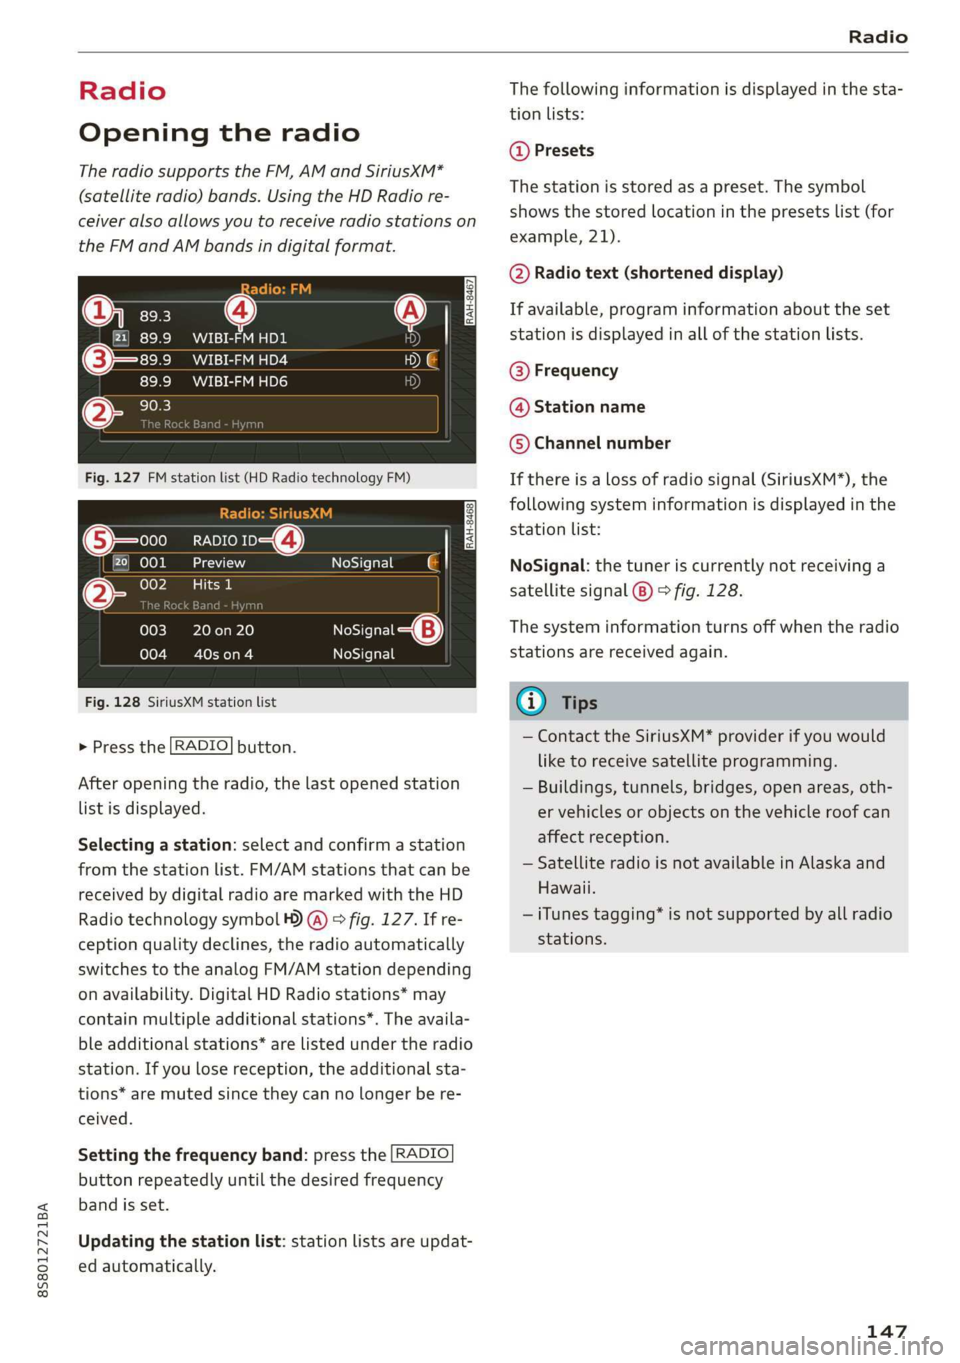
Opening the radio
The radio supports the FM, AM and SiriusXM*
(satellite radio) bands. Using the HD Radio re-
ceiver also allows you to receive radio stations on
the FM and AM bands in digital format.
eer
iCeleesto nc mts) VED
89.9 WIBI-FM HD4
89.9 WIBI-FM HD6
(2) 90.3
Fig. 127 FM station list (HD Radio technology FM)
RADIO v-Q)
kVA
lie
|
RAH-8468
NoSignal
20 on 20
40s on 4
NoSignal NoSignal
Fig. 128 SiriusXM station list
> Press the [RADIO] button.
After opening the radio, the last opened station
list is displayed.
Selecting a station: select and confirm a station
from the station list. FM/AM stations that can be
received by digital radio are marked with the HD
Radio
technology symbol ) @) > fig. 127. If re-
ception quality declines, the radio automatically
switches to the analog FM/AM station depending
on availability. Digital HD Radio stations* may
contain multiple additional stations*. The availa-
ble additional stations* are listed under the radio
station. If you lose reception, the additional sta-
tions* are muted since they can no longer be re-
ceived.
Setting the frequency band: press the [RADIO
button
repeatedly until the desired frequency
band is set.
Updating the station list: station lists are updat-
ed automatically.
The following information is displayed in the sta-
tion lists:
@ Presets
The station is stored as a preset. The symbol
shows the stored location in the presets list (for
example, 21).
@ Radio text (shortened display)
If available, program information about the set
station is displayed in all of the station lists.
@ Frequency
@ Station name
© Channel number
If there is a loss of radio signal (SiriusXM*), the
following system information is displayed in the
station list:
NoSignal: the tuner is currently not receiving a
satellite signal (®) > fig. 128.
The system information turns off when the radio
stations are received again.
@) Tips
— Contact the SiriusXM* provider if you would
like to receive satellite programming.
— Buildings, tunnels, bridges, open areas, oth-
er vehicles or objects on the vehicle roof can
affect reception.
— Satellite radio is not available in Alaska and
Hawaii.
— iTunes tagging” is not supported by all radio
stations.
147
Page 150 of 304
![AUDI TT ROADSTER 2019 Owners Manual Radio
Radio functions
ct-Me-y aati]
Using the free text search, you can select the or-
der that the search terms are entered in the in-
put field. Search in all frequency bands for a sta-
t AUDI TT ROADSTER 2019 Owners Manual Radio
Radio functions
ct-Me-y aati]
Using the free text search, you can select the or-
der that the search terms are entered in the in-
put field. Search in all frequency bands for a sta-
t](/manual-img/6/57667/w960_57667-149.png)
Radio
Radio functions
ct-Me-y aati]
Using the free text search, you can select the or-
der that the search terms are entered in the in-
put field. Search in all frequency bands for a sta-
tion name or program type (such as News).
MYA Dee
Mt)
WIBI-FM HD6
Fig. 129 Input field and results list for free text search
— Opening the free text search: when in a station
list, keep turning the control knob to the left
until the free text search input field is dis-
played.
— Using the free text search: see > page 100,
Free text search.
You can also search for frequencies.
Stations from the presets (3) are displayed in the
results list @ > fig. 129. The symbol @) indicates
which station list you switched to based on the
station selection.
Additional options
> Select: [RADIO] button > right control button.
The following options are available depending on
the frequency band:
— Sound settings: see > page 175.
— Store as preset: see > page 149, Presets.
— Delete all entries: all entries are deleted in the
Last stations view.
— Tag this song for iTunes*): connect your Apple
device to the Audi music interface* on your
MMI. Select and confirm Tag this song for
iTunes. The track that is currently playing is
stored on your Apple device. Synchronize your
) In preparation at the time of printing.
148
Apple device with iTunes. The tagged track will
display the next time you open your iTunes me-
dia center. If there is no Apple device connect-
ed, the tagged tracks are stored temporarily in
the MMI (maximum of 50 tracks). Once you
connect your Apple device to the Audi music in-
terface, the tags are stored on the device.
— Manual tuning: the frequency bars are dis-
played. Select and confirm the desired frequen-
vy.
— Seek: the radio tunes to the previous or next re-
ceivable station.
— Scan: all stations are played for several seconds
each.
— Radio settings: see > page 150.
Radio text
> Select: [RADIO] button > left control button >a
frequency band (such as FM) > a station.
> Select: right control button > Radio text.
Browsing through radio text entries: turn the
control knob to the left or right.
Requirement: a radio text entry must be dis-
played and the station must be broadcasting a
phone number, a navigation destination or a text
message number as RadioText Plus information.
If a location, a phone number or a text message
number is included with a radio text entry, the ra-
dio text will be shown with a colored border. You
have the following options:
Call*/Start route guidance*/Write text mes-
sage”*:
— Select a radio text entry with RadioText Plus in-
formation and press the control knob.
— Select and confirm Call*/Start route guid-
ance*/Write text message”. Or: press the
BACK] button to cancel.
(i) Tips
The availability of radio text and RadioText
Plus depends on the radio station.
Page 151 of 304
![AUDI TT ROADSTER 2019 Owners Manual 8S8012721BA
Radio
View: Show "Now Playing" screen > Select: [RADIO] button > left control button.
Setting the frequency band: select and confirm
the desired frequency band in the radio men AUDI TT ROADSTER 2019 Owners Manual 8S8012721BA
Radio
View: Show "Now Playing" screen > Select: [RADIO] button > left control button.
Setting the frequency band: select and confirm
the desired frequency band in the radio men](/manual-img/6/57667/w960_57667-150.png)
8S8012721BA
Radio
View: Show "Now Playing" screen > Select: [RADIO] button > left control button.
Setting the frequency band: select and confirm
the desired frequency band in the radio menu
> fig. 131. Or: press the [RADIO] button repeat-
edly until the desired frequency band is set. Dis-
plays the station list.
@ Switch to media
The Media menu is displayed. See > page 160,
Playing media. Fig. 130 Radio view: additional station information
Requirement: you must be tuned to a radio sta- @ Favorites
tion. The Show "Now Playing" screen option
| The favorites list is displayed. See > page 149,
must be switched on > page 150.
Presets.
Symbols in the Show "Now Playing" screen
> fig. 130:
@ Radio text availability
@® Last stations
The last stations listened to from all frequency
bands are shown in the list. Select and confirm a
Radio text is available for the selected station. station for immediate playback.
See > page 148.
@ SiriusxM*
iTunes taggin
@ gging The SiriusXM* station list is displayed.
The Tag this song for iTunes option is available
for the set station. See > page 148, Additional @©FM
options. The FM station list is displayed.
@ FM HD Radio technology Additional frequency
bands
The station is received through FM HD Radio Depending on the vehicle equipment, you can se-
technology. lect additional frequency bands in the selection
@ Screen view menu © fig. 131.
Display Cover art or Station logo. See Presets
=> page 150.
You can store your favorite stations from every
Displaying a station list: turn the control knob. frequency band in the presets list.
Or: press the [BACK] button.
> Select: the [RADIO] button > Presets.
Radio menu Requirement: the presets list must be displayed.
run : — Storing presets: select and confirm a free pre-
) | Change to media . .
set space. Follow the system instructions.
— Select and confirm a station from the list if
necessary.
Presets
©— Oso clear
pSTTa Tey
a i Requirement: a station list must be displayed.
— Storing presets: select: an entry from the list >
right control button > Store as preset. Or: press
and hold the control knob for several seconds. >
Fig. 131 Example: Radio menu
149
Page 152 of 304
![AUDI TT ROADSTER 2019 Owners Manual Radio
— Displaying the presets list: select: [RADIO] but-
ton > Presets.
Requirement: the favorites list must be dis-
played.
— Listening to presets: select and confirm a pre-
AUDI TT ROADSTER 2019 Owners Manual Radio
— Displaying the presets list: select: [RADIO] but-
ton > Presets.
Requirement: the favorites list must be dis-
played.
— Listening to presets: select and confirm a pre-](/manual-img/6/57667/w960_57667-151.png)
Radio
— Displaying the presets list: select: [RADIO] but-
ton > Presets.
Requirement: the favorites list must be dis-
played.
— Listening to presets: select and confirm a pre-
set from the list.
— Move preset: select a preset from the list >
right control button > Move preset. Or: press
and hold the control knob for several seconds.
Select and confirm the location of the selected
preset.
— Deleting presets: select a preset from the list >
right control button > Delete preset > Delete
this preset or Delete all presets.
Additional settings
Radio settings
> Select: [RADIO] button > right control button >
Radio settings.
The following settings can be selected, depend-
ing on the band that is selected:
Station names (FM)
Variable: scrolling text transmitted by the FM
stations is shown in the Infotainment system dis-
play.
Fixed: scrolling text transmitted by the FM sta-
tions is not shown in the Infotainment system
display. Only the current section of the scrolling
text is displayed.
FM/AM HD Radio*
You can switch HD Radio reception on or off.
Channel sorting (SiriusXM*)
You can set the channel sorting for SiriusXM sta-
tion lists* by:
— Channel number: the channels are sorted in as-
cending order according to their channel num-
ber.
— Channel name: the channels are listed in alpha-
betical order.
— First category, then channel number: the chan-
nels are sorted by their category and then by
their channel numbers.
150
— First category, then channel name: the sta-
tions are sorted by their category and then by
their channel names.
Category filter (SiriusXM*)
The stations shown in the station list can be fil-
tered by your personal preferences and by pro-
gram type. The program categories that you can
select depend on what is offered by your provid-
er. Select the All categories option to deactivate
all filter options and display all available stations
in the satellite station list.
Show "Now Playing" screen
When the function is switched on ¥ and the sta-
tions or presets list is open, the display will
switch to the Show "Now Playing" screen view
after approximately five seconds > page 149. De-
pending on availability, information about the set
station (such as station name, artist and station
logo) may be displayed in this view.
Preferred picture view
You can set your preferred screen view for the
Show "Now Playing" screen > page 149.
— Station logo: the station logo is displayed, de-
pending on availability.
— Cover art: the album cover or genre cover is dis-
played, depending on availability.
Gracenote online database*
Requirement: the MMI must be connected to the
Internet. The Cover art option must be selected
= page 150, Preferred picture view.
When the function is switched on (¥, the album
cover or genre cover for the song that is playing is
loaded from the Gracenote online database, de-
pending on availability.
Subscription status (SiriusXM)*
This option is available when your subscription is
about to expire or has already expired. The expi-
ration date for your license is displayed.
Call to SiriusXM”*: the contact information for
your satellite radio provider is displayed. To call
your satellite radio provider using the MMI, press
Call to SiriusXM”*.