Page 209 of 232

OPTION button (2)
Pressing the "Option" button while within the modes (”RADIO”, “MEDIA”, “PHONE”, “NAVIGATION”) will open the "Settings" screen of
the concerned mode. Press it again to go back to the previously selected mode.
Rotary Pad (3)
Action Function
ROTATIONWithinthe Menus: scrolls the menu items.
In Navigation mode (where provided): zoom function on the maps.
PUMP Within the Menus: confirms the selection.
BRIEF MOVEMENT TO THE RIGHTWithin the Menus: accesses to the sub-menu of the selected function.
In Navigation mode (where provided), in the Explore map: to move to the
right on the map.
BRIEF MOVEMENT TO THE LEFTWithin the Menus: returns to the previous menu; Esc function.
In Navigation mode (where provided), in the Explore map: to move to the
left on the map.
BRIEF UPWARD MOVEMENTWithin the Menus: enter the Multitasking menu and closes the
preselection bar.
In Navigation mode (where provided), in the Explore map: to move
upwards on the map.
BRIEF DOWNWARD MOVEMENTActivates the radio preselection.
Within the Menus: enter the preselection bar and closes the Multitasking
menu.
In Navigation mode (where provided), in the Explore map: to move
downwards on the map.
MENU button (4)
Opens the main menu.
207
Page 210 of 232
CONTROLS ON THE STEERING WHEEL
DESCRIPTION
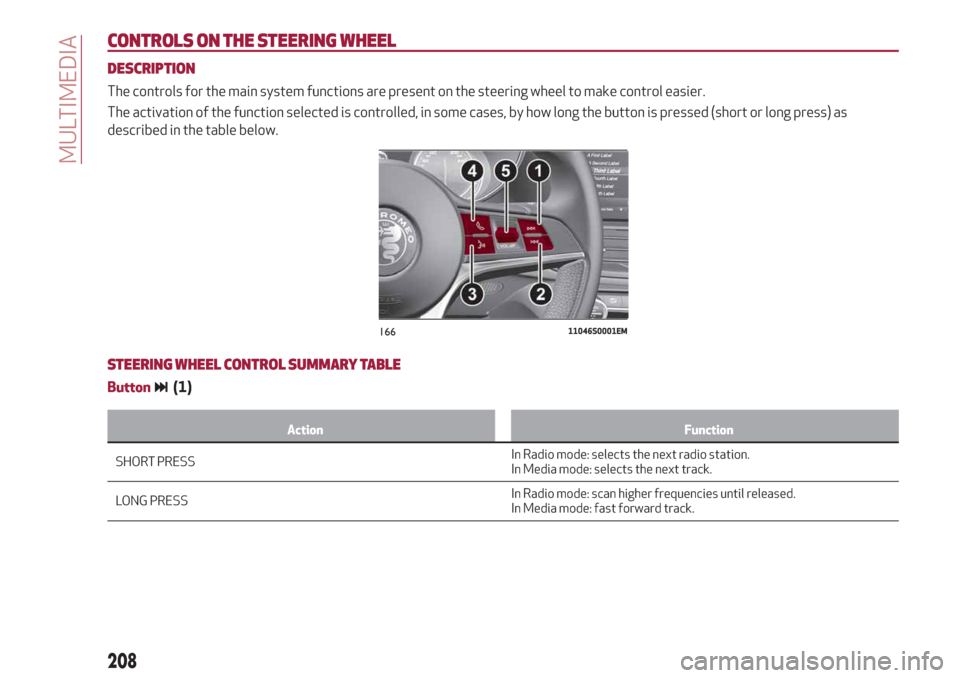
The controls for the main system functions are present on the steering wheel to make control easier.
The activation of the function selected is controlled, in some cases, by how long the button is pressed (short or long press) as
described in the table below.
STEERING WHEEL CONTROL SUMMARY TABLE
Button(1)
Action Function
SHORT PRESSInRadio mode: selects the next radio station.
In Media mode: selects the next track.
LONG PRESSIn Radio mode: scan higher frequencies until released.
In Media mode: fast forward track.
16611046S0001EM
208
MULTIMEDIA
Page 211 of 232
Button(2)
Action Function
SHORT PRESSInRadio mode: selects the previous radio station.
In Media mode: selects the previous track.
LONG PRESSIn Radio mode: scan lower frequencies until released.
In Media mode: fast rewind track.
Voice command button (3)
Action Function
SHORT PRESS Activate voice commands.
L
ONG PRESS Close the voice session immediately.
Phone button (4)
Answers / closes call or shows the recent calls list.
Volume Control (5)
Action Function
ROTATIONUpwards:increases the volume.
Downwards: decreases the volume.
SHORT PRESSIn Radio mode: activates/deactivates the Mute function.
In Media mode: activates play/pause.
In Phone mode: activates/deactivates the microphone Mute function.
209
Page 212 of 232
INTRODUCTION
The system can be managed using the
Rotary Pad. Turn it to navigate the menus,
press it to activate/confirm the
selections, push it leftwards to go back to
the previous screen.
RADIO MODE
After the desired radio station is
selected, the following information is
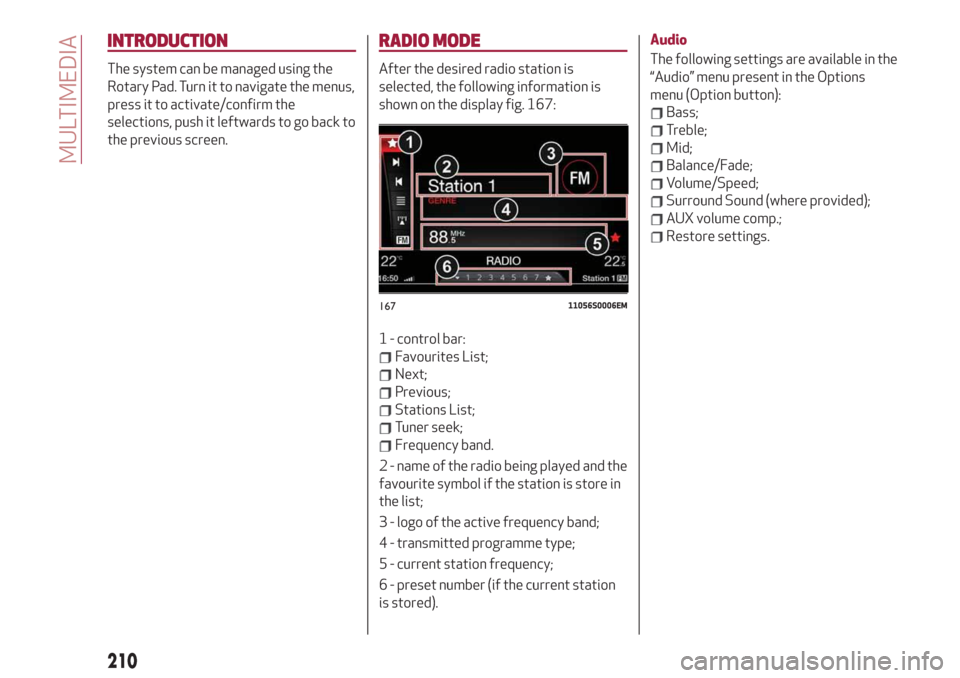
shown on the display fig. 167:
1 - control bar:
Favourites List;
Next;
Previous;
Stations List;
Tuner seek;
Frequency band.
2 - name of the radio being played and the
favourite symbol if the station is store in
the list;
3 - logo of the active frequency band;
4 - transmitted programme type;
5 - current station frequency;
6 - preset number (if the current station
is stored).Audio
The following settings are available in the
“Audio” menu present in the Options
menu (Option button):
Bass;
Treble;
Mid;
Balance/Fade;
Volume/Speed;
Surround Sound (where provided);
AUX volume comp.;
Restore settings.
16711056S0006EM
210
MULTIMEDIA
Page 213 of 232

MEDIA MODE
IMPORTANT Applications used on
portable devices may be not compatible
with the Connect system.
Track selection (Browse)
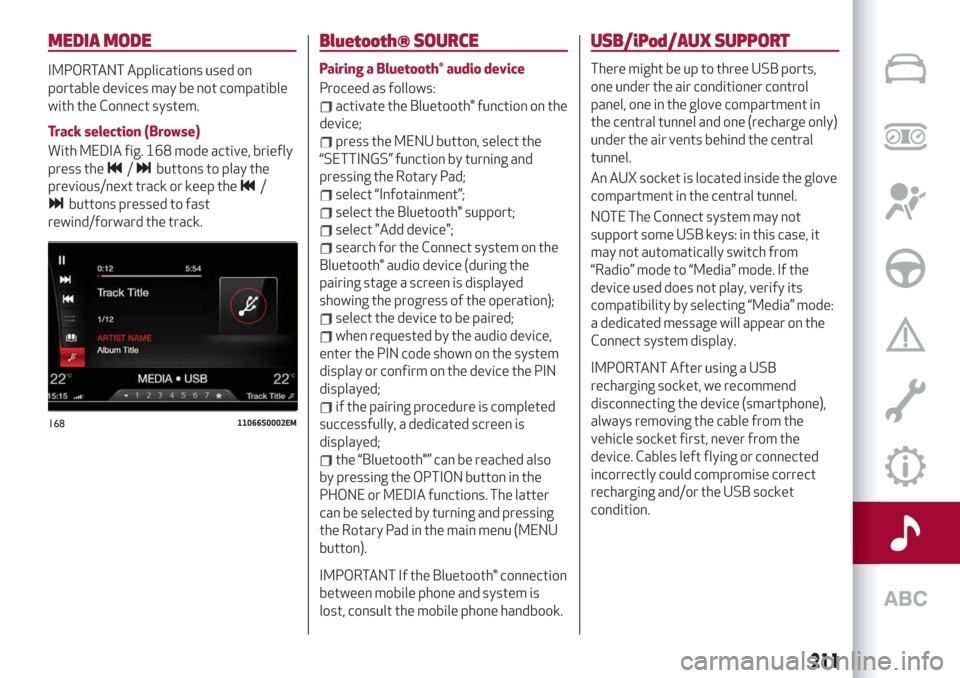
With MEDIA fig. 168 mode active, briefly
press the
/buttons to play the
previous/next track or keep the
/
buttons pressed to fast
rewind/forward the track.
Bluetooth® SOURCE
Pairing a Bluetooth® audio device
Proceed as follows:
activate the Bluetooth® function on the
device;
press the MENU button, select the
“SETTINGS” function by turning and
pressing the Rotary Pad;
select “Infotainment”;
select the Bluetooth® support;
select "Add device";
search for the Connect system on the
Bluetooth® audio device (during the
pairing stage a screen is displayed
showing the progress of the operation);
select the device to be paired;
when requested by the audio device,
enter the PIN code shown on the system
display or confirm on the device the PIN
displayed;
if the pairing procedure is completed
successfully, a dedicated screen is
displayed;
the “Bluetooth®” can be reached also
by pressing the OPTION button in the
PHONE or MEDIA functions. The latter
can be selected by turning and pressing
the Rotary Pad in the main menu (MENU
button).
IMPORTANT If the Bluetooth® connection
between mobile phone and system is
lost, consult the mobile phone handbook.
USB/iPod/AUX SUPPORT
There might be up to three USB ports,
one under the air conditioner control
panel, one in the glove compartment in
the central tunnel and one (recharge only)
under the air vents behind the central
tunnel.
An AUX socket is located inside the glove
compartment in the central tunnel.
NOTE The Connect system may not
support some USB keys: in this case, it
may not automatically switch from
“Radio” mode to “Media” mode. If the
device used does not play, verify its
compatibility by selecting “Media” mode:
a dedicated message will appear on the
Connect system display.
IMPORTANT After using a USB
recharging socket, we recommend
disconnecting the device (smartphone),
always removing the cable from the
vehicle socket first, never from the
device. Cables left flying or connected
incorrectly could compromise correct
recharging and/or the USB socket
condition.
16811066S0002EM
211
Page 214 of 232

PHONE MODE
PHONE mode can be activated from the
main menu (MENU button) by turning and
pressing the Rotary Pad.
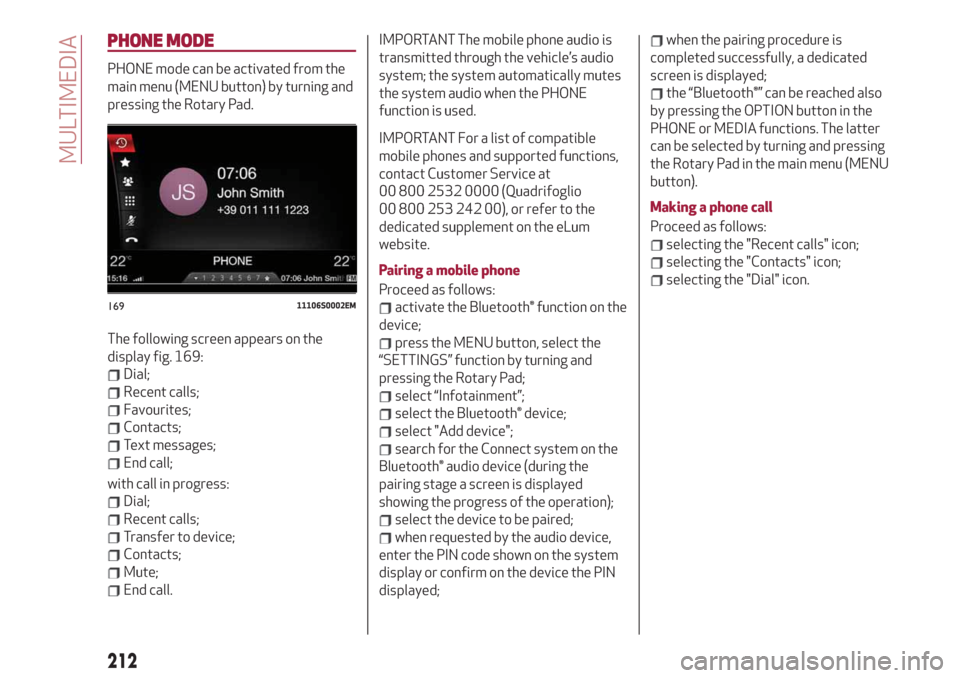
The following screen appears on the
display fig. 169:
Dial;
Recent calls;
Favourites;
Contacts;
Text messages;
End call;
with call in progress:
Dial;
Recent calls;
Transfer to device;
Contacts;
Mute;
End call.
IMPORTANT The mobile phone audio is
transmitted through the vehicle’s audio
system; the system automatically mutes
the system audio when the PHONE
function is used.
IMPORTANT For a list of compatible
mobile phones and supported functions,
contact Customer Service at
00 800 2532 0000 (Quadrifoglio
00 800 253 242 00), or refer to the
dedicated supplement on the eLum
website.
Pairing a mobile phone
Proceed as follows:
activate the Bluetooth® function on the
device;
press the MENU button, select the
“SETTINGS” function by turning and
pressing the Rotary Pad;
select “Infotainment”;
select the Bluetooth® device;
select "Add device";
search for the Connect system on the
Bluetooth® audio device (during the
pairing stage a screen is displayed
showing the progress of the operation);
select the device to be paired;
when requested by the audio device,
enter the PIN code shown on the system
display or confirm on the device the PIN
displayed;
when the pairing procedure is
completed successfully, a dedicated
screen is displayed;
the “Bluetooth®” can be reached also
by pressing the OPTION button in the
PHONE or MEDIA functions. The latter
can be selected by turning and pressing
the Rotary Pad in the main menu (MENU
button).
Making a phone call
Proceed as follows:
selecting the "Recent calls" icon;
selecting the "Contacts" icon;
selecting the "Dial" icon.
16911106S0002EM
212
MULTIMEDIA
Page 215 of 232

NAVIGATION MODE
(where provided)
IMPORTANT In the interest of safety and
to reduce distractions while you are
driving, you should always plan a route
before you start driving.
To plan a route, do the following:
Activate the NAVIGATION mode by
selecting it on the main menu fig. 170;
Activate the "Set destination"
function;
To insert the address, select the item to
add (Country, City) on the circular keypad,
choosing the keys to compose the
desired name; proceeding with keying in
the letters, the system automatically
completes the word and on the right of
the display offers a list of options that
apply to the entered letters. You can now
either complete the word or go to the list
of suggestions by moving the Rotary Padrightwards or by pointing to “OK” and
pressing the Rotary Pad.
Or
Select an address on the "Recent
destinations" list.
Or
Select an address on the "Favourite
destinations" list.
Once the desired destination has been
set, select "Start navigation" function.
The system suggests three alternatives
according to the set criteria (fastest, no
toll routes etc.); select the preferred
alternative using the Rotary Pad.
With navigation started, using the control
bar on the display, you can choose from
the following options:
Interrupt navigation: lets you interrupt
navigation;
Navigation volume: allows to set the
message volume;
Route management: lets you refine
your route choice, offering a series of
options;
Route Preview: this is used to see a
preview of the planned route;
Zoom: lets you enlarge/reduce the
map;
Map explore: lets you move within the
map.
SETTINGS
To access the user-programmable
functions, open the main menu by
pressing the MENU button, then select
SETTINGS by turning and pressing the
Rotary Pad.
The following menu items can be found
here fig. 171:
Lights;
Units & Language;
Time and Date;
Safety;
Driver assistance;
Doors & Locks;
Cluster;
Infotainment;
System.17011186S0003EM
17111126S0009EM
213
Page 216 of 232

Lights
To access the “Lights” function, select it
by turning the Rotary Pad and press the
Rotary Pad to activate. The following
settings can be modified when this mode
is selected:
Headlight sensor;
Follow me;
Cornering lights;
Flash lights when locking;
Daytime running lights;
Courtesy lights;
Interior lights;
Automatic High Beam;
Restore settings.
Units & Language
To access the “Units and languages”
function, select it by turning the Rotary
Pad and press the Rotary Pad to activate.
The following settings can be modified
when this mode is selected:
Units;
Language;
Restore settings.Time and Date
To access the “Time & date” function,
select it by turning the Rotary Pad and
press the Rotary Pad to activate. The
following settings can be modified when
this mode is selected:
Sync with GPS Time;
Set time;
Time format;
Set Date;
Restore settings.
Safety
To access the “Safety” function, select it
by turning the Rotary Pad and press the
Rotary Pad to activate. The following
settings can be modified when this mode
is selected:
Speed Limiter
This lets you activate/deactivate the
function warning that you have exceeded
the set speed.
Speed Limiter - Set Speed
Lets you set the speed limit value. By
turning the Rotary Pad, the speed
increases by 5 mph (5 km/h), on rotation,
from a minimum of 20 mph (30 km/h) to a
maximum of 110 mph (180 km/h).
Forward Collision Warning
Allows you to select the intervention
readiness for the anti-collision system.
The options available are:
"Status": lets you activate/deactivate
the system (where provided);
"Mode": used to set the following
operating modes: “Warning-brake”,
“Warning”, “Off” (where provided);
"Sensitivity": allows you to select the
intervention readiness for the system
according to the distance of the obstacle
(near, average, far).
Lane Departure Warning
This function can be used to select the
"readiness" of the Lane Departure
system to intervene. The “Sensitivity"
option is provided: allows you to select
the intervention readiness for the system
(high, low).
Blind Spot Monitoring
This function can be used to set the
warning linked to the presence of objects
in the door mirror blind spot.
The options available are:
"Sound & Display": the system warns
the driver that an obstacle is present
through acoustic (via the speakers in the
car) and visual indications using warning
lights on the door mirrors;
"Sound Only": the system warns the
driver that an obstacle is present through
acoustic indications only, via the
speakers in the car;
"Off": system disengaged.
214
MULTIMEDIA