2019 Acura RDX steering
[x] Cancel search: steeringPage 530 of 649

529
uuMaintenance MinderTMuTo Use Maintenance MinderTM
Continued
Maintenance
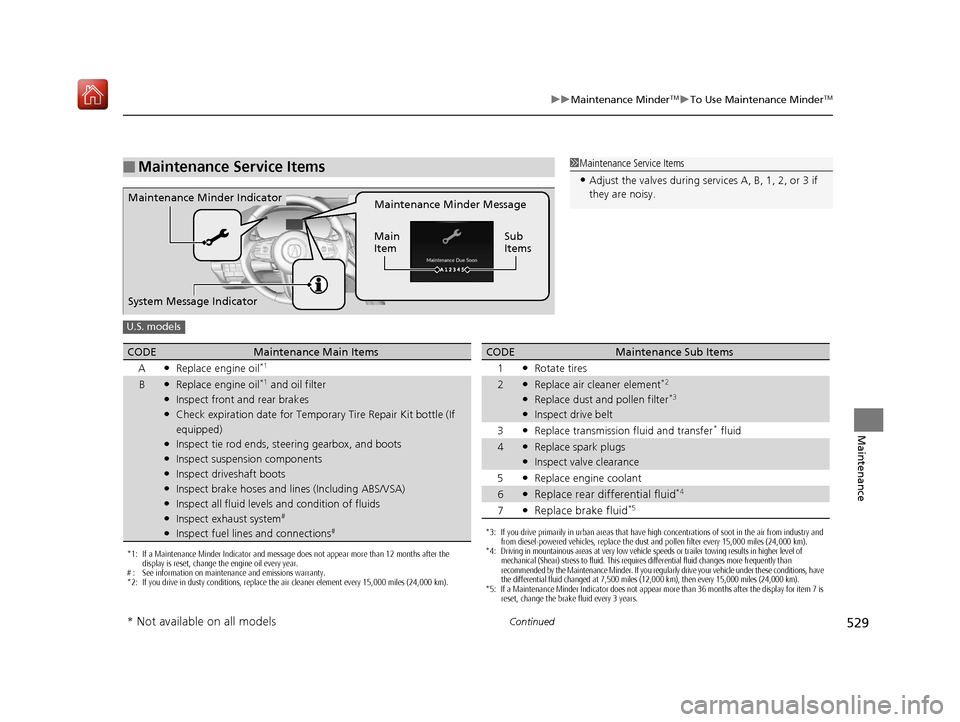
■Maintenance Service Items1Maintenance Service Items
•Adjust the valves during services A, B, 1, 2, or 3 if
they are noisy.
Maintenance Minder Message
Main
Item Sub
ItemsMaintenance Minder Indicator
System Message Indicator
U.S. models
*1: If a Maintenance Minder Indicator and message does not appear more than 12 months after the
display is reset, change the engine oil every year.
# : See information on maintenance and emissions warranty.
*2: If you drive in dusty conditions, replace the air cleaner element every 15,000 miles (24,000 km).
CODEMaintenance Main Items
A
●Replace engine oil*1
B●Replace engine oil*1 and oil filter●Inspect front and rear brakes●Check expiration date for Temporary Tire Repair Kit bottle (If
equipped)
●Inspect tie rod ends, steering gearbox, and boots●Inspect suspension components●Inspect driveshaft boots●Inspect brake hoses and lin es (Including ABS/VSA)●Inspect all fluid levels and condition of fluids●Inspect exhaust system#
●Inspect fuel lines and connections#*3: If you drive primarily in urban areas that have high concentrations of soot in the air from industry and
from diesel-powered vehicles, replace the dust and pollen filter every 15,000 miles (24,000 km).
*4: Driving in mountainous areas at very low vehicle speeds or trailer towing results in higher level of
mechanical (Shear) stress to fluid. This requires differential fluid changes more frequently than
recommended by the Maintenance Minder. If you regularly drive your vehicle under these conditions, have
the differential fluid changed at 7,500 miles (12,000 km), then every 15,000 miles (24,000 km).
*5: If a Maintenance Minder Indicator does not appear more than 36 months after the display for item 7 is reset, change the brake fluid every 3 years.
CODEMaintenance Sub Items
1
●Rotate tires
2●Replace air cleaner element*2
●Replace dust and pollen filter*3
●Inspect drive belt
3
●Replace transmission fluid and transfer* fluid
4●Replace spark plugs●Inspect valve clearance
5
●Replace engine coolant
6●Replace rear differential fluid*4
7●Replace brake fluid*5
* Not available on all models
19 ACURA RDX-31TJB6000.book 529 ページ 2018年4月26日 木曜日 午後4時51分
Page 563 of 649

562
uuChecking and Maintaining Tires uWinter Tires
Maintenance
Winter Tires
If driving on snowy or frozen roads, mount all season marked M+S tires, snow tires,
or tire chains; reduce speed; and maintain sufficient distance be tween vehicles when
driving.
Be particularly careful when operating the steering wheel or brakes to prevent
skidding.
Use tire chains, snow tires, or all season ti res when necessary or according to the law.
When mounting, refer to the following points.
For winter tires:
• Select the size and load ranges that are the same as the original tires.
• Mount the tires to all four wheels.
For tire chains:
• Install them on the front tires only.
• Because your vehicle has limited tire clearance, we strongly recommend using the
chains listed below:
• Follow the chain manufacturer’s instruction when installing. Mount them as
tightly as you can.
• Check that the chains do not to uch the brake lines or suspension.
• Drive slowly.
Cable-type: QCC Cobra 1046
1Winter Tires
NOTICE
Traction devices that are th e wrong size or improperly
installed can damage your vehicle’s brake lines,
suspension, body, and wheels. Stop driving if they are
hitting any part of the vehicle.
When tire chains are mounted, follow the chain
manufacturer’s instructi ons regarding vehicle
operational limits.
If your vehicle is equipped with summer tires, be
aware that these tires are not designed for winter
driving conditions. For more information, contact a
dealer.
3WARNING
Using the wrong chains, or not properly
installing chains, can damage the brake
lines and cause a crash in which you can be
seriously injured or killed.
Follow all instruction s in this owner’s
manual regarding the selection and use of
tire chains.
19 ACURA RDX-31TJB6000.book 562 ページ 2018年4月26日 木曜日 午後4時51分
Page 578 of 649

577
Handling the Unexpected
This chapter explains how to handle unexpected troubles.
ToolsTypes of Tools .................................. 578
If a Tire Goes Flat
Changing a Flat Tire ......................... 579
Temporarily Repairi ng a Flat Tire....... 587
Engine Does Not Start Checking the Engine ........................ 601
If the Keyless Access Remote Battery is Weak ............................................. 602
Emergency Engine Stop ................... 603
Jump Starting .................................... 604
Vehicles with a compact spare tire
Vehicles with temporary tire repair kit
Overheating
How to Handle Overheating............. 606
Indicator, Coming On/Blinking
If the Low Oil Pressure Warning Appears ... 608If the Charging System Indicator Comes On... 609If the Malfunction Indicator Lamp Comes On or Blinks ................................... 609
If the Brake System Indicator (Red) Comes
On or Blinks ....................................... 610
If the Electric Power Steering (EPS) System
Indicator Comes On ........................... 611
If the Brake System Indicator (Red) Comes On or Blinks at the Same Time When the Brake
System Indicator (Amber) Comes On .....612
If the Low Tire Pressure/TPMS Indicator Comes On or Blinks ....................... 613
If the Transmission System Indicator Blinks along with the Warning Message .... 614
Fuses
Fuse Locations ................................. 615
Inspecting and Changing Fuses ........ 621
Emergency Towing ........................... 622
When You Cannot Unlock the Fuel Fill Door ................................................. 623
When You Cannot Open the Tailgate.. 624Refueling ........................................... 625
19 ACURA RDX-31TJB6000.book 577 ページ 2018年4月26日 木曜日 午後4時51分
Page 580 of 649

579Continued
Handling the Unexpected
If a Tire Goes Flat
Changing a Flat Tire
If a tire goes flat while driving, grasp the steering wheel firmly, and brake gradually
to reduce speed. Then, stop in a safe plac e. Replace the flat tire with a compact
spare tire. Go to a dealer as soon as possib le to have the full-size tire repaired or
replaced.
1. Park the vehicle on firm, level, non-slip pery surface and apply the parking brake.
2. Change the gear position to
(P.
3. Turn on the hazard warning lights an d set the power mode to VEHICLE OFF
(LOCK).
Vehicles with a compact spare tire
1 Changing a Flat Tire
Follow compact spare precautions:
Periodically check the tire pressure of the compact
spare. It should be set to the specified pressure.
Specified Pressure: 60 psi (420 kPa, 4.2 kgf/cm
2)
When driving with the compact spare tire, keep the
vehicle speed under 50 mph (80 km/h). Replace with
a full-size tire as soon as possible.
The compact spare tire and wheel in your vehicle are
specifically for this model. Do not use them with
another vehicle. Do not us e another type of compact
spare tire or wheel with your vehicle.
Do not mount tire chains on a compact spare tire.
If a chain-mounted front tire goes flat, remove one of
the full-size rear tires and replace it with the compact
spare tire. Remove the flat front tire and replace it
with the full-size tire that was removed from the rear.
Mount the tire chains on the front tire.
Do not use a puncture-repairi ng agent on a flat tire,
as it can damage the tire pressure sensor.
19 ACURA RDX-31TJB6000.book 579 ページ 2018年4月26日 木曜日 午後4時51分
Page 588 of 649

587
uuIf a Tire Goes Flat uTemporarily Repairing a Flat Tire
Continued
Handling the Unexpected
Temporarily Repairing a Flat Tire
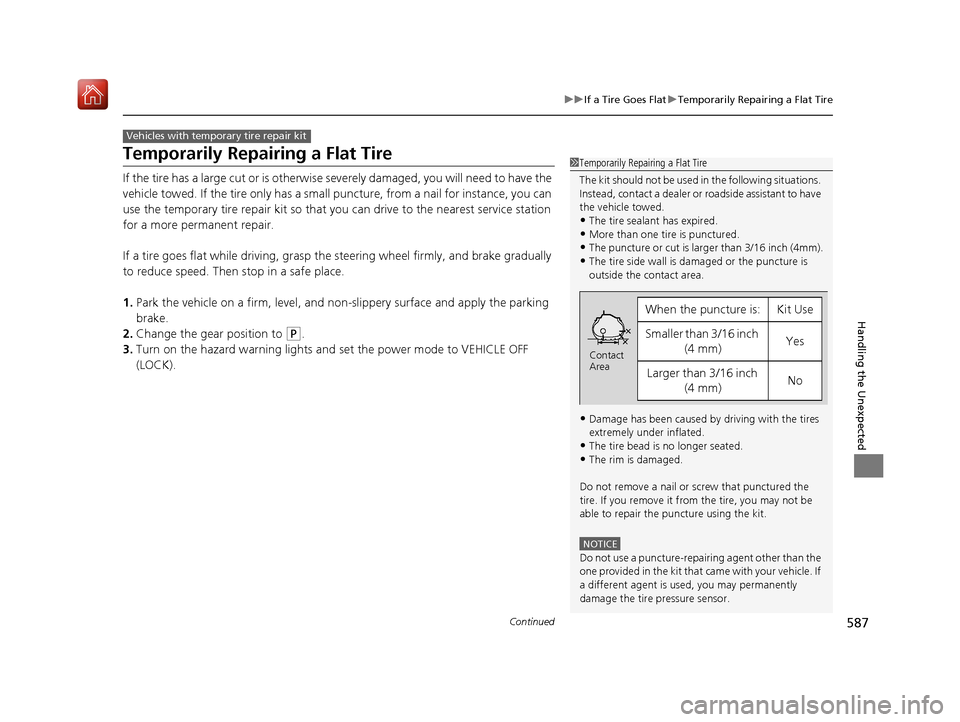
If the tire has a large cut or is otherwise severely damaged, you will need to have the
vehicle towed. If the tire only has a small puncture, from a nail for instance, you can
use the temporary tire repair kit so that you can drive to the nearest service station
for a more permanent repair.
If a tire goes flat while driving, grasp the steering wheel firmly, and brake gradually
to reduce speed. Then stop in a safe place.
1. Park the vehicle on a firm, level, and n on-slippery surface and apply the parking
brake.
2. Change the gear position to
(P.
3. Turn on the hazard warning lights an d set the power mode to VEHICLE OFF
(LOCK).
Vehicles with temporary tire repair kit
1 Temporarily Repairing a Flat Tire
The kit should not be used in the following situations.
Instead, contact a dealer or roadside assistant to have
the vehicle towed.
•The tire sealant has expired.
•More than one tire is punctured.•The puncture or cut is larger than 3/16 inch (4mm).
•The tire side wall is da maged or the puncture is
outside the contact area.
•Damage has been caused by driving with the tires
extremely under inflated.
•The tire bead is no longer seated.
•The rim is damaged.
Do not remove a nail or screw that punctured the
tire. If you remove it from the tire, you may not be
able to repair the puncture using the kit.
NOTICE
Do not use a puncture-repairing agent other than the
one provided in the kit that came with your vehicle. If
a different agent is used, you may permanently
damage the tire pressure sensor.
When the puncture is:Kit Use
Smaller than 3/16 inch (4 mm)Yes
Larger than 3/16 inch (4 mm)No
Contact
Area
19 ACURA RDX-31TJB6000.book 587 ページ 2018年4月26日 木曜日 午後4時51分
Page 604 of 649

603
uuEngine Does Not Start uEmergency Engine Stop
Handling the Unexpected
Emergency Engine Stop
The ENGINE START/STOP button may be used to stop the engine due to an
emergency situation even while driving. If you must stop the engine, do either of the
following operations:
• Press and hold the ENGINE START/STOP button for two seconds.
• Firmly press the ENGINE START/STOP button three times.
The steering wheel will not lock. However, because turning off the engine disables
the power assist the engine provides to the steering and braking systems, it will
require significantly more physical effort an d time to steer and slow the vehicle. Use
both feet on the brake pedal to slow down the vehicle and stop immediately in a
safe place.
The gear position auto matically changes to
(P after the vehicle comes to a complete
stop. Then, the power mode changes to VEHICLE OFF.
The gear position auto matically changes to
(P after the vehicle comes to a complete
stop. Then press the ENGINE START/STOP button twice without depressing the
brake pedal to change the mode to VEHICLE OFF.
1 Emergency Engine Stop
Do not press the button while driving unless it is
absolutely necessary for the engine to be turned off.
Vehicles with U.S. models
Vehicles with Canada models
19 ACURA RDX-31TJB6000.book 603 ページ 2018年4月26日 木曜日 午後4時51分
Page 612 of 649

611
uuIndicator, Coming On/Blinking uIf the Electric Power Steering (EPS) System Indicator Comes On
Handling the Unexpected
If the Electric Power Steeri ng (EPS) System Indicator
Comes On
■Reasons for the indicator to come on
• Comes on when there is a problem with the EPS system.
• If you depress the accelerator pedal repeatedly to increase the engine
speed while the engine is idling, the indicator comes on, and
sometimes the steering wheel becomes harder to operate.
■What to do when th e indicator comes on
Stop the vehicle in a safe place and restart the engine.
If the indicator comes on and stays on, immediately have your vehicle
inspected by a dealer.
19 ACURA RDX-31TJB6000.book 611 ページ 2018年4月26日 木曜日 午後4時51分
Page 641 of 649

Index
640
Index
Index
A
ABS (Anti-lock Brake System)................... 493
Accessories and Modifications ................. 574
Accessory Power Socket ........................... 225
AcuraLink® ................................................ 387
AcuraWatch
TM............................................. 22
Adaptive Cruise Control (ACC) ................... 91
Adaptive Cruise Control (ACC) with
Low Speed Follow (LSF) .................... 91, 455
Adaptive Front Lighting System (AFS) ..... 189
Additives
Coolant ................................................... 540
Engine Oil ................................................ 535
Washer .................................................... 544
Additives, Engine Oil ................................ 535
Adjusting Armrest ................................................... 218
Front Seats .............................................. 207
Head Restraints........................................ 212
Mirrors .................................................... 204
Rear Seats................................................ 216
Steering Wheel ........................................ 203
Agile Handling Assist ................................ 436
Air Conditioning System (Climate Control System) .................................................... 230
Changing the Mode ................................ 230
Defrosting the Windshield and Windows ............................................... 232
Dust and Pollen Filter ............................... 568
Rear Temperature Control Dial................. 234
Recirculation/Fresh Air Mode ................... 230 Sensors ................................................... 235
Synchronized Mode................................. 233
Using Automatic Climate Control ............ 230
Air Pressure ....................................... 555, 629
Airbags ........................................................ 42
Advanced Airbags ..................................... 48
After a Collision ........................................ 45
Airbag Care............................................... 57
Front Airbags (SRS) .................................... 45
Indicator.............................................. 55, 84
Knee Airbags............................................. 49
Passenger Airbag Off Indicator .................. 56
Sensors ..................................................... 42
Side Airbags .............................................. 52
Side Curtain Airbags.................................. 54
AM/FM Radio ............................................ 274
Anti-lock Brake System (ABS) .................. 493
Indicator.................................................... 84
Apple CarPlay
TM........................................ 303
Armrest ..................................................... 218
Audio Remote Controls ........................... 243
Audio System ............................................ 238
Adjusting the Sound................................ 269
Audio/Information Screen........................ 249
Auxiliary Input Jack.................................. 241
Display Setup .......................................... 270
Error Messages ........................................ 307
General Information ................................ 310
Home Screen........................................... 254
How to Update Wirelessly ....................... 263
How to Update with a USB Device........... 267 How to use Siri
® Eyes Free....................... 302
iPod ........................................................ 291
Limitations for Manual Operation ............ 270
MP3/WMA/AAC ..................................... 294
Reactivating ............................................ 242
Remote Controls ..................................... 243
Security Code ......................................... 242
Status Area ............................................. 259
System Updates ...................................... 263
Theft Protection ...................................... 242
USB Flash Drives.............................. 294, 312
USB Ports ................................................ 239
Audio/Information Screen ....................... 249
Authorized Manuals ................................ 638
Auto Door Locking/Unlocking ................ 162
Auto High-Beam ...................................... 191
Indicator ................................................... 87
Auto Idle Stop .......................................... 428
OFF Button ............................................. 429
Automatic Brake Hold ............................. 491
Indicator ........................................... 77, 491
Automatic Folding Door Mirror .............. 206
Automatic Intermittent Wipers .............. 195
Automatic Lighting .................................. 187
Automatic Transmission .......................... 417
Creeping................................................. 417
Fluid ....................................................... 542
Kickdown ............................................... 417
Operating the Shift Button ...................... 420
Sequential Shift Mode............................. 424
Shifting ................................................... 418
19 ACURA RDX-31TJB6000.book 640 ページ 2018年4月26日 木曜日 午後4時51分