2019.75 VAUXHALL CROSSLAND X lights
[x] Cancel search: lightsPage 190 of 247

188Vehicle care4. Insert bulb holder and turnclockwise.
5. Insert left end of the lamp, slide to
the left and insert right end.
Number plate light
The number plate light is designed as
LEDs and cannot be changed. In
case of defective LEDs, have them
replaced by a workshop.
Interior lights
Have the following bulbs replaced by
a workshop:
● courtesy light, reading lights
● load compartment light
● instrument panel illuminationElectrical system
Fuses Data on the replacement fuse mustmatch the data on the defective fuse.
The three fuse boxes are located in: ● engine compartment
● instrument panel
Before replacing a fuse, turn off the
respective switch and the ignition.
A blown fuse can be recognised by its melted wire.Caution
Do not replace the fuse until the
cause of the fault has been
remedied.
Some functions are protected by
several fuses.
Fuses may also be inserted without
existence of a function.
Fuse extractor
A fuse extractor may be located in the
fuse box in the engine compartment.
The extractor has two sides, each
side is designed for a different type of fuses.
Grab the fuse with the fuse extractor
and withdraw the fuse.
Page 191 of 247

Vehicle care189Engine compartment fusebox
The fuse box is in the front left of the
engine compartment.
Disengage the cover and remove it.
No.Circuit1Fan climate control system2–3Body fuse box4–5Instrument panel fuse box6Engine cooling unit7Body control module8Engine control fuel pump9Engine controlNo.Circuit10Engine control11Engine control12Engine cooling unit13Body control module14Intelligent battery sensor15–16Front fog lights17–18High beam right19High beam left20Engine control fuel pump21Starter22–23Starter24Trailer hitch25Instrument panel fuse box26Transmission control module
Page 193 of 247

Vehicle care191No.Circuit7Heated steering wheel8Rear wiper9–10Central locking system11Central locking system12Instrument cluster13Climate control system, USB14OnStar15Instrument cluster, climate
control system16Brake, starter, retained power
off17Instrument cluster18Advanced parking assist19Top column module, trailer
control module20–21Anti-theft alarm system, start
buttonNo.Circuit22Rain sensor, front camera23Door module24Advanced parking assist,
camera, Infotainment25Airbag26Top column module27Anti-theft alarm system28–29Infotainment30–31Infotainment32Power outlet front33–34Heated exterior mirrors, door
moduleNo.Circuit35Instrument cluster, light switch,
advanced parking assist, trans‐
mission control module36Courtesy lights, sun visor lights,
glovebox light
Fuse box on the right side of the
instrument panel
In right-hand drive vehicles, the fuse
box is behind a cover in the
instrument panel. Disengage cover at
the side and remove.
Page 208 of 247
206Vehicle care● The vehicles must not come intocontact with each other during
the jump starting process.
● Apply the parking brake, transmission in neutral,
automatic transmission in P.
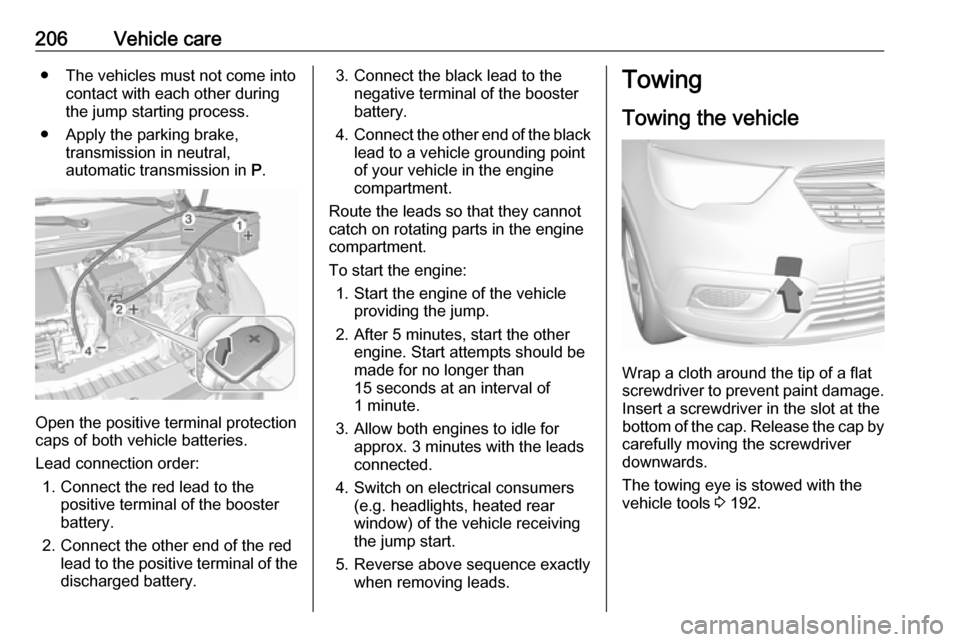
Open the positive terminal protection
caps of both vehicle batteries.
Lead connection order: 1. Connect the red lead to the positive terminal of the booster
battery.
2. Connect the other end of the red lead to the positive terminal of the
discharged battery.
3. Connect the black lead to the negative terminal of the boosterbattery.
4. Connect the other end of the black
lead to a vehicle grounding point
of your vehicle in the engine
compartment.
Route the leads so that they cannot
catch on rotating parts in the engine
compartment.
To start the engine: 1. Start the engine of the vehicle providing the jump.
2. After 5 minutes, start the other engine. Start attempts should be
made for no longer than
15 seconds at an interval of
1 minute.
3. Allow both engines to idle for approx. 3 minutes with the leads
connected.
4. Switch on electrical consumers (e.g. headlights, heated rear
window) of the vehicle receiving
the jump start.
5. Reverse above sequence exactly when removing leads.Towing
Towing the vehicle
Wrap a cloth around the tip of a flat
screwdriver to prevent paint damage.
Insert a screwdriver in the slot at the
bottom of the cap. Release the cap by carefully moving the screwdriver
downwards.
The towing eye is stowed with the vehicle tools 3 192.
Page 209 of 247
Vehicle care207
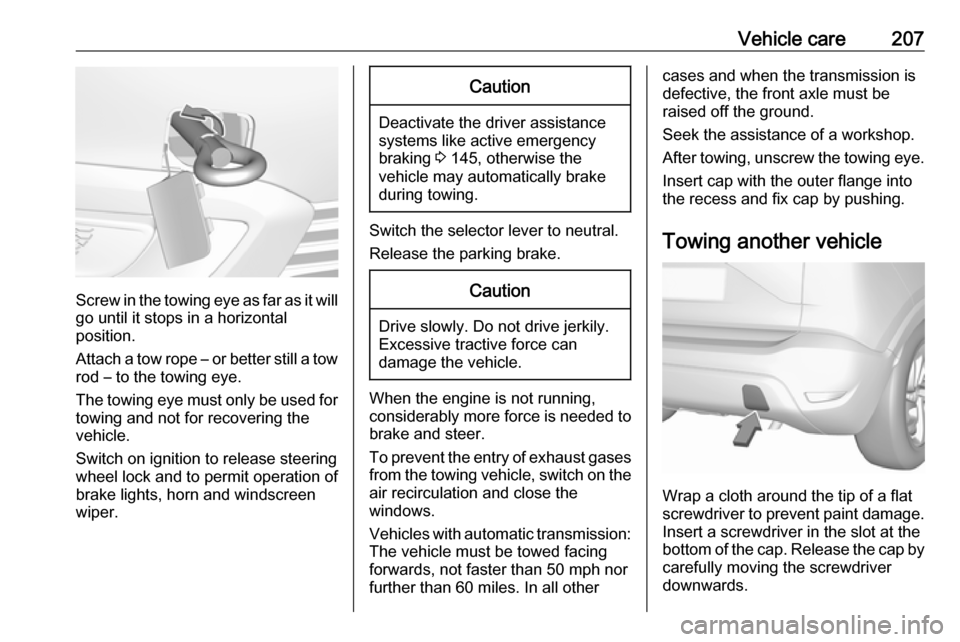
Screw in the towing eye as far as it will
go until it stops in a horizontal
position.
Attach a tow rope – or better still a tow
rod – to the towing eye.
The towing eye must only be used for towing and not for recovering the
vehicle.
Switch on ignition to release steering
wheel lock and to permit operation of
brake lights, horn and windscreen
wiper.
Caution
Deactivate the driver assistance
systems like active emergency
braking 3 145, otherwise the
vehicle may automatically brake during towing.
Switch the selector lever to neutral.
Release the parking brake.
Caution
Drive slowly. Do not drive jerkily.
Excessive tractive force can
damage the vehicle.
When the engine is not running,
considerably more force is needed to
brake and steer.
To prevent the entry of exhaust gases from the towing vehicle, switch on the
air recirculation and close the
windows.
Vehicles with automatic transmission: The vehicle must be towed facing
forwards, not faster than 50 mph nor further than 60 miles. In all other
cases and when the transmission is
defective, the front axle must be
raised off the ground.
Seek the assistance of a workshop. After towing, unscrew the towing eye.
Insert cap with the outer flange into
the recess and fix cap by pushing.
Towing another vehicle
Wrap a cloth around the tip of a flat
screwdriver to prevent paint damage.
Insert a screwdriver in the slot at the
bottom of the cap. Release the cap by carefully moving the screwdriver
downwards.
Page 211 of 247
Vehicle care209and rear window wiper must be
switched off. Remove antenna and
external accessories such as roof
racks etc.
If the vehicle is washed by hand,
make sure that the insides of the
wheel housings are also thoroughly
rinsed out.
Wax painted parts of the vehicle
regularly.
Clean edges and folds on opened
doors and the bonnet as well as the
areas they cover.
Clean bright metal mouldings with a
cleaning solution approved for
aluminium to avoid damages.Caution
Always use a cleaning agent with
a pH value of four to nine.
Do not use cleaning agents on hot surfaces.
Do not clean the engine compartmentwith a steam-jet or high-pressure jet
cleaner.
Thoroughly rinse and leather-off the vehicle. Rinse leather frequently. Use
separate leathers for painted and
glass surfaces: remnants of wax on
the windows will impair vision.
Have the door hinges of all doors
greased by a workshop.
Do not use hard objects to remove
spots of tar. Use tar removal spray on
painted surfaces.
Exterior lights
Headlight and other light covers are
made of plastic. Do not use any
abrasive or caustic agents, do not use an ice scraper, and do not clean them
dry.
Polishing and waxing
Wax the vehicle regularly (at the
latest when water no longer beads).
Otherwise, the paintwork will dry out.
Polishing is necessary only if the paint
has become dull or if solid deposits
have become attached to it.
Paintwork polish with silicone forms a
protective film, making waxing
unnecessary.Plastic body parts must not be treated with wax or polishing agents.
Windows and windscreen wiper
blades
Switch off wipers before handling in
their areas.
Use a soft lint-free cloth or chamois leather together with window cleaner
and insect remover.
When cleaning the rear window from
inside, always wipe in parallel to the
heating element to prevent damage.
For mechanical removal of ice, use a
sharp-edged ice scraper. Press the
scraper firmly against the glass so
that no dirt can get under it and
scratch the glass.
Clean smearing wiper blades with a
soft cloth and window cleaner.
Remove dirt residues from smearing
wiper blades by using a soft cloth and window cleaner. Also make sure to
remove any residues such as wax,
insect residues and similar from the
window.
Page 238 of 247

236Customer informationOperating data in the vehicleControl units process data for
operation of the vehicle.
This data includes, for example: ● vehicle status information (e.g. speed, movement delay, lateral
acceleration, wheel rotation rate, "seat belts fastened" display)
● ambient conditions (e.g. temperature, rain sensor,
distance sensor)
As a rule such data is transient and is
not stored for longer than an
operational cycle, and only processed on board the vehicle itself. Often
control units include data storage
(including the vehicle key). This is
used to allow information to be
documented temporarily or
permanently on vehicle condition,
component stress, maintenance
requirements and technical events
and errors.Depending on technical equipment
levels, the data stored is as follows:
● system component operating states (e.g. fill level, tyre
pressure, battery status)
● faults and defects in important system components (e.g. lights,
brakes)
● system reactions in special driving situations (e.g. triggering
of an airbag, actuation of the
stability control systems)
● information on events damaging the vehicle
● for electric vehicles the amount of
charge in the high-voltage
battery, estimated range
In special cases (e.g. if the vehicle
has detected a malfunction), it may be
necessary to save data that would
otherwise just be volatile.
When you use services (e.g. repairs,
maintenance), the operating data
saved can be read together with the
vehicle identification number and
used where necessary. Staff working
for the service network ( e.g. garages,
manufacturers) or third parties (e.g.breakdown services) can read the
data from the vehicle. The same
applies to warranty work and quality
assurance measures.
Data is generally read via the OBD
(On-Board Diagnostics) port
prescribed by law in the vehicle. The operating data read documents the
technical condition of the vehicle or
individual components and assists
with fault diagnosis, compliance with
warranty obligations and quality
improvement. This data, in particular
information on component stress,
technical events, operator errors and
other faults, is transmitted to the
manufacturer where appropriate,
together with the vehicle identification number. The manufacturer is also
subject to product liability. The
manufacturer potentially also uses
operating data from vehicles for
product recalls. This data can also be
used to check customer warranty and
guarantee claims.
Fault memories in the vehicle can be
reset by a service company when
carrying out servicing or repairs or at
your request.
Page 243 of 247

241Control indicators.......................... 81
Control of the vehicle .................121
Controls ........................................ 70
Convex shape .............................. 33
Coolant and antifreeze ...............217
Cornering lights .......................... 102
Cruise control ...................... 87, 139
Cupholders .................................. 61
Curtain airbag system .................. 53
D Danger, Warnings and Cautions ...4
Daytime running lights ...............102
Declaration of conformity ............229
DEF ............................................ 129
Deflation detection system ...........85
Diesel exhaust fluid ....................129
Diesel fuel system bleeding .......179
Door open .................................... 87
Doors ............................................ 29
Driver alert .................................. 163
Driver assistance systems ..........139
Driver Information Centre .............87
Driving characteristics and towing tips .............................. 168
Driving hints ................................ 121
E Electric adjustment ......................33
Electrical system......................... 188
Electronic climate control system 112Electronic driving programmes ..133
Electronic key system ...................22
Electronic Stability Control and Traction Control system ....84, 137
Electronic Stability Control and Traction Control system off .......84
Emergency call ............................. 97
End-of-life vehicle recovery .......173
Engine compartment fuse box ...189
Engine coolant ........................... 176
Engine coolant temperature ........84
Engine coolant temperature gauge ....................................... 79
Engine data ............................... 223
Engine exhaust .......................... 128
Engine identification ...................220
Engine oil ...........175, 217, 221, 227
Engine oil level monitor ................79
Engine oil pressure ......................85
Entry lighting .............................. 106
Event data recorders ..................235
Exhaust filter ......................... 85, 128
Exit lighting ................................ 106
Exterior care .............................. 208
Exterior light ................................. 86
Exterior lighting ......................12, 99
Exterior mirrors ............................. 33F
Fault ........................................... 134 First aid ......................................... 66
First aid kit ................................... 66
Fixed air vents ........................... 118
Floor mats................................... 211
Folding mirrors ............................. 34
Forward collision alert................. 144
Front airbag system .....................52
Front fog lights .............86, 103, 183
Front pedestrian protection ........148
Front seats.................................... 41
Fuel............................................. 164
Fuel for diesel engines ..............164
Fuel for petrol engines ...............164
Fuel gauge ................................... 79
Fuel tank ..................................... 227
Fuses ......................................... 188
G Gauges ......................................... 77
Gear selection ........................... 132
Gear shifting ................................. 84
General information ...................167
Glass panel .................................. 38
Glovebox ..................................... 61
H Halogen headlights ....................180
Hand brake ................................. 136
Hazard warning flashers ............102