2018 YAMAHA AEROX50 checking oil
[x] Cancel search: checking oilPage 6 of 78

Table of contentsSafety information............................ 1-1
Further safe-riding points ............... 1-5
Description....................................... 2-1
Left view ......................................... 2-1
Right view ....................................... 2-2
Controls and instruments ............... 2-3
Instrument and control functions... 3-1
Main switch/steering lock............... 3-1
Indicator lights and warning
lights............................................ 3-2
Multi-function display ..................... 3-3
Handlebar switches ........................ 3-6
Front brake lever ............................ 3-7
Rear brake lever ............................. 3-7
Fuel tank cap .................................. 3-7
Fuel ................................................. 3-8
Catalytic converter ....................... 3-10
Kickstarter .................................... 3-10
Seats ............................................ 3-11
Storage compartment .................. 3-12
For your safety – pre-operation
checks............................................... 4-1
Operation and important riding
points................................................ 5-1
Starting a cold engine .................... 5-1
Starting off ...................................... 5-2
Acceleration and deceleration ........ 5-2Braking ............................................ 5-3
Tips for reducing fuel
consumption ................................ 5-3
Engine break-in ............................... 5-4
Parking ............................................ 5-4
Periodic maintenance and
adjustment........................................ 6-1
Periodic maintenance chart for the
emission control system .............. 6-2
General maintenance and
lubrication chart ........................... 6-3
Removing and installing the
cowling and panel........................ 6-6
Checking the spark plug ................. 6-7
Engine oil and oil strainer ................ 6-9
Final transmission oil..................... 6-11
Coolant.......................................... 6-12
Replacing the air filter element
and cleaning the check hose..... 6-13
Checking the throttle grip free
play ............................................ 6-14
Valve clearance ............................. 6-14
Tires .............................................. 6-15
Cast wheels................................... 6-16
Checking the front and rear brake
lever free play ............................ 6-17
Checking the front and rear brake
pads ........................................... 6-17
Checking the brake fluid level ....... 6-18
Changing the brake fluid ............... 6-19Checking and lubricating the
cables ........................................ 6-19
Checking and lubricating the
throttle grip and cable ............... 6-20
Lubricating the front and rear
brake levers ............................... 6-20
Checking and lubricating the
centerstand ............................... 6-21
Checking the front fork ................. 6-21
Checking the steering................... 6-22
Checking the wheel bearings ....... 6-22
Battery .......................................... 6-23
Replacing the fuse ........................ 6-24
Replacing the headlight bulb ........ 6-25
Replacing the auxiliary light bulb
(for CHE) .................................... 6-26
Replacing the tail/brake light
bulb ........................................... 6-27
Replacing a turn signal light
bulb ........................................... 6-27
License plate light......................... 6-28
Troubleshooting............................ 6-28
Troubleshooting charts................. 6-29
Scooter care and storage................ 7-1
Matte color caution......................... 7-1
Care ................................................ 7-1
Storage ........................................... 7-4U1GBE1E0.book Page 1 Tuesday, October 17, 2017 11:45 AM
Page 45 of 78

Periodic maintenance and adjustment
6-10
6
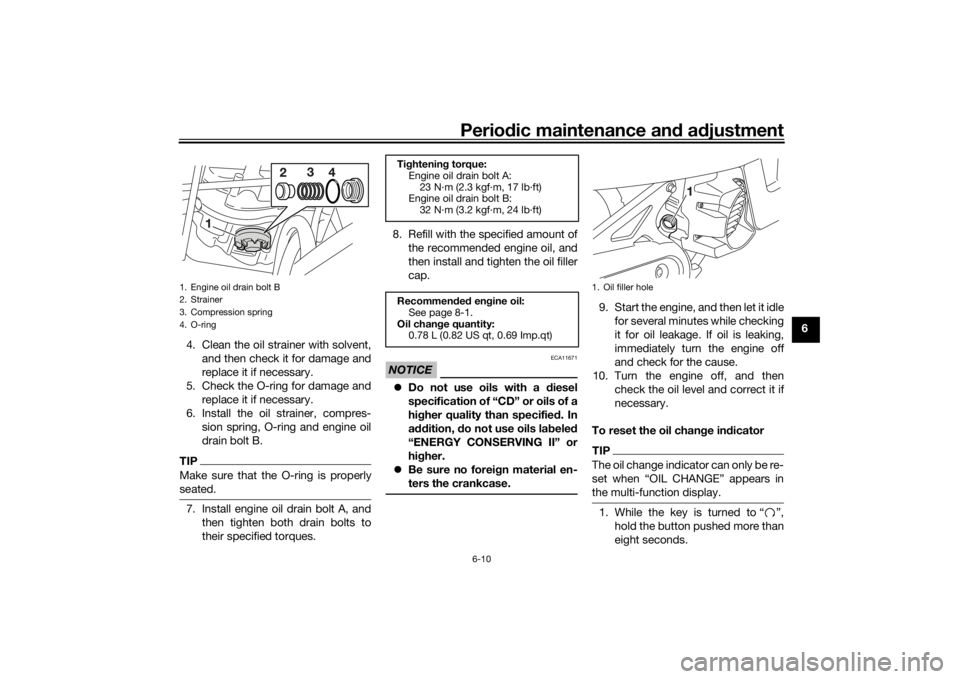
4. Clean the oil strainer with solvent,
and then check it for damage and
replace it if necessary.
5. Check the O-ring for damage and
replace it if necessary.
6. Install the oil strainer, compres-
sion spring, O-ring and engine oil
drain bolt B.
TIPMake sure that the O-ring is properly
seated.7. Install engine oil drain bolt A, and
then tighten both drain bolts to
their specified torques.8. Refill with the specified amount of
the recommended engine oil, and
then install and tighten the oil filler
cap.
NOTICE
ECA11671
Do not use oils with a diesel
specification of “CD” or oils of a
higher quality than specified. In
addition, do not use oils labeled
“ENERGY CONSERVING II” or
higher.
Be sure no foreign material en-
ters the crankcase.
9. Start the engine, and then let it idle
for several minutes while checking
it for oil leakage. If oil is leaking,
immediately turn the engine off
and check for the cause.
10. Turn the engine off, and then
check the oil level and correct it if
necessary.
To reset the oil change indicatorTIPThe oil change indicator can only be re-
set when “OIL CHANGE” appears in
the multi-function display.1. While the key is turned to “ ”,
hold the button pushed more than
eight seconds.
1. Engine oil drain bolt B
2. Strainer
3. Compression spring
4. O-ring
Tightening torque:
Engine oil drain bolt A:
23 N·m (2.3 kgf·m, 17 lb·ft)
Engine oil drain bolt B:
32 N·m (3.2 kgf·m, 24 lb·ft)
Recommended engine oil:
See page 8-1.
Oil change quantity:
0.78 L (0.82 US qt, 0.69 Imp.qt)
1. Oil filler hole
U1GBE1E0.book Page 10 Tuesday, October 17, 2017 11:45 AM
Page 47 of 78

Periodic maintenance and adjustment
6-12
6 7. Check the final transmission case
for oil leakage. If oil is leaking,
check for the cause.
EAU20071
CoolantThe coolant level should be checked
before each ride. In addition, the cool-
ant must be changed at the intervals
specified in the periodic maintenance
and lubrication chart.
EAUM3182
To check the coolant level
1. Place the vehicle on a level sur-
face and hold it in an upright posi-
tion.TIPThe coolant level must be
checked on a cold engine since
the level varies with engine tem-
perature.
Make sure that the vehicle is posi-
tioned straight up when checking
the coolant level. A slight tilt to the
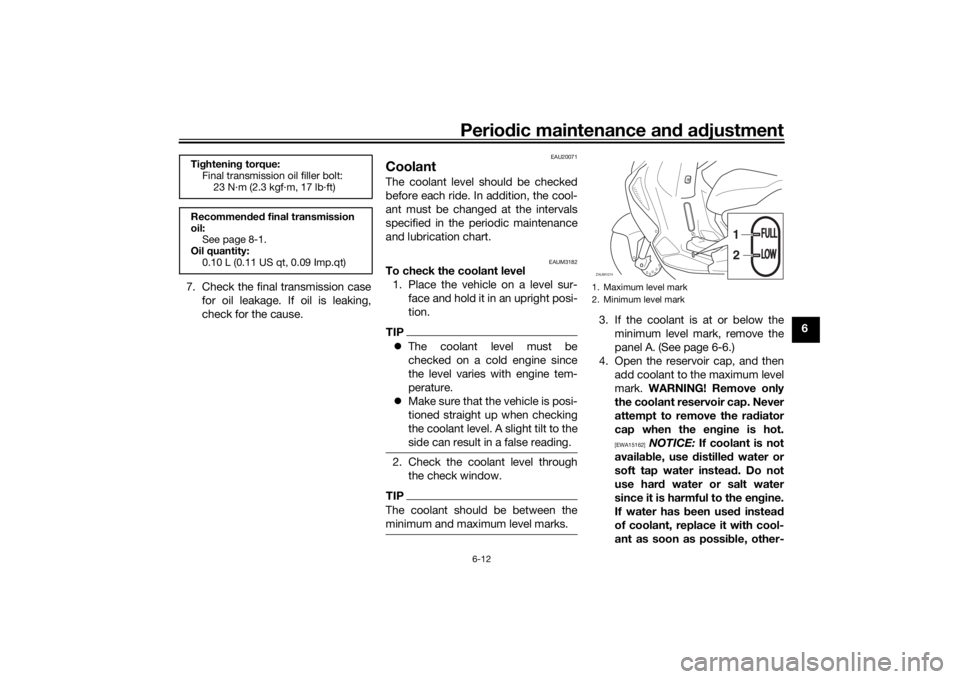
side can result in a false reading.2. Check the coolant level through
the check window.TIPThe coolant should be between the
minimum and maximum level marks.
3. If the coolant is at or below the
minimum level mark, remove the
panel A. (See page 6-6.)
4. Open the reservoir cap, and then
add coolant to the maximum level
mark. WARNING! Remove only
the coolant reservoir cap. Never
attempt to remove the radiator
cap when the engine is hot.
[EWA15162]
NOTICE: If coolant is not
available, use distilled water or
soft tap water instead. Do not
use hard water or salt water
since it is harmful to the engine.
If water has been used instead
of coolant, replace it with cool-
ant as soon as possible, other-
Tightening torque:
Final transmission oil filler bolt:
23 N·m (2.3 kgf·m, 17 lb·ft)
Recommended final transmission
oil:
See page 8-1.
Oil quantity:
0.10 L (0.11 US qt, 0.09 Imp.qt)
1. Maximum level mark
2. Minimum level markZAUM1074
1
2
FULLFULLLOWLOW
U1GBE1E0.book Page 12 Tuesday, October 17, 2017 11:45 AM
Page 54 of 78

Periodic maintenance and adjustment
6-19
6Insufficient brake fluid may al-
low air to enter the brake sys-
tem, reducing braking
performance.
Clean the filler cap before re-
moving. Use only DOT 4 brake
fluid from a sealed container.
Use only the specified brake flu-
id; otherwise, the rubber seals
may deteriorate, causing leak-
age.
Refill with the same type of
brake fluid. Adding a brake fluid
other than DOT 4 may result in a
harmful chemical reaction.
Be careful that water does not
enter the brake fluid reservoir
when refilling. Water will signifi-
cantly lower the boiling point of
the fluid and may result in vapor
lock.
EAUM1362
Changing the brake fluidHave a Yamaha dealer change the
brake fluid at the intervals specified in
the periodic maintenance and lubrica-
tion chart. In addition, have the brake
hose replaced every four years and
whenever it is damaged or leaking.
EAU23098
Checking and lubricating the
cablesThe operation of all control cables and
the condition of the cables should be
checked before each ride, and the ca-
bles and cable ends should be lubri-
cated if necessary. If a cable is
damaged or does not move smoothly,
have a Yamaha dealer check or re-
place it. WARNING! Damage to the
outer housing of cables may result
in internal rusting and cause inter-
ference with cable movement. Re-
place damaged cables as soon as
possible to prevent unsafe condi-
tions.
[EWA10712]
Recommended lubricant:
Yamaha cable lubricant or other
suitable cable lubricant
U1GBE1E0.book Page 19 Tuesday, October 17, 2017 11:45 AM
Page 56 of 78

Periodic maintenance and adjustment
6-21
6
EAU23193
Checking and lubricating the
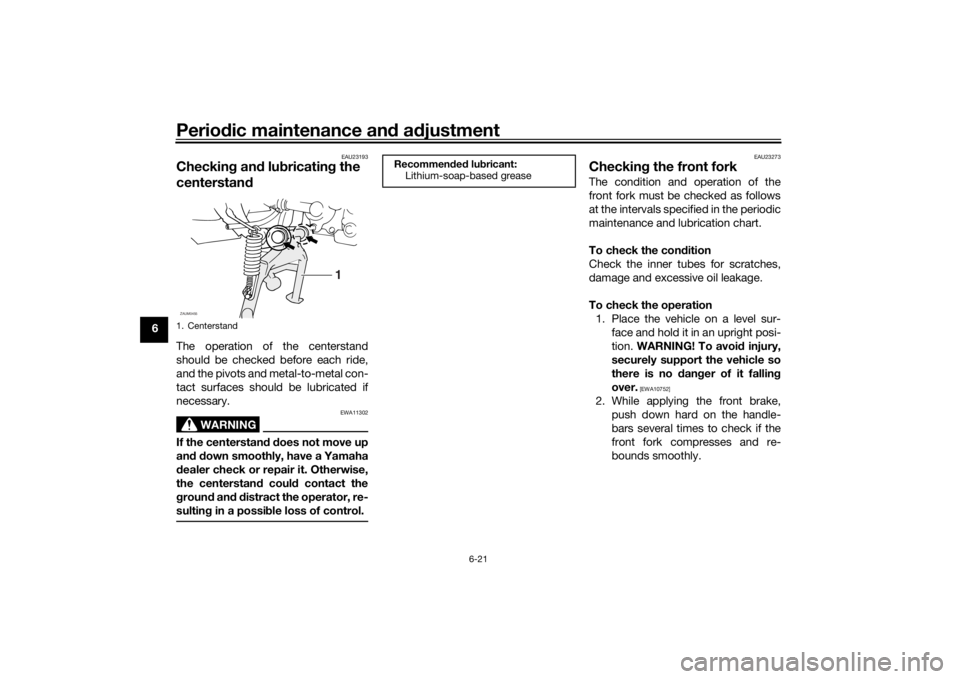
centerstandThe operation of the centerstand
should be checked before each ride,
and the pivots and metal-to-metal con-
tact surfaces should be lubricated if
necessary.
WARNING
EWA11302
If the centerstand does not move up
and down smoothly, have a Yamaha
dealer check or repair it. Otherwise,
the centerstand could contact the
ground and distract the operator, re-
sulting in a possible loss of control.
EAU23273
Checking the front forkThe condition and operation of the
front fork must be checked as follows
at the intervals specified in the periodic
maintenance and lubrication chart.
To check the condition
Check the inner tubes for scratches,
damage and excessive oil leakage.
To check the operation
1. Place the vehicle on a level sur-
face and hold it in an upright posi-
tion. WARNING! To avoid injury,
securely support the vehicle so
there is no danger of it falling
over.
[EWA10752]
2. While applying the front brake,
push down hard on the handle-
bars several times to check if the
front fork compresses and re-
bounds smoothly.
1. Centerstand
1
ZAUM0455
Recommended lubricant:
Lithium-soap-based grease
U1GBE1E0.book Page 21 Tuesday, October 17, 2017 11:45 AM
Page 75 of 78

10-1
10
Index
AAcceleration and deceleration ................ 5-2
Air filter element and check hose,
replacing and cleaning ....................... 6-13
Auxiliary light bulb, replacing ............... 6-26BBattery .................................................. 6-23
Brake fluid, changing............................ 6-19
Brake fluid level, checking.................... 6-18
Brake lever, front .................................... 3-7
Brake lever, rear ..................................... 3-7
Brake levers, lubricating ....................... 6-20
Braking ................................................... 5-3CCables, checking and lubricating ......... 6-19
Care ........................................................ 7-1
Catalytic converter ............................... 3-10
Centerstand, checking and
lubricating........................................... 6-21
Coolant ................................................. 6-12
Coolant temperature warning light ......... 3-2
Cowling and panel, removing and
installing ............................................... 6-6DData recording, vehicle........................... 9-2
Diagnostic connector ............................. 9-2
Dimmer switch........................................ 3-6EEngine break-in ...................................... 5-4
Engine oil ................................................ 6-9
Engine trouble warning light ................... 3-3FFinal transmission oil ............................ 6-11Front and rear brake lever free play,
checking ............................................ 6-17
Front and rear brake pads, checking ... 6-17
Front fork, checking ............................. 6-21
Fuel ........................................................ 3-8
Fuel consumption, tips for reducing ...... 5-3
Fuel level warning light........................... 3-2
Fuel tank cap.......................................... 3-7
Fuse, replacing..................................... 6-24
HHandlebar switches ............................... 3-6
Headlight bulb, replacing ..................... 6-25
High beam indicator light ....................... 3-2
Horn switch ............................................ 3-6IIdentification numbers ........................... 9-1
Indicator lights and warning lights ......... 3-2KKickstarter ............................................ 3-10LLicense plate light ................................ 6-28MMain switch/steering lock ...................... 3-1
Maintenance and lubrication, periodic... 6-3
Maintenance, emission control
system ................................................. 6-2
Matte color, caution ............................... 7-1
Model label............................................. 9-1
Multi-function display............................. 3-3PParking ................................................... 5-4
Part locations ......................................... 2-1SSafe-riding points................................... 1-5Safety information................................... 1-1
Seats ..................................................... 3-11
Spark plug, checking .............................. 6-7
Specifications ......................................... 8-1
Starting a cold engine............................. 5-1
Starting off .............................................. 5-2
Start switch ............................................. 3-6
Steering, checking ................................ 6-22
Storage ................................................... 7-4
Storage compartment........................... 3-12
TTail/brake light bulb, replacing ............. 6-27
Throttle grip and cable, checking and
lubricating ........................................... 6-20
Throttle grip free play, checking ........... 6-14
Tires ...................................................... 6-15
Troubleshooting .................................... 6-28
Troubleshooting charts ......................... 6-29
Turn signal indicator light ....................... 3-2
Turn signal light bulb, replacing............ 6-27
Turn signal switch ................................... 3-6VValve clearance..................................... 6-14
Vehicle identification number ................. 9-1WWheel bearings, checking .................... 6-22
Wheels .................................................. 6-16
U1GBE1E0.book Page 1 Tuesday, October 17, 2017 11:45 AM