2018 YAMAHA AEROX50 seat adjustment
[x] Cancel search: seat adjustmentPage 6 of 78

Table of contentsSafety information............................ 1-1
Further safe-riding points ............... 1-5
Description....................................... 2-1
Left view ......................................... 2-1
Right view ....................................... 2-2
Controls and instruments ............... 2-3
Instrument and control functions... 3-1
Main switch/steering lock............... 3-1
Indicator lights and warning
lights............................................ 3-2
Multi-function display ..................... 3-3
Handlebar switches ........................ 3-6
Front brake lever ............................ 3-7
Rear brake lever ............................. 3-7
Fuel tank cap .................................. 3-7
Fuel ................................................. 3-8
Catalytic converter ....................... 3-10
Kickstarter .................................... 3-10
Seats ............................................ 3-11
Storage compartment .................. 3-12
For your safety – pre-operation
checks............................................... 4-1
Operation and important riding
points................................................ 5-1
Starting a cold engine .................... 5-1
Starting off ...................................... 5-2
Acceleration and deceleration ........ 5-2Braking ............................................ 5-3
Tips for reducing fuel
consumption ................................ 5-3
Engine break-in ............................... 5-4
Parking ............................................ 5-4
Periodic maintenance and
adjustment........................................ 6-1
Periodic maintenance chart for the
emission control system .............. 6-2
General maintenance and
lubrication chart ........................... 6-3
Removing and installing the
cowling and panel........................ 6-6
Checking the spark plug ................. 6-7
Engine oil and oil strainer ................ 6-9
Final transmission oil..................... 6-11
Coolant.......................................... 6-12
Replacing the air filter element
and cleaning the check hose..... 6-13
Checking the throttle grip free
play ............................................ 6-14
Valve clearance ............................. 6-14
Tires .............................................. 6-15
Cast wheels................................... 6-16
Checking the front and rear brake
lever free play ............................ 6-17
Checking the front and rear brake
pads ........................................... 6-17
Checking the brake fluid level ....... 6-18
Changing the brake fluid ............... 6-19Checking and lubricating the
cables ........................................ 6-19
Checking and lubricating the
throttle grip and cable ............... 6-20
Lubricating the front and rear
brake levers ............................... 6-20
Checking and lubricating the
centerstand ............................... 6-21
Checking the front fork ................. 6-21
Checking the steering................... 6-22
Checking the wheel bearings ....... 6-22
Battery .......................................... 6-23
Replacing the fuse ........................ 6-24
Replacing the headlight bulb ........ 6-25
Replacing the auxiliary light bulb
(for CHE) .................................... 6-26
Replacing the tail/brake light
bulb ........................................... 6-27
Replacing a turn signal light
bulb ........................................... 6-27
License plate light......................... 6-28
Troubleshooting............................ 6-28
Troubleshooting charts................. 6-29
Scooter care and storage................ 7-1
Matte color caution......................... 7-1
Care ................................................ 7-1
Storage ........................................... 7-4U1GBE1E0.book Page 1 Tuesday, October 17, 2017 11:45 AM
Page 45 of 78

Periodic maintenance and adjustment
6-10
6
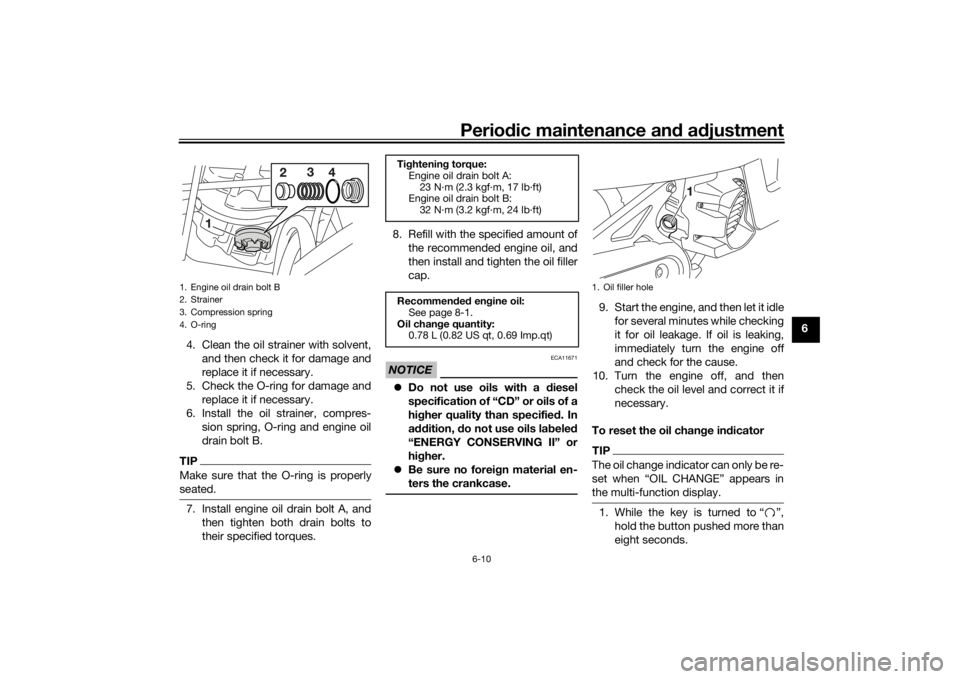
4. Clean the oil strainer with solvent,
and then check it for damage and
replace it if necessary.
5. Check the O-ring for damage and
replace it if necessary.
6. Install the oil strainer, compres-
sion spring, O-ring and engine oil
drain bolt B.
TIPMake sure that the O-ring is properly
seated.7. Install engine oil drain bolt A, and
then tighten both drain bolts to
their specified torques.8. Refill with the specified amount of
the recommended engine oil, and
then install and tighten the oil filler
cap.
NOTICE
ECA11671
Do not use oils with a diesel
specification of “CD” or oils of a
higher quality than specified. In
addition, do not use oils labeled
“ENERGY CONSERVING II” or
higher.
Be sure no foreign material en-
ters the crankcase.
9. Start the engine, and then let it idle
for several minutes while checking
it for oil leakage. If oil is leaking,
immediately turn the engine off
and check for the cause.
10. Turn the engine off, and then
check the oil level and correct it if
necessary.
To reset the oil change indicatorTIPThe oil change indicator can only be re-
set when “OIL CHANGE” appears in
the multi-function display.1. While the key is turned to “ ”,
hold the button pushed more than
eight seconds.
1. Engine oil drain bolt B
2. Strainer
3. Compression spring
4. O-ring
Tightening torque:
Engine oil drain bolt A:
23 N·m (2.3 kgf·m, 17 lb·ft)
Engine oil drain bolt B:
32 N·m (3.2 kgf·m, 24 lb·ft)
Recommended engine oil:
See page 8-1.
Oil change quantity:
0.78 L (0.82 US qt, 0.69 Imp.qt)
1. Oil filler hole
U1GBE1E0.book Page 10 Tuesday, October 17, 2017 11:45 AM
Page 49 of 78

Periodic maintenance and adjustment
6-14
6 To replace the air filter element
1. Remove the air filter case cover by
removing the screws.
2. Pull the air filter element out.
3. Insert a new air filter element into
the air filter case as shown.
NOTICE: Make sure that the air
filter element is properly seated
in the air filter case. The engine
should never be operated with-
out the air filter element in-
stalled, otherwise the piston(s)
and/or cylinder(s) may become
excessively worn.
[ECA10482]
4. Install the air filter case cover by
installing the screws.
To clean the air filter check hose
1. Check the hose on the side of the
air filter case for accumulated dirt
or water.
2. If dirt or water is visible, remove
the hose, clean it, and then install
it.
EAU21386
Checking the throttle grip free
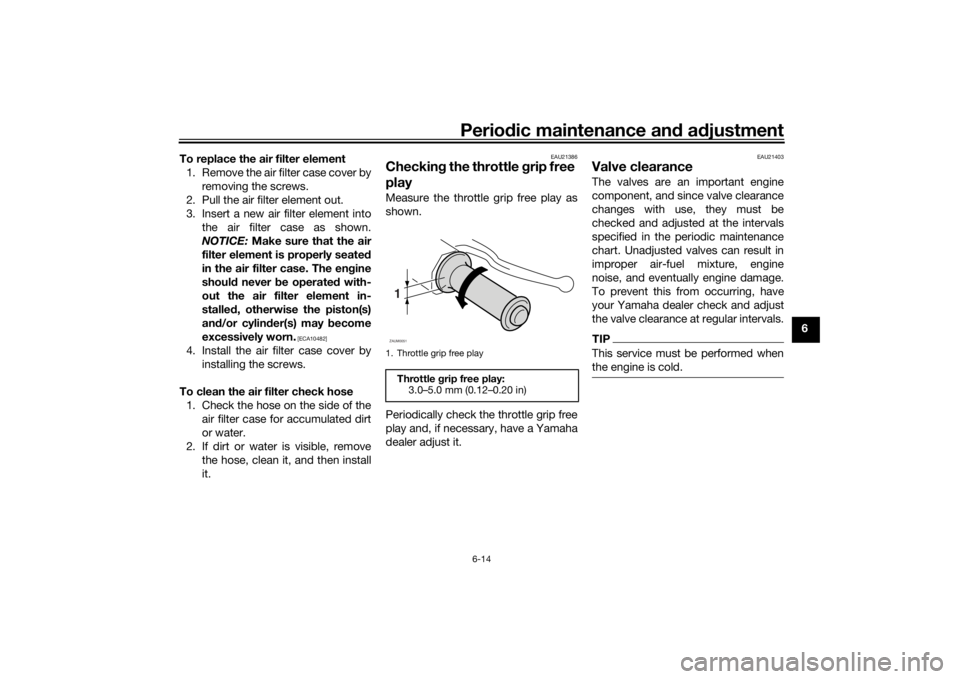
playMeasure the throttle grip free play as
shown.
Periodically check the throttle grip free
play and, if necessary, have a Yamaha
dealer adjust it.
EAU21403
Valve clearanceThe valves are an important engine
component, and since valve clearance
changes with use, they must be
checked and adjusted at the intervals
specified in the periodic maintenance
chart. Unadjusted valves can result in
improper air-fuel mixture, engine
noise, and eventually engine damage.
To prevent this from occurring, have
your Yamaha dealer check and adjust
the valve clearance at regular intervals.TIPThis service must be performed when
the engine is cold.
1. Throttle grip free play
Throttle grip free play:
3.0–5.0 mm (0.12–0.20 in)1ZAUM0051
U1GBE1E0.book Page 14 Tuesday, October 17, 2017 11:45 AM