2018 VOLVO XC90 T8 charge battery
[x] Cancel search: charge batteryPage 478 of 686

STARTING AND DRIVING
476
Towing using a towlineThis section refers to one vehicle being towed behind another using a towline.
Twin Engine vehicles may not be towed behind another vehicle due to the risk of damage to theelectric motor. If the vehicle cannot be driven andneeds to be moved, it must be transported on atow truck with all four wheels on the bed of thetruck.
Towing another vehicleTowing another vehicle requires a lot of power - use the AWD drive mode. This helps charge the
hybrid battery and improve the vehicle's driving and roadholding characteristics. Before towing another vehicle, check applicable speed limit regulations.
Jump startingDo not tow the vehicle to start the engine. Use anauxiliary battery if the start battery's charge levelis so low that the engine cannot be started.
CAUTION
Attempts to tow-start the vehicle could cause damage to the electrical drive motor andthree-way catalytic converter.
Related information
• Attaching and removing the towing eyelet (p. 476)
• Hazard warning flashers (p. 161)
• Recovery (p. 477)
• Jump starting using another battery (p. 469)
• Selecting ignition mode (p. 428)
Attaching and removing the towingeyelet
Use the towing eyelet to tow another vehicle. Screw the towing eyelet securely into place inthe threaded outlet behind the cover on theright-hand side of the rear bumper.
NOTE
If the vehicle is equipped with a towbar, there is no rear attachment for the towing eye.
Attaching the towing eyelet
Take out the towing eyelet, which is stored in a foam block under the floor in the cargocompartment.
Page 585 of 686
LOADING, STORAGE AND PASSENGER COMPARTMENT
583
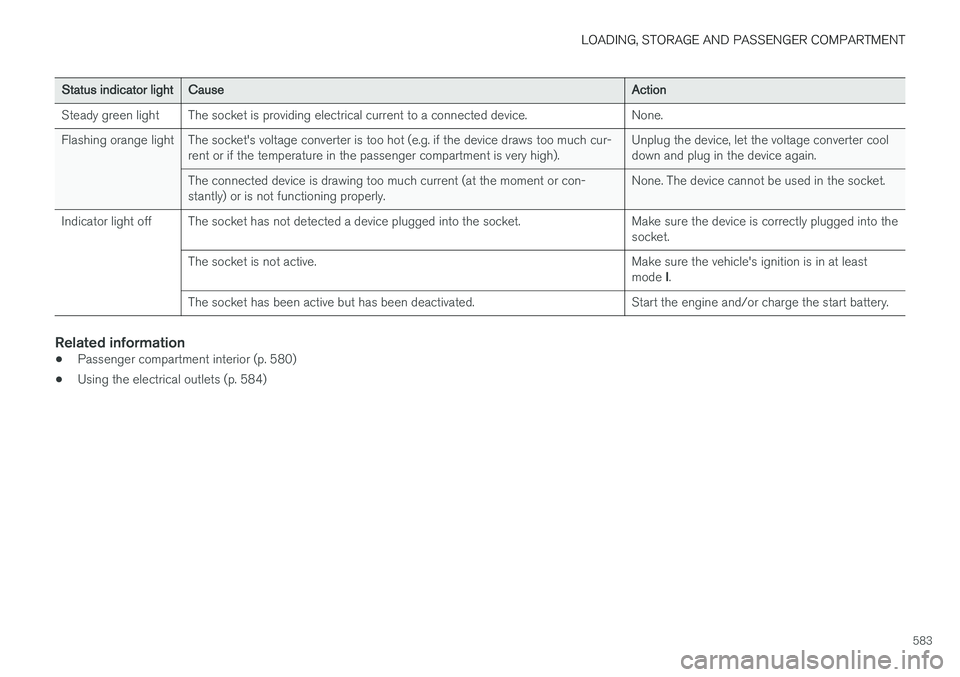
Status indicator lightCauseAction
Steady green light The socket is providing electrical current to a connected device. None.
Flashing orange light The socket's voltage converter is too hot (e.g. if the device draws too much cur- rent or if the temperature in the passenger compartment is very high). Unplug the device, let the voltage converter cool down and plug in the device again.
The connected device is drawing too much current (at the moment or con-stantly) or is not functioning properly. None. The device cannot be used in the socket.
Indicator light off The socket has not detected a device plugged into the socket. Make sure the device is correctly plugged into the socket.
The socket is not active. Make sure the vehicle's ignition is in at least mode I.
The socket has been active but has been deactivated. Start the engine and/or charge the start battery.
Related information
• Passenger compartment interior (p. 580)
• Using the electrical outlets (p. 584)
Page 586 of 686

LOADING, STORAGE AND PASSENGER COMPARTMENT
* Option/accessory.
584
Using the electrical outlets
The 12 V outlet can be used for devices intended for this such as MP3 players, coolersand cellular phones. The high-voltage outlet * can be used for devices
intended for this, such as chargers, laptops, etc.
The ignition must be in at least mode I for the
outlets to supply current. The outlets will then be active as long as there is sufficient charge in thestart battery. If the engine is turned off and the vehicle is locked, the outlets will be deactivated. If theengine is turned off and the vehicle remainsunlocked, the sockets will remain active for up to7 minutes.
NOTE
Bear in mind that using the electrical outlets when the engine is off could cause the starterbattery to have too low of a charge level,which could limit other functionality. Accessories connected to the electrical out- lets can be activated even when the vehicleelectrical system is off or if preconditioning isused. For this reason, disconnect plugs whenthey are not in use to prevent the starter bat-tery from becoming discharged.
WARNING
• Do not use accessories with large or heavy plugs – they could damage the out-let or come loose while you are driving.
• Do not use accessories that could causedisruptions to e.g. the vehicle's radioreceiver or electrical system.
• Position the accessory so that there is norisk of it injuring the driver or passengersin the event of heavy braking or a colli-sion.
• Pay attention to connected accessoriesas they can generate heat that could burnpassengers or the interior.
Using 12 V outlets1. Remove the stopper (tunnel console) or fold
down the cover (trunk/cargo compartment)over the socket and plug in the device.
2. Unplug the device and put the stopper back in (tunnel console) or fold up the cover(trunk/cargo compartment) when the socketis not in use or left unattended.
CAUTION
The maximum power is 120 W (10 A) per outlet.
Using high-voltage outletsThe ignition must be in at least mode I for outlets
to supply current. The outlets will then be active as long as there is sufficient charge in the startbattery. 1. Slide down the cover over the outlet and plug in the device. >
The LED 2
light on the outlet will indicate
its status.
2. The outlet is supplying electrical current when the light is glowing steadily green.
3. Disconnect the device by pulling out the plug (do not pull on the cord). Pull up the cover when the outlet is not in use or is left unattended.
CAUTION
The maximum power is 150 W.
WARNING
Do not attempt to alter or repair the high-volt- age outlet on your own. Volvo recommendscontacting an authorized Volvo workshop.
2LED (Light Emitting Diode)
Page 617 of 686

MAINTENANCE AND SERVICE
}}
615
Start battery
The vehicle has a single-pole electrical system that uses the chassis and engine mount as con-ductors. The start battery is used to start the electrical system and power electrical equipment in thevehicle. The hybrid battery is used to start thecombustion engine. The start battery should only be replaced by a workshop 15
.
The start battery is a 12 V AGM (Absorbed Glass Mat) battery, dimensioned for regenerative charg-ing and to support the function of the vehicle'svarious systems. The service life and performance of the start bat- tery are affected by factors such as driving style,driving conditions, climate, battery discharges,number of starts, etc.
• Never disconnect the start battery while theengine is running.
• Make sure the cables to the start battery arecorrectly connected and the clamps aresecurely tightened.
WARNING
•Batteries generate hydrogen gas, which is flammable and explosive.
• Do not connect the jumper cable to anypart of the fuel system or to any movingparts. Avoid touching hot manifolds.
• Battery fluid contains sulfuric acid. Do notallow battery fluid to contact eyes, skin,fabrics or painted surfaces.
• If contact occurs, flush the affected areaimmediately with water. Obtain medicalhelp immediately if eyes are affected.
• Never expose the battery to open flameor electric spark. Do not smoke near thebattery. Failure to follow the instructionsfor jump starting can lead to injury.
Connection points
WARNING
PROPOSITION 65 WARNING Battery posts, terminals, and related accesso- ries contain lead and lead compounds, chemi-cals known to the state of California to causecancer and reproductive harm. Wash handsafter handling. Use the vehicle's connection points in the engine compartment to connect an external start batteryor battery charger. The battery terminals on the car's starter battery in the luggage/cargo area must
not be used.
Positive connection point
Negative connection point
CAUTION
It is not possible to charge another vehicle's battery by means of current through thecharging points. Using the charging points tocharge another vehicle's battery could causea fuse to blow, which would cause the charg-ing points to stop working.
15
An authorized Volvo workshop is recommended.
Page 618 of 686

||
MAINTENANCE AND SERVICE
616
CAUTION
Only a modern battery charger with controlled charge voltage should be used to charge thestarter battery. The rapid charging functionshould not be used as this could damage thebattery.
NOTE
If both the starter battery and the hybrid bat- tery are discharged, both batteries must be
charged. In such cases, it is not possible to charge only the hybrid battery first. The starter battery must have a certain level of charge for it to be possible to charge thehybrid battery.
CAUTION
Failure to observe the following could cause the infotainment energy save mode to tempo-rarily stop working and/or a message in thedriver's display regarding the state of chargeof the starter battery may be temporarilyincorrect after an external starter battery orbattery charger has been connected:
• The negative battery terminal of the vehi- cle's starter battery must
never be used
to connect an external starter battery orbattery charger – only the vehicle's neg-
ative charging point should be used as
a grounding point.
NOTE
If the starter battery becomes discharged too many times, it will shorten its service life. The service life of the starter battery is affec- ted by several factors, such as driving condi-tions and climate. The starting capacity of thebattery reduces gradually over time. The bat-tery must therefore be recharged if the vehi-cle is not used or a long period of time or if itis only driven short distances. Severe cold fur-ther limits the starting capacity. To keep the starter battery in a good condi- tion, the vehicle should be driven at least15 minutes per week or the battery should beconnected to a battery charger with automatictrickle charging. A starter battery that is always kept fully charged has the maximum service life.
Page 621 of 686

MAINTENANCE AND SERVICE
619
Hybrid battery
The vehicle's electric motor is powered by a rechargeable, maintenance-free, lithium-ionhybrid battery.
NOTE
The vehicle cannot be started if the hybrid battery is discharged.
NOTE
If both the starter battery and the hybrid bat- tery are discharged, both batteries must be
charged. In such cases, it is not possible to charge only the hybrid battery first. The starter battery must have a certain level of charge for it to be possible to charge thehybrid battery.
WARNING
Hybrid battery replacement may only be per- formed by a workshop – an authorized Volvoworkshop is recommended.
CoolantThe hybrid battery's cooling system has its own expansion tank.
CAUTION
Filling the hybrid battery coolant should only be performed by a workshop – an authorizedVolvo workshop is recommended.
SpecificationsType: Lithium-ion
Power reserve: 10.4 kWh.
NOTE
The capacity of the hybrid battery decreases with age and use, which could result inincreased use of the combustion engine,leading to higher fuel consumption andreduced electric motor range.
Related information
•Battery symbols (p. 620)
• Start battery (p. 615)
• Charging the hybrid battery (p. 407)
Page 625 of 686

MAINTENANCE AND SERVICE
}}
623
Fuse pliers are provided on the inside of the fuse box cover to assist in removing and insertingfuses. There are also spaces for several extra fuses in the fusebox.
PositionsThere is a decal with a diagram of the locationsof the fuses on the inside of the cover.
• Fuses 1–13, 18–30, 35–37 and 46–70 are"Micro" fuses.
• Fuses 14–17, 31–34, 38–45 and 71–78 are"MCase" fuses and should only be replaced by a workshop 17
.
FunctionAA
– –
– –
– –
Control module for actuator for engaging/changing gears, auto-matic transmission 5
High-voltage coolant heater control module
5
FunctionAA
Control module for A/C; heat exchanger cut-off valve; cut-offvalve for coolant through the cli-mate system5
Hybrid battery control module; high-voltage converter for com-bined high-voltage generator/starter motor with 500 V–12 Vvoltage converter5
– –
Converter for controlling feed to rear axle electric motor
10
Hybrid battery control module; high-voltage converter for com-bined high-voltage generator/starter motor with 500 V–12 Vvoltage converter10
Charge module 5
Cut-off valve for hybrid battery coolant; coolant pump 1 forhybrid battery
10
Coolant pump for electric drive system
10
FunctionAA
Hybrid component cooling fan 25
– –
– –
– –
– –
– –
– –
– –
– –
– –
12 V outlet in tunnel console, front15
12 V outlet in tunnel console between second-row seats
B
12 V outlet in tunnel console,between rear seats C
; USB ports
in tunnel console between rearseats C 15
17
An authorized Volvo workshop is recommended.
Page 671 of 686

INDEX
669
Charge level
vehicle function 459
Charging hybrid battery 407 opening and closing the charging
door 411
start charging 412
Status 414, 415, 416
stop charging 418
Charging cable 409
Charging current 408
Checking engine oil level 611
Child restraints 63, 65 booster cushions 71
convertible seats 69
infant seats 67
integrated booster cushion 76
ISOFIX/LATCH anchors 74
lower attachment points 74
recalls and registration 65
top tether anchors 72
Child safety 63
Child safety locks 259
Circuit breaker 410
City Safety 335, 336, 338, 339, 344, 346
City Safety in crossing traffic 341, 342
City Safety when evasive maneuver preven- ted 343
Cleaning 635, 637, 638 automatic car wash 641
car wash 638, 639, 641, 642, 643, 644
center display 633
Seat belts 635
textile upholstery 633, 635, 636
upholstery 633, 635, 636, 637, 638
wheels 644
Cleaning wheels 644
Cleaning wiper blades 642
Clean Zone 205
Clean Zone Interior Package 206
Climate 202 auto-regulation 219
blower control 224, 225
parking 230
perceived temperature 203
Sensors 202
temperature control 226, 227, 228
voice control 203
zones 202
Climate controls 213 center display 213
rear seat 213Climate system 202, 213
Refrigerant 664
repairs 608
Clock, setting 93
Collision 42, 47, 52, 61Collision warner detection of pedestrians 339
radar sensor 326
Collision warning 335, 347
Color code, paintwork 646
Color codes 646
Compass 481, 482 calibration 482
Condensation in headlights 639, 641, 642, 643
Connecting vehicle to Internet No connection or poor connection 534
via a mobile device (WiFi) 531
via mobile device (Bluetooth) 531
via vehicle's modem 532
Connect phone 521
Contact information 26
Convertible seats 69
coolant 663
Coolant, filling 612