2018 VOLVO XC60 T8 warning
[x] Cancel search: warningPage 192 of 674

||
SEATS AND STEERING WHEEL
190
Models without the electric backrest fold-
down function
The backrest consists of two sections: •The right-side seat and the center seat fold down as one unit.
• The left-side seat folds down separately.
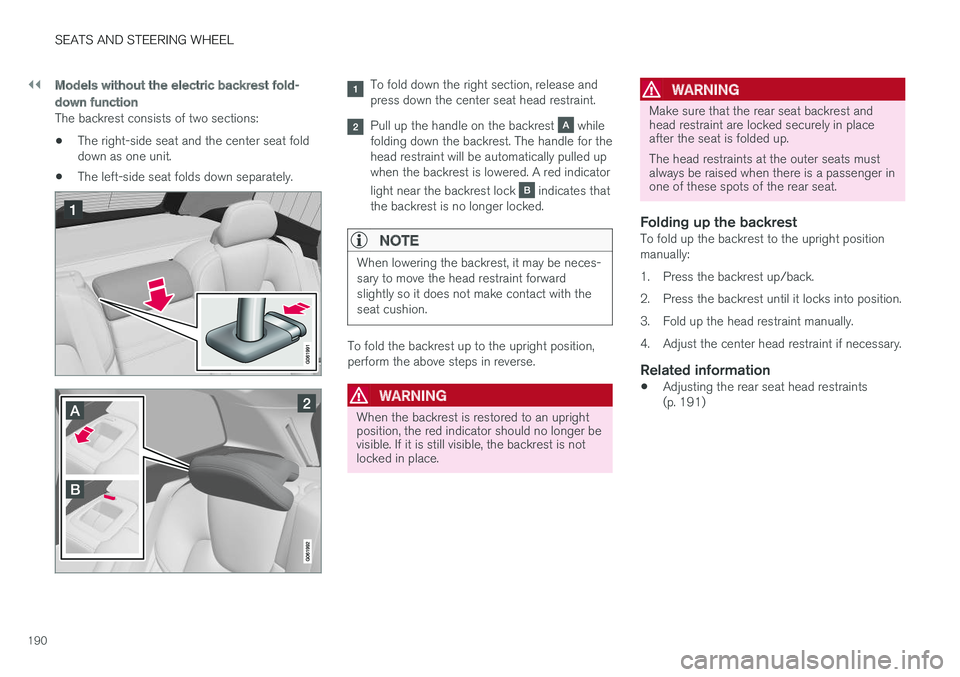
To fold down the right section, release and press down the center seat head restraint.
Pull up the handle on the backrest while
folding down the backrest. The handle for the head restraint will be automatically pulled upwhen the backrest is lowered. A red indicator light near the backrest lock
indicates that
the backrest is no longer locked.
NOTE
When lowering the backrest, it may be neces- sary to move the head restraint forwardslightly so it does not make contact with theseat cushion.
To fold the backrest up to the upright position, perform the above steps in reverse.
WARNING
When the backrest is restored to an upright position, the red indicator should no longer bevisible. If it is still visible, the backrest is notlocked in place.
WARNING
Make sure that the rear seat backrest and head restraint are locked securely in placeafter the seat is folded up. The head restraints at the outer seats must always be raised when there is a passenger inone of these spots of the rear seat.
Folding up the backrestTo fold up the backrest to the upright position manually:
1. Press the backrest up/back.
2. Press the backrest until it locks into position.
3. Fold up the head restraint manually.
4. Adjust the center head restraint if necessary.
Related information
• Adjusting the rear seat head restraints (p. 191)
Page 193 of 674

SEATS AND STEERING WHEEL
}}
* Option/accessory.191
Adjusting the rear seat headrestraints
Adjust the center head restraint in the rear seat to the seat occupant's height. Fold down theoutboard head restraints to improve rear visibil-ity.
Adjusting the center head restraint
The center head restraint should be adjusted to suit the passenger's height. The entire back ofthe head should be covered if possible. Manuallymove the restraint up or down as needed.
To lower the restraint, push and hold the button (see illustration) while carefully lowering the headrestraint.
WARNING
The center seat head restraint must be in its lowest position when the seat is not occupied.When the center seat is occupied, the headrestraint must be correctly adjusted to thepassenger's height, covering the entire backof the head if possible.
Electrically folding down the rear seat's outboard head restraints *
The outer head restraints can be folded via the center display's function view. The head restraintcan be folded down when the vehicle is in igni- tion mode 0.
Page 194 of 674

||
SEATS AND STEERING WHEEL
* Option/accessory.
192 Tap the
Headrest Fold button
to activate/deactivate folding.
Manually push the head restraint until it clicks into position.
WARNING
Do not lower the head restraint if there are passengers in any of the rear seats.
WARNING
The head restraint must be locked in the upright position after it has been folded up.
Manually folding down the rear seat's outboard head restraints
For models with electrically folding backrests *,
the outboard head restraints are folded manually using the control on the top of the seat (see illus- tration
). For vehicles without electrically fold-
ing backrests, fold down the outboard head restraints using the inner control on the top of the seat (see illustration
).
Related information
• Folding down the rear seat backrests (p. 188)
Steering wheel controls and horn The steering wheel has a horn and controls for e.g. driver support systems and voice control.
Steering wheel keypads and paddles
*.
Driver support system controls 2
.
Paddle * for manually shifting gears (auto-
matic transmission).
Controls for voice commands, adjusting the head-up display, accessing menus and mes-sages, and handling phone calls.
2 Speed limiter *, Cruise Control, Adaptive Cruise Control *, Distance Alert * and Pilot Assist *.
Page 195 of 674

SEATS AND STEERING WHEEL
193
Horn
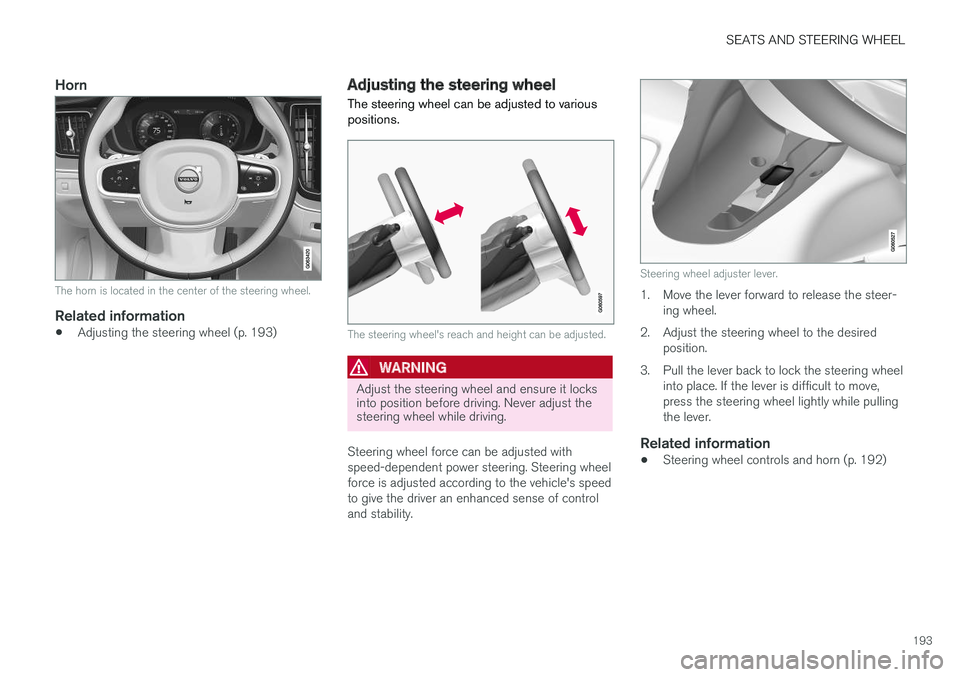
The horn is located in the center of the steering wheel.
Related information
•Adjusting the steering wheel (p. 193)
Adjusting the steering wheel
The steering wheel can be adjusted to various positions.
The steering wheel's reach and height can be adjusted.
WARNING
Adjust the steering wheel and ensure it locks into position before driving. Never adjust thesteering wheel while driving.
Steering wheel force can be adjusted with speed-dependent power steering. Steering wheelforce is adjusted according to the vehicle's speedto give the driver an enhanced sense of controland stability.
Steering wheel adjuster lever.
1. Move the lever forward to release the steer- ing wheel.
2. Adjust the steering wheel to the desired position.
3. Pull the lever back to lock the steering wheel into place. If the lever is difficult to move, press the steering wheel lightly while pullingthe lever.
Related information
• Steering wheel controls and horn (p. 192)
Page 232 of 674

||
KEY, LOCKS AND ALARM
* Option/accessory.
230 The keyless system for locking/unlocking the doors and tailgate (Passive Entry
*) is available as
an option. This system has a range in a semicircle with a radius of approximately 1.5 meter (5 feet)out from the driver's door and approx. 1 meter(3 feet) out from the tailgate. With keyless start in combination with keyless locking and unlocking, the remote key can belocated anywhere in the passenger compartmentor cargo compartment in order to start theengine. Each remote key supplied with the vehicle can be linked to a driver profile with unique settings forthe vehicle. When a key with a specific profile isused, the vehicle settings are adjusted accordingto that profile.
Buttonless key, Key TagFor vehicles equipped with keyless locking and unlocking *, a smaller, lighter and button-less key
(Key Tag 3
) is also provided. It works the same
way as the regular remote key as regard keyless start and keyless locking and unlocking 4
. It does
not have a detachable key blade and its battery cannot be replaced.
Remote key buttons
The remote key has four buttons, one on the left side and three on the right.
Locking - Press once to lock the doors,
tailgate and fuel filler door and arm the alarm. Press and hold to close all windows.
Unlocking - Press once to unlock the
doors and tailgate and disarm the alarm. Press and hold to open all windows at the same time 5
.
Tailgate - Unlock and disarm the tailgate
only. On vehicles equipped with the power tailgate *, press and hold to automatically
open the tailgate. Press and hold to close an open tailgate (an audible warning signal will sound).
Panic alarm - Used to attract attention in
emergency situations. Press and hold the button for at least 3 seconds or press twicewithin 3 seconds to activate the turn signalsand horn. To deactivate, wait at least 5 sec-onds and press the button again. If no actionis taken, the panic alarm will deactivate auto-matically after 3 minutes.
WARNING
If anyone is left in the vehicle, make sure that power to the power windows and panoramic roof * is cut off by always taking the remote
key with you when you leave the vehicle.
NOTE
Be aware of the risk of locking the Key Tag in the vehicle. If the remote key/Key Tag is leftin the vehicle, it will be deactivated when thevehicle is locked and the alarm set usinganother valid key. The deactivated key will be reactivated when the vehicle is unlocked.
3 Även kallad sportnyckel.
4 The key is waterproof up to a depth of approx. 10 meters (30 feet) for up to 60 minutes, making it suitable for use in activities in and around water.
5 The total airing function can be used to e.g. quickly air out the vehicle in hot weather.
Page 236 of 674

||
KEY, LOCKS AND ALARM
* Option/accessory.
234 For keyless use, a remote key or the Key Tag must be within the shaded areas shown in theillustration, i.e. a semicircle with a radius ofapprox. 1.5 meter (5 feet) along the sides of thevehicle or approx. 1 meter (3 feet) from the tail-gate.
NOTE
The functions of the remote control key can be disrupted by ambient radio waves, build-ings, topographical conditions, etc. The vehi-cle can always be locked/unlocked using thekey blade.
If the remote key is removed from the vehicle
If the remote key is removed from the vehicle while the engine is running, the warning message
Vehicle key not
found Removed from vehicle will be
displayed in the instrument panel and an audible signal will sound when the last door is closed.
The message will disappear when the key is returned to the vehicle and the O button on the
right-side steering wheel keypad is pressed or when the last door is closed again.
Related information
• Remote key (p. 229)
• Antenna locations for the start and lock sys-tem (p. 247) •
Keyless and touch-sensitive surfaces
*
(p. 243)
Replacing the remote key's battery
The battery in the remote key must be replaced when it is discharged.
NOTE
All batteries have a limited service life and must eventually be replaced (does not applyfor Key Tag). The battery's service life variesdepending on how often the vehicle/key isused.
The remote key battery should be replaced if:
the information symbol illuminates and the message
Vehicle key bat. low
See Owner's manual is displayed in
the instrument panel
and/or
• the locks do not react after several attempts to lock or unlock the vehicle using theremote key within approx. 20 meter (65 feet)from the vehicle.
NOTE
Move closer to the vehicle and try to unlock it again.
Page 241 of 674

KEY, LOCKS AND ALARM
* Option/accessory.239
secure when handing over the vehicle to e.g. a young driver, parking attendant or workshop. Thesettings for a Red Key cannot be changed by itsuser; a regular remote key is needed to changesettings.
Related information
•
Red Key
* settings (p. 239)
• Remote key (p. 229)
Red Key
* settings
The holder of a regular remote key can adjust settings for a Red Key. Certain driver supportfunctions are always active.
1. Tap Settings in the center display's Top
view.
2. Tap
SystemDriver ProfilesRed Key.
> The following settings can be made:
•
Set Time Gap For Adaptive Cruise Control
•Reduced Maximum Volume
•Max Speed Limit
•Speed Limit Warning
Adaptive Cruise Control *:
•Default setting: Longest interval
Reduced maximum volume (On/Off):
•Default setting: On
Speed Limiter (On/Off):
•Setting interval: 50-250 km/h (30-160 mph)
• The default setting is 120 km/h (75 mph)
• Increments: 1 km/h (1 mph)
The following symbol and message will be shown in the instrument panel
Red key Speed limitation cannot
be exceeded.
Speed reminder (On/Off):
• Setting interval: 0-250 km/h (0-160 mph)
• Default setting: 50, 70 and 90 km/h (30, 45 and 55 mph)
• Increments: 1 km/h (1 mph)
• Maximum number of simultaneous remind-ers: 6
Driver support functionsThe following driver support functions will alwaysbe active for a Red Key user:
• Blind Spot Information (BLIS)
*
• Lane Keeping Aid (LKA)
*
• Distance Alert
*
• City Safety
• Driver Alert Control (DAC)
*
• Road Sign Information
*
Related information
•Red Key - restricted remote key
* (p. 238)
Page 248 of 674

KEY, LOCKS AND ALARM
* Option/accessory.
246
Keyless unlock settings *
Several different sequences are available for keyless unlocking.
1. Tap Settings in the center display's Top
view.
2. Tap
My CarLockingKeyless Unlock
3. Select alternative: •
All Doors
- unlocks all doors at the same time.
•
Single Door
- unlocks the selected door.
Related information
• Keyless locking and unlocking
* (p. 244)
• Keyless and touch-sensitive surfaces
*
(p. 243)
Keyless tailgate unlock *
The tailgate can be opened using the remote key. The key only needs to be within range, e.g.in a pocket or bag.
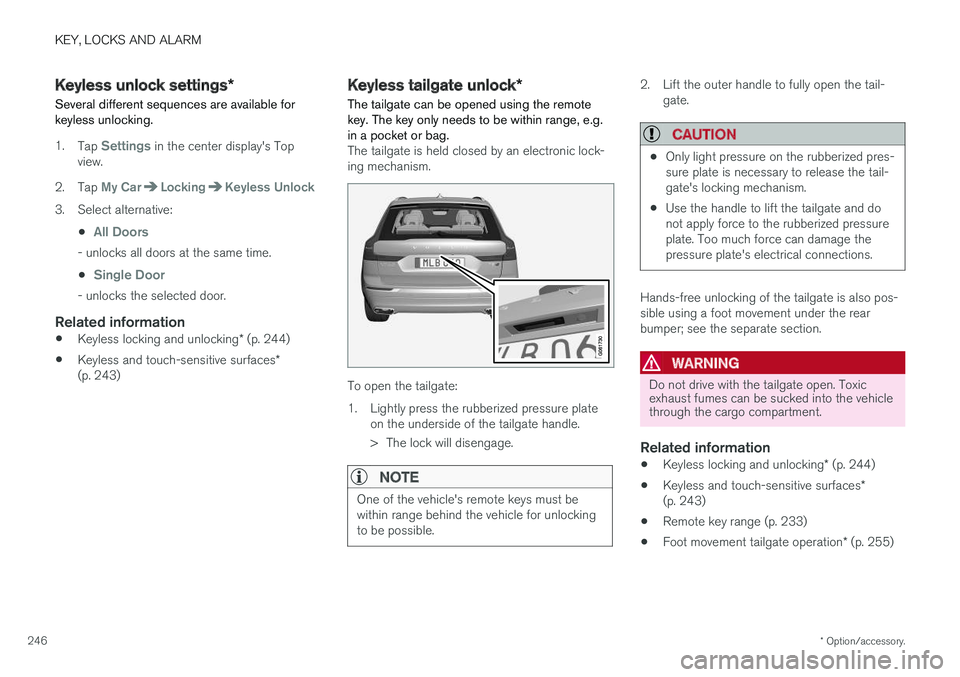
The tailgate is held closed by an electronic lock- ing mechanism.
To open the tailgate:
1. Lightly press the rubberized pressure plate on the underside of the tailgate handle.
> The lock will disengage.
NOTE
One of the vehicle's remote keys must be within range behind the vehicle for unlockingto be possible.
2. Lift the outer handle to fully open the tail-gate.
CAUTION
•Only light pressure on the rubberized pres- sure plate is necessary to release the tail-gate's locking mechanism.
• Use the handle to lift the tailgate and donot apply force to the rubberized pressureplate. Too much force can damage thepressure plate's electrical connections.
Hands-free unlocking of the tailgate is also pos- sible using a foot movement under the rearbumper; see the separate section.
WARNING
Do not drive with the tailgate open. Toxic exhaust fumes can be sucked into the vehiclethrough the cargo compartment.
Related information
•
Keyless locking and unlocking
* (p. 244)
• Keyless and touch-sensitive surfaces
*
(p. 243)
• Remote key range (p. 233)
• Foot movement tailgate operation
* (p. 255)