2018 VOLVO XC60 T8 light
[x] Cancel search: lightPage 358 of 674
||
DRIVER SUPPORT
356
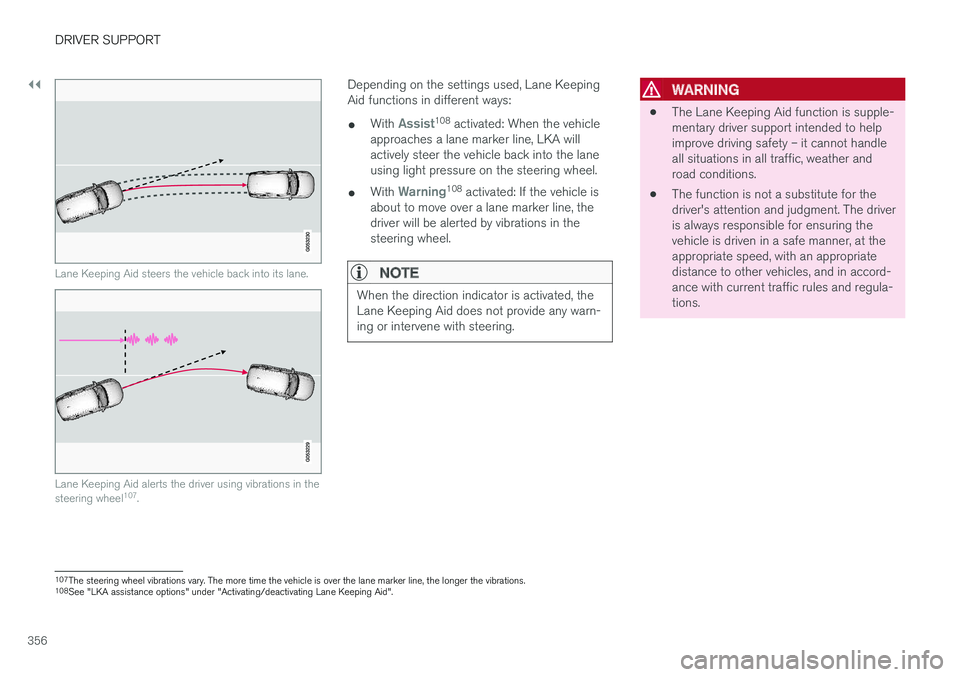
Lane Keeping Aid steers the vehicle back into its lane.
Lane Keeping Aid alerts the driver using vibrations in the steering wheel107
.
Depending on the settings used, Lane Keeping Aid functions in different ways:
• With
Assist108
activated: When the vehicle
approaches a lane marker line, LKA will actively steer the vehicle back into the laneusing light pressure on the steering wheel.
• With
Warning108
activated: If the vehicle is
about to move over a lane marker line, the driver will be alerted by vibrations in thesteering wheel.
NOTE
When the direction indicator is activated, the Lane Keeping Aid does not provide any warn-ing or intervene with steering.
WARNING
• The Lane Keeping Aid function is supple- mentary driver support intended to helpimprove driving safety – it cannot handleall situations in all traffic, weather androad conditions.
• The function is not a substitute for thedriver's attention and judgment. The driveris always responsible for ensuring thevehicle is driven in a safe manner, at theappropriate speed, with an appropriatedistance to other vehicles, and in accord-ance with current traffic rules and regula-tions.
107
The steering wheel vibrations vary. The more time the vehicle is over the lane marker line, the longer the vibrations.
108 See "LKA assistance options" under "Activating/deactivating Lane Keeping Aid".
Page 360 of 674
DRIVER SUPPORT
358
Activating/deactivating LaneKeeping Aid The Lane Keeping Aid (LKA110
) function can be
switched On or Off.
On/OffPress the Lane Keeping Aidbutton in the center display's Function view.
• GREEN button indicator light - LKA is acti- vated.
• GRAY button indicator light - LKA is deacti-vated.
Related information
•Lane Keeping Aid (p. 355)
Selecting type of assistance forLane Keeping Aid
The driver can determine what types of assis- tance LKA 111
should provide if the vehicle veers
from its lane.
1. Select SettingsMy CarIntelliSafe in
the center display's Top view.
2. Under
Lane Keeping Aid Mode, select
what assistance LKA should provide:
•
Assist the driver will receive steering
assistance but no warning.
•
Both - the driver will receive both steering
assistance and a warning.
•
Warning - the driver will only receive a
warning.
Related information
• Lane Keeping Aid (p. 355)
Lane Keeping Aid limitations
In certain demanding driving conditions, Lane Keeping Aid may not be able to properly assistthe driver. In these situations, it is recommendedthat the function be deactivated.
Examples of such situations include:
• road work
• winter driving conditions
• poor road surfaces
• a very sporty driving style
• bad weather with reduced visibility
• roads with indistinct or no lane markings
• sharp edges or lines other than the lane's side markings
• when the power steering works at reducedpower - e.g. during cooling due to overheat-ing (see section "Speed-dependent steeringforce").
NOTE
The function uses the vehicle's camera unit, which has some general limitations – see thesection "Camera unit limitations".
110
Lane Keeping Aid
111 Lane Keeping Aid
Page 376 of 674

||
DRIVER SUPPORT
* Option/accessory.
374
CAUTION
When installing auxiliary lights: Make sure these do not obscure the sensors – the auxili-ary lights could be perceived as an obstacle.
Related information
• Park Assist
* (p. 372)
Activating/deactivating Park Assist
The Park Assist Pilot function can be activated/ deactivated.
On/OffPark Assist's front and side sensors are automat- ically activated when the engine is started. Therear sensors are activated if the vehicle is movingbackward or reverse gear is engaged.
The function can be activated/deactivated in the center dis-play's Function view.
–Tap the Park Assist button in Function view.
> The Park Assist Pilot indicator light shows the status of the function: GREEN (on) or GRAY (off).
In vehicles equipped with Park Assist Camera,Park Assist can also be activated/deactivatedfrom the relevant camera view.
Related information
• Park Assist
* (p. 372)
Park Assist limitations
Park Assist may not be able to detect all condi- tions in all situations and functionality may there-fore be limited in certain cases.
The driver should be aware of the following limi- tations for Park Assist:
WARNING
Be extra cautious when reversing if this symbol isshown when a trailer, bikecarrier or similar is attachedand electrically connectedto the vehicle. The symbol indicates that
the rear parking assist sensors are deacti-
vated and will not warn of any obstacles.
Page 380 of 674
DRIVER SUPPORT
* Option/accessory.
378
Park Assist Camera views
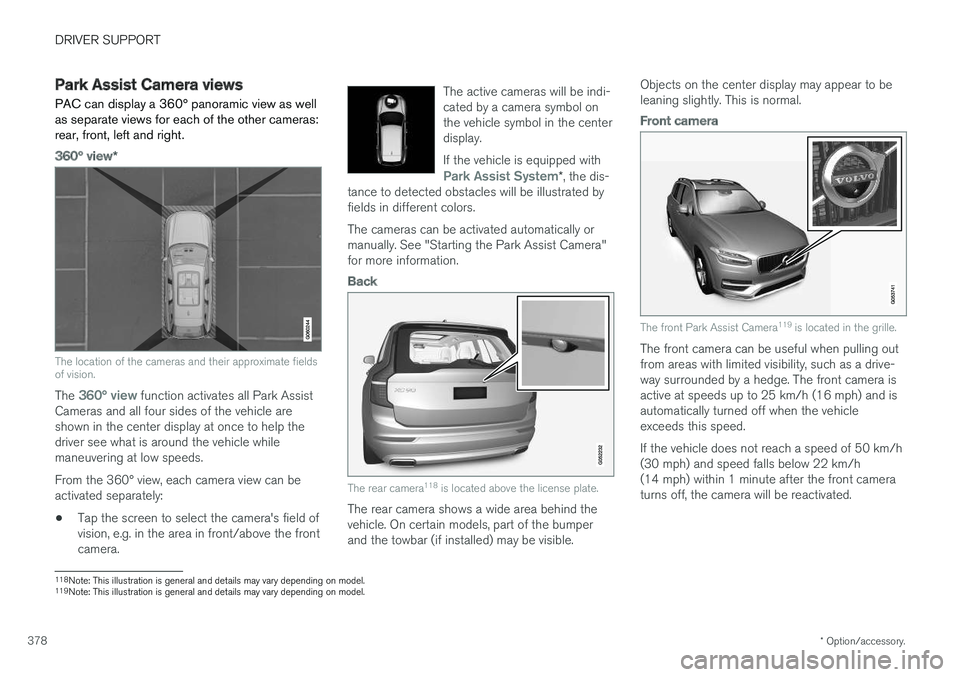
PAC can display a 360° panoramic view as well as separate views for each of the other cameras:rear, front, left and right.
360° view *
The location of the cameras and their approximate fields of vision.
The 360° view function activates all Park Assist
Cameras and all four sides of the vehicle are shown in the center display at once to help thedriver see what is around the vehicle whilemaneuvering at low speeds. From the 360° view, each camera view can be activated separately:
• Tap the screen to select the camera's field ofvision, e.g. in the area in front/above the frontcamera. The active cameras will be indi-cated by a camera symbol onthe vehicle symbol in the centerdisplay. If the vehicle is equipped with
Park Assist System*
, the dis-
tance to detected obstacles will be illustrated by fields in different colors.
The cameras can be activated automatically or manually. See "Starting the Park Assist Camera"for more information.
Back
The rear camera 118
is located above the license plate.
The rear camera shows a wide area behind the vehicle. On certain models, part of the bumperand the towbar (if installed) may be visible. Objects on the center display may appear to beleaning slightly. This is normal.
Front camera
The front Park Assist Camera
119
is located in the grille.
The front camera can be useful when pulling out from areas with limited visibility, such as a drive-way surrounded by a hedge. The front camera isactive at speeds up to 25 km/h (16 mph) and isautomatically turned off when the vehicleexceeds this speed. If the vehicle does not reach a speed of 50 km/h (30 mph) and speed falls below 22 km/h(14 mph) within 1 minute after the front cameraturns off, the camera will be reactivated.
118Note: This illustration is general and details may vary depending on model.
119 Note: This illustration is general and details may vary depending on model.
Page 385 of 674
DRIVER SUPPORT
* Option/accessory.383
Blind sectors
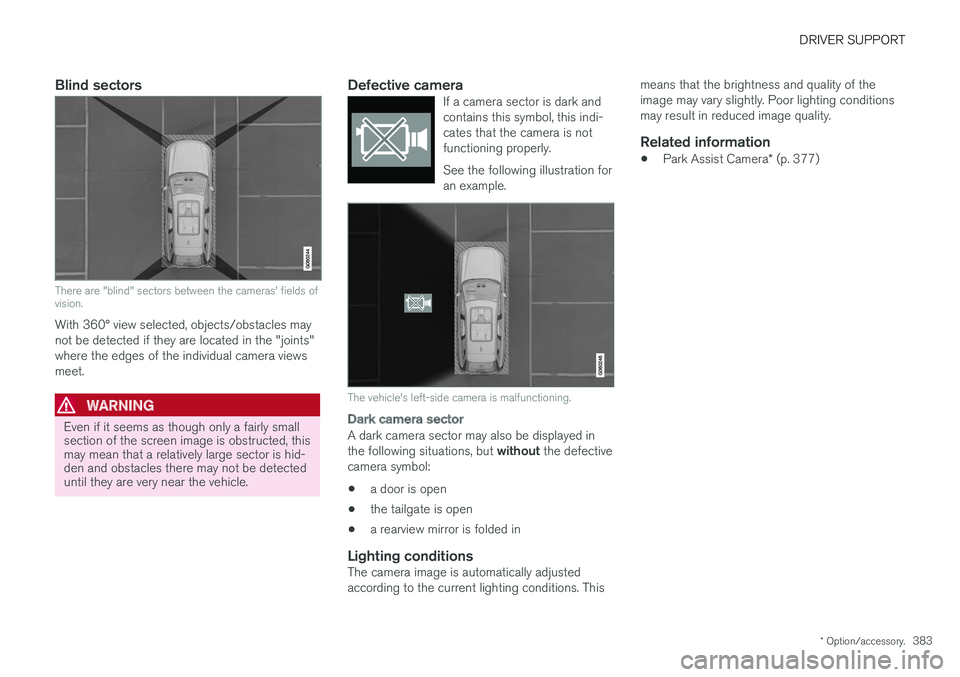
There are "blind" sectors between the cameras' fields of vision.
With 360° view selected, objects/obstacles may not be detected if they are located in the "joints"where the edges of the individual camera viewsmeet.
WARNING
Even if it seems as though only a fairly small section of the screen image is obstructed, thismay mean that a relatively large sector is hid-den and obstacles there may not be detecteduntil they are very near the vehicle.
Defective cameraIf a camera sector is dark and contains this symbol, this indi-cates that the camera is notfunctioning properly. See the following illustration for an example.
The vehicle's left-side camera is malfunctioning.
Dark camera sector
A dark camera sector may also be displayed in the following situations, but without the defective
camera symbol:
• a door is open
• the tailgate is open
• a rearview mirror is folded in
Lighting conditionsThe camera image is automatically adjusted according to the current lighting conditions. This means that the brightness and quality of theimage may vary slightly. Poor lighting conditionsmay result in reduced image quality.
Related information
•
Park Assist Camera
* (p. 377)
Page 386 of 674
DRIVER SUPPORT
* Option/accessory.
384
Recommended maintenance of thePark Assist Camera
Each of the Park Assist Cameras, located above the license plate, the grille and in both door mir-rors, require a certain degree of maintenance.
Clean the camera lenses regularly using luke- warm water and car washing detergent. Washgently to avoid scratching the lens.
NOTE
Keep the camera lens free of dirt, snow and ice to help ensure the best functionality. Thisis particularly important in poor light condi-tions.
Related information
• Park Assist Camera
* (p. 377)
Page 398 of 674
HYBRID INFORMATION
396
General information about TwinEngine
Twin Engine vehicles are driven just like any other vehicle, but certain functions differ from avehicle powered exclusively by gasoline. Theelectric motor powers the vehicle primarily at lowspeeds; the gasoline engine is used at higherspeeds or during more active driving.
The instrument panel displays Twin Engine-spe- cific information - charging information, selecteddrive mode, distance to discharged battery andhybrid battery charge level. Different drive modes can be selected while driv- ing, e.g. electric power only or, if more power isneeded, a combination of electric and gasolinepower. The vehicle calculates the optimal combi-nation of driveability, driving experience, environ-mental impact and fuel economy for the selecteddrive mode. In order to function optimally, the hybrid battery (and its electrical drive systems) and the gasolineengine (and its drive systems) must be at thecorrect operating temperature. Battery capacitycan be considerably reduced if the battery is toocold or too hot. Preconditioning prepares thevehicle's drive systems and passenger compart-ment before driving to help reduce both wear andenergy consumption. It also helps increase thehybrid battery's range. The hybrid battery, which powers the electric motor, is recharged using the charging cable. Itcan also be recharged during light braking and through engine braking in gear position
B. The
combustion engine can also help recharge thehybrid battery.
Important
No electrical current
Keep in mind that if there is no electrical current to the vehicle, i.e. the ignition is switched off orthe start battery is discharged, certain functionssuch as brakes, power steering, etc. will not work.
WARNING
If the vehicle does not have electrical current and both the electric motor and the gasolineengine are switched off, the brakes cannot beused to stop the vehicle.
Towing not permitted
Never tow a Twin Engine vehicle behind another vehicle, as this could damage the electric motor.
Exterior engine noise
WARNING
Keep in mind that the vehicle does not emit any engine noise when using the electricmotor and may therefore be difficult to detectfor children, pedestrians, cyclists or animals.This is especially true at low speeds, e.g. inparking lots.
High-voltage electrical current
WARNING
Several components in the vehicle work with high voltage that can be hazardous in case ofan incorrect procedure. These componentsand any orange wiring in the vehicle may onlybe handled by trained and qualified Volvoservice technicians.
Do not touch anything that is not clearly descri- bed in this Owner's Manual.
Related information
• Charging the hybrid battery (p. 397)
• Hybrid gauge (p. 83)
• Drive modes (p. 435)
• Starting and stopping preconditioning(p. 222)
• Hybrid battery (p. 609)
• Factors affecting electric motor range(p. 448)
• Gear selector positions for automatic trans-missions (p. 429)
• Towing using a towline (p. 466)
Page 399 of 674

HYBRID INFORMATION
}}
397
Charging the hybrid battery In addition to the conventional fuel tank, your vehicle is also equipped with a rechargeablelithium-ion hybrid battery.
The hybrid battery can be recharged using the charging cable stored in a storage space in thecargo compartment.
WARNING
The hybrid electrical system in your vehicle uses high voltage electrical current. Any dam-age to this system or to the hybrid batterymay result in the danger of overheating, fire,or serious injury. If the vehicle is involved in acollision or subjected to flooding, fire, etc.,have it inspected by a trained and qualifiedVolvo service technician. Prior to this inspec-tion, the vehicle should be parked outdoors ata safe distance from any building or poten-tially flammable materials.
The hybrid battery's charging time depends on the charging current used.
NOTE
The capacity of the hybrid battery diminishes somewhat with age and use, which couldresult in increased use of the gasoline engineand consequently, slightly higher fuel con-sumption.
WARNING
If the hybrid battery needs to be replaced, this may only be done by Volvo retailer or author-ized Volvo workshop.
Charging cable handle and charging socket.
Charging status is indicated in three ways: • The indicator lights in the charging module (the unit connected to the wall outlet).
• Indicator light in the vehicle's chargingsocket.
• Images and text in the instrument panel.
The hybrid battery's charging process alsocharges the vehicle's start battery. If the hybrid battery's temperature is below -10 ºC (14 ºF) or above 40 ºC (104 ºF), some of
the vehicle's functions may be reduced or not available at all. The electric motor cannot be used if the battery'stemperature is too low or too high. If the PUREdrive mode is selected, the gasoline engine willstart.
Charging using the gasoline engine
The vehicle generates electrical current to charge the battery, e.g. when the driver lightly presses the brakepedal or when engine braking is used on downgrades.
The vehicle can also generate current to the hybrid battery to charge it.
• The hybrid battery can also be recharged bylightly depressing the brake pedal, i.e. duringlight braking. This converts the vehicle'skinetic energy to electrical energy, which isused to charge the hybrid battery.
• In gear position
B, the electric motor brakes
the vehicle when the accelerator pedal is