2018 VOLVO XC60 T8 rear view mirror
[x] Cancel search: rear view mirrorPage 6 of 674

4
Resetting user data when the vehicle changes owners130
Resetting center display settings 131
Setting types in the center display 131
Table of settings in the center display 132
Driver profiles 133
Selecting a driver profile 134
Changing a driver profile's name 135
Resetting driver profile settings 135
Linking a remote key to a driver profile 135
Messages in the center display 136
Handling messages in the center display 137
Handling messages saved from thecenter display 138
Head-up display *
138
Activating and deactivating the head- up display * 140
Head-up display settings *
140
Voice control 141
Using voice commands 142
Voice control for cellular phones 143
Voice control for radio and media 144
Voice control settings 144
LIGHTING
Lighting panel and controls148
Adjusting light functions via the cen- ter display 149
Parking lights 150
Daytime running lights 150
Low beams 151
Using high beam 152
Active high beam 153
Using turn signals 154
Active Bending Lights *
155
Rear fog light 155
Brake lights 156
Emergency brake lights 156
Hazard warning flashers 157
Using home safe lighting 157
Welcome Light 157
Interior Lighting 158
Adjusting interior lighting 159
WINDOWS, GLASS AND MIRRORS
Windows, glass and mirrors162
Pinch protection for windows and sun curtains 162
Reset procedure for pinch protection 163
Power windows 163
Operating the power windows 164
Rearview/door mirrors 165
Adjusting the rearview mirror dim-ming function 166
Adjusting the door mirrors 166
Panoramic roof *
168
Operating the panoramic roof *
169
Auto closing the panoramic roof * sun
curtain 171
Using the windshield wipers 172
Heated windshield washer nozzles *
173
Using the rain sensor 173
Using the rain sensor's memory function 174
Using the windshield and headlightwashers 175
Using the rear window wiper/washer 176
Using automatic rear window wipingwhen backing up 176
Page 58 of 674

||
SAFETY
56
WARNING
•No objects or accessory equipment, e.g. dashboard covers, may be placed on,attached to, or installed near the air bagcover (the area above the glove compart-ment) or the area affected by airbagdeployment.
• There should be no loose articles, suchas coffee cups on the floor, seat, or dash-board area.
• Never try to open the airbag cover on thesteering wheel or the passenger's sidedashboard. This should only be done by atrained and qualified Volvo service techni-cian.
• Failure to follow these instructions canresult in injury to the vehicle's occupants.
Related information
• Airbags (p. 52)
• Occupant weight sensor (p. 56)
Occupant weight sensor
The Occupant Weight Sensor (OWS) is designed to meet the regulatory requirements ofFederal Motor Vehicle Safety Standard (FMVSS)208 and is designed to disable (will not inflate)the passenger's side front airbag under certainconditions.
Occupant Weight Sensor (OWS) indicator light
Disabling the passenger's side front airbag
Volvo recommends that ALL occupants (adults and children) shorter than 140 cm (4 feet7 inches) be seated in the back seat of any vehi-cle with a front passenger side airbag and beproperly restrained for their size and weight. The OWS works with sensors that are part of the front passenger's seat and seat belt. The sensors are designed to detect the presence of a properly seated occupant and determine if the passeng- er's side front airbag should be enabled (mayinflate) or disabled (will not inflate). The OWS will disable (will not inflate) the pas- senger's side front airbag when:
• the front passenger's seat is unoccupied, orhas small/medium objects in the front seat,
• the system determines that an infant is pres-ent in a rear-facing infant seat that is instal-led according to the manufacturer's instruc-tions,
• the system determines that a small child ispresent in a forward-facing child restraintthat is installed according to the manufactur-er's instructions,
• the system determines that a small child ispresent in a booster seat,
• a front passenger takes his/her weight off ofthe seat for a period of time,
• a child or a small person occupies the frontpassenger's seat.
The OWS uses a PASSENGER AIRBAG OFFindicator lamp which will illuminate and stay on toremind you that the passenger's side front airbagis disabled. The PASSENGER AIRBAG OFF indi-cator lamp is located in the overhead console,near the base of the rearview mirror.
Page 67 of 674

SAFETY
}}
65
Child restraints
Suitable child restraints should always be used when children travel in the vehicle.
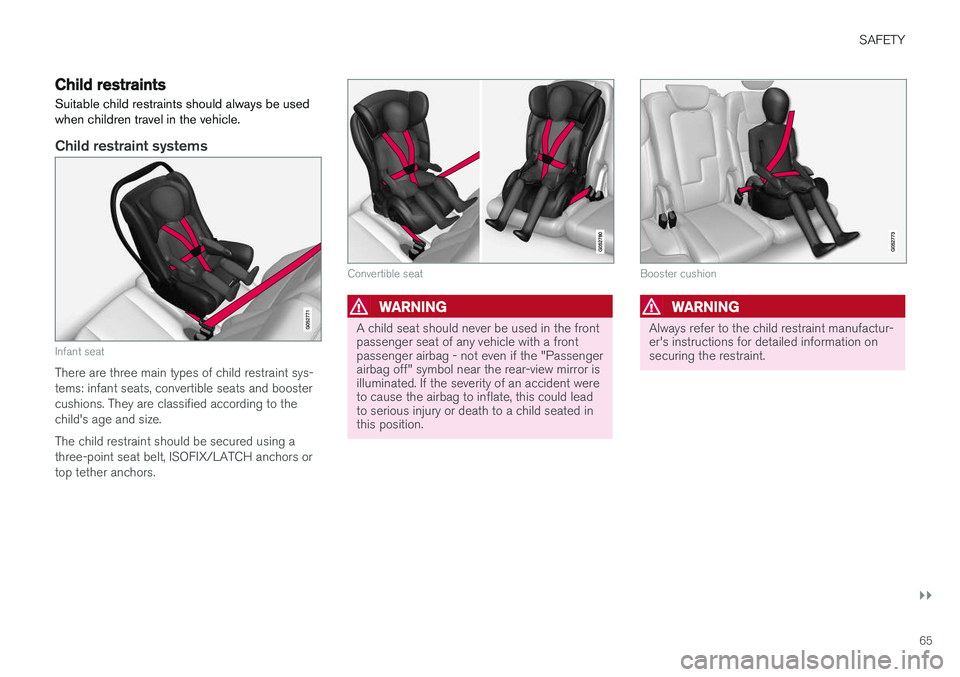
Child restraint systems
Infant seat
There are three main types of child restraint sys- tems: infant seats, convertible seats and boostercushions. They are classified according to thechild's age and size. The child restraint should be secured using a three-point seat belt, ISOFIX/LATCH anchors ortop tether anchors.
Convertible seat
WARNING
A child seat should never be used in the front passenger seat of any vehicle with a frontpassenger airbag - not even if the "Passengerairbag off" symbol near the rear-view mirror isilluminated. If the severity of an accident wereto cause the airbag to inflate, this could leadto serious injury or death to a child seated inthis position.
Booster cushion
WARNING
Always refer to the child restraint manufactur- er's instructions for detailed information onsecuring the restraint.
Page 69 of 674

SAFETY
}}
67
Infant seatsSuitable child restraints should always be used when children (depending on their age/size) areseated in the vehicle.
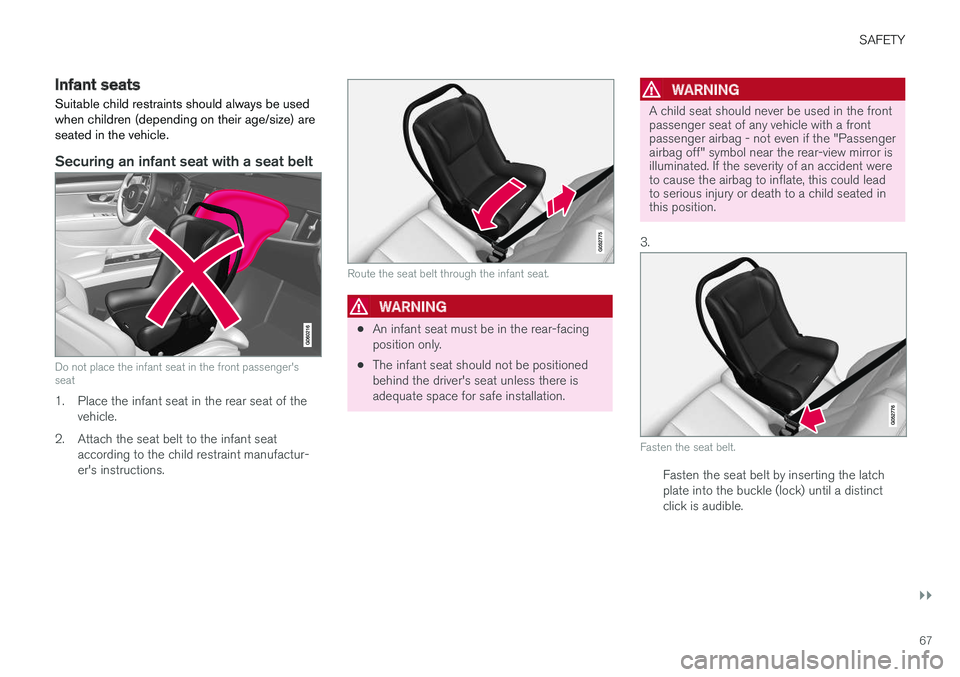
Securing an infant seat with a seat belt
Do not place the infant seat in the front passenger's seat
1. Place the infant seat in the rear seat of the vehicle.
2. Attach the seat belt to the infant seat according to the child restraint manufactur- er's instructions.
Route the seat belt through the infant seat.
WARNING
•An infant seat must be in the rear-facing position only.
• The infant seat should not be positionedbehind the driver's seat unless there isadequate space for safe installation.
WARNING
A child seat should never be used in the front passenger seat of any vehicle with a frontpassenger airbag - not even if the "Passengerairbag off" symbol near the rear-view mirror isilluminated. If the severity of an accident wereto cause the airbag to inflate, this could leadto serious injury or death to a child seated inthis position.
3.
Fasten the seat belt.
Fasten the seat belt by inserting the latch plate into the buckle (lock) until a distinctclick is audible.
Page 72 of 674

||
SAFETY
70
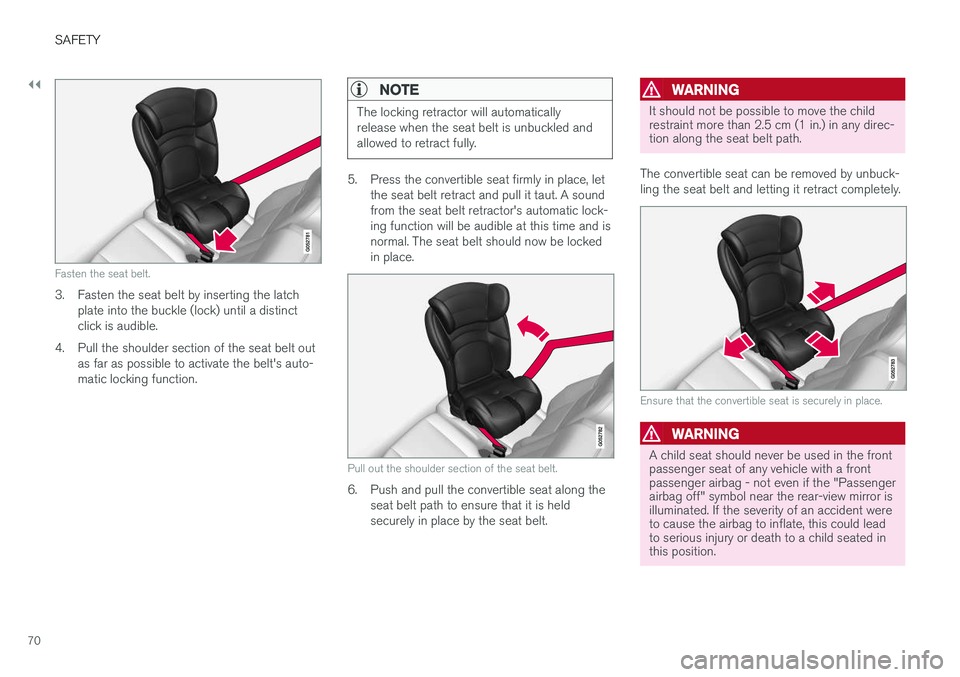
Fasten the seat belt.
3. Fasten the seat belt by inserting the latchplate into the buckle (lock) until a distinct click is audible.
4. Pull the shoulder section of the seat belt out as far as possible to activate the belt's auto-matic locking function.
NOTE
The locking retractor will automatically release when the seat belt is unbuckled andallowed to retract fully.
5. Press the convertible seat firmly in place, letthe seat belt retract and pull it taut. A sound from the seat belt retractor's automatic lock-ing function will be audible at this time and isnormal. The seat belt should now be lockedin place.
Pull out the shoulder section of the seat belt.
6. Push and pull the convertible seat along theseat belt path to ensure that it is held securely in place by the seat belt.
WARNING
It should not be possible to move the child restraint more than 2.5 cm (1 in.) in any direc-tion along the seat belt path.
The convertible seat can be removed by unbuck- ling the seat belt and letting it retract completely.
Ensure that the convertible seat is securely in place.
WARNING
A child seat should never be used in the front passenger seat of any vehicle with a frontpassenger airbag - not even if the "Passengerairbag off" symbol near the rear-view mirror isilluminated. If the severity of an accident wereto cause the airbag to inflate, this could leadto serious injury or death to a child seated inthis position.
Page 164 of 674

WINDOWS, GLASS AND MIRRORS
* Option/accessory.
162
Windows, glass and mirrors
The vehicle is equipped with controls for win- dows, glass and mirrors. Some of the windowsin the car are laminated.
Laminated glass
The windshield and panoramic roof * have lamina-
ted glass. The glass is reinforced, which provides better protection against break-ins and improvedsoundproofing in the passenger compartment.Laminated glass is available as an option forsome other glass surfaces.
The symbol shows the windows containing laminated glass 1
Related information
•
Pinch protection for windows and sun cur- tains (p. 162)
• Panoramic roof
* (p. 168)
• Power windows (p. 163)
• Rearview/door mirrors (p. 165)
• Head-up display
* (p. 138)
• Using the windshield wipers (p. 172)
• Using the windshield and headlight washers(p. 175) •
Activating and deactivating the heated wind- shield
* (p. 215)
• Activating and deactivating the heated rear window and door mirrors (p. 217)
Pinch protection for windows andsun curtains
All windows and sun curtains * that are controlled
electrically have a pinch protection function that is triggered if anything blocks them while theyare opening or closing.
If pinch protection is activated, movement will stop and then retract automatically to approx.50 mm (2 inches) from the point at which it wasblocked (or to full ventilation position). If pinch protection has been triggered, it is still possible to operate the window or sun curtainonce more in the same direction without pinchprotection, if this is done within 10 seconds afterpinch protection has been triggered. It is thus stillpossible to override pinch protection when clos-ing is interrupted (e.g. due to ice) by pressing andholding down the control until the window or suncurtain is fully closed.
WARNING
If the starter battery is disconnected, the func- tion for automatic opening and closing mustbe reset to function correctly. A reset isrequired in order for the pinch protection towork.
1 Does not apply to windshield and panoramic roof *, which are always laminated and therefore do not have this symbol.
Page 167 of 674

WINDOWS, GLASS AND MIRRORS
* Option/accessory.165
WARNING
Make sure that no child or other passenger comes into contact with the windows as they are closing with keyless closing *.
NOTE
One way to reduce the pulsating wind noise heard when the rear windows are open is toalso open the front windows slightly.
NOTE
The windows cannot be opened at speeds over approx. 180 km/h (ca112 mph), but theycan be closed. The driver is always responsible for following applicable traffic regulations.
Related information
• Power windows (p. 163)
• Pinch protection for windows and sun cur- tains (p. 162)
• Reset procedure for pinch protection(p. 163)
• Keyless locking and unlocking
* (p. 244)
• Locking and unlocking using the remote key(p. 231)
• Locking and unlocking from inside the vehi-cle (p. 247)
Rearview/door mirrors
The rearview mirror and door mirrors can be used to improve the driver's visibility behind thevehicle.
Rearview mirrorThe rearview mirror can be easily adjusted man- ually. The rearview mirror can be equipped with HomeLink *, auto-dim * and compass *.
Door mirrors
WARNING
The door mirror on the passenger side is curved to improve visibility. Objects in the mir-ror may appear farther away than they actuallyare.
The joystick in the drivers' door control panel is used to adjust the position of the door mirrors.There are also several automatic settings thatcan also be connected to the memory function buttons for the power seat *.
Related information
•
HomeLink ®
* (p. 468)
• Compass (p. 471)
• Adjusting the rearview mirror dimming func- tion (p. 166)
• Adjusting the door mirrors (p. 166) •
Storing memory settings in power front seats
* (p. 182)
• Activating and deactivating the heated rear window and door mirrors (p. 217)
Page 168 of 674

WINDOWS, GLASS AND MIRRORS
* Option/accessory.
166
Adjusting the rearview mirrordimming function
Bright light entering the vehicle from behind, e.g. from the headlights of following vehicles, couldreflect in the rearview mirror and door mirrorsand cause a glare. Use the dimming functionwhen light from behind is distracting.
Auto-dimIf bright light enters the vehicle from behind, the door mirrors will automatically dim. Auto-dim isalways active when the engine is running, exceptwhen reverse gear is engaged.
NOTE
When the level of sensitivity is changed, this change will not be noticeable immediately butwill instead take effect after a short period oftime.
The sensitivity level for dimming will affect both the rearview mirror and door mirrors. 1. Tap
Settings in the Top view in the center
display.
2. Tap
My CarMirrors and Convenience.
3. Under
Rearview Mirror Auto Dimming,
select Normal, Dark or Light.
The rearview mirror instead has two sensors - one pointing forward and one pointing rearward -which work together to identify and eliminate glare. The forward-pointing sensor monitorsambient light, while the rearward-pointing sensormonitors light from the headlights of followingvehicles. For the door mirrors to be equipped with auto- dim, the rearview mirror must also be equippedwith auto-dim.
NOTE
If the sensors are obstructed by e.g. a parking permit, transponder, sunshade or objects onthe seats or in the cargo compartment in away that prevents light from reaching the sen-sors, the auto-dim function in the door andrearview mirrors will be reduced.
Related information
•
Rearview/door mirrors (p. 165)
• Adjusting the door mirrors (p. 166)
Adjusting the door mirrors
To improve visibility to the rear, the door mirrors need to be adjusted to the driver's height andseating position. There are several automaticsettings that can also be connected to the mem- ory function buttons for the power seat *.
Controls used for door mirrors
Door mirror controls.
The joystick in the drivers' door control panel is used to adjust the position of the door mirrors. 1.
Press the L button for the left door mirror or
R for the right door mirror. The button will
light up.
2. Adjust the position using the joystick located between the buttons.
3. Press the L or R button again. The light in
the button will go out.