Page 590 of 662
||
MAINTENANCE AND SERVICE
* Option/accessory.
588
CAUTION
Never touch the bulb glass with your bare fin- gers. Grease and oils from your fingers vapor-ize in the heat and will leave a deposit on thereflector, which may damage it.
NOTE
If the error message persists after the defec- tive bulb has been replaced, we recommend avisit to an authorized Volvo workshop.
NOTE
Exterior lighting such as headlights and tail- lights may develop temporary condensationon the inside of the lens. This is normal. Allexterior lighting is designed to resist this.Condensation is normally vented out of thelamp housing once the light has been lit forsome period of time.
NOTE
Bulbs for active curve lighting * contain traces
of mercury and should therefore always be submitted to a certified Volvo service techni-cian.
Related information
• Location of exterior lights (p. 589)
• Removing the plastic cover to replace bulbs (p. 588)
• Replacing the low beam headlight bulbs(p. 590)
• Replacing the high beam headlight bulbs(p. 590)
• Replacing daytime running lights/front park-ing light bulbs (p. 591)
• Replacing front turn signal bulbs (p. 592)
• Replacing backup lights (p. 593)
• Replacing the rear fog light bulb (p. 593)
• Bulb specifications (p. 594)
Removing the plastic cover toreplace bulbs
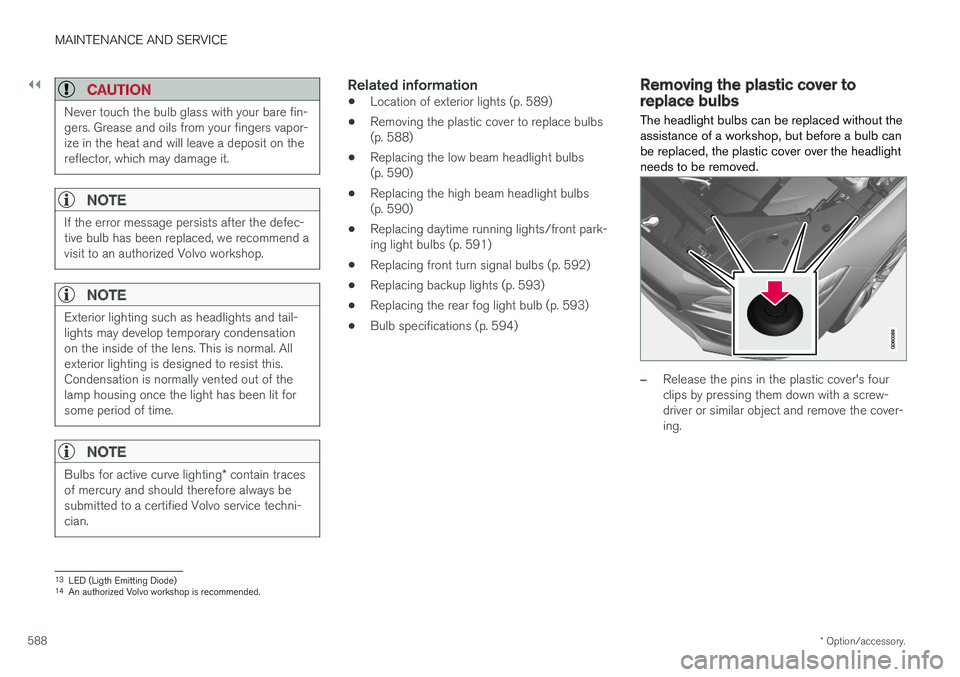
The headlight bulbs can be replaced without the assistance of a workshop, but before a bulb canbe replaced, the plastic cover over the headlightneeds to be removed.
–Release the pins in the plastic cover's four clips by pressing them down with a screw-driver or similar object and remove the cover-ing.
13 LED (Ligth Emitting Diode)
14 An authorized Volvo workshop is recommended.
Page 591 of 662
MAINTENANCE AND SERVICE
* Option/accessory.589
NOTE
To bear in mind when refitting the covering:
• The pin in the clip must be pressed back completely before the clip is reinstalled inthe covering.
• When the covering is reinstalled, the pinmust be pressed in until the end surfaceis level with the surface of the clip.
Related information
• Replacing bulbs (p. 587)
• Replacing the low beam headlight bulbs (p. 590)
• Replacing the high beam headlight bulbs(p. 590)
• Replacing daytime running lights/front park-ing light bulbs (p. 591)
• Replacing front turn signal bulbs (p. 592)
• Bulb specifications (p. 594)
Location of exterior lights
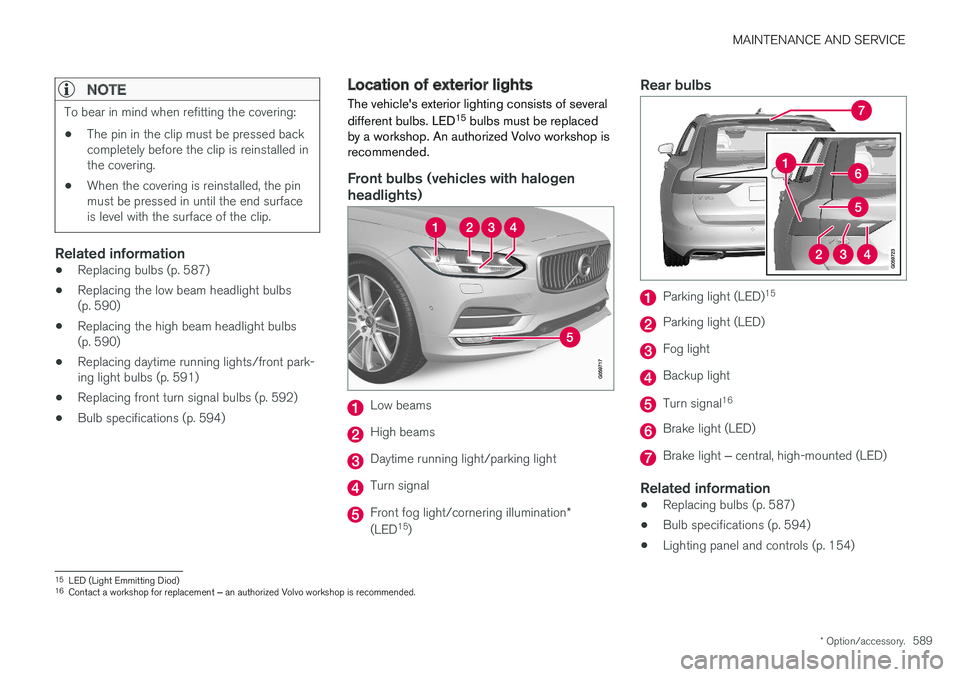
The vehicle's exterior lighting consists of several different bulbs. LED 15
bulbs must be replaced
by a workshop. An authorized Volvo workshop is recommended.
Front bulbs (vehicles with halogen headlights)
Low beams
High beams
Daytime running light/parking light
Turn signal
Front fog light/cornering illumination *
(LED 15
)
Rear bulbs
Parking light (LED) 15
Parking light (LED)
Fog light
Backup light
Turn signal
16
Brake light (LED)
Brake light
‒ central, high-mounted (LED)
Related information
• Replacing bulbs (p. 587)
• Bulb specifications (p. 594)
• Lighting panel and controls (p. 154)
15
LED (Light Emmitting Diod)
16 Contact a workshop for replacement ‒ an authorized Volvo workshop is recommended.
Page 592 of 662
MAINTENANCE AND SERVICE
590
Replacing the low beam headlightbulbs
The low beam bulbs in the halogen headlights can be changed without the help of a workshop.
Before the bulbs can be replaced, the plastic cov- ering over the headlight must be removed.
CAUTION
Never touch the bulb glass with your bare fin- gers. Grease and oils from your fingers vapor-ize in the heat and will leave a deposit on thereflector, which may damage it.
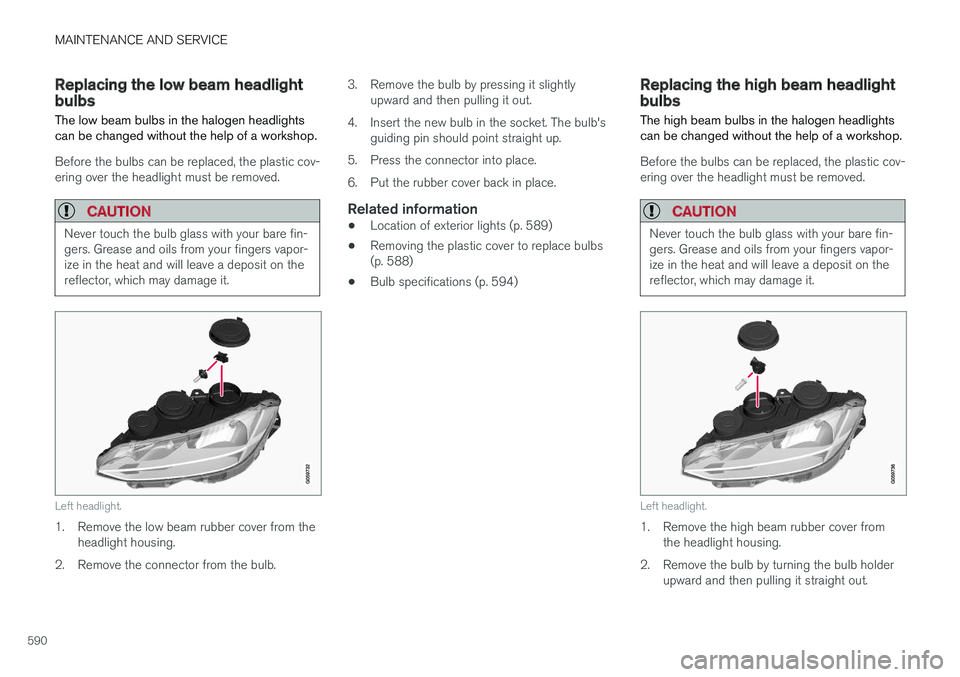
Left headlight.
1. Remove the low beam rubber cover from the headlight housing.
2. Remove the connector from the bulb. 3. Remove the bulb by pressing it slightly
upward and then pulling it out.
4. Insert the new bulb in the socket. The bulb's guiding pin should point straight up.
5. Press the connector into place.
6. Put the rubber cover back in place.
Related information
• Location of exterior lights (p. 589)
• Removing the plastic cover to replace bulbs (p. 588)
• Bulb specifications (p. 594)
Replacing the high beam headlightbulbs
The high beam bulbs in the halogen headlights can be changed without the help of a workshop.
Before the bulbs can be replaced, the plastic cov- ering over the headlight must be removed.
CAUTION
Never touch the bulb glass with your bare fin- gers. Grease and oils from your fingers vapor-ize in the heat and will leave a deposit on thereflector, which may damage it.
Left headlight.
1. Remove the high beam rubber cover from the headlight housing.
2. Remove the bulb by turning the bulb holder upward and then pulling it straight out.
Page 593 of 662
MAINTENANCE AND SERVICE
}}
591
3. Carefully pry the plastic sleeve by the con-
nector's locking lug to release it.
4. Remove the connector from the bulb.
5. Replace the bulb.
6. Position the bulb in the socket and turn it downward.
7. Put the rubber cover back in place.
Related information
• Location of exterior lights (p. 589)
• Removing the plastic cover to replace bulbs (p. 588)
• Bulb specifications (p. 594)
Replacing daytime running lights/front parking light bulbs
The daytime running light/parking light bulbs in the halogen headlights can be changed withoutthe help of a workshop.
Before the bulbs can be replaced, the plastic cov- ering over the headlight must be removed.
NOTE
Daytime running lights/parking lights are eas- ier to reach if the high beam headlight bulbsare removed. The high beam headlights aremounted above and to the side of the daytimerunning lights/parking lights. Remove thehigh beam headlight bulb by turning the bulbholder upward and then pulling it straight out.
CAUTION
Never touch the bulb glass with your bare fin- gers. Grease and oils from your fingers vapor-ize in the heat and will leave a deposit on thereflector, which may damage it.
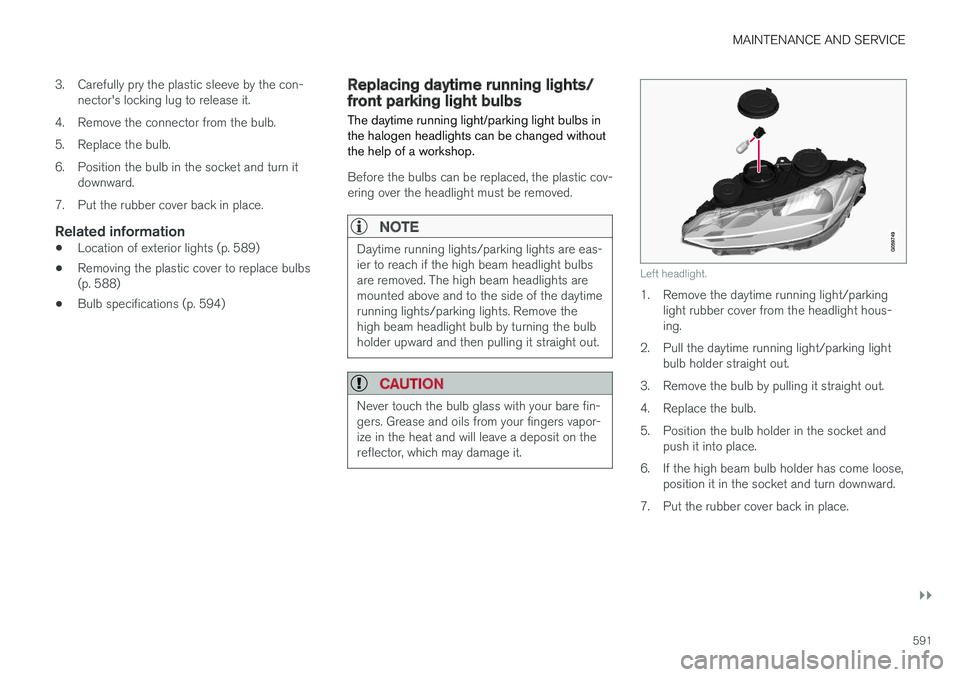
Left headlight.
1. Remove the daytime running light/parking light rubber cover from the headlight hous- ing.
2. Pull the daytime running light/parking light bulb holder straight out.
3. Remove the bulb by pulling it straight out.
4. Replace the bulb.
5. Position the bulb holder in the socket and push it into place.
6. If the high beam bulb holder has come loose, position it in the socket and turn downward.
7. Put the rubber cover back in place.
Page 594 of 662
||
MAINTENANCE AND SERVICE
592
Related information
•Location of exterior lights (p. 589)
• Removing the plastic cover to replace bulbs (p. 588)
• Bulb specifications (p. 594)
Replacing front turn signal bulbs The turn signal bulbs in the halogen headlights can be changed without the help of a workshop.
Before the bulbs can be replaced, the plastic cov- ering over the headlight must be removed.
Left headlight.
1. Remove the turn signal rubber cover from
the headlight housing.
2. Press the retaining catches together and pull the bulb holder straight out.
3. The bulb holder and bulb must be replaced as one unit.
4. Position the bulb holder in the socket and push it into place.
5. Put the rubber cover back in place.
Related information
• Location of exterior lights (p. 589)
• Removing the plastic cover to replace bulbs (p. 588)
• Bulb specifications (p. 594)
Page 595 of 662
MAINTENANCE AND SERVICE
}}
593
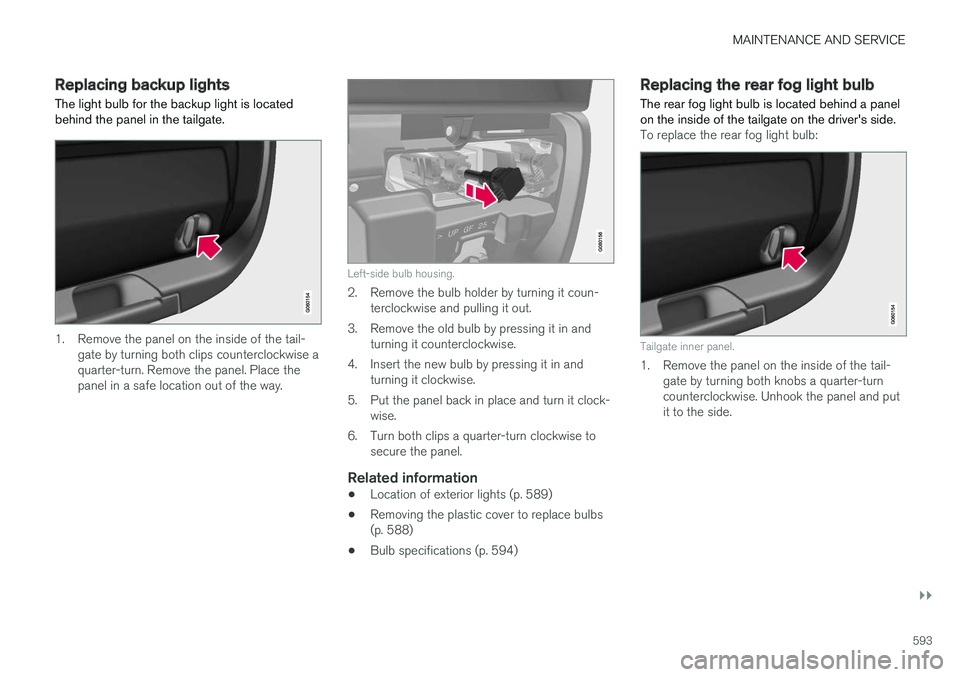
Replacing backup lights The light bulb for the backup light is located behind the panel in the tailgate.
1. Remove the panel on the inside of the tail-gate by turning both clips counterclockwise a quarter-turn. Remove the panel. Place thepanel in a safe location out of the way.
Left-side bulb housing.
2. Remove the bulb holder by turning it coun-terclockwise and pulling it out.
3. Remove the old bulb by pressing it in and turning it counterclockwise.
4. Insert the new bulb by pressing it in and turning it clockwise.
5. Put the panel back in place and turn it clock- wise.
6. Turn both clips a quarter-turn clockwise to secure the panel.
Related information
• Location of exterior lights (p. 589)
• Removing the plastic cover to replace bulbs (p. 588)
• Bulb specifications (p. 594)
Replacing the rear fog light bulb The rear fog light bulb is located behind a panel on the inside of the tailgate on the driver's side.
To replace the rear fog light bulb:
Tailgate inner panel.
1. Remove the panel on the inside of the tail-
gate by turning both knobs a quarter-turn counterclockwise. Unhook the panel and putit to the side.
Page 596 of 662
||
MAINTENANCE AND SERVICE
594
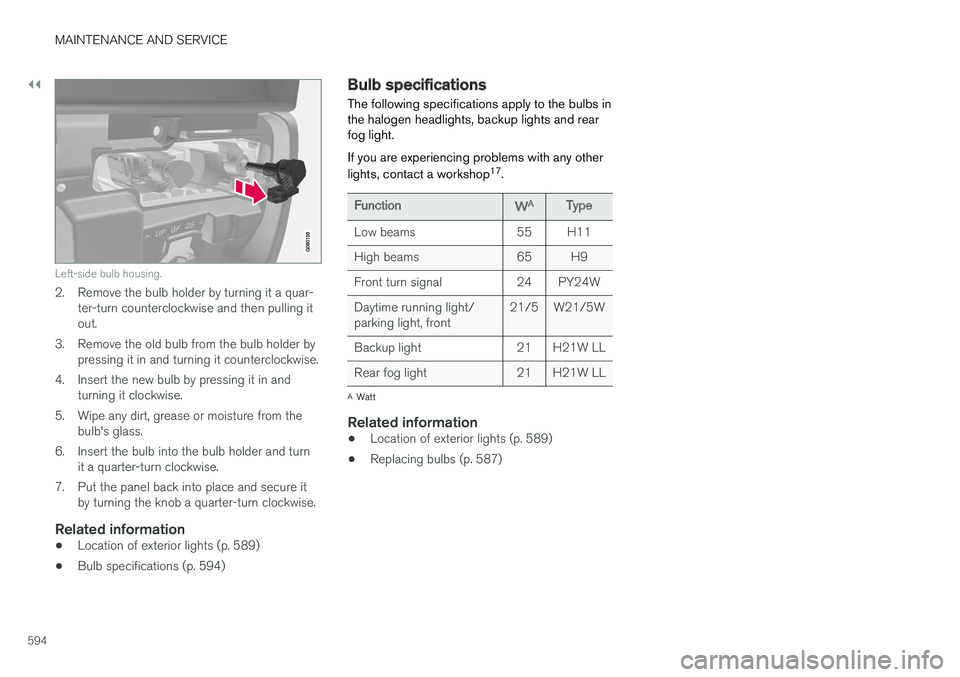
Left-side bulb housing.
2. Remove the bulb holder by turning it a quar-ter-turn counterclockwise and then pulling it out.
3. Remove the old bulb from the bulb holder by pressing it in and turning it counterclockwise.
4. Insert the new bulb by pressing it in and turning it clockwise.
5. Wipe any dirt, grease or moisture from the bulb's glass.
6. Insert the bulb into the bulb holder and turn it a quarter-turn clockwise.
7. Put the panel back into place and secure it by turning the knob a quarter-turn clockwise.
Related information
• Location of exterior lights (p. 589)
• Bulb specifications (p. 594)
Bulb specifications The following specifications apply to the bulbs in the halogen headlights, backup lights and rearfog light. If you are experiencing problems with any other lights, contact a workshop 17
.
FunctionWAType
Low beams 55 H11
High beams 65 H9
Front turn signal 24 PY24WDaytime running light/ parking light, front 21/5 W21/5W
Backup light 21 H21W LL
Rear fog light 21 H21W LL
A Watt
Related information
• Location of exterior lights (p. 589)
• Replacing bulbs (p. 587)
Page 606 of 662
||
MAINTENANCE AND SERVICE
* Option/accessory.
604
FunctionAA
– –
Heated windshield *, left side Shunt
Heated windshield
*, left side 40
Headlight washers
*25
Windshield washer 25
Transmission control module 15
Horn 20
Alarm siren
* 5
Brake system control module (valves, parking brake) 40
Wipers 30
Rear window washer 25
Heated windshield
*, right side 40
Parking heater
* 20
Brake system control module (ABS pump) 40
– –
Heated windshield
*, right side Shunt
FunctionAA
Fed when ignition is on: engine control module, transmissioncomponents, electrical powersteering, central electrical mod-ule, brake system control mod-ule 5
– –
Right-side headlight 7.5 Right-side headlight, some mod- els with LED
B 15
– –
– –
Battery connection control mod- ule 5
Airbags 5
Left-side headlight 7.5 Left-side headlight, some mod- els with LED
B 15
Accelerator pedal sensor 5
A
Ampere
B LED (Light Emitting Diode)
Related information
• Fuses and fuseboxes (p. 600)
• Replacing fuses (p. 601)