2018 VOLVO V60 CROSS COUNTRY light
[x] Cancel search: lightPage 108 of 404
INSTRUMENTS AND CONTROLS
* Option/accessory.
106
Power door mirrors
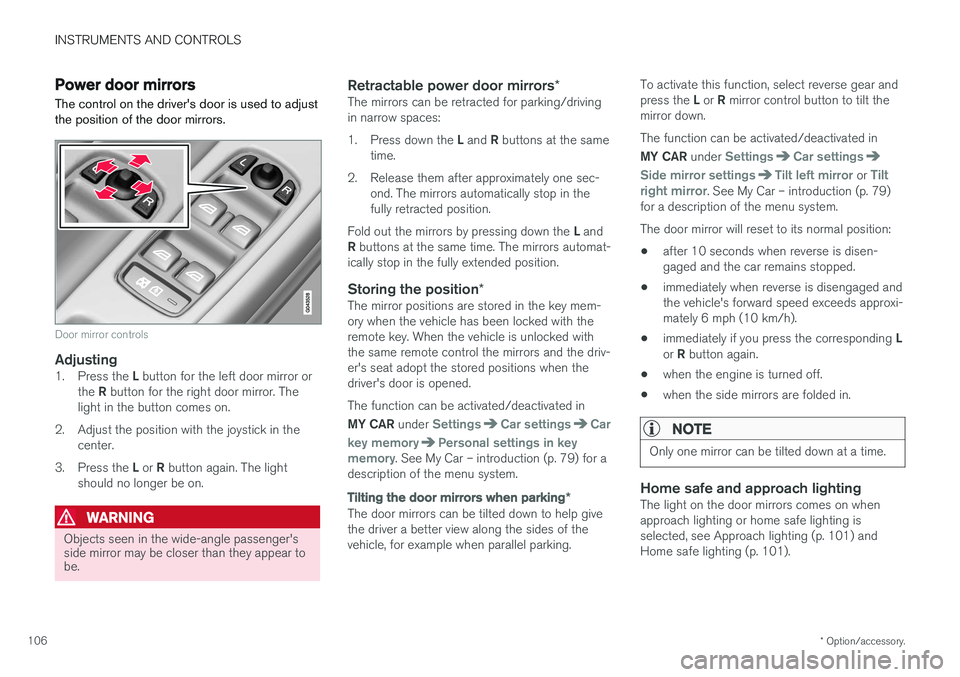
The control on the driver's door is used to adjust the position of the door mirrors.
Door mirror controls
Adjusting1. Press the L button for the left door mirror or
the R button for the right door mirror. The
light in the button comes on.
2. Adjust the position with the joystick in the center.
3. Press the L or R button again. The light
should no longer be on.
WARNING
Objects seen in the wide-angle passenger's side mirror may be closer than they appear tobe.
Retractable power door mirrors *The mirrors can be retracted for parking/driving in narrow spaces: 1.
Press down the L and R buttons at the same
time.
2. Release them after approximately one sec- ond. The mirrors automatically stop in the fully retracted position.
Fold out the mirrors by pressing down the L and
R buttons at the same time. The mirrors automat-
ically stop in the fully extended position.
Storing the position *The mirror positions are stored in the key mem-ory when the vehicle has been locked with theremote key. When the vehicle is unlocked withthe same remote control the mirrors and the driv-er's seat adopt the stored positions when thedriver's door is opened. The function can be activated/deactivated in MY CAR under
SettingsCar settingsCar
key memory
Personal settings in key
memory. See My Car – introduction (p. 79) for a
description of the menu system.
Tilting the door mirrors when parking *
The door mirrors can be tilted down to help give the driver a better view along the sides of thevehicle, for example when parallel parking. To activate this function, select reverse gear and press the
L or R mirror control button to tilt the
mirror down. The function can be activated/deactivated in MY CAR under
SettingsCar settings
Side mirror settingsTilt left mirror or Tilt
right mirror. See My Car – introduction (p. 79)
for a description of the menu system. The door mirror will reset to its normal position:
• after 10 seconds when reverse is disen- gaged and the car remains stopped.
• immediately when reverse is disengaged andthe vehicle's forward speed exceeds approxi-mately 6 mph (10 km/h).
• immediately if you press the corresponding
L
or R button again.
• when the engine is turned off.
• when the side mirrors are folded in.
NOTE
Only one mirror can be tilted down at a time.
Home safe and approach lightingThe light on the door mirrors comes on when approach lighting or home safe lighting isselected, see Approach lighting (p. 101) andHome safe lighting (p. 101).
Page 110 of 404

INSTRUMENTS AND CONTROLS
* Option/accessory.
108
Heated windshield *, rear window
and door mirror defrosters
The heating function is used to defrost/de-ice the windshield and/or the rear window and doormirrors.
Heated windshield
Heated rear window and door mirrors
Press button (1) to defrost/de-ice the windshield and/or button (2) to defrost the rear window anddoor mirrors. The indicator lights in the respectivebuttons indicate that the function is active. Switchthe function off when then windshield/rear win-dow/mirrors have cleared to help avoid batterydrain. The heating function will also switch offautomatically after a certain amount of time. Auto-defrosting for the rear window and door mirrors (if the vehicle is started when the ambient temperature is below 45 °F (7 °C) can be selected in MY CAR under
SettingsClimate
settings
Automatic rear defroster.
If the Engine Remote Start (ERS) * function is
used, the electrically heated windshield function will be activated automatically at temperaturesbelow approx. 40 °F (+5 °C) if auto-defrostinghas been selected in the MY CAR menu. See My Car – introduction (p. 79) for a descrip- tion of the menu system.
Interior rearview mirror The interior rearview mirror has an auto-dim function that helps reduce glare from followingvehicle's headlights.
Auto-dim functionThe interior rearview mirror
Page 114 of 404
||
INSTRUMENTS AND CONTROLS
* Option/accessory.
112
Tilt position
G028900
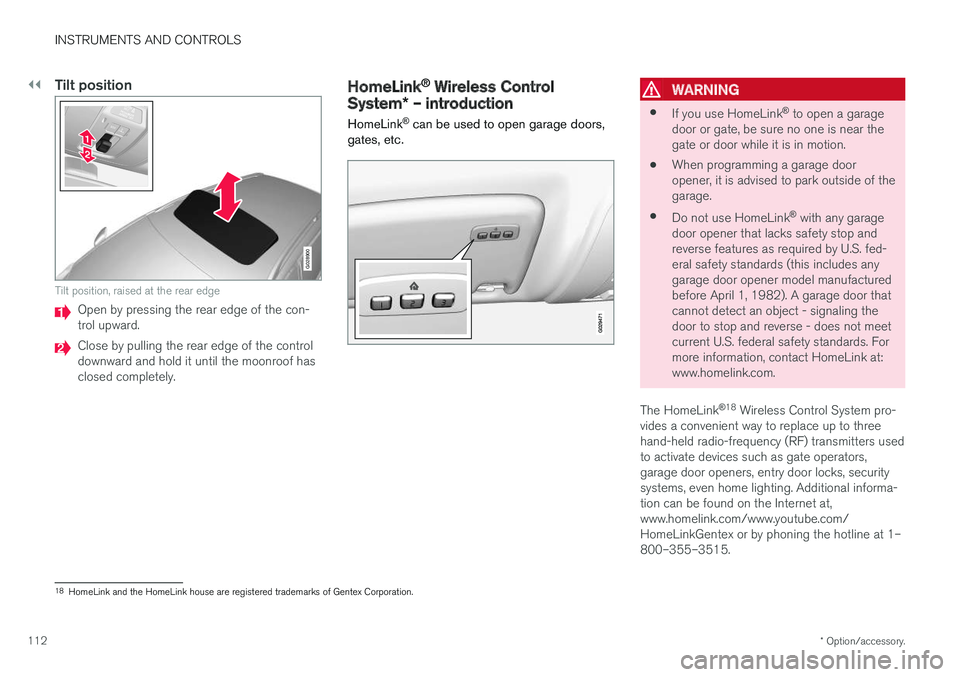
Tilt position, raised at the rear edge
Open by pressing the rear edge of the con- trol upward.
Close by pulling the rear edge of the control downward and hold it until the moonroof hasclosed completely.
HomeLink ®
Wireless Control
System * – introduction
HomeLink ®
can be used to open garage doors,
gates, etc.WARNING
• If you use HomeLink ®
to open a garage
door or gate, be sure no one is near the gate or door while it is in motion.
• When programming a garage dooropener, it is advised to park outside of thegarage.
• Do not use HomeLink ®
with any garage
door opener that lacks safety stop andreverse features as required by U.S. fed-eral safety standards (this includes anygarage door opener model manufacturedbefore April 1, 1982). A garage door thatcannot detect an object - signaling thedoor to stop and reverse - does not meetcurrent U.S. federal safety standards. Formore information, contact HomeLink at:www.homelink.com.
The HomeLink ®
18
Wireless Control System pro-
vides a convenient way to replace up to threehand-held radio-frequency (RF) transmitters usedto activate devices such as gate operators,garage door openers, entry door locks, securitysystems, even home lighting. Additional informa-tion can be found on the Internet at,www.homelink.com/www.youtube.com/HomeLinkGentex or by phoning the hotline at 1–800–355–3515.
18 HomeLink and the HomeLink house are registered trademarks of Gentex Corporation.
Page 115 of 404
INSTRUMENTS AND CONTROLS
}}
* Option/accessory.113
Retain the original transmitter of the RF device you are programming for use in other vehicles aswell as for future HomeLink programming. It isalso suggested that upon the sale of the vehicle,the programmed HomeLink buttons be erasedfor security purposes. Refer to “Resetting Home- Link Buttons” in HomeLink
®
Wireless Control
System * – programming (p. 113).
Using HomeLinkTo operate, simply press and hold the pro- grammed HomeLink button until the traineddevice begins to operate (this may take severalseconds). Activation will now occur for the traineddevice (i.e., garage door opener, gate operator,security system, entry door lock, home/officelighting, etc.). For convenience, the hand-heldtransmitter of the device may also be used at anytime. In the event that there are still programmingdifficulties or questions, contact HomeLink at:www.homelink.com/www.youtube.com/HomeLinkGentex or by phoning the hotline at 1–800–355–3515.
NOTE
If the ignition is switched off, HomeLink will function for 30 minutes after the driver's doorhas been opened.
HomeLink ®
Wireless Control
System * – programming
The HomeLink Wireless Control System pro- vides a convenient way to replace up to threehand-held radio-frequency (RF) transmittersused to activate devices such as gate operators,garage door openers, entry door locks, securitysystems, even home lighting. Additional informa-tion can be found on the Internetatwww.homelink.com/www.youtube.com/HomeLinkGentex or by phoning the hotline at 1–800–355–3515.
NOTE
Some vehicles may require the ignition to be switched on or be in the “accessories” posi-tion for programming and/or operation ofHomeLink. It is also recommended that a newbattery be placed in the hand-held transmitterof the device being programmed to Home-Link for quicker training and accurate trans-mission of the radio-frequency signal. TheHomeLink buttons must be reset first. Whenthis has been completed, Homelink is inlearning mode so that you can perform pro-gramming.
1. Position the end of your hand-held transmit- ter 1–3 inches (5–14 cm) away from the HomeLink button you wish to program whilekeeping the indicator light in view. 2. Simultaneously press and hold both the
chosen HomeLink and hand-held transmitterbuttons until the HomeLink indicator lightchanges from a slow to a rapidly blinkinglight. Now you may release both the Home-Link and hand-held transmitter buttons.
NOTE
Some devices may require you to replace this Programming Step 2 with procedures notedin the “Gate Operator / Canadian Program-ming” section. If the HomeLink indicator lightdoes not change to a rapidly blinking lightafter performing these steps, contact Home-Link at www.homelink.com/www.youtube.com/HomeLinkGentex or byphoning the hotline at 1–800–355–3515.
Page 116 of 404
||
INSTRUMENTS AND CONTROLS
1143.
Firmly press, hold for five seconds and
release the programmed HomeLink button
up to two separate times to activate the door. If the door does not activate, press and holdthe just-trained HomeLink button andobserve the indicator light.
• If the indicator light
stays on constantly,
programming is complete and your
device should activate when the Home-Link button is pressed and released.
• If the indicator light blinks
rapidly for two
seconds and then turns to a constantlight continue with “Programming”steps 4-6 to complete the programming
of a rolling code equipped device (mostcommonly a garage door opener).
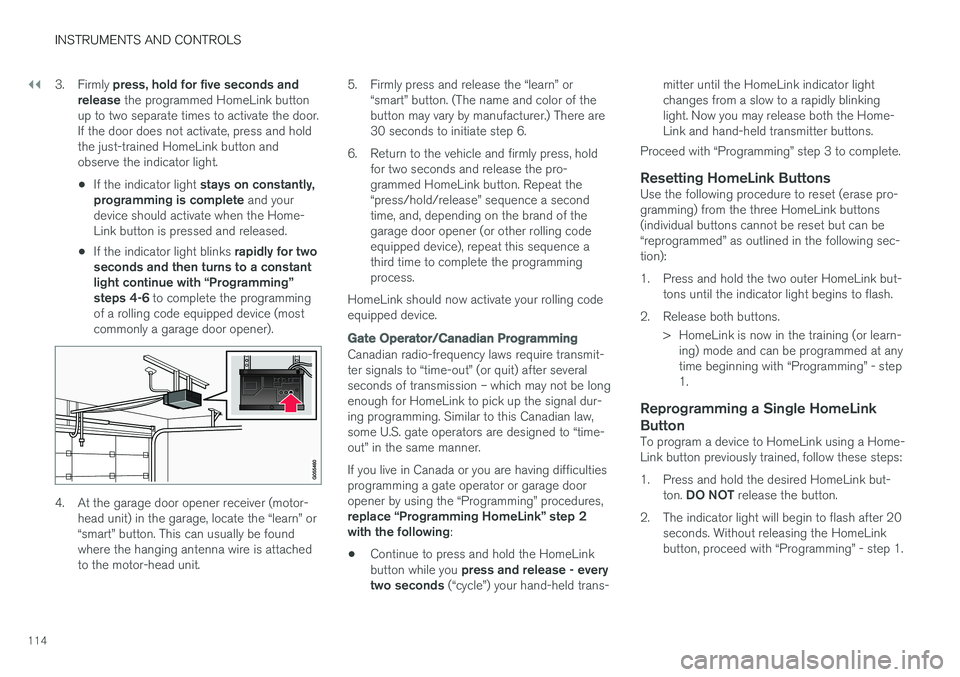
4. At the garage door opener receiver (motor- head unit) in the garage, locate the “learn” or “smart” button. This can usually be foundwhere the hanging antenna wire is attachedto the motor-head unit. 5. Firmly press and release the “learn” or
“smart” button. (The name and color of thebutton may vary by manufacturer.) There are30 seconds to initiate step 6.
6. Return to the vehicle and firmly press, hold for two seconds and release the pro-grammed HomeLink button. Repeat the“press/hold/release” sequence a secondtime, and, depending on the brand of thegarage door opener (or other rolling codeequipped device), repeat this sequence athird time to complete the programmingprocess.
HomeLink should now activate your rolling codeequipped device.
Gate Operator/Canadian Programming
Canadian radio-frequency laws require transmit- ter signals to “time-out” (or quit) after severalseconds of transmission – which may not be longenough for HomeLink to pick up the signal dur-ing programming. Similar to this Canadian law,some U.S. gate operators are designed to “time-out” in the same manner. If you live in Canada or you are having difficulties programming a gate operator or garage dooropener by using the “Programming” procedures, replace “Programming HomeLink” step 2 with the following :
• Continue to press and hold the HomeLink button while you
press and release - every
two seconds (“cycle”) your hand-held trans- mitter until the HomeLink indicator light changes from a slow to a rapidly blinkinglight. Now you may release both the Home-Link and hand-held transmitter buttons.
Proceed with “Programming” step 3 to complete.
Resetting HomeLink ButtonsUse the following procedure to reset (erase pro-gramming) from the three HomeLink buttons(individual buttons cannot be reset but can be“reprogrammed” as outlined in the following sec-tion):
1. Press and hold the two outer HomeLink but- tons until the indicator light begins to flash.
2. Release both buttons. > HomeLink is now in the training (or learn-ing) mode and can be programmed at any time beginning with “Programming” - step1.
Reprogramming a Single HomeLink Button
To program a device to HomeLink using a Home- Link button previously trained, follow these steps:
1. Press and hold the desired HomeLink but-
ton. DO NOT release the button.
2. The indicator light will begin to flash after 20 seconds. Without releasing the HomeLink button, proceed with “Programming” - step 1.
Page 120 of 404

||
INSTRUMENTS AND CONTROLS
118
MessageDescription
Time for reg- ular mainte-nanceTime for regular service at an authorized Volvo workshop.The timing is determined bythe number of miles driven,number of months since thelast service, engine runningtime.
Maintenance overdueIf the service intervals are not followed, the warranty doesnot cover any damaged parts.Contact an authorized Volvoworkshop for service.
Temporarily OFFAA function has been tempo- rarily switched off and isreset automatically while driv-ing or after starting again.
Low battery Power savemodeThe audio system is switched off to save current. Chargethe battery.
A
There will also be a system-specific part of this message
Related information
• Information displays – introduction (p. 71)
• Information display – menu overview (p. 117)
• Information display – menu controls (p. 116)
Trip computer – introduction
The content and appearance of the trip com- puter varies depending on whether the vehicle isequipped with an Analog or Digital instrument
panel.
Analog information display and controls
Digital information displays and controls
The instrument panel illuminates as soon as the vehicle is unlocked and trip computer settingscan be made. If none of the trip computer's con-trols are used within 30 seconds after the driver'sdoor has been opened, the instrument panellighting will go out and the trip computer cannotbe used again until: • the ignition is put in mode
II21
• the engine is started
NOTE
If a warning message appears while you are using the trip computer, this message mustbe acknowledged in order to return to the tripcomputer function. Acknowledge a message by pressing
OK.
21
See Ignition modes (p. 82) for information about the various ignition modes.
Page 130 of 404
CLIMATE
* Option/accessory.
128
Climate – general information
The vehicle is equipped with Electronic Climate
Control (ECC) (p. 132) that cools, heats or dehumidifies the air in the passenger compart-ment.
Air conditioning
NOTE
• The air conditioning can be switched off, but to ensure the best possible climatecomfort in the passenger compartmentand to prevent the windows from misting,it should always be on.
• In warm weather, a small amount of watermay accumulate under the car when ithas been parked. This water is condensa-tion from the A/C system and is normal.
Side windows and moonroofTo ensure that the air conditioning works opti- mally, the side windows, and the optional moon-roof should be closed.
Fog on the inside of the windowsThe defroster function (p. 135) should be usedto remove fog or mist from the inside of the win-dows. Keeping the windows clean with a com-mercially available window washing spray will alsohelp prevent fogging or misting.
Temporary shut-off of the air conditioning
The air conditioning (p. 135) is momentarily dis- engaged during full acceleration or when drivinguphill with a trailer. This may result in a temporaryincrease in cabin temperature.
Ice and snowAlways keep the air intake grille at the base ofthe windshield free of snow.
Climate system maintenanceSpecial tools and equipment are required tomaintain and carry out repairs on the climate sys-tem. Work of this type should only be done by atrained and qualified Volvo service technician.
RefrigerantVolvo cares about the environment. The air condi-tioning system in your car contains a CFC-freerefrigerant – R134a. This substance will notdeplete the ozone layer. The air conditioning sys-tem contains 1.76 lbs (800 g) of R134a. Thesystems uses PAG oil.
Related information
• Climate – sensors (p. 128)
• Climate – menu settings (p. 130)
Climate – sensors
The climate system utilizes a number of sensors to help regulate the temperature and humiditylevel in the passenger compartment.
Sensor location
• The sunlight sensor is located on the top side of the dashboard.
NOTE
The sunlight sensor monitors which side of the car that is most exposed to sunlight. Thiscan mean that the temperature may differbetween the right and left-side air vents, evenif the temperatures set for both sides of thepassenger compartment are the same.
•
The temperature sensor for the passenger compartment is located below the climatecontrol panel.
• The outside (ambient) temperature sensor islocated on the door mirror.
• The humidity sensor
* is located in the interior
rearview mirror.
NOTE
Do not cover or block the sensors with cloth- ing or other objects.
Page 135 of 404

CLIMATE
* Option/accessory.133
Heated seats
The front seat heating has three levels to increase comfort for the driver and passenger incold weather. The rear outboard seat heating has three levels to increase comfort for the passengers in coldweather.
Heated front seats *
The current seat temperature setting is shown in the center console display
Press the lower section of the button repeatedly until thedesired number of indicatorlights illuminate: Highest heat level – three indi- cator lights.
Medium heat level – two indicator lights.
Lowest heat level – one indicator light. If no indicator lights are illuminated, the seat heating is switched off. Seat heating will automatically switch off when the engine is switched off.
Starting the seat heating automatically
This setting starts heating the driver's seat (at the highest level) automatically when the engine isstarted if the ambient temperature is belowapprox. 50° F (10° C). Activate/deactivate this function in the MY CAR
menu system, under
SettingsClimate
settings
Auto start driver seat heater.
Heated rear seats *
Heat control for the outboard seating positions is done in the same way as for the front seats.
Related information
•Climate – general information (p. 128)
• Electronic climate control (ECC) (p. 132)