2018 VOLKSWAGEN T-ROC ESP
[x] Cancel search: ESPPage 124 of 502
WARNING
Injuries can be caused if the rear seat backrests are folded forwards and backwards in an
uncontrolled way and without taking due care.
While folding the rear seat backrest forward, always make sure that no people or animals are in its
path.
Never fold the rear seat backrest forwards or backwards while the vehicle is in motion.
Ensure that the seat belt is not trapped or damaged when folding back the rear seat backrest.
Always keep hands, fingers, feet or other body parts away from the swivel area when folding the
rear seat backrest forwards and backwards.
Ensure that each rear seat backrest engages securely, otherwise the seat belts for the rear seats will
not offer maximum protection. This applies to the centre seat of the rear bench seat in particular. If
a seat is occupied and the corresponding rear seat backrest has not engaged securely into place, the
seat occupant and rear seat backrest may move forwards in the event of a sudden braking or driving
manoeuvre or during accidents.
Adults and children must not use seats if the corresponding backrest is folded forwards or is not
engaged securely into place.
NOTICE
Damage to the vehicle or to other objects could be caused if the rear bench seat backrest is folded
forwards and backwards in an uncontrolled way or without due care.
Before folding the rear seat backrests forwards, always adjust the front seats so that the rear head
restraints or rear seat cushions do impact the front seats.
Before folding down the rear seat backrest, always make sure that there are no objects located in its
path.
Head restraints
Introduction
This chapter contains information on the followingsubjects:
Adjusting the head restraints
Removing and installing head restraints
The following section describes the options for adjusting and removing the head restraints. Always
ensure that you adjust the correct sitting position Sitting position
Every seat is fitted with a head restraint. The centre head restraint at the rear is designed solely for
use with the centre rear bench seat. Therefore you should not install this head restraint in any of the
other positions.
Page 127 of 502
Removing the front head restraints
Lower the head restraint if necessary
To release the head restraint, feel for the recess in the marked area on the rear side and press it in
the direction of the arrow Fig.
0
Pull the head restraint out in the direction of the arrow Fig.
0
Fitting the front head restraints
Position the head restraint correctly over the head restraint guides and then insert into the guides of
the corresponding seat backrest.
Slide the head restraint all the way down until the guide pins click into place.
Adjust the head restraint so a correct sitting position can be assumed.
Removing the rear head restraints
Release the rear bench seat backrest and fold the backrest forwards.
Push the head restraint all the way up
Press button Fig.
0on the head restraint guide.
Fold back the rear seat backrest and allow it to engage securely.
Fitting the rear head restraints
Release the rear bench seat backrest and fold the backrest forwards.
Position the head restraint correctly over the head restraint guides and then insert into the guides of
the corresponding seat backrest.
Press and hold the button Fig.
0and push down the head restraint.
Fold back the rear seat backrest and allow it to engage securely.
Adjust the head restraint so that a correct sitting position can be assumed Sitting position
Seat functions
Centre armrest
Page 131 of 502
tion:
The lights are switched off.Leaving Home function (orientation lighting) can be switched on
Coming Home and Leaving Home function (orientation lighting)Side lights or continuous
parking light on both sides of the vehicle switched on Switching the parking lights on and off
symbol in the light switch lights up green.Dipped beam is switched off the side lights will stay
on as long as the vehicle key is in the ignition lock or, in vehicles with Keyless Access, the driver door
is closed.
Daytime running lights
The daytime running lights (dependent on equipment level) can increase the visibility of your vehicle
in traffic during the day.
The daytime running lights are switched on every time the ignition is switched on when the light
switch is in position , or (when brightness is detected).
The daytime running lights cannot be switched on or off manually.
WARNING
Accidents and serious injuries can occur if the road is not sufficiently illuminated and other road
users have difficulty seeing the vehicle, or cannot see it at all.
The light assist systems are designed only to provide support; the driver is responsible for the
correct vehicle lights being switched on.
Always switch on the dipped beam headlights if it is dark, raining or visibility is poor.
WARNING
The side lights or daytime running lights are not bright enough to illuminate the road ahead and to
ensure that other road users are able to see you.
Always switch on the dipped beam headlights if it is dark, raining or visibility is poor.
The tail light clusters are not switched on with the daytime running lights. If the tail light clusters are
not switched on, the vehicle may not be visible to other road users if it is dark, raining, or if visibility
is poor.
WARNING
The automatic headlights ( ) switch dipped beam on and off only when there is a change in
the level of brightness.
Switch on dipped beam manually if required by the weather conditions, e.g. in fog.
Page 132 of 502
both sides of the vehicle switches on to
provide better illumination of the surrounding area when manoeuvring.
Switching the fog lights on and off
Switching on the front fog lights : pull the light switch Fig. 79out to the first position. The
indicator lamp in the light switch lights up green.
Switching on the rear fog light : pull the light switch all the way out. The indicator lamp in the
instrument cluster lights up yellow.
To switch the fog lights off, press in the light switch or turn it to position .
When the automatic headlights are switched on and the front or rear fog lights are switched
on, the dipped beam headlights will also be switched on irrespective of the current light conditions
outside.
In vehicles with a factory-fitted towing bracket: the vehicle's rear fog light is not switched on if a
trailer with rear fog light is electrically connected to the vehicle Trailer towing
Light functions
Side lights
If the side lights are switched on, both headlights light up with the side lights, parts of the tail
light clusters, the number plate lighting and the buttons in the centre console and the dash panel.
The daytime running lights also switch on when the ignition is switched on.
If the vehicle is not locked from outside when the ignition is switched off, the continuous parking
light on both sides of the vehicle switches on automatically after around 10 minutes to reduce 12-
volt vehicle battery discharge Switching the parking lights on and off
Automatic headlights
If the automatic headlights are switched on, the vehicle lighting and the instrument and
switch lighting will switch on and off according to the light conditions. When the lights are switched
on, the indicator lamp lights up yellow.
The automatic headlights are merely an aid and will not always be able to detect all driving
situations.
In vehicles with a corresponding equipment level, the switch-on time of the automatic headlights
can be adjusted in the Infotainment system in the Vehicle settings menu Infotainment system
controls an
Cornering light
A cornering light is switched on when turning slowly or travelling around very tight bends.
Signal tones if lights are not switched off
Page 136 of 502
NOTICE
Please observe the following points in order to avoid impairing the proper function of the system:
Regularly clean the camera's field of view, and keep it free from snow and ice.
Do not cover the camera's field of view.
Regularly check the area of the windscreen that is in the camera's field of view for damage.
Light-emitting objects in the camera's field of operation, e.g. mobile navigation devices, can impair
the functions of the main-beam control system.
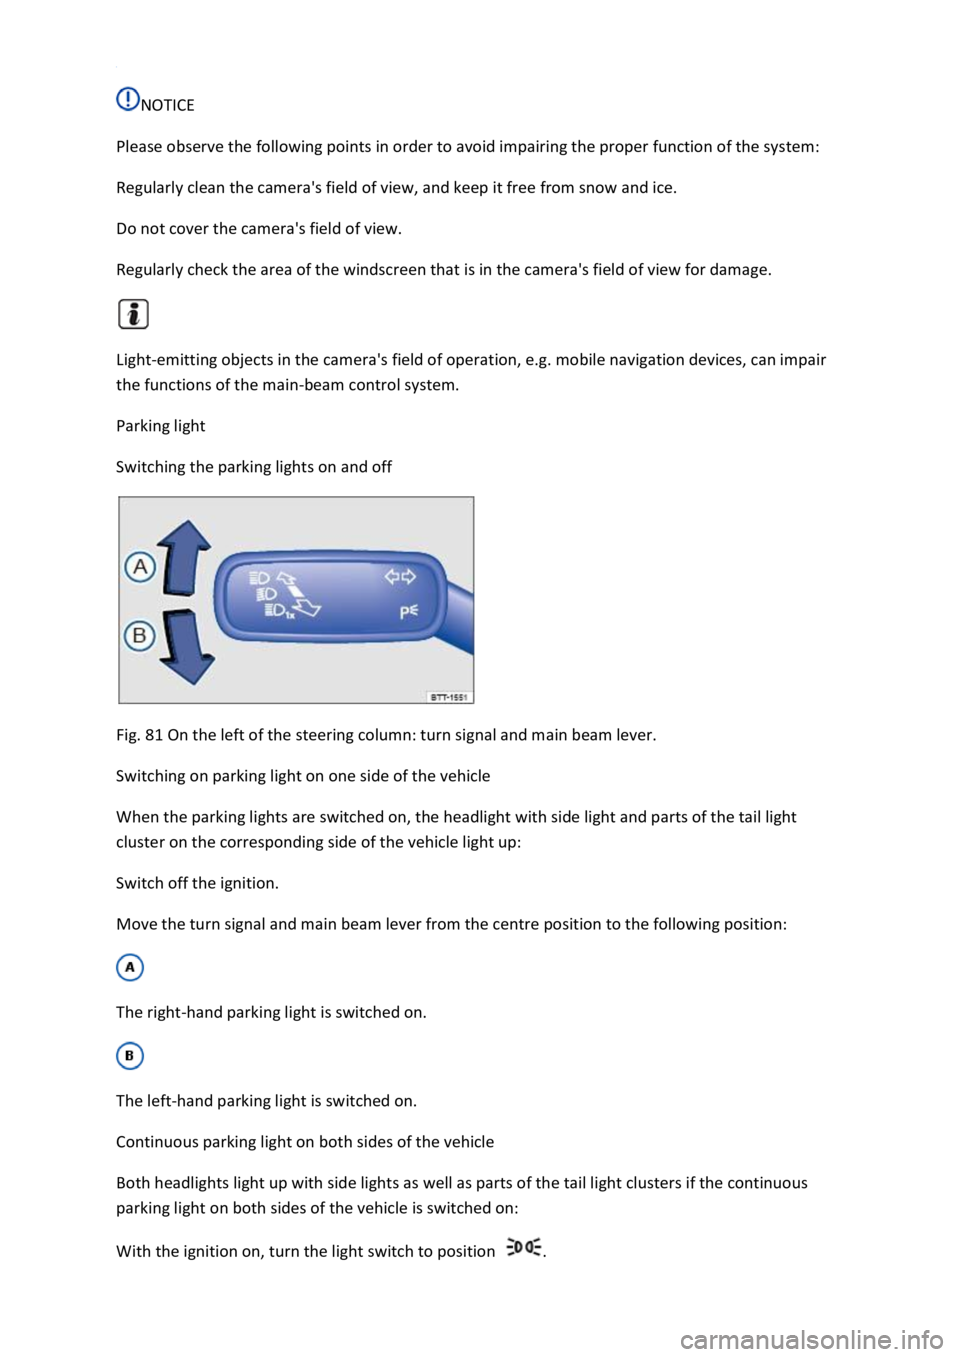
Parking light
Switching the parking lights on and off
Fig. 81 On the left of the steering column: turn signal and main beam lever.
Switching on parking light on one side of the vehicle
When the parking lights are switched on, the headlight with side light and parts of the tail light
cluster on the corresponding side of the vehicle light up:
Switch off the ignition.
Move the turn signal and main beam lever from the centre position to the following position:
The right-hand parking light is switched on.
The left-hand parking light is switched on.
Continuous parking light on both sides of the vehicle
Both headlights light up with side lights as well as parts of the tail light clusters if the continuous
parking light on both sides of the vehicle is switched on:
With the ignition on, turn the light switch to position .
Page 144 of 502

depending on the intensity of the rain.
Activating and deactivating the rain/light sensor
Position - the rain/light sensor is deactivated.
Position - the rain/light sensor is activated, automatic wipe when necessary.
The automatic wipe function can be activated and deactivated in the Infotainment system in
the Vehicle settings menu Infotainment system controls and displays
If the automatic wipe function is deactivated in the Infotainment system, the intervals are set at
fixed levels.
Adjusting the sensitivity of the rain/light sensor
The sensitivity of the rain/light sensor can be adjusted manually using the switch in the wiper lever
Fig.
Switch to the right high sensitivity.
Switch to the left low sensitivity.
WARNING
The rain/light sensor cannot always adequately detect all precipitation and activate the wipers
correspondingly.
If necessary, switch on the wipers manually in good time if the water on the windscreen restricts the
field of vision.
Some settings can be stored in the user accounts of the personalisation function and therefore
change automatically when the user account changes
Troubleshooting
Washer fluid level too low
The indicator lamp lights up yellow.
Fill up the washer fluid reservoir at the next opportunity Washer fluid
Fault in rain/light sensor
The wipers are not switched on automatically if it rains during rain/light sensor operation.
The indicator lamp lights up yellow.
Switch the ignition off and on.
If the problem persists, go to a qualified workshop.
Page 146 of 502

ant that the driver positions the exterior and interior mirrors correctly
before starting a journey
Looking in the exterior mirrors and the interior mirror does not allow the driver to see the entire
side and rear area around the vehicle. The area that cannot be seen is known as the blind spot.
There may be objects and other road users in the blind spot.
WARNING
Adjusting the exterior and interior mirrors while the vehicle is moving may cause the driver to
become distracted. This could lead to accidents and serious injuries.
Exterior and interior mirrors should be adjusted only when the vehicle is at a standstill.
When parking, changing lane, or performing an overtaking or turning manoeuvre, always pay careful
attention to the area around the vehicle as objects and other road users may be located in the blind
spot.
Always ensure that the mirrors are positioned correctly and that the rear view is not restricted by
ice, snow, condensation or any other objects.
WARNING
If you estimate the distance from traffic behind you incorrectly, you can cause accidents and serious
injuries.
Curved mirrors (convex or aspheric) enlarge the field of vision and can make objects in the mirror
seem smaller and further away than they actually are.
Using curved mirrors to estimate the distance from other vehicles behind you when changing lanes
can provide inaccurate results and can lead to accidents and serious injuries.
Whenever possible, use the interior mirror to check the exact distance between your vehicle and
following traffic or other objects.
Ensure that you have a good view to the rear of the vehicle.
WARNING
Automatic anti-dazzle mirrors contain an electrolyte fluid which could leak if the mirror is broken.
The leaking electrolyte fluid can cause irritation to the skin, eyes and respiratory organs, especially in
people who suffer from asthma or similar illnesses. Immediately ensure that there is a sufficient
supply of fresh air and get out of the vehicle. If this is not possible, open all of the windows and
doors.
If the electrolyte fluid gets into the eyes or onto the skin, immediately wash the area with plenty of
water for at least 15 minutes and consult a doctor.
Page 170 of 502
NOTICE
Free access to the pedals must be ensured at all times. For example, a larger brake pedal travel will
be necessary in order to stop the vehicle if a brake circuit fails. The brake pedal will have to be
depressed further and harder than normal.
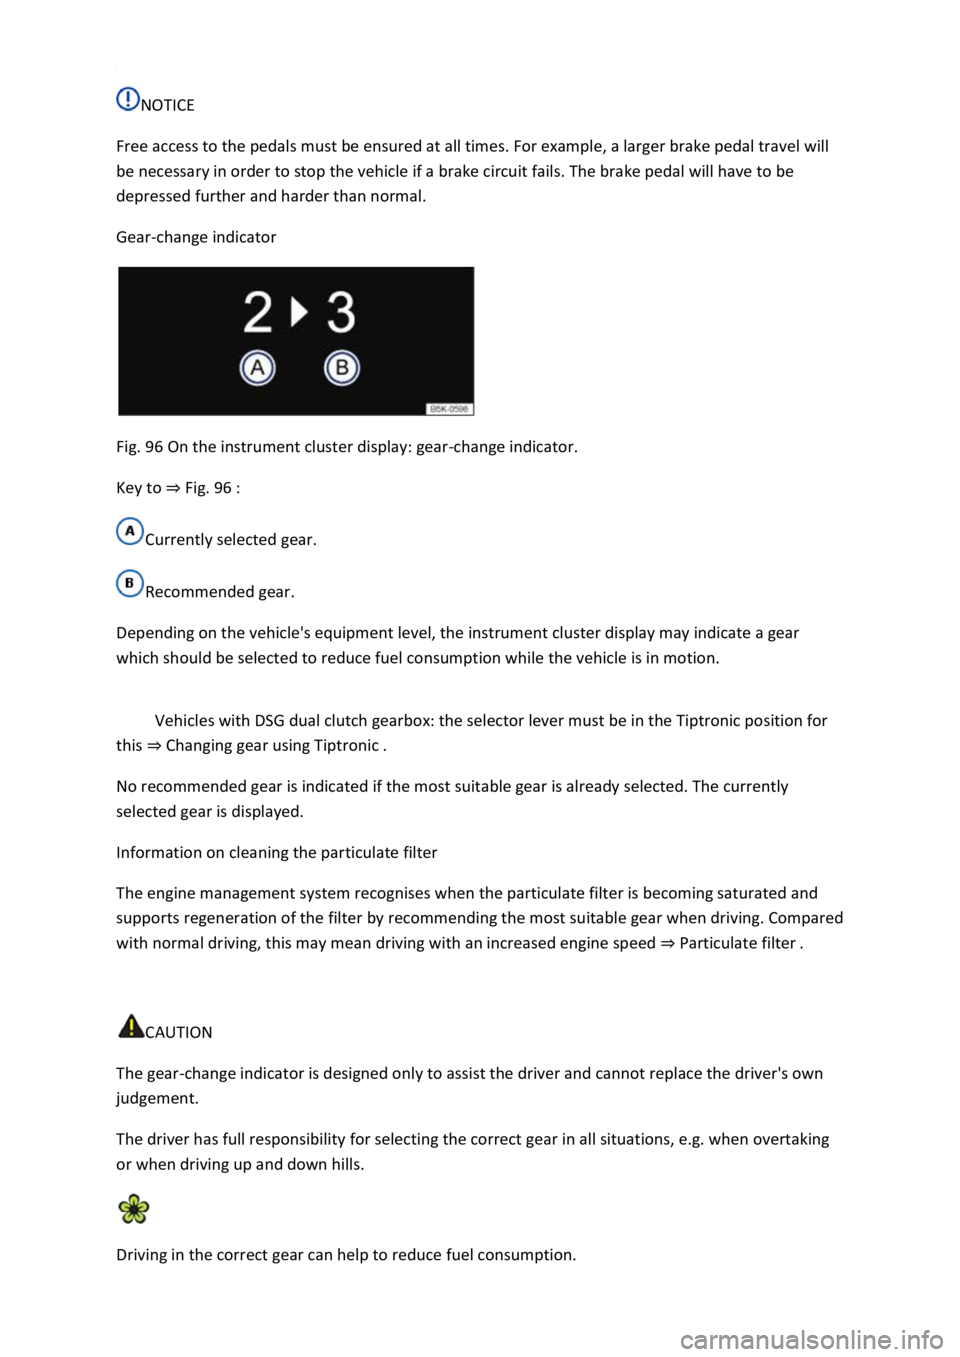
Gear-change indicator
Fig. 96 On the instrument cluster display: gear-change indicator.
Key to Fig. 96
Currently selected gear.
Recommended gear.
Depending on the vehicle's equipment level, the instrument cluster display may indicate a gear
which should be selected to reduce fuel consumption while the vehicle is in motion.
Vehicles with DSG dual clutch gearbox: the selector lever must be in the Tiptronic position for
this Changing gear using Tiptronic
No recommended gear is indicated if the most suitable gear is already selected. The currently
selected gear is displayed.
Information on cleaning the particulate filter
The engine management system recognises when the particulate filter is becoming saturated and
supports regeneration of the filter by recommending the most suitable gear when driving. Compared
with normal driving, this may mean driving with an increased engine speed Particulate filter
CAUTION
The gear-change indicator is designed only to assist the driver and cannot replace the driver's own
judgement.
The driver has full responsibility for selecting the correct gear in all situations, e.g. when overtaking
or when driving up and down hills.
Driving in the correct gear can help to reduce fuel consumption.