Page 158 of 520

1584-3. Operating the lights and wipers
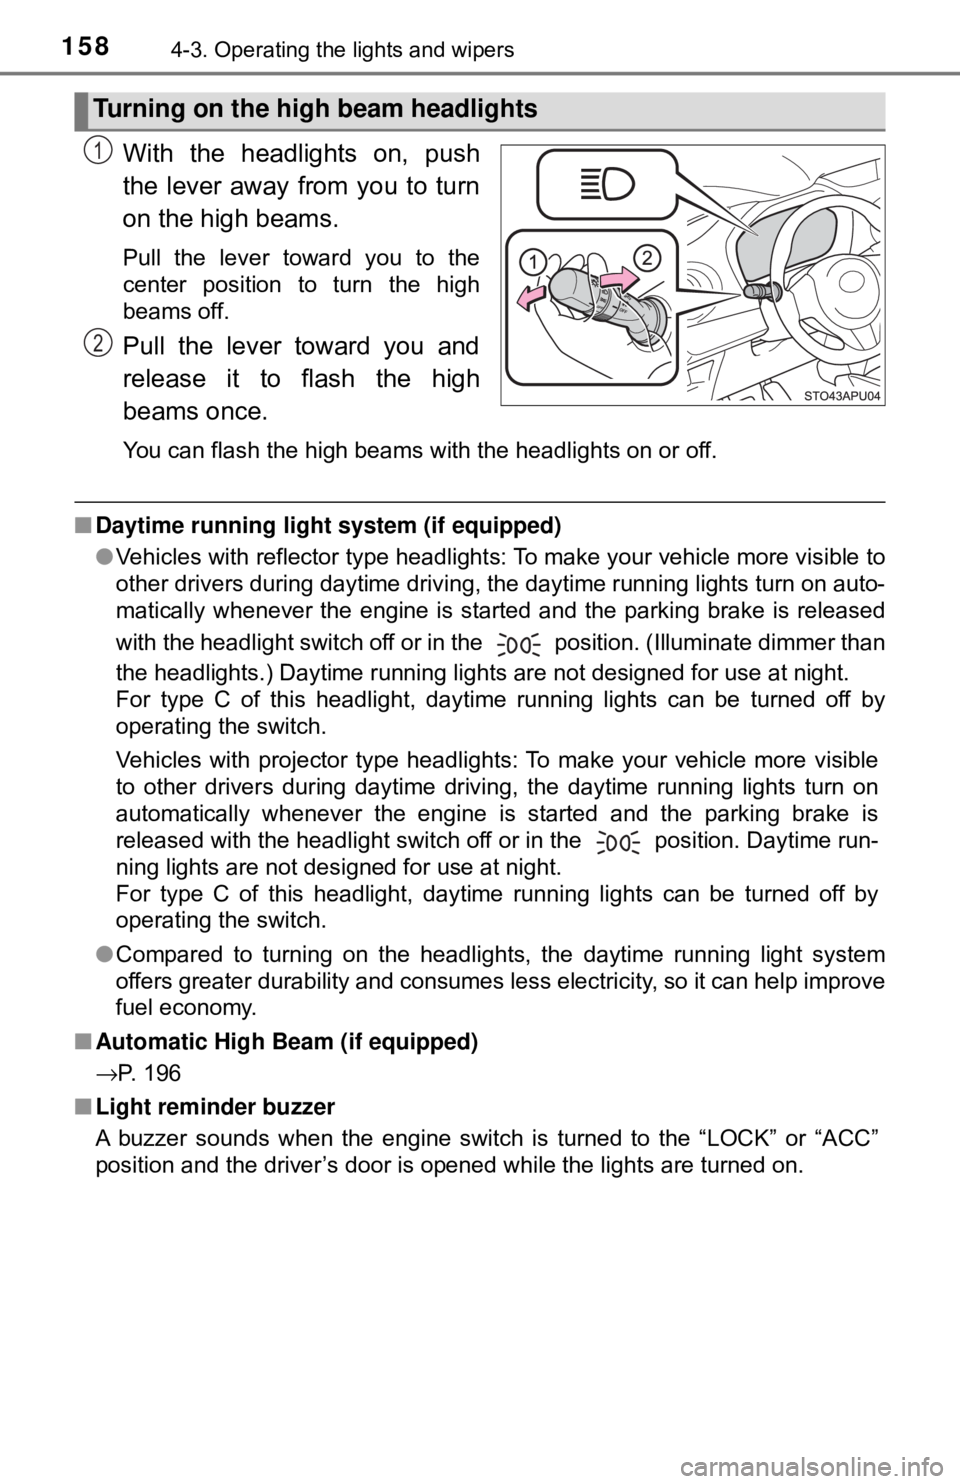
With the headlights on, push
the lever away from you to turn
on the high beams.
Pull the lever toward you to the
center position to turn the high
beams off.
Pull the lever toward you and
release it to flash the high
beams once.
You can flash the high beams with the headlights on or off.
■Daytime running light system (if equipped)
●Vehicles with reflector type headlights: To make your vehicle more visible to
other drivers during daytime driving, the daytime running lights turn on auto-
matically whenever the engine is started and the parking brake is released
with the headlight switch off or in the position. (Illuminate dimmer than
the headlights.) Daytime running lights are not designed for use at night.
For type C of this headlight, daytime running lights can be turned off by
operating the switch.
Vehicles with projector type headlights: To make your vehicle more visible
to other drivers during daytime driving, the daytime running lights turn on
automatically whenever the engine is started and the parking brake is
released with the headlight switch off or in the position. Daytime run-
ning lights are not designed for use at night.
For type C of this headlight, daytime running lights can be turned off by
operating the switch.
● Compared to turning on the headlights, the daytime running light system
offers greater durability and consumes less electricity, so it can help improve
fuel economy.
■ Automatic High Beam (if equipped)
→P. 196
■ Light reminder buzzer
A buzzer sounds when the engine switch is turned to the “LOCK” or “ACC”
position and the driver’s door is opened while the lights are turned on.
Turning on the high beam headlights
1
2
Page 159 of 520

1594-3. Operating the lights and wipers
4
Driving
■Automatic light off system (vehicles with daytime running light system)
● When the headlights are on: The headlights and tail lights turn off 30 sec-
onds after the engine switch is turned to the “ACC” or “LOCK” position and a
door is opened and closed. (The lights turn off immediately if on the key
is pressed after all the doors are locked.)
● When only the tail lights are on: The tail lights turn off automatically if the
engine switch is turned to the “ACC” or “LOCK” position and the driver’s
door is opened.
To turn the lights on again, turn the engine switch to the “ON” position, or turn
the headlight switch to or once and then back to the or
position.
If any of the doors is kept open, the lights automatically turn off after 20 min-
utes.
■ Battery-saving function (vehicles wit h daytime running light system or
Automatic High Beam)
In all following conditions, the headlights and the other remaining lights will go
off automatically after 20 minutes in order to prevent the vehicle battery from
being discharged:
● The engine switch is in the “LOCK” position.
● The headlights and/or tail lights are on.
This function will be canceled in any of the following situations:
● When the engine switch is turned to the “ON” position.
● When the light switch is operated.
● When the door is opened or closed.
■ Customization
Settings (e.g. automatic light off system) can be changed.
(Customizable features: →P. 489)
NOTICE
■To prevent battery discharge
Do not leave the lights on longer than necessary when the engine is not
running.
Page 163 of 520
1634-3. Operating the lights and wipers
4
Driving
Ty p e BIntermittent windshield
wiper operation
Low speed windshield
wiper operation
High speed windshield
wiper operation
Temporary operation
Washer/wiper dual operation
The wiper will automatically
operate a couple of times after
the washer squirts.
■ The windshield wiper and washer can be operated when
The engine switch is in the “ON” position.
■ If no windshield washer fluid sprays
Check that the washer nozzles are not blocked, if there is washer fluid in the
windshield washer fluid reservoir.
1
2
3
4
5
Page 167 of 520
1674-3. Operating the lights and wipers
4
Driving
■The rear window wiper and w asher can be operated when
The engine switch is in the “ON” position.
■ If no washer fluid sprays
Check that the washer nozzle is not blocked, if there is washer fluid in the
washer fluid reservoir.
NOTICE
■When the rear window is dry
Do not use the wiper, as it may damage the rear window.
■ When the washer fluid tank is empty
Do not operate the switch continually as the washer fluid pump may over-
heat.
■ When a nozzle becomes blocked
In this case, contact your Toyota dealer.
Do not try to clear it with a pin or other object. The nozzle will be damaged.
Page 168 of 520

1684-4. Refueling
Opening the fuel tank cap
●Turn the engine switch to the “LOC K” position and ensure that all
the doors and windows are closed.
● Confirm the type of fuel.
■Fuel types
→P. 471
■ Fuel tank opening for unleaded gasoline
To help prevent incorrect fueling, y our vehicle has a fuel tank opening that
only accommodates the special nozzle on unleaded fuel pumps.
Perform the following steps to open the fuel tank cap:
Before refueling the vehicle
WARNING
■ When refueling the vehicle
Observe the following precautions while refueling the vehicle. Failure to do
so may result in death or serious injury.
● After exiting the vehicle and before opening the fuel door, touch an
unpainted metal surface to discharge any static electricity. It is important to
discharge static electricity before refueling because sparks resulting from
static electricity can cause fuel vapors to ignite while refueling.
● Always hold the grips on the fuel tank cap and turn it slowly to remove it.
A whooshing sound may be heard when the fuel tank cap is loosened.
Wait until the sound cannot be heard before fully removing the cap. In hot
weather, pressurized fuel may spray out the filler neck and cause injury.
Page 179 of 520

1794-5. Toyota Safety Sense C
4
Driving
WARNING
●While driving, such as when driving through a railway crossing, the system
may determine that the possibility of a collision with an object, such as rail-
way crossing barrier, is high and operate the pre-collision braking function.
To move the vehicle in an emergency, such as if the system operates in a
railway crossing, perform the following operations and then take the nec-
essary measures to ensure your safety.
• If the vehicle has been stopped, depress the accelerator pedal.
• If the vehicle is decelerating, fully depress the accelerator pedal.
(→P. 182)
• Disable the pre-collision system. ( →P. 180)
■ When to disable the pre-collision system
In the following situations, disable the system, as it may not operate prop-
erly, possibly leading to an accident resulting in death or serious injury:
● When the vehicle is being towed
● When your vehicle is towing another vehicle
● When transporting the vehicle via truck, boat, train or similar means of
transportation
● When the vehicle is raised on a lift with the engine running on and the tires
are allowed to rotate freely
● When inspecting the vehicle using a drum tester such as a chassis dyna-
mometer or speedometer tester, or when using an on vehicle wheel bal-
ancer
● If the vehicle cannot be driven in a stable manner, such as when the vehi-
cle has been in an accident or is malfunctioning
● When the vehicle is driven in a sporty manner or off-road
● When the condition of the tires is poor and they do not perform well
(→P. 370)
● When tires of a size other than specified are installed
● When tire chains are installed
● When a compact spare tire or an emergency tire puncture repair kit is used
Page 180 of 520
1804-5. Toyota Safety Sense C
■Enabling/disabling the pre-collision system
Press the PCS switch for 3 sec-
onds or more.
The PCS warning light will turn
on and a message will be dis-
played in the multi-information
display, when the system is
turned off.
To enable the system, press the
PCS switch again.
The pre-collision system is
enabled each time the engine is
started.
Changing settings of th e pre-collision system
Page 181 of 520
1814-5. Toyota Safety Sense C
4
Driving
■Changing the pre-collision warning timing
Press the PCS switch to turn on the PCS activation indicator and
display the current warning timing in the multi-information display.
Each time the PCS switch is presse d in the displayed state, the tim-
ing for the warning changes as follows:
If the operation timing setting has been changed, the setting will be
retained the next time the engine is started.
Far
The warning will begin to oper-
ate earlier than with the default
timing.
Middle
This is the default setting.
Near
The warning will begin to oper-
ate later than with the default
timing.
1
2
3