Page 106 of 520
1063-3. Adjusting the seats
Front seats
Driver’s seat
Seat position adjustment lever
Seatback angle adjustment
lever
Vertical height adjustment lever
(if equipped)
Front passenger’s seat
Seat position ad justment lever
Seatback angle adjustment
lever
Seatback lock release lever
(3-door models only)
Adjustment procedure
1
2
3
1
2
3
Page 107 of 520

1073-3. Adjusting the seats
3
Operation of each component
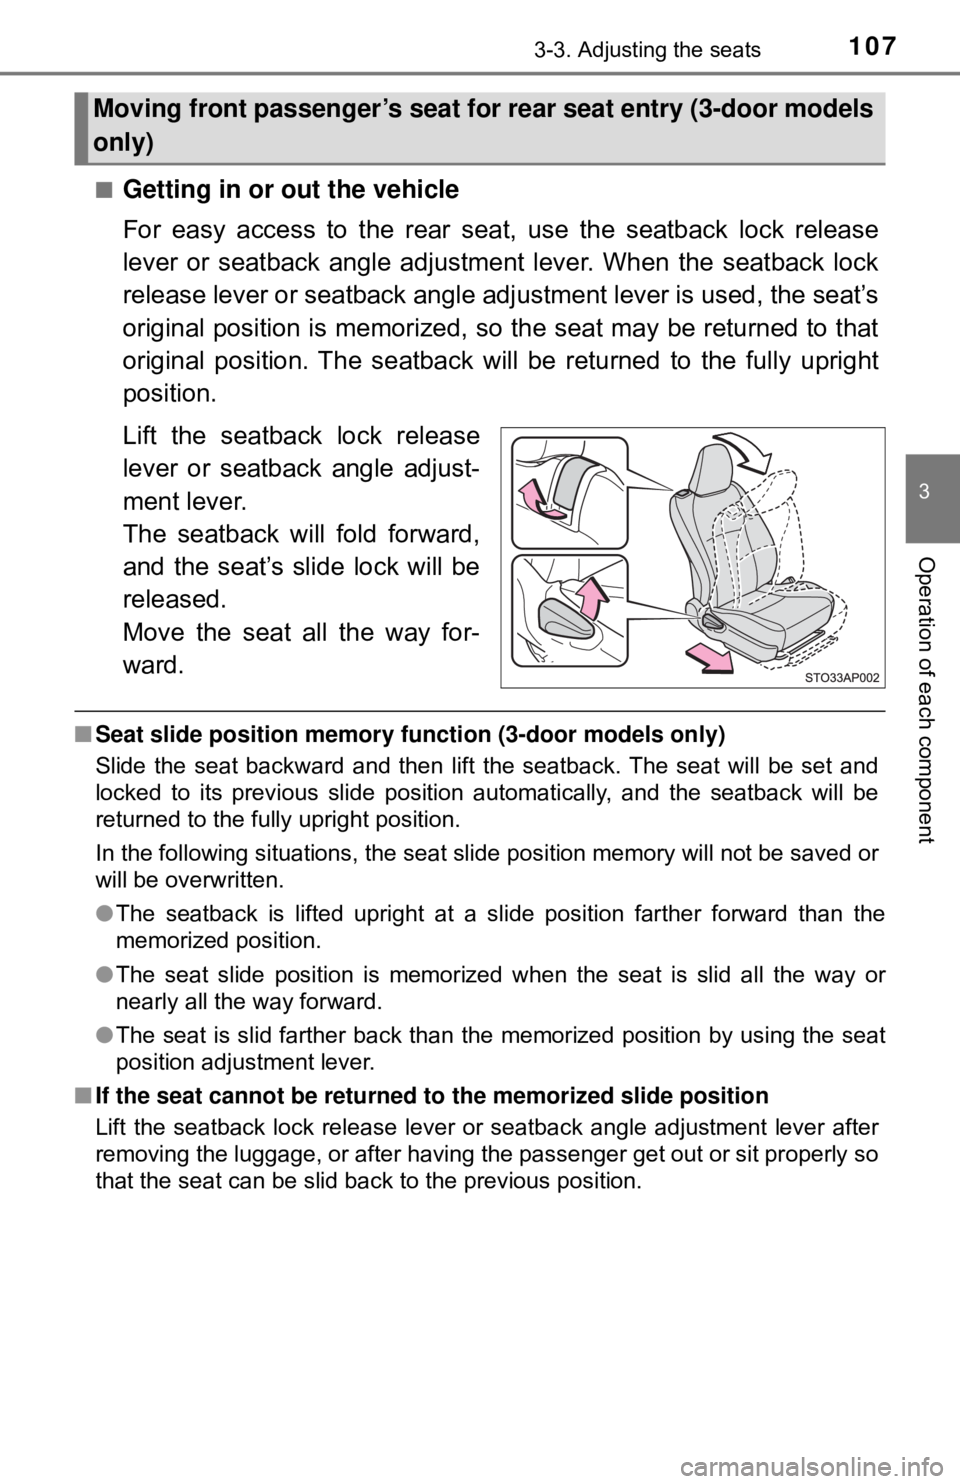
■Getting in or out the vehicle
For easy access to the rear seat, use the seatback lock release
lever or seatback angle adjustment lever. When the seatback lock
release lever or seatback angle adj ustment lever is used, the seat’s
original position is memorized, so the seat may be returned to that
original position. The seatback will be returned to the fully upright
position.
Lift the seatback lock release
lever or seatback angle adjust-
ment lever.
The seatback will fold forward,
and the seat’s slide lock will be
released.
Move the seat all the way for-
ward.
■ Seat slide position memory fu nction (3-door models only)
Slide the seat backward and then lift the seatback. The seat will be set and
locked to its previous slide position automatically, and the seatback will be
returned to the fully upright position.
In the following situations, the seat slide position memory will not be saved or
will be overwritten.
● The seatback is lifted upright at a slide position farther forward than the
memorized position.
● The seat slide position is memorized when the seat is slid all the way or
nearly all the way forward.
● The seat is slid farther back than the memorized position by using the seat
position adjustment lever.
■ If the seat cannot be returned to the memorized slide position
Lift the seatback lock release lever or seatback angle adjustment lever after
removing the luggage, or after having the passenger get out or sit properly so
that the seat can be slid back to the previous position.
Moving front passenger’s seat for rear seat entry (3-door models
only)
Page 108 of 520

1083-3. Adjusting the seats
WARNING
■When adjusting the seat position
● Take care when adjusting the seat position to ensure that other passen-
gers are not injured by the moving seat.
● Do not put your hands under the seat or near the moving parts to avoid
injury.
Fingers or hands may become jammed in the seat mechanism.
■ Seat adjustment
● Be careful that the seat does not hit passenger or luggage.
● To reduce the risk of sliding under the lap belt during a collision, do not
recline the seat more than necessary.
If the seat is too reclined, the lap belt may slide past the hips and apply
restraint forces directly to the abdomen, or your neck may contact the
shoulder belt, increasing the risk of death or serious injury in the event of
an accident.
Adjustments should not be made while driving as the seat may unexpect-
edly move and cause the driver to lose control of the vehicle.
● After adjusting the seat, make sure that the seat is locked in position.
● Never allow anyone to touch seatback lock release levers while the vehi-
cle is moving.
● If anyone is in the vicinity, make sure they are clear of the seat back path
and let them know that the seat is about to move.
■ After returning the seatback to the upright position
Make sure the seatback is securely locked by pushing it forward and rear-
ward. Failure to do so may result in death or serious injury.
NOTICE
■ To prevent the seat lock mechanism malfunction
Do not use the seatback angle adjustment lever and seatback lock release
lever at the same time. If they are used together, the seat lock mechanism
may be damaged.
Page 110 of 520
1103-3. Adjusting the seats
Pull the seatback lock release
knob and fold the seatback
down.
Each seatback may be folded sep-
arately.
Install the outer head restraints. (→P. 1 1 3 )
Raise the seatback and lock it
in place.
When locked, the red label of the
lock release knob cannot be seen.
Return the seat belt to the origi-
nal position.
Center: → P. 3 0
Outer: Remove the seat belt of
the rear outboard seat from the
belt hanger.
5
Returning the rear seatbacks
1
2
3
Page 112 of 520
1123-3. Adjusting the seats
WARNING
■After returning the rear seat back to the upright position
Observe the following precautions. Failure to do so may result in death or
serious injury.
● Check that the seat belts are not twisted or caught in the seatback.
NOTICE
■Stowing the seat belts
The seat belts and the buckles must be stowed before you fold down the
rear seatbacks.
● Make sure that the seatback is securely
locked in position by lightly pushing it
back and forth.
If the seatback is not securely locked,
the red marking will be visible on the
seatback lock release knob. Make sure
that the red marking is not visible.
Page 113 of 520
1133-3. Adjusting the seats
3
Operation of each component
Head restraints
Up
Pull the head restraints up.
Down
Push the head restraint down while
pressing the lock release button.
■Removing the front seats and re ar center seat head restraints
■ Removing the rear oute r seats head restraints
Head restraints are provided for all seats.
Adjusting the front seats and rear center seat head restraints
Lock
release
button
1
2
Pull the head restraint up while pressing
the lock release button.
Pull the lock release knob and fold
down the seatback until it reaches the
position where the head restraints can
be removed.
Pull the head restraint up while pushing
the lock release button.
Lock
release
button
1
2
Lock release
button
Page 114 of 520

1143-3. Adjusting the seats
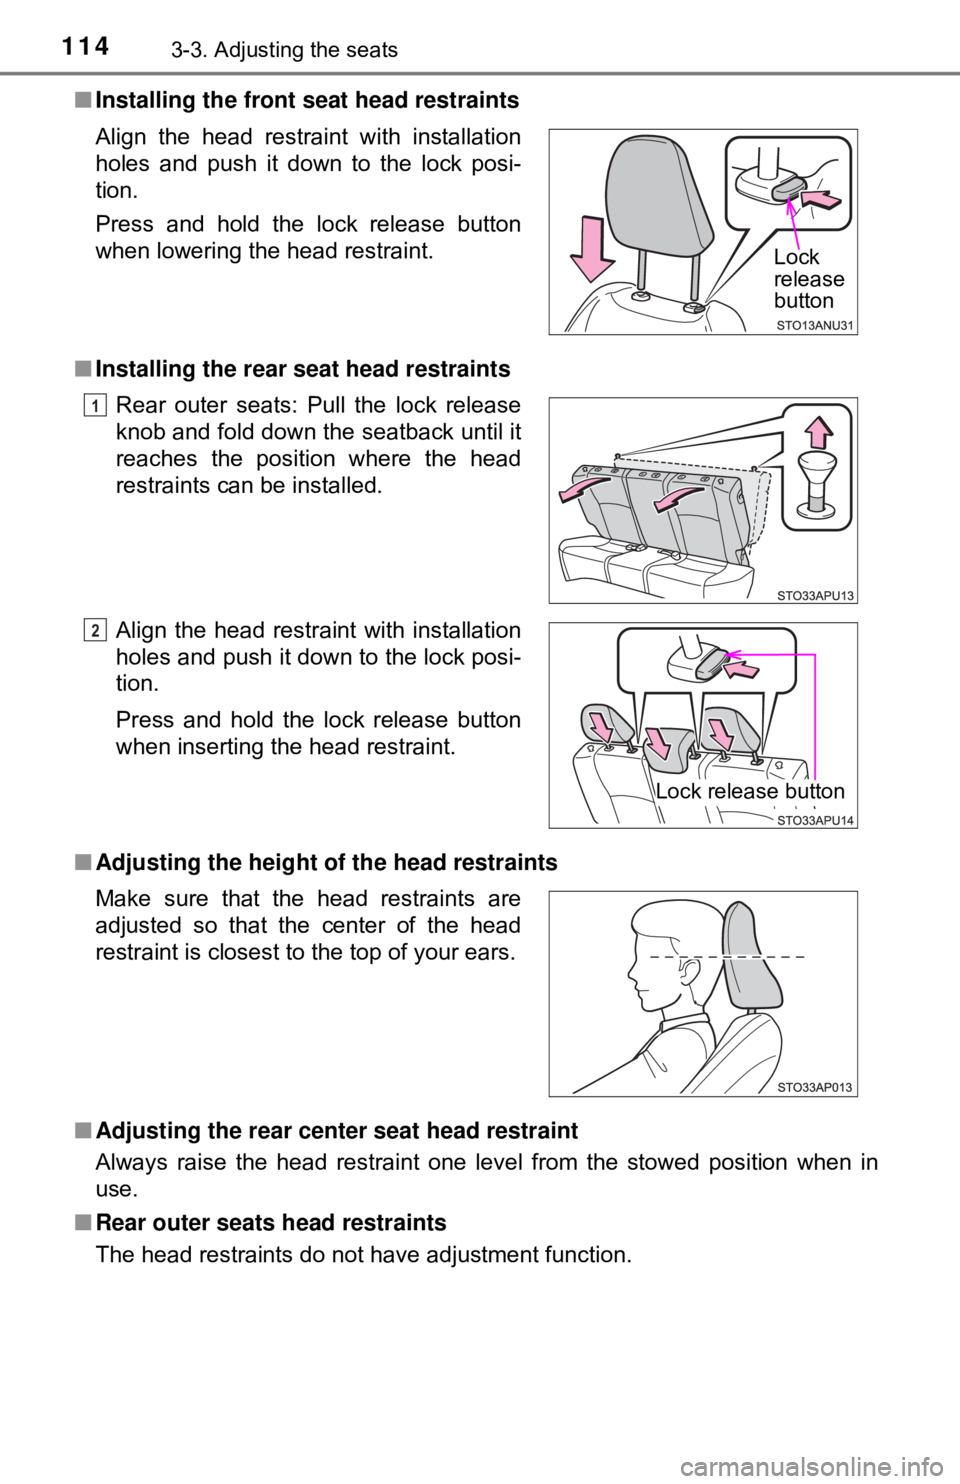
■Installing the front seat head restraints
■ Installing the rear seat head restraints
■ Adjusting the height of the head restraints
■ Adjusting the rear center seat head restraint
Always raise the head restraint one level from the stowed position when in
use.
■ Rear outer seats head restraints
The head restraints do not have adjustment function. Align the head restraint with installation
holes and push it down to the lock posi-
tion.
Press and hold the lock release button
when lowering the head restraint.
Rear outer seats: Pull the lock release
knob and fold down the seatback until it
reaches the position where the head
restraints can be installed.
Align the head restraint with installation
holes and push it down to the lock posi-
tion.
Press and hold the lock release button
when inserting the head restraint.
Make sure that the head restraints are
adjusted so that the center of the head
restraint is closest to the top of your ears.
Lock
release
button
1
2
Lock release button
Page 115 of 520
1153-3. Adjusting the seats
3
Operation of each component
WARNING
■Head restraint precautions
Observe the following precautions regarding the head restraints. Failure to
do so may result in death or serious injury.
● Use the head restraints designed for each respective seat.
● Adjust the head restraints to the correct position at all times.
● After adjusting the head restraints, push down on them and make sure
they are locked in position.
● Do not drive with the head restraints removed.