2018 TOYOTA TUNDRA brakes
[x] Cancel search: brakesPage 267 of 672

2674-5. Using the driving support systems
4
Driving
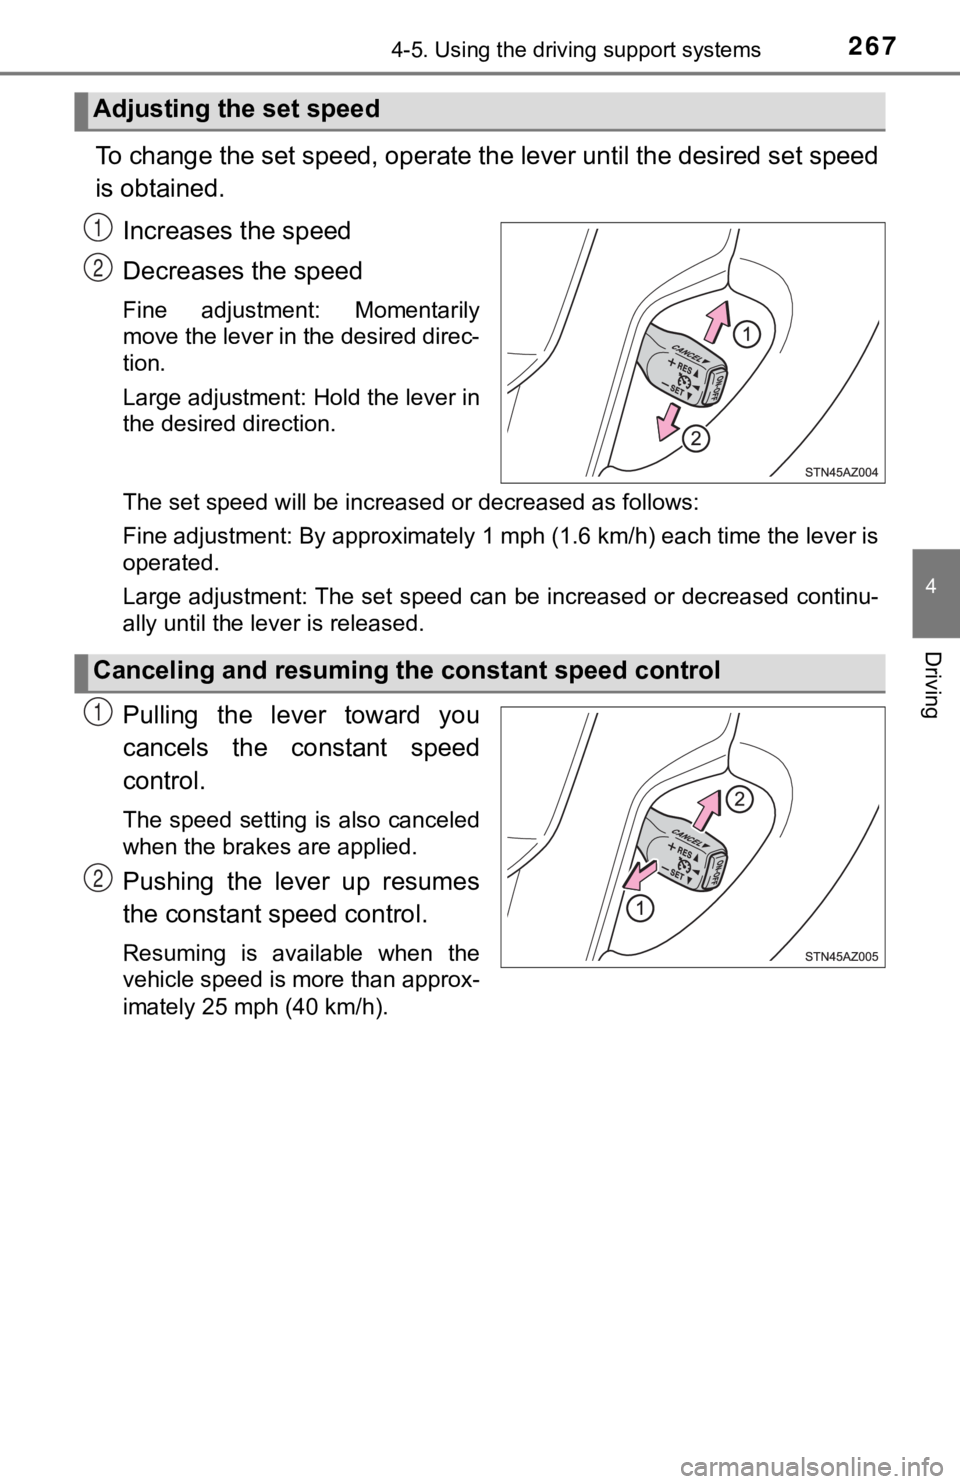
To change the set speed, operate the lever until the desired set speed
is obtained.
Increases the speed
Decreases the speed
Fine adjustment: Momentarily
move the lever in the desired direc-
tion.
Large adjustment: Hold the lever in
the desired direction.
The set speed will be increased or decreased as follows:
Fine adjustment: By approximately 1 mph (1.6 km/h) each time th e lever is
operated.
Large adjustment: The set speed can be increased or decreased c ontinu-
ally until the lever is released.
Pulling the lever toward you
cancels the c onstant speed
control.
The speed setting is also canceled
when the brakes are applied.
Pushing the lever up resumes
the constant speed control.
Resuming is available when the
vehicle speed is more than approx-
imately 25 mph (40 km/h).
Adjusting the set speed
1
2
Canceling and resuming t he constant speed control
1
2
Page 274 of 672

2744-5. Using the driving support systems
WARNING
■Sensor detection information
Pay particular attention to the following instances in where th is may occur.
Failing to do so way result in the vehicle being unable to be d riven or parked
safety and possibly cause an accident.
● The sensor’s detection areas are limited to the areas around the vehicle’s
front corner and rear bumpers.
● Certain vehicle conditions and the surrounding environment may affect the
ability of the sensor to correctly detect obstacles. Particular instances
where this may occur are listed below.
• There is dirt, snow or ice on the sensor. (Wiping the sensors will resolve
this problem.)
• The sensor is frozen. (Thawing the area will resolve this prob lem.)
• The sensor is covered in any way.
• The vehicle is leaning considerably to one side.
• On an extremely bumpy road, on an incline, on gravel, or on grass.
• The vicinity of the vehicle is noisy due to vehicle horns, mot orcycle
engines, air brakes of large vehicles, or other loud noises pro ducing
ultrasonic waves.
• There is another vehicle equipped with parking assist sensors in the
vicinity.
• The sensor is coated with a sheet of spray or heavy rain.
• The vehicle is equipped with a fender pole or radio antenna.
• The bumper or sensor receives a strong impact.
• The vehicle is approaching a tall or curved curb.
• In harsh sunlight or intense cold weather.
• The area directly under the bumpers is not detected.
• If obstacles draw too close to the sensor.
• A non-genuine Toyota suspension (lowered suspension, etc.) is installed.
• A backlit license plate, license plate holder, etc., are insta lled.
• People may not be detected if they are wearing certain types a nd color-
ing of clothing.
• People, animals, and moving objects may not be able to be detected.
In addition to the examples above, there are instances in which , because of
their shape, signs and other objects may be judged by the senso r to be
closer than they are.
Page 301 of 672

3014-5. Using the driving support systems
4
Driving
Driving assist systems
◆ABS (Anti-lock Brake System)
Helps to prevent wheel lock when the brakes are applied suddenl y,
or if the brakes are applied while driving on a slippery road surface
◆Brake assist
Generates an increased level of braking force after the brake p edal
is depressed when the system de tects a panic stop situation
◆VSC (Vehicle Stability Control)
Helps the driver to control skidding when swerving suddenly or
turning on slippery road surfaces
◆Trailer Sway Control
Helps the driver to control trailer sway by selectively applying brake
pressure for individual wheels and reducing driving torque when
trailer sway is detected
◆TRAC (Traction Control) for 2WD models and 2WD mode on
4WD models
Helps to maintain drive power and prevent the drive wheels from
spinning when starting the vehicl e or accelerating on slippery roads
◆Hill-start assist control
Helps to reduce the backward movement of the vehicle when start -
ing on an uphill
To keep driving safety and perf ormance, the following systems
operate automatically in respon se to various driving situations.
Be aware, however, that these systems are supplementary and
should not be relied upon too heav ily when operating the vehi-
cle.
Page 307 of 672

3074-5. Using the driving support systems
4
Driving
WARNING
■When the TRAC/VSC/Trailer Sway Control are activated
The slip indicator light flashes. Always drive carefully. Reckless driving may
cause an accident. Exercise particular care when the indicator light flashes.
■ When the TRAC/VSC/Trailer Sway Control systems are turned off
Be especially careful and drive at a speed appropriate to the r oad condi-
tions. As these are the systems to help ensure vehicle stabilit y and driving
force, do not turn the TRAC/VSC/Trailer Sway Control systems of f unless
necessary.
Trailer Sway Control is part of the VSC system and will not operate if VSC is
turned off or experiences a malfunction.
■ Replacing tires
Make sure that all tires are of the specified size, brand, trea d pattern and
total load capacity. In addition, make sure that the tires are inflated to the
recommended tire inflation pressure level.
The ABS, TRAC, VSC and Trailer Sway Control systems will not function
correctly if different tires are installed on the vehicle.
Contact your Toyota dealer for further information when replaci ng tires or
wheels.
■ Handling of tires and the suspension
Using tires with any kind of problem or modifying the suspensio n will affect
the driving assist systems, and may cause a system to malfuncti on.
■ Trailer Sway Control precaution
The Trailer Sway Control system is not able to reduce trailer sway in all situ-
ations. Depending on many factors such as the conditions of the vehicle,
trailer, road surface, and driving environment, the Trailer Swa y Control sys-
tem may not be effective. Refer to your trailer owner’s manual for informa-
tion on how to tow your trailer properly.
■ If trailer sway occurs
Observe the following precautions.
Failure to do so may cause death or serious injury.
● Firmly grip the steering wheel. Steer straight ahead.
Do not try to control trailer swaying by turning the steering w heel.
● Begin releasing the accelerator pedal immediately but very grad ually to
reduce speed.
Do not increase speed. Do not apply vehicle brakes.
If you make no extreme correction with the steering or brakes, your vehicle
and trailer should stabilize. ( P. 191)
Page 308 of 672

3084-5. Using the driving support systems
Trailer brake controller
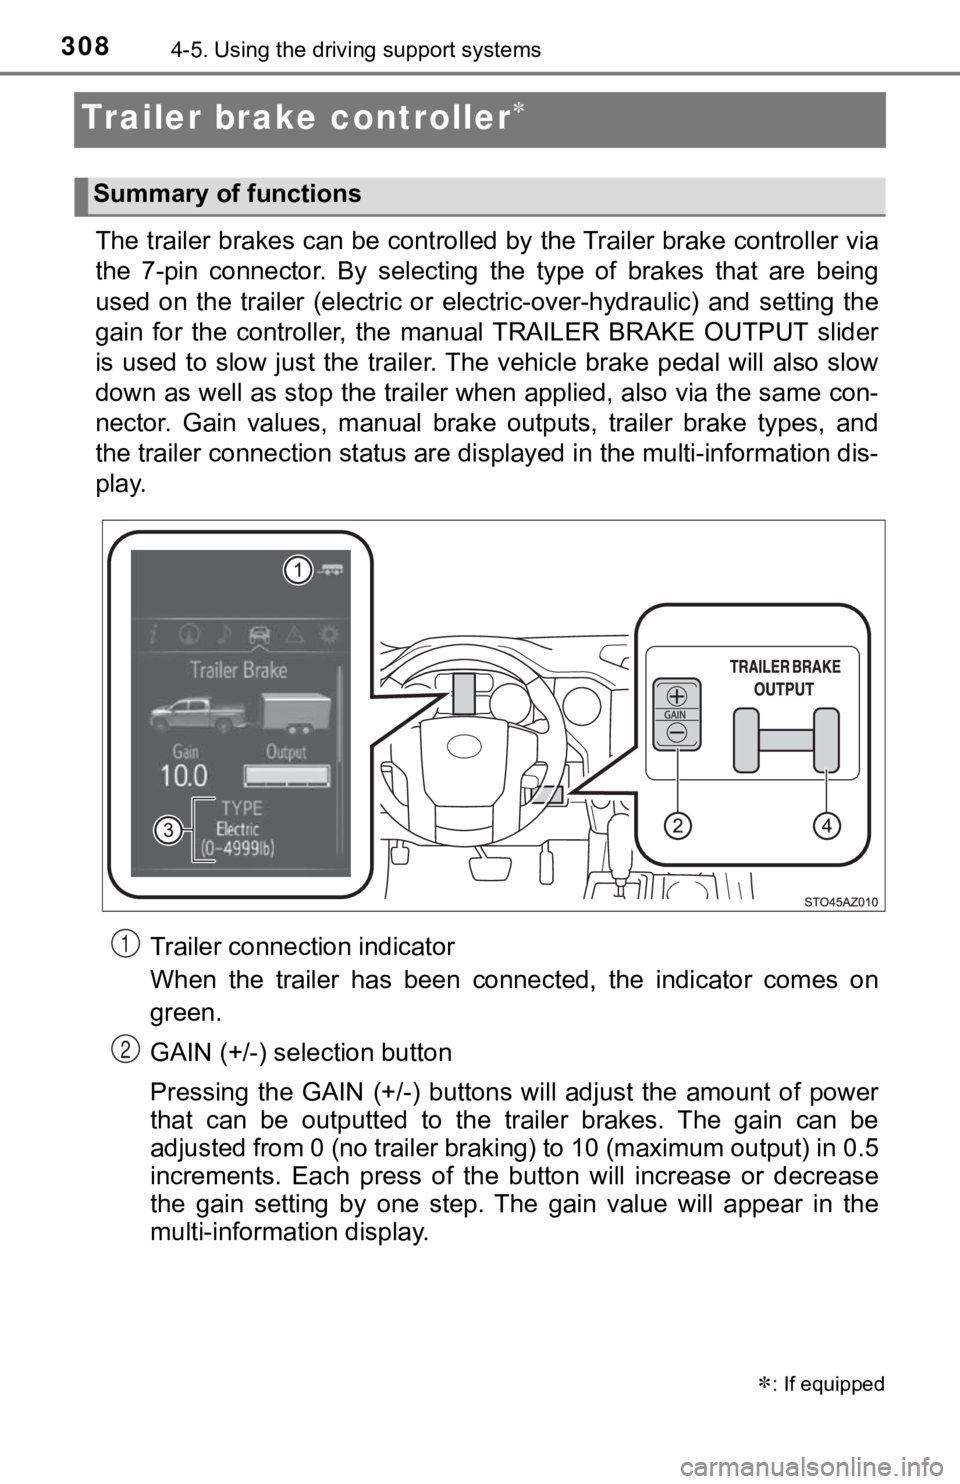
The trailer brakes can be controlled by the Trailer brake contr oller via
the 7-pin connector. By selecting the type of brakes that are being
used on the trailer (electric or electric-over-hydraulic) and s etting the
gain for the controller, the manual TRAILER BRAKE OUTPUT slider
is used to slow just the traile r. The vehicle brake pedal will also slow
down as well as stop the trailer when applied, also via the sam e con-
nector. Gain values, manual brake outputs, trailer brake types, and
the trailer connection status are displayed in the multi-information dis-
play.
Trailer connection indicator
When the trailer has been connected, the indicator comes on
green.
GAIN (+/-) selection button
Pressing the GAIN (+/-) buttons w ill adjust the amount of power
that can be outputted to the trailer brakes. The gain can be
adjusted from 0 (no trailer braking) to 10 (maximum output) in 0.5
increments. Each press of the bu tton will increase or decrease
the gain setting by one step. The gain value will appear in the
multi-information display.
: If equipped
Summary of functions
1
2
Page 309 of 672

3094-5. Using the driving support systems
4
Driving
Trailer brake type
Trailer brake type can be selected by using the multi-information. The
combination meter will show which trailer brake type is selected in the
multi-information display.
Manual TRAILER BRAKE OUTPUT slider
Adjusting this slider position will engage the trailer’s brakes only. If the
manual TRAILER BRAKE OUTPUT slider is used while the vehicle
brake is applied, the greater of the two outputs will be sent to the trailer
brakes.
The trailer brake type can be se lected on the multi-information display
as following:
Press “ ” or “” of meter control sw itches and select .
Press “ ” or “ ” of meter control switches and select “Vehicle Set-
tings”, and press .
Press “ ” or “ ” of meter control switches and select “TBC Trailer
Type”, and press to select the correct type of trailer brakes that
are equipped on the trailer.
Changing trailer brake type will cause the current gain setting to reset
to zero. Make sure to set the gain as described in the followin g sec-
tion.
Gain setting on trailer brake controller should be set for a sp ecific tow-
ing condition. Gain setting should be adjusted each time the ve hicle
load, trailer load, road conditions, or weather changes. Settin g the
gain value to 0 will disable the tra iler brake controller output.
Make sure the trailer brakes are in good working condition and
functioning normally. See trailer dealer if necessary.
Hook up the trailer and make p roper electrical connections.
Select the correct type of trailer brakes that are equipped on the
trailer by using the multi-information display.
Drive vehicle with trailer attached on a level road surface sim ilar to
towing condition and in traffic-free environment. Driving speed
should be approximately 20 - 25 mph [35 - 40 km/h].
Changing settings of the trailer brake type
Setting the Gain
3
4
1
2
3
1
2
3
4
Page 311 of 672

3114-5. Using the driving support systems
4
Driving
WARNING
■Trailer brake type setting
It is the responsibility of the driver to make sure the trailer brakes are func-
tioning normally and adjusted appropriately. Failure to check a nd maintain
trailer brakes may result in loss of vehicle control, crash, or serious injury.
Trailer brake control system will work with most electric and e lectric-over-
hydraulic trailer braking systems up to 3 axles (24A output to trailer brakes).
Please be sure to test compatibility with the system at low spe eds and in a
safe area. If a warning message appears in the multi-information display
( P. 563), have the vehicle inspected by your Toyota dealer immed iately.
Some electric-over-hydraulic trailer brakes will take some mini mum output
to activate. Trailer brake control system will not work with tr ailer hydraulic
surge brakes.
■ When driving on slippery road surfaces
When stopping with ABS activated, output to the trailer might b e reduced in
order to reduce the likelihood of trailer wheels to lock. The trailer is not
equipped with ABS. Drive safely on slippery road surfaces.
Page 312 of 672

3124-6. Driving tips
Winter driving tips
●Use fluids that are appropriate t o the prevailing outside tempera-
tures. • Engine oil
• Engine coolant
• Washer fluid
● Have a service technician inspec t the condition of the battery.
● Have the vehicle fitted with four snow tires or purchase a set of tire
chains for the rear tires.
Ensure that all tires are the same size and brand, and that chains match
the size of the tires.
Perform the following according to the driving conditions:
● Do not try to forcibly open a window or move a wiper that is fr ozen.
Pour warm water over the frozen area to melt the ice. Wipe away
the water immediately to p revent it from freezing.
● To ensure proper operation of the climate control system fan,
remove any snow that has accumulated on the air inlet vents in
front of the windshield.
● Check for and remove any excess ic e or snow that may have accu-
mulated on the exterior lights, vehicle’s roof, chassis, around the
tires or on the brakes.
● Remove any snow or mud from the bottom of your shoes before
getting in the vehicle.
Accelerate the vehicle slowly, keep a safe distance between you and
the vehicle ahead, and drive at a reduced speed suitable to roa d con-
ditions.
Carry out the necessary preparations and inspections before
driving the vehicle in winter. Always drive the vehicle in a ma n-
ner appropriate to the prevailing weather conditions.
Preparation for winter
Before driving the vehicle
When driving the vehicle