2018 TOYOTA TUNDRA change time
[x] Cancel search: change timePage 241 of 672

2414-5. Using the driving support systems
4
Driving
• If a vehicle ahead makes an abrupt maneuver (such as sudden swerving,
acceleration or deceleration)
• When suddenly cutting behind a preceding vehicle
• When driving in inclement weather such as heavy rain, fog, snow or a sandstorm
• When the vehicle is hit by water, snow, dust, etc., from a veh icle ahead
• When driving through steam or smoke
• When driving in a place where the surrounding brightness changes sud-
denly, such as at the entrance or exit of a tunnel
• When a very bright light, such as the sun or the headlights of oncoming traffic, shines directly into the camera sensor
• When the surrounding area is dim, such as at dawn or dusk, or while at
night or in a tunnel
• After the engine has started the vehicle has not been driven for a certain
amount of time
• While making a left/right turn and for a few seconds after mak ing a left/
right turn
• While driving on a curve and for a few seconds after driving o n a curve
• If your vehicle is skidding
• If the wheels are misaligned
• If a wiper blade is blocking the camera sensor
• The vehicle is wobbling.
• The vehicle is being driven at extremely high speeds.
• When driving on a hill
• If the radar sensor or camera sensor is misaligned • When a vehicle ahead is not directly in front of your vehicle
• If the front of the vehicle is raised or lowered
Page 256 of 672

2564-5. Using the driving support systems
Example of constant speed cruising
When there are no vehicles ahead
The vehicle travels at the speed set by the driver. The desired vehicle-to-
vehicle distance can also be set by operating the vehicle-to-ve hicle dis-
tance switch.
Example of deceleration crui sing and follow-up cruising
When a preceding vehicle driving slower than the set speed
appears
When a vehicle is detected running ahead of you, the system automatically
decelerates your vehicle. When a greater reduction in vehicle s peed is
necessary, the system applies the brakes (the stop lights will come on at
this time). The system will respond to changes in the speed of the vehicle
ahead in order to maintain the vehicle-to-vehicle distance set by the driver.
Approach warning warns you when the system cannot decelerate su ffi-
ciently to prevent your vehicle from closing in on the vehicle ahead.
Example of acceleration
When there are no longer any preceding vehicles driving slower
than the set speed
The system accelerates until the set speed is reached. The syst em then
returns to constant speed cruising.
1
2
3
Page 258 of 672

2584-5. Using the driving support systems
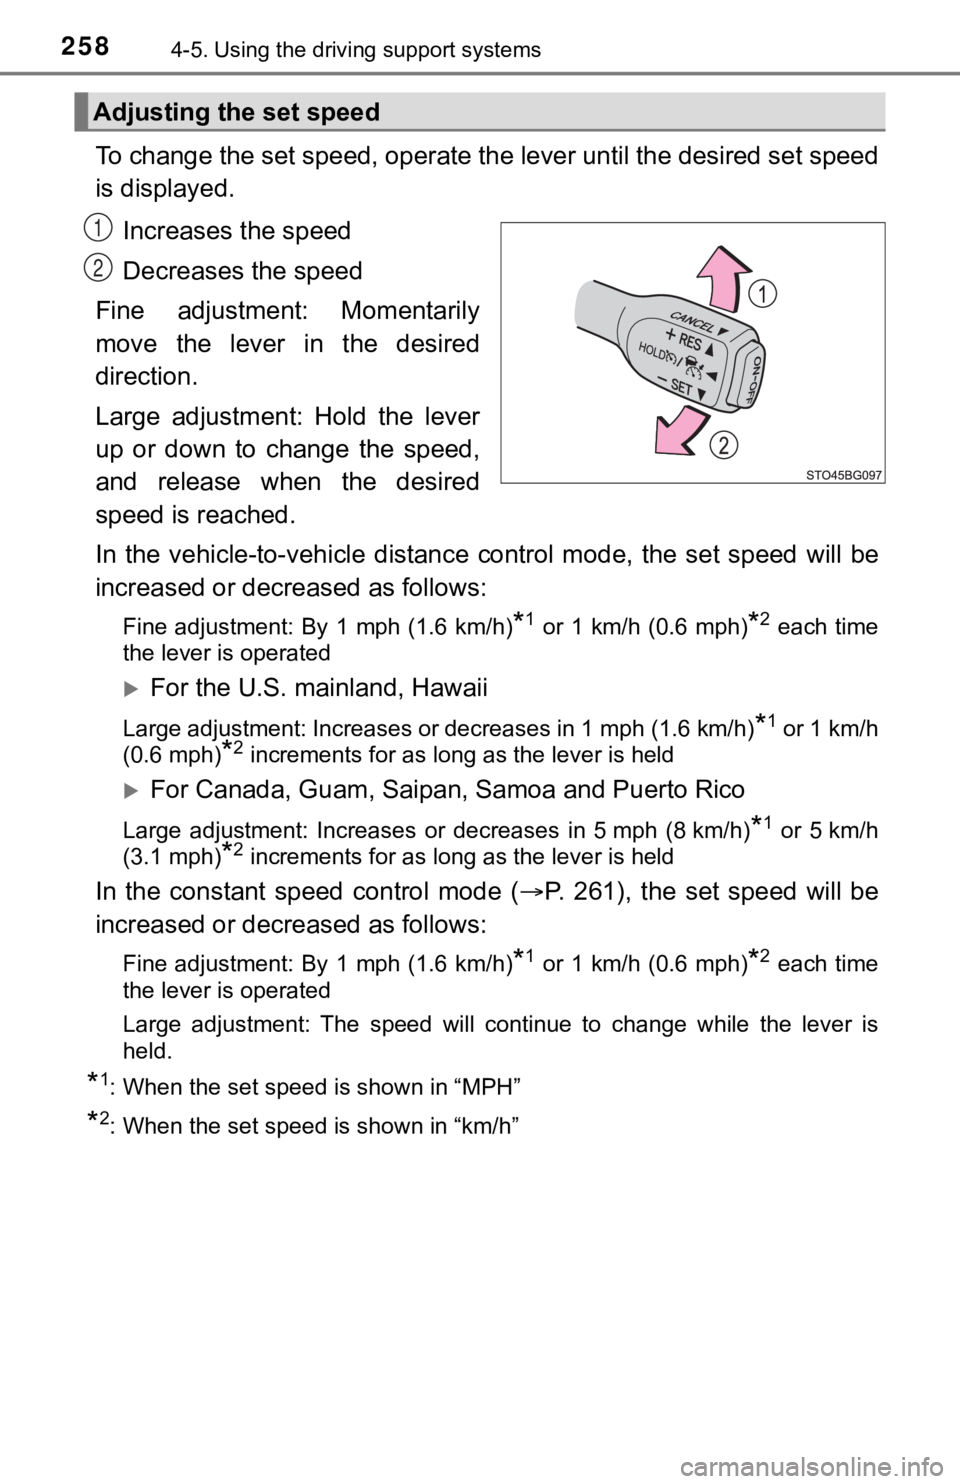
To change the set speed, operate the lever until the desired se t speed
is displayed.
Increases the speed
Decreases the speed
Fine adjustment: Momentarily
move the lever in the desired
direction.
Large adjustment: Hold the lever
up or down to change the speed,
and release when the desired
speed is reached.
In the vehicle-to-vehicle distance control mode, the set speed will be
increased or decreased as follows:
Fine adjustment: By 1 mph (1.6 km/h)*1 or 1 km/h (0.6 mph)*2 each time
the lever is operated
For the U.S. mainland, Hawaii
Large adjustment: Increases or decreases in 1 mph (1.6 km/h)*1 or 1 km/h
(0.6 mph)
*2 increments for as long as the lever is held
For Canada, Guam, Saipan, Samoa and Puerto Rico
Large adjustment: Increases or decreases in 5 mph (8 km/h)*1 or 5 km/h
(3.1 mph)
*2 increments for as long as the lever is held
In the constant speed control mode ( P. 261), the set speed will be
increased or decreased as follows:
Fine adjustment: By 1 mph (1.6 km/h)*1 or 1 km/h (0.6 mph)*2 each time
the lever is operated
Large adjustment: The speed will continue to change while the lever is
held.
*1: When the set speed is shown in “MPH”
*2: When the set speed is shown in “km/h”
Adjusting the set speed
1
2
Page 267 of 672

2674-5. Using the driving support systems
4
Driving
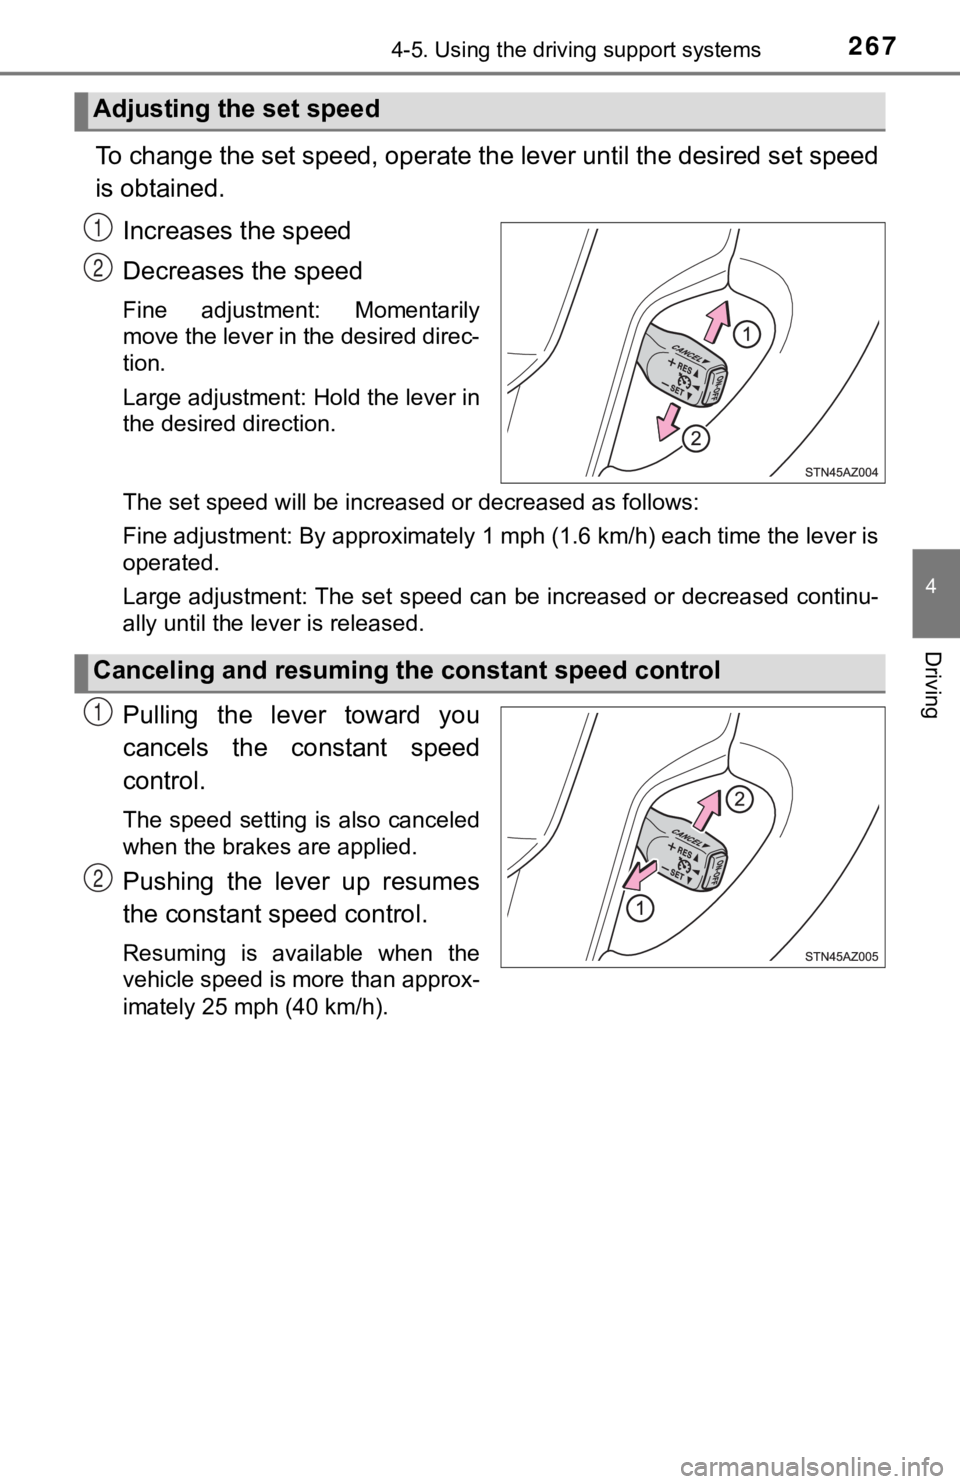
To change the set speed, operate the lever until the desired set speed
is obtained.
Increases the speed
Decreases the speed
Fine adjustment: Momentarily
move the lever in the desired direc-
tion.
Large adjustment: Hold the lever in
the desired direction.
The set speed will be increased or decreased as follows:
Fine adjustment: By approximately 1 mph (1.6 km/h) each time th e lever is
operated.
Large adjustment: The set speed can be increased or decreased c ontinu-
ally until the lever is released.
Pulling the lever toward you
cancels the c onstant speed
control.
The speed setting is also canceled
when the brakes are applied.
Pushing the lever up resumes
the constant speed control.
Resuming is available when the
vehicle speed is more than approx-
imately 25 mph (40 km/h).
Adjusting the set speed
1
2
Canceling and resuming t he constant speed control
1
2
Page 272 of 672

2724-5. Using the driving support systems
Rear center sensor
■When multiple obstacles are de tected in front and behind the
vehicle at the same time
The buzzer will change in the following manner.
● If an obstacle has been detected within 1.5 ft. (45 cm) of the front
or 2.8 ft. (85 cm) in rear of t he vehicle (a continuous buzzer is
sounding), and a new obstacle is detected at the other end of the
vehicle, the buzzer w ill sound 7 times then 1 continuous buzzer.
● If an obstacle has been detected within 1.5 ft. (45 cm) of the front
or 2.8 ft. (85 cm) in rear of t he vehicle (a continuous buzzer is
sounding), and a new obstacle is detected in the same way at th e
other end of the vehicle, the buzzer will sound 3 times then 1
continuous buzzer.
■Detection range of the sensors
Approximately 5.9 ft. (180 cm)
Approximately 2.0 ft. (60 cm)
Approximately 2.8 ft. (85 cm)
The diagram shows the detection
range of the sensors. Note that the
sensors may not be able to detect
obstacles that are extremely close
to the vehicle.
The range of the sensors may
change depending on the shape of
the object, etc.
Approximate distance to obstacleDisplay and buzzer
5.9 ft. (180 cm) to 3.3 ft. (100 cm)Intermittent
3.3 ft. (100 cm) to 2.5 ft. (75 cm)Fast intermittent
2.5 ft. (75 cm) to 1.6 ft. (50 cm)Very fast intermittent
Less than 1.6 ft. (50 cm)Continuously
1
2
3
Page 298 of 672

2984-5. Using the driving support systems
■When the front-wheel drive cont rol switch is shifted to “4L”
VSC is automatically turned off.
■ If the “4HI” indicator flashes
The transfer mode may not successfully change. Drive straight a head while
accelerating or decelerating, or drive in reverse.
■ If the “4LO” indicator continues to flash
The transfer mode may not successfully change. Operate the fron t-wheel
drive control switch again.
■ If the “4LO” indicator continues to flash and a buzzer sounds
The shift lever is not in N and/or the vehicle is moving. Stop the vehicle com-
pletely, shift the shift lever to N and make sure that the indi cator stops flash-
ing.
■ If the “4HI” or “4LO” indicator flashes rapidly
There may be a malfunction in the four-wheel drive system. Have the vehicle
inspected by your Toyota dealer immediately.
■ Four-wheel drive usage frequency
You should drive in four-wheel drive for at least 10 miles (16 km) each month.
This will assure that the front drive components are lubricated .
WARNING
■Shifting the front-wheel drive control switch from “2WD” to “4H ” while
driving
Never operate the front-wheel drive control switch if the wheels are slipping.
Stop the slipping or spinning before shifting.
■ When the vehicle is parked
If the shift lever is moved before the “4LO” indicator turns on/off, the transfer
mode may not be shifted completely. The transfer mode disengage s both
the front and rear driveshafts from the powertrain and allows t he vehicle to
move regardless of the shift position. (At this time, the indic ator blinks and
the buzzer sounds.)
Therefore, the vehicle is free to roll even if the automatic tr ansmission is in
P. You or someone else could be seriously injured. You must com plete the
shifting of the transfer mode before placing transmission in P.
Page 309 of 672

3094-5. Using the driving support systems
4
Driving
Trailer brake type
Trailer brake type can be selected by using the multi-information. The
combination meter will show which trailer brake type is selected in the
multi-information display.
Manual TRAILER BRAKE OUTPUT slider
Adjusting this slider position will engage the trailer’s brakes only. If the
manual TRAILER BRAKE OUTPUT slider is used while the vehicle
brake is applied, the greater of the two outputs will be sent to the trailer
brakes.
The trailer brake type can be se lected on the multi-information display
as following:
Press “ ” or “” of meter control sw itches and select .
Press “ ” or “ ” of meter control switches and select “Vehicle Set-
tings”, and press .
Press “ ” or “ ” of meter control switches and select “TBC Trailer
Type”, and press to select the correct type of trailer brakes that
are equipped on the trailer.
Changing trailer brake type will cause the current gain setting to reset
to zero. Make sure to set the gain as described in the followin g sec-
tion.
Gain setting on trailer brake controller should be set for a sp ecific tow-
ing condition. Gain setting should be adjusted each time the ve hicle
load, trailer load, road conditions, or weather changes. Settin g the
gain value to 0 will disable the tra iler brake controller output.
Make sure the trailer brakes are in good working condition and
functioning normally. See trailer dealer if necessary.
Hook up the trailer and make p roper electrical connections.
Select the correct type of trailer brakes that are equipped on the
trailer by using the multi-information display.
Drive vehicle with trailer attached on a level road surface sim ilar to
towing condition and in traffic-free environment. Driving speed
should be approximately 20 - 25 mph [35 - 40 km/h].
Changing settings of the trailer brake type
Setting the Gain
3
4
1
2
3
1
2
3
4
Page 325 of 672

3255-1. Basic Operations
5
Multimedia
By touching the screen with your finger, you can control the Audio
system, hands-free system, etc.
■Drag*
Touch the screen with your finger and move the screen to the
desired position.
● Scrolling the lists
● Using scroll bar in lists
■Flick*
Touch the screen with your finger and then quickly move the
screen.
●Scrolling the main screen page
● Returning to the menu screen from the sub-menu screen (screen
one level below)
*: The above operations may not be performed on all screens.
■When using the touch screen
●If the screen is cold, the display may be dark, or the system may seem to be
operating slightly slower than normal.
● The screen may seem dark and hard to see when viewed through su n-
glasses. Change your angle of viewing, adjust the display on th e “Display
Settings” screen ( P. 333) or remove your sunglasses.
■ Using cellular phones
Interference may be heard through the multimedia system's speakers if a cel-
lular phone is being used inside or close to the vehicle while the multimedia
system is operating.
Operating the touch screen