Page 356 of 672

3565-7. Connecting Bluetooth®
Preparations to use wireless communica-
tion
■ About Bluetooth®
■Certification
For vehicles sold in the U.S.A.
FCC ID: ACJ932YEAP01A727
NOTE:
<§15.19(a)(3)> This device complies with part 15 of the FCC Rules. Opera-
tion is subject to the following two conditions: (1) This devic e may not
cause harmful interference, and (2) this device must accept any interfer-
ence received, including interference that may cause undesired operation.
FCC WARNING:
<§15.21> Changes or modifications not expressly approved by the party
responsible for compliance could void the user’s authority to o perate the
equipment.
CAUTION:
<§2.1091> Radio frequency radiation exposure information:
This equipment complies with FCC radiation exposure limits set forth for an
uncontrolled environment. This equipment should be installed an d operated
with minimum distance of 20 cm between the radiator and your body. This
transmitter must not be co-located or operating in conjuction w ith any other
antenna or transmitter.
The following can be performed using Bluetooth® wireless com-
munication:
■A portable audio player can be operated and listened to via
multimedia system
■Hands-free phone calls can be made via a cellular phone
In order to use wireless communication, register and connect a
Bluetooth
® device by performing the following procedures.
The Bluetooth® word mark and logos are
registered trademarks owned Bluetooth
SIG, Inc. and any use of such marks by
Panasonic Corporation is under license.
Other trademarks and trade names are
those of their respective owners.
Page 357 of 672

3575-7. Connecting Bluetooth®
5
Multimedia
For vehicles sold in Canada
NOTE:
This device complies with Industry Canada licence-exempt RSS stan-
dard(s). Operation is subject to the following two conditions: (1) this device
may not cause interference, and (2) this device must accept any interfer-
ence, including interference that may cause undesired operation of the
device.
Le présent appareil est conforme aux CNR d’Industrie Canada app licables
aux appareils radio exempts de licence. L’exploitation est autorisée aux
deux conditions suivantes: (1) l’appareil ne doit pas produire de brouillage,
et (2) l’utilisateur de l’appareil doit accepter tout brouillag e radioélectrique
subi, même si le brouillage est susceptible d’en compromettre l e
fonctionnement.
NOTE:
This radio transmitter (identify the device by certification nu mber, or model
number if Category II) has been approved by Industry Canada to operate
with the antenna types listed below with the maximum permissibl e gain and
required antenna impedance for each antenna type indicated. Antenna
types not included in this list, having a gain greater than the maximum gain
indicated for that type, are strictly prohibited for use with t his device.
Le présent émetteur radio (identifier le dispositif par son num éro de certifi-
cation ou son numéro de modèle s’il fait partie du matériel de catégorie II) a
été approuvé par Industrie Canada pour fonctionner avec les typ es
d’antenne énumérés ci-dessous et ayant un gain admissible maximal et
l’impédance requise pour chaque type d’antenne. Les types d’ant enne non
inclus dans cette liste, ou dont le gain est supérieur au gain maximal
indiqué, sont strictement interdits pour l’exploitation de l’ém etteur.
Page 358 of 672
3585-7. Connecting Bluetooth®
Access to http://www.ptc.panasonic.eu/,enter the below Model No. into the
keyword search box, you can download the latest “DECLARATION of CON-
FORMITY” (DoC).
Model No. YEAP01D104
Page 359 of 672
3595-7. Connecting Bluetooth®
5
Multimedia
Device registration/connection flow
1. Register the Bluetooth® device to be used with multimedia
system ( P. 361, 362, 363)
2. Connect the Bluetooth® device to be used
( P. 3 6 5 )
To be used for audio To be used for hands-free
phone
3. Start Bluetooth® connec-
tion ( P. 3 6 5 )3. Start Bluetooth® connec-
tion ( P. 3 6 5 )
4. Check connection status
( P. 3 6 9 )4. Check connection status
( P. 371)
5. Use Bluetooth® audio
( P. 3 6 9 )5. Use Bluetooth® phone
( P. 370)
Page 360 of 672
3605-7. Connecting Bluetooth®
To display the screen shown below, press the “SETUP” button and
select “Bluetooth” on the “Setup” screen.Select to connect the device to
be used with multimedia sys-
tem. ( P. 365)
Select to register a Bluetooth
®
device to be used with multime-
dia system. ( P. 3 6 3 )
Select to set detailed
Bluetooth
® system settings.
( P. 368)
Select to delete regi stered devices. (P. 364)
Registering and conne cting from the “Bluetooth Setup” screen
1
2
3
4
Page 361 of 672
3615-7. Connecting Bluetooth®
5
Multimedia
Registering a Bluetooth® audio player for
the first time
Turn the Bluetooth® connection setting of your audio player on.
This function is not available when the Bluetooth® connection setting of
your audio player is set to off.
Press the “AUDIO” button.
Select “ Audio” on the “Sel ect Audio Source” screen.
Follow the steps in “How to registering a Bluetooth
® device” from
step . ( P. 363)
To use the Bluetooth® Audio, it is necessary t o register an audio
player with the system.
Once the player has been registered, it is possible to use the
Bluetooth
® Audio.
This operation cannot be pe rformed while driving.
For details about regis tering a Bluetooth
® device (P. 363)
1
2
3
4
2
Page 362 of 672
3625-7. Connecting Bluetooth®
Registering a Bluetooth® phone for the first
time
Turn the Bluetooth® connection setting of your cellular phone on.
Press the button.
Select “YES” to register a phone.
Follow the steps in “How to registering a Bluetooth
® device” from
step . ( P. 363)
To use the hands-free system, it is necessary to register a
Bluetooth® phone with the system.
Once the phone has been registe red, it is possible to use the
hands-free system.
For details about regis tering a Bluetooth
® device (P. 363)
1
2
3
4
3
Page 363 of 672

3635-7. Connecting Bluetooth®
5
Multimedia
Registering a Bluetooth® device
Display the “Bluetooth Setup” screen. (P. 360)
Select “Add”.
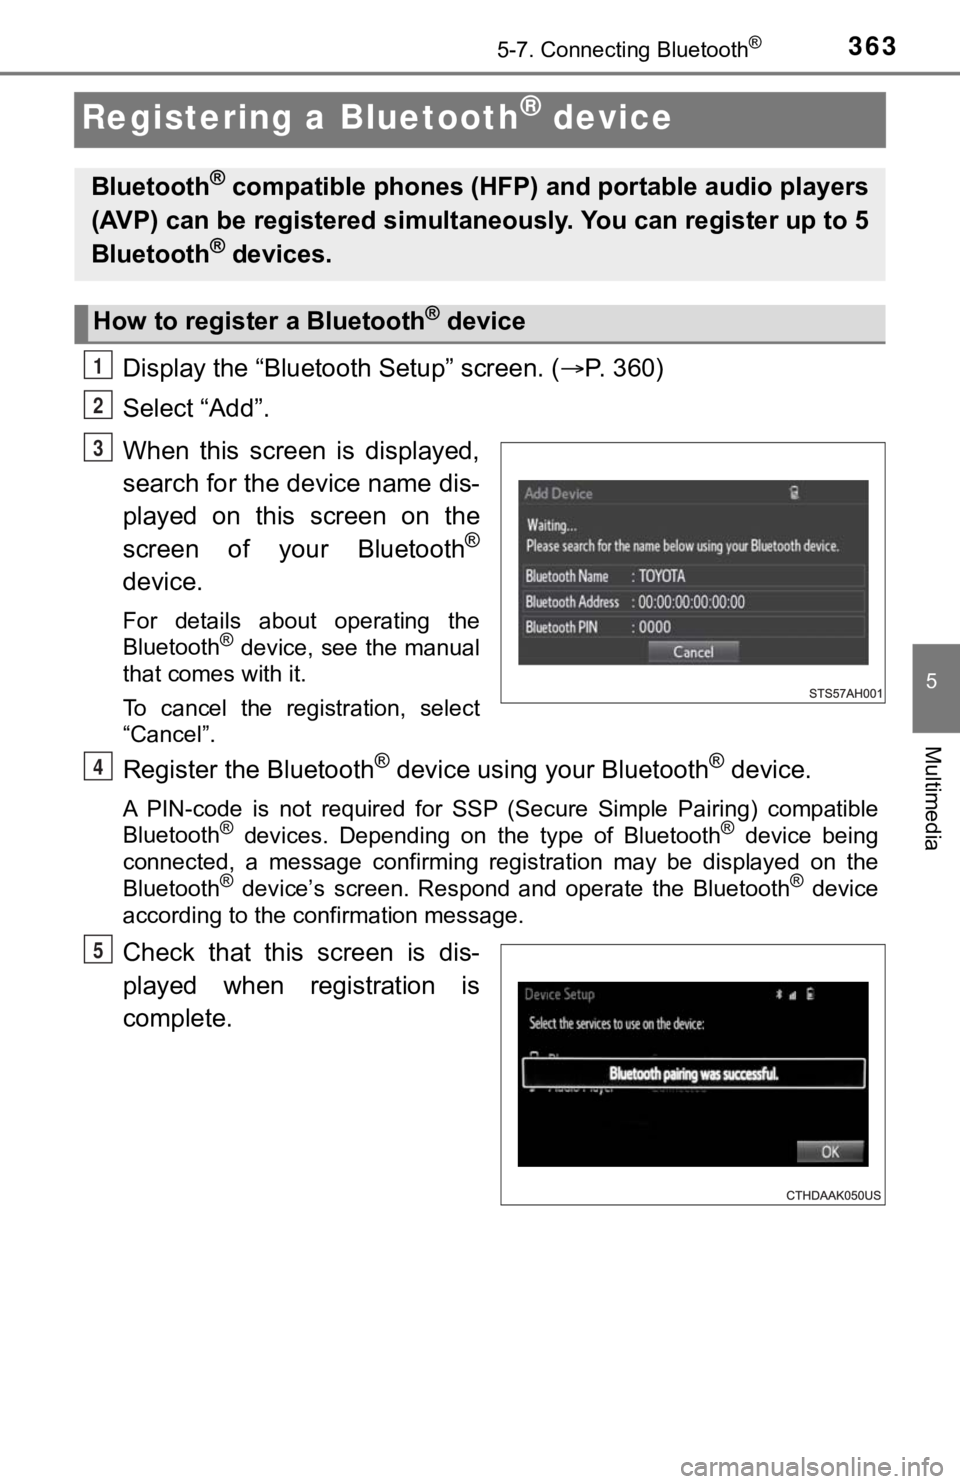
When this screen is displayed,
search for the device name dis-
played on this screen on the
screen of your Bluetooth
®
device.
For details about operating the
Bluetooth® device, see the manual
that comes with it.
To cancel the registration, select
“Cancel”.
Register the Bluetooth® device using your Bluetooth® device.
A PIN-code is not required for SS P (Secure Simple Pairing) compatible
Bluetooth® devices. Depending on the type of Bluetooth® device being
connected, a message confirming registration may be displayed o n the
Bluetooth
® device’s screen. Respond and operate the Bluetooth® device
according to the confirmation message.
Check that this screen is dis-
played when registration is
complete.
Bluetooth® compatible phones (HFP) a nd portable audio players
(AVP) can be registered simulta neously. You can register up to 5
Bluetooth
® devices.
How to registe r a Bluetooth® device
1
2
3
4
5