Page 488 of 672

4887-3. Do-it-yourself maintenance
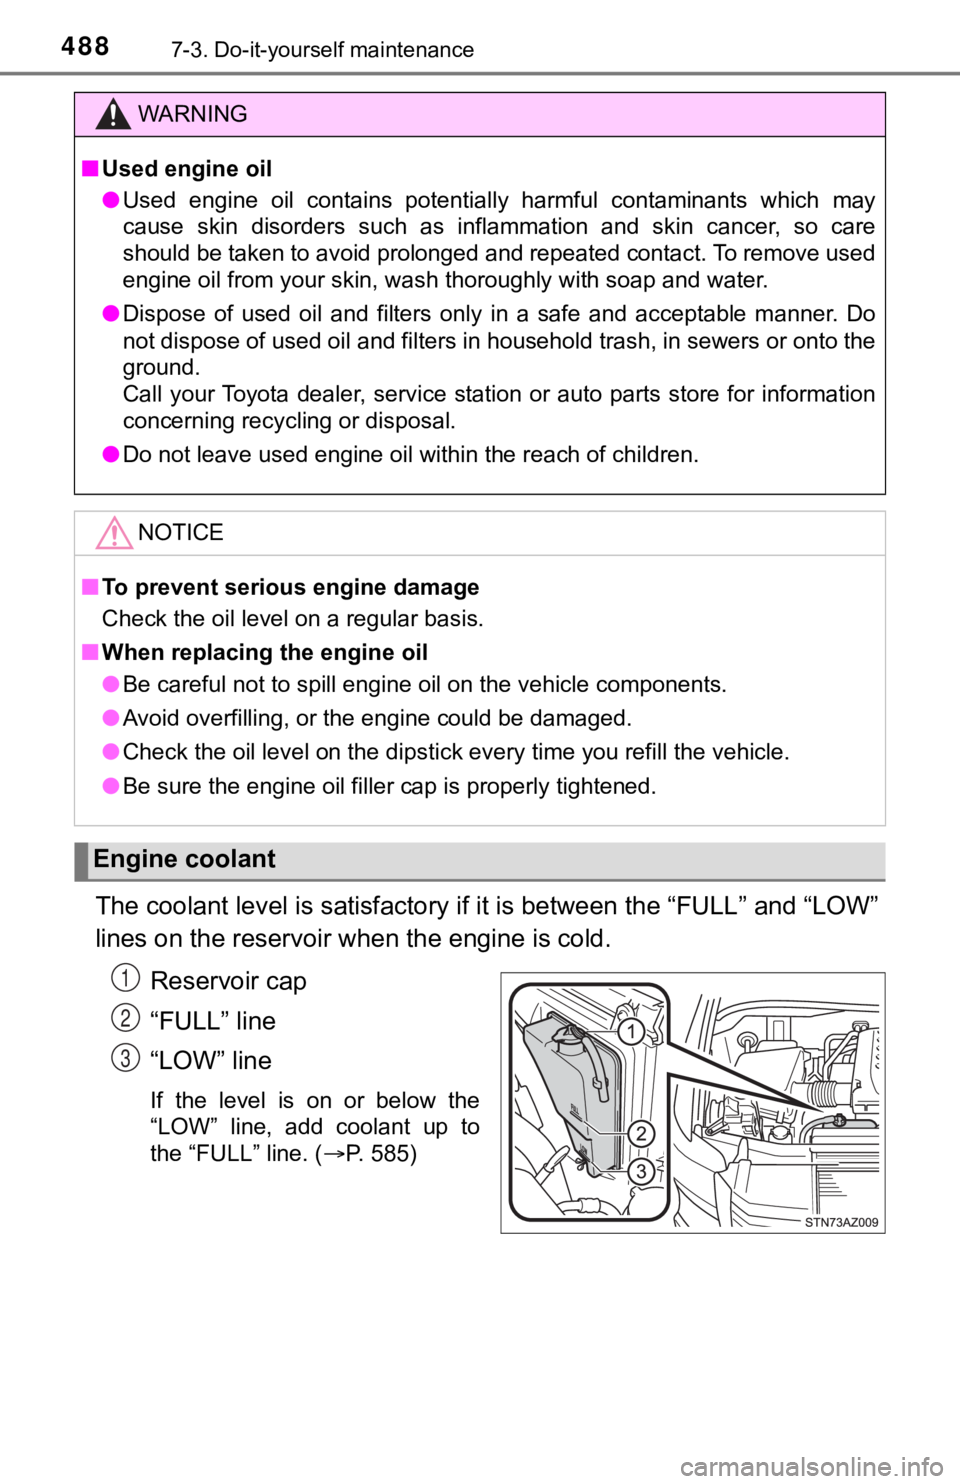
The coolant level is satisfactory if it is between the “FULL” a nd “LOW”
lines on the reservoir wh en the engine is cold.
Reservoir cap
“FULL” line
“LOW” line
If the level is on or below the
“LOW” line, add coolant up to
the “FULL” line. ( P. 585)
WARNING
■Used engine oil
● Used engine oil contains potentially harmful contaminants which may
cause skin disorders such as inflammation and skin cancer, so c are
should be taken to avoid prolonged and repeated contact. To remove used
engine oil from your skin, wash thoroughly with soap and water.
● Dispose of used oil and filters only in a safe and acceptable m anner. Do
not dispose of used oil and filters in household trash, in sewe rs or onto the
ground.
Call your Toyota dealer, service station or auto parts store fo r information
concerning recycling or disposal.
● Do not leave used engine oil within the reach of children.
NOTICE
■To prevent serious engine damage
Check the oil level on a regular basis.
■ When replacing the engine oil
● Be careful not to spill engine oil on the vehicle components.
● Avoid overfilling, or the engine could be damaged.
● Check the oil level on the dipstick every time you refill the v ehicle.
● Be sure the engine oil filler cap is properly tightened.
Engine coolant
1
2
3
Page 489 of 672

4897-3. Do-it-yourself maintenance
7
Maintenance and care
■Coolant selection
Only use “Toyota Super Long Life Coolant” or a similar high quality ethylene
glycol based non-silicate, non-amine, non-nitrite, and non-bora te coolant with
long-life hybrid organic acid technology.
U.S.A.:
“Toyota Super Long Life Coolant” is a mixture of 50% coolant and 50% deion-
ized water. (Minimum temperature: -31 F [-35 C])
Canada:
“Toyota Super Long Life Coolant” is a mixture of 55% coolant and 45% deion-
ized water. (Minimum temperature: -44 F [-42 C])
For more details about coolant, contact your Toyota dealer.
■ If the coolant level drops within a short time of replenishing
Visually check the radiator, hoses, engine coolant reservoir ca p, drain cock
and water pump.
If you cannot find a leak, have your Toyota dealer test the cap and check for
leaks in the cooling system.
WARNING
■ When the engine is hot
Do not remove the radiator cap.( P. 587)
The cooling system may be under pressure and may spray hot coolant if the
cap is removed, causing serious injuries, such as burns.
NOTICE
■ When adding coolant
Coolant is neither plain water nor straight antifreeze. The cor rect mixture of
water and antifreeze must be used to provide proper lubrication , corrosion
protection and cooling. Be sure to read the antifreeze or coolant label.
■ If you spill coolant
Be sure to wash it off with water to prevent it from damaging p arts or paint.
Page 490 of 672
4907-3. Do-it-yourself maintenance
Check the radiator and condenser and clear away any foreign objects.
If either of the above parts is extremely dirty or you are not sure of
their condition, have your vehic le inspected by your Toyota dea ler.
■Checking fluid level
The brake fluid level should be
between the “MAX” and “MIN”
lines on the tank.
■Adding fluid
Make sure to check the fluid type and prepare the necessary ite m.
■Brake fluid can absorb moisture from the air
Excess moisture in the brake fluid can cause a dangerous loss o f braking effi-
ciency. Use only newly opened brake fluid.
Radiator and condenser
WARNING
■ When the engine is hot
Do not touch the radiator or condenser as they may be hot and c ause seri-
ous injuries, such as burns.
Brake fluid
Fluid type FMVSS No.116 DOT 3 or SAE J1703 brake fluid
Items Clean funnel
Page 491 of 672

4917-3. Do-it-yourself maintenance
7
Maintenance and care
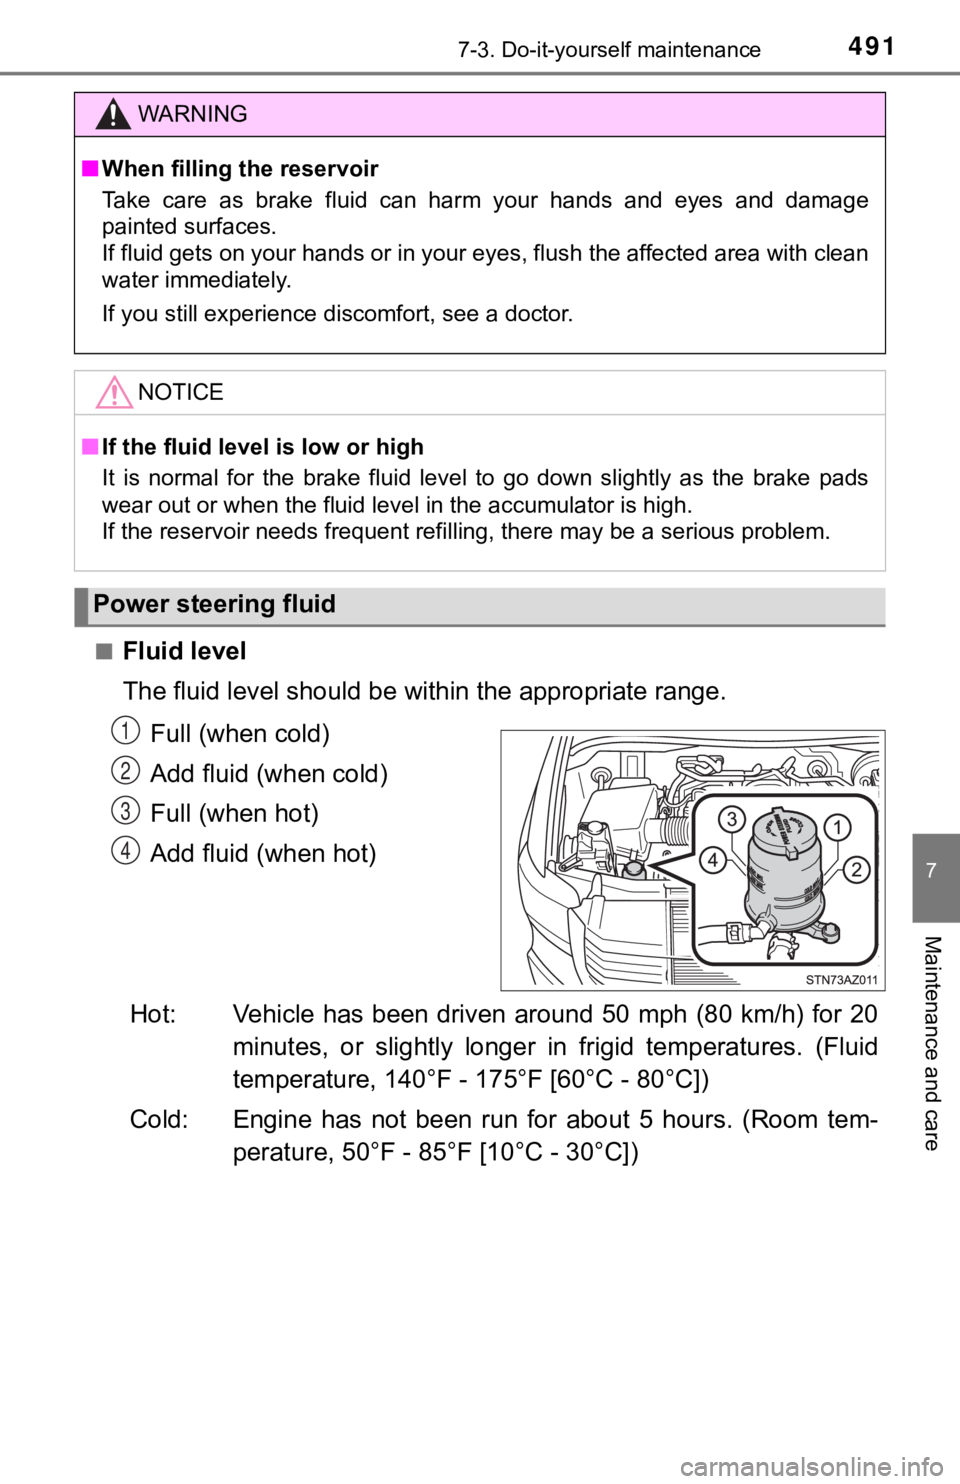
■Fluid level
The fluid level should be within the appropriate range.Full (when cold)
Add fluid (when cold)
Full (when hot)
Add fluid (when hot)
Hot: Vehicle has been driven around 50 mph (80 km/h) for 20 minutes, or slightly longer in frigid temperatures. (Fluid
temperature, 140°F - 175°F [60°C - 80°C])
Cold: Engine has not been run for about 5 hours. (Room tem- perature, 50°F - 85°F [10°C - 30°C])
WARNING
■When filling the reservoir
Take care as brake fluid can harm your hands and eyes and damag e
painted surfaces.
If fluid gets on your hands or in your eyes, flush the affected area with clean
water immediately.
If you still experience discomfort, see a doctor.
NOTICE
■ If the fluid level is low or high
It is normal for the brake fluid level to go down slightly as t he brake pads
wear out or when the fluid level in the accumulator is high.
If the reservoir needs frequent refilling, there may be a serio us problem.
Power steering fluid
1
2
3
4
Page 494 of 672
4947-3. Do-it-yourself maintenance
Add washer fluid in the following
situations:
●A washer does not work.
● The warning message appears
on the display.
NOTICE
■When recharging the battery
Never recharge the battery while the engine is running. Also, b e sure all
accessories are turned off.
Washer fluid
WARNING
■ When adding washer fluid
Do not add washer fluid when the engine is hot or running as wa sher fluid
contains alcohol and may catch fire if spilled on the engine, e tc.
NOTICE
■Do not use any fluid ot her than washer fluid
Do not use soapy water or engine antifreeze instead of washer f luid.
Doing so may cause streaking on the vehicle’s painted surfaces, as well as
damaging the pump leading to problems of the washer fluid not s praying.
■ Diluting washer fluid
Dilute washer fluid with water as necessary.
Refer to the freezing temperatures listed on the label of the washer fluid bot-
tle.
Page 497 of 672

4977-3. Do-it-yourself maintenance
7
Maintenance and care
■How to initialize the tire pressure warning systemPark the vehicle in a safe place and turn the engine switch off .
Initialization cannot be performed while the vehicle is moving.
Adjust the tire inflation pressure to the specified cold tire i nflation
pressure level. ( P. 607)
Make sure to adjust the tire pre ssure to the specified cold tire infla-
tion pressure level. The tire pressure warning system will oper ate
based on this pr essure level.
Turn the engine switch t o the “ON” position.
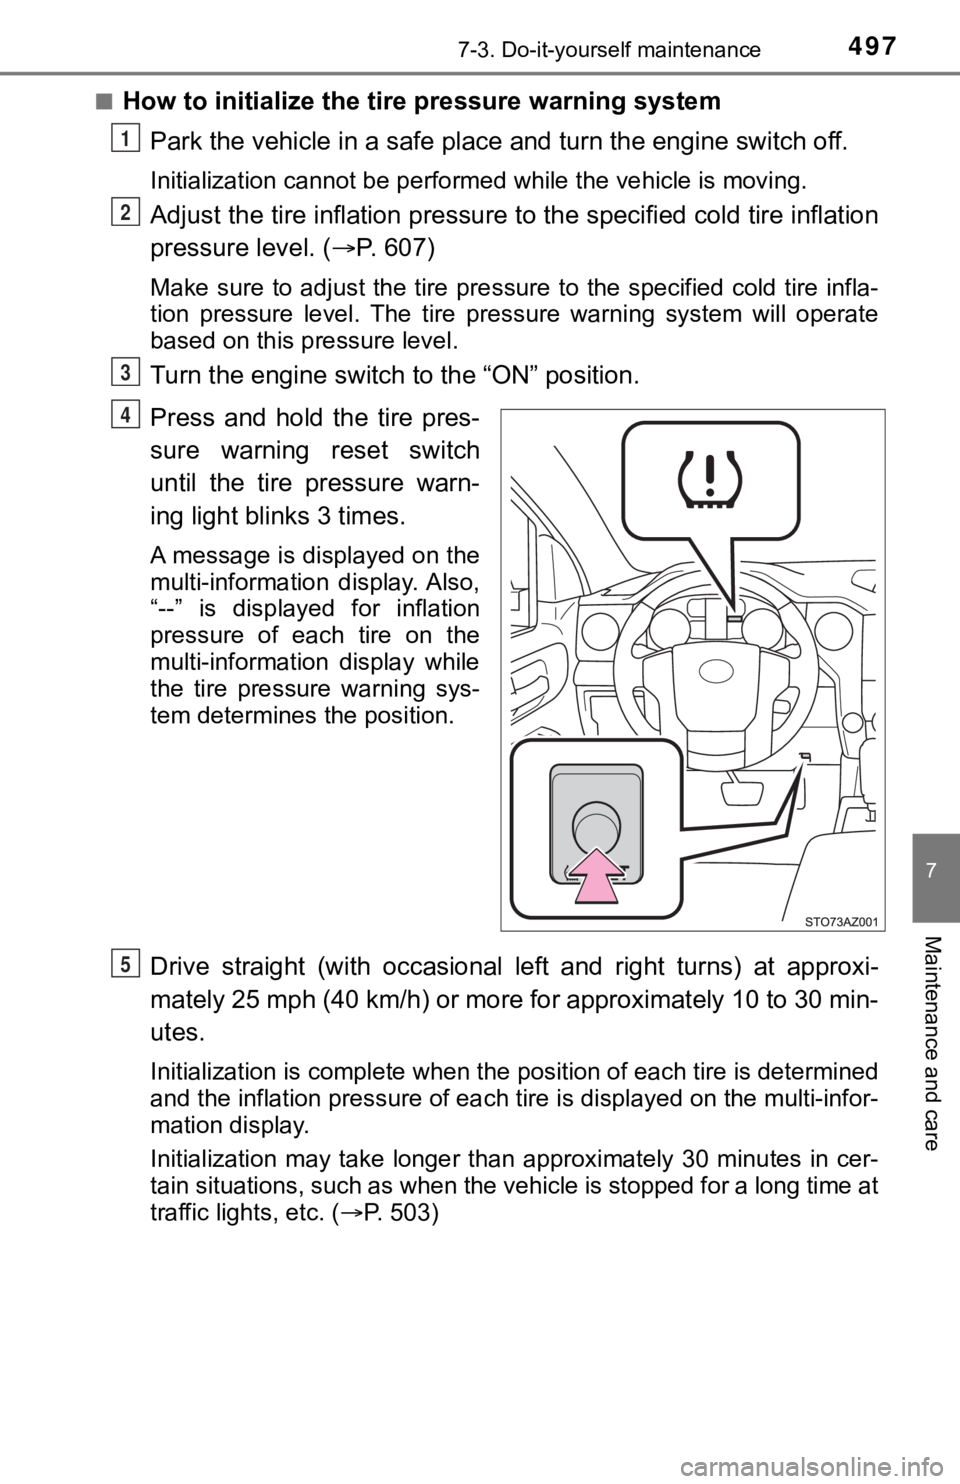
Press and hold the tire pres-
sure warning reset switch
until the tire pressure warn-
ing light blinks 3 times.
A message is displayed on the
multi-information display. Also,
“--” is displayed for inflation
pressure of each tire on the
multi-information display while
the tire pressure warning sys-
tem determines the position.
Drive straight (with occasional left and right turns) at approxi-
mately 25 mph (40 km/h) or more for approximately 10 to 30 min-
utes.
Initialization is complete when the position of each tire is determined
and the inflation pressure of ea ch tire is displayed on the multi-infor-
mation display.
Initialization may take longer than approximately 30 minutes in cer-
tain situations, such as when the vehicle is stopped for a long time at
traffic lights, etc. ( P. 503)
1
2
3
4
5
Page 502 of 672

5027-3. Do-it-yourself maintenance
■The initialization operation
●Make sure to carry out initialization after adjusting the tire inflation pres-
sure.
Also, make sure the tires are co ld before carrying out initialization or tire
inflation pressure adjustment.
●If you have accidentally turned the engine switch off during in itialization,
it is not necessary to press the reset swit ch again as initialization will
restart automatically when the en gine switch has been turned to the
“ON” position for the next time.
●If you accidentally press the reset switch when initialization is not neces-
sary, adjust the tire inflation pressure to the specified level when the
tires are cold, and cond uct initialization again.
●While the position of each tire is being determined and the inf lation pres-
sures are not being displayed on the multi-information display, if the
inflation pressure of a tire drops, the tire pressure warning l ight will come
on.
■Warning performance of the tire pressure warning system
The warning of the tire pressu re warning system will change in accor-
dance with the conditions under which it was initialized. For t his reason,
the system may give a warning even if the tire pressure does no t reach a
low enough level, or if the pressure is higher than the pressur e that was
adjusted to when the sys tem was initialized.
Page 513 of 672
5137-3. Do-it-yourself maintenance
7
Maintenance and care
Air conditioning filter
Turn the engine switch off.
Open the glove box.
Remove the tray.
Remove the cover by sliding up
while pulling toward you.
The air conditioning filter must be changed regularly to maintain
air conditioning efficiency.
Removal method
1
2
3
4