2018 TOYOTA PROACE VERSO Lock doors
[x] Cancel search: Lock doorsPage 83 of 504
83
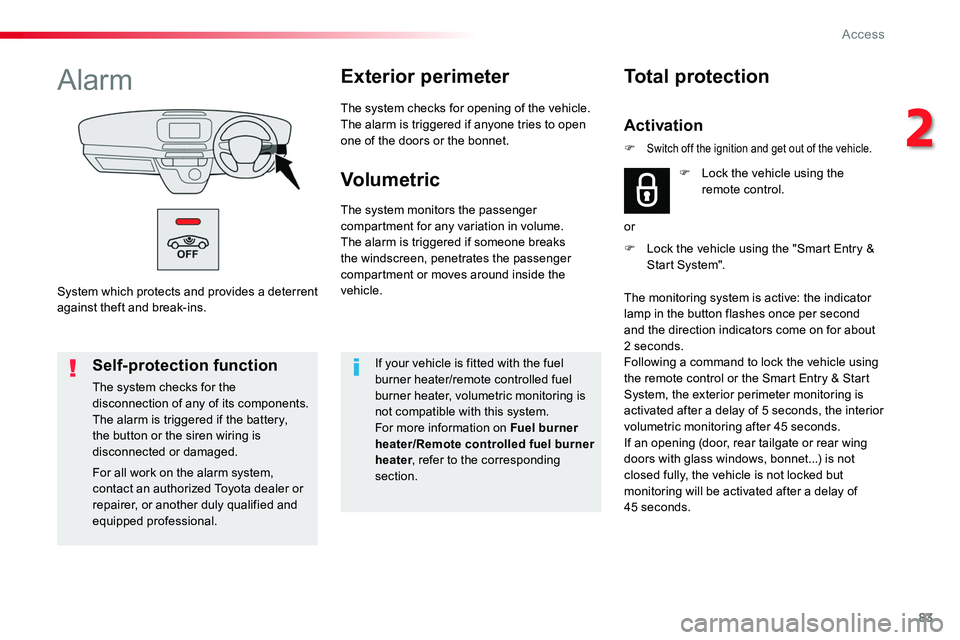
System which protects and provides a deterrent against theft and break-ins.
AlarmExterior perimeter
The system checks for opening of the vehicle.The alarm is triggered if anyone tries to open one of the doors or the bonnet.
Self-protection function
The system checks for the disconnection of any of its components.The alarm is triggered if the battery, the button or the siren wiring is disconnected or damaged.
For all work on the alarm system, contact an authorized Toyota dealer or repairer, or another duly qualified and equipped professional.
Volumetric
The system monitors the passenger compartment for any variation in volume.The alarm is triggered if someone breaks the windscreen, penetrates the passenger compartment or moves around inside the vehicle.
If your vehicle is fitted with the fuel burner heater/remote controlled fuel burner heater, volumetric monitoring is not compatible with this system.For more information on Fuel burner heater/Remote controlled fuel burner heater, refer to the corresponding section.
F Lock the vehicle using the "Smart Entry & Start System".
Total protection
Activation
F Lock the vehicle using the remote control.
or
The monitoring system is active: the indicator lamp in the button flashes once per second and the direction indicators come on for about 2 seconds.Following a command to lock the vehicle using the remote control or the Smart Entry & Start System, the exterior perimeter monitoring is activated after a delay of 5 seconds, the interior volumetric monitoring after 45 seconds.If an opening (door, rear tailgate or rear wing doors with glass windows, bonnet...) is not closed fully, the vehicle is not locked but monitoring will be activated after a delay of 45 seconds.
F Switch off the ignition and get out of the vehicle.
2
Access
Page 84 of 504
84
Volumetric monitoring
Deactivation
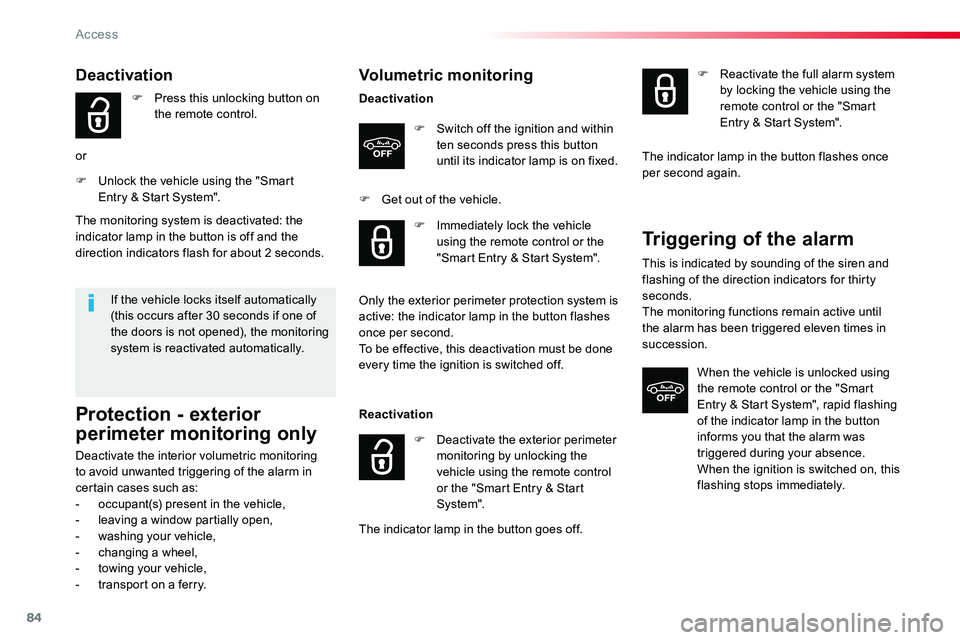
F Switch off the ignition and within ten seconds press this button until its indicator lamp is on fixed.
F Get out of the vehicle.
Reactivation
The indicator lamp in the button goes off.
F Immediately lock the vehicle using the remote control or the "Smart Entry & Start System".
Only the exterior perimeter protection system is active: the indicator lamp in the button flashes once per second.To be effective, this deactivation must be done every time the ignition is switched off.
F Deactivate the exterior perimeter monitoring by unlocking the vehicle using the remote control or the "Smart Entry & Start System".
F Reactivate the full alarm system by locking the vehicle using the remote control or the "Smart Entry & Start System".
The indicator lamp in the button flashes once per second again.
Triggering of the alarm
This is indicated by sounding of the siren and flashing of the direction indicators for thirty seconds.The monitoring functions remain active until the alarm has been triggered eleven times in succession.
When the vehicle is unlocked using the remote control or the "Smart Entry & Start System", rapid flashing of the indicator lamp in the button informs you that the alarm was triggered during your absence.When the ignition is switched on, this flashing stops immediately.
Deactivation
F Press this unlocking button on the remote control.
or
F Unlock the vehicle using the "Smart Entry & Start System".
If the vehicle locks itself automatically (this occurs after 30 seconds if one of the doors is not opened), the monitoring system is reactivated automatically.
The monitoring system is deactivated: the indicator lamp in the button is off and the direction indicators flash for about 2 seconds.
Protection - exterior
perimeter monitoring only
Deactivate the interior volumetric monitoring to avoid unwanted triggering of the alarm in certain cases such as:- occupant(s) present in the vehicle,- leaving a window partially open,- washing your vehicle,- changing a wheel,- towing your vehicle,- transport on a ferry.
Access
Page 140 of 504
140
Individual reading lamp
Rear
Courtesy lampsAutomatic operation
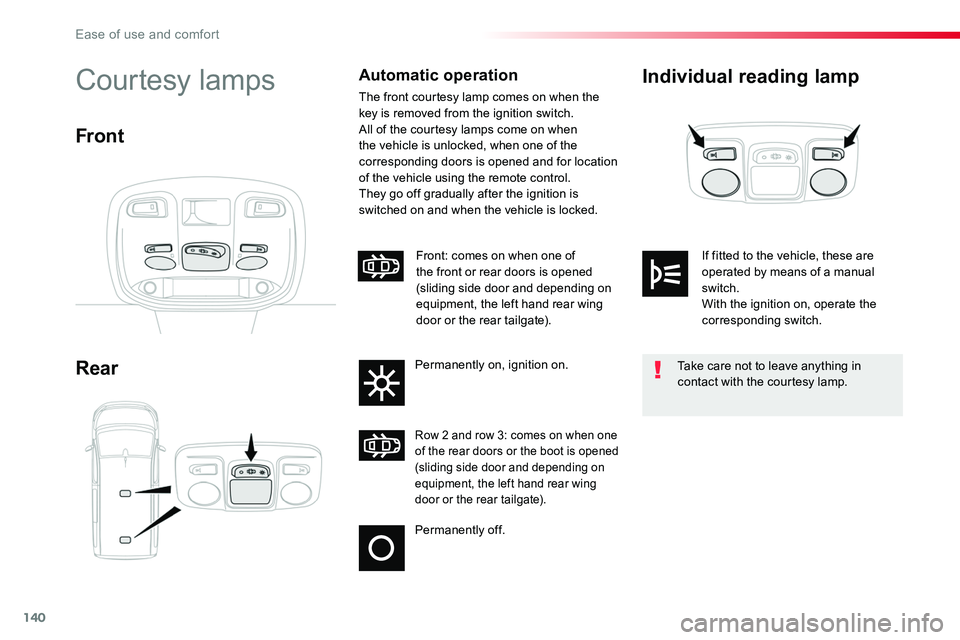
The front courtesy lamp comes on when the key is removed from the ignition switch.All of the courtesy lamps come on when the vehicle is unlocked, when one of the corresponding doors is opened and for location of the vehicle using the remote control.They go off gradually after the ignition is switched on and when the vehicle is locked.
Front
Permanently off.
Row 2 and row 3: comes on when one of the rear doors or the boot is opened (sliding side door and depending on equipment, the left hand rear wing door or the rear tailgate).
Front: comes on when one of the front or rear doors is opened (sliding side door and depending on equipment, the left hand rear wing door or the rear tailgate).
Permanently on, ignition on.Take care not to leave anything in contact with the courtesy lamp.
If fitted to the vehicle, these are operated by means of a manual switch.With the ignition on, operate the corresponding switch.
Ease of use and comfort
Page 189 of 504
189
Child seatsInstalling a booster
cushion
Recommendations
The legislation on carrying a child on the front passenger seat is specific to each country. Refer to the legislation in force in the country in which you are driving.Deactivate the passenger front airbag when a rear ward facing child seat is installed on the front passenger seat. Otherwise, the child would risk being seriously injured or killed if the airbag were deployed.
For optimum installation of the forward facing child seat, ensure that the back of the child seat is as close as possible to the backrest of the vehicle's seat, or in contact if possible.The head restraint must be removed before installing a child seat with a backrest on the passenger seat.Ensure that the head restraint is stowed or attached securely so that it is not thrown around the vehicle in the event of sharp braking.Refit the head restraint as soon as the child seat is removed.
The incorrect installation of a child seat in a vehicle compromises the child's protection in the event of an accident.Check that there is no seat belt or seat belt buckle under the child seat as this could destabilise it.Remember to fasten the seat belts or the child seat harnesses keeping the slack in relation to the child's body to a minimum, even for short journeys.For the installation of a child seat using a seat belt, ensure that this is well tensioned on the child seat and that it is holding the child seat firmly against the seat of your vehicle. If your front passenger seat is adjustable, move it for ward if necessary.At the rear seats, always leave sufficient space between the front seat and:- a rear ward facing child seat,- the feet of a child seated in a for ward facing child seat.For this, move the front seat for ward and if necessary straighten its backrest.
Children at the front
The chest part of the seat belt must be positioned on the child's shoulder without touching the neck.Ensure that the lap part of the seat belt passes correctly over the child's thighs.Toyota recommends the use of a booster seat which has a back, fitted with a seat belt guide at shoulder level.
As a safety precaution, do not leave:- one or more children alone and unsupervised in a vehicle,- a child or an animal in a vehicle which is exposed to the sun, with the windows closed,- the keys within reach of children inside the vehicle.To prevent accidental opening of the doors, use the child lock.Take care not to open the rear windows by more than one third.To protect young children from the rays of the sun, fit side blinds on the rear windows.
5
Safety
Page 190 of 504
190
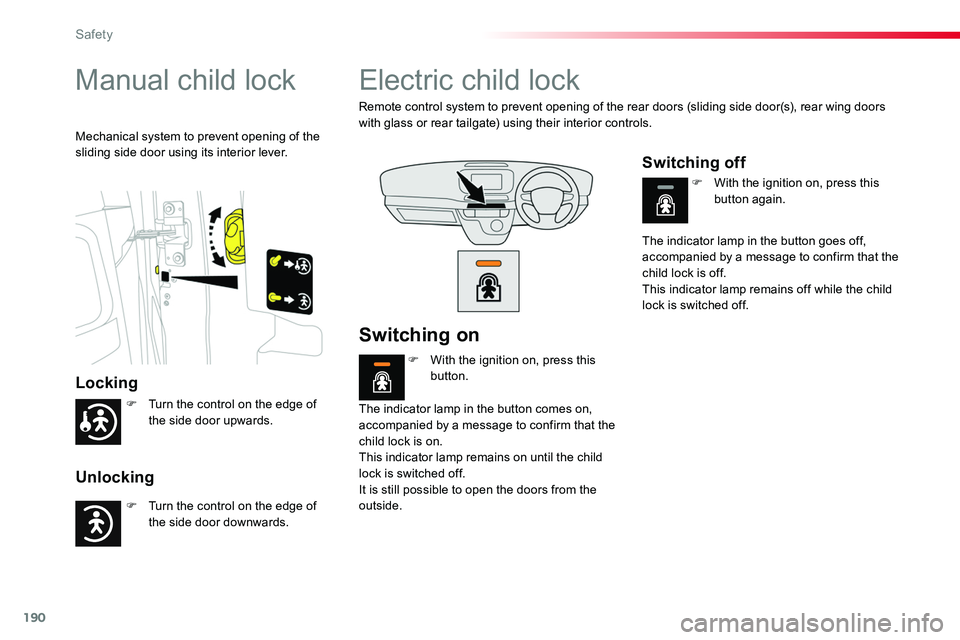
Manual child lock
Locking
Unlocking
Mechanical system to prevent opening of the sliding side door using its interior lever.
Electric child lock
Remote control system to prevent opening of the rear doors (sliding side door(s), rear wing doors with glass or rear tailgate) using their interior controls.
The indicator lamp in the button comes on, accompanied by a message to confirm that the child lock is on.This indicator lamp remains on until the child lock is switched off.It is still possible to open the doors from the outside.
The indicator lamp in the button goes off, accompanied by a message to confirm that the child lock is off.This indicator lamp remains off while the child lock is switched off.
Switching on
F With the ignition on, press this button.
F With the ignition on, press this button again.
Switching off
F Turn the control on the edge of the side door upwards.
F Turn the control on the edge of the side door downwards.
Safety
Page 197 of 504
197
Avoid attaching heavy objects to the key, which would weigh down on its blade in the ignition switch and could cause a malfunction.
Switching off the engine leads to a loss of braking assistance.
Key left in the "Ignition on" position
If the key has been left in the ignition switch at position 2 (Ignition on), the ignition will be switched off automatically after one hour.To switch the ignition back on, turn the key to position 1 (Stop), then back to position 2 (Ignition on).Never switch off the ignition until the vehicle has been brought to a complete stop.
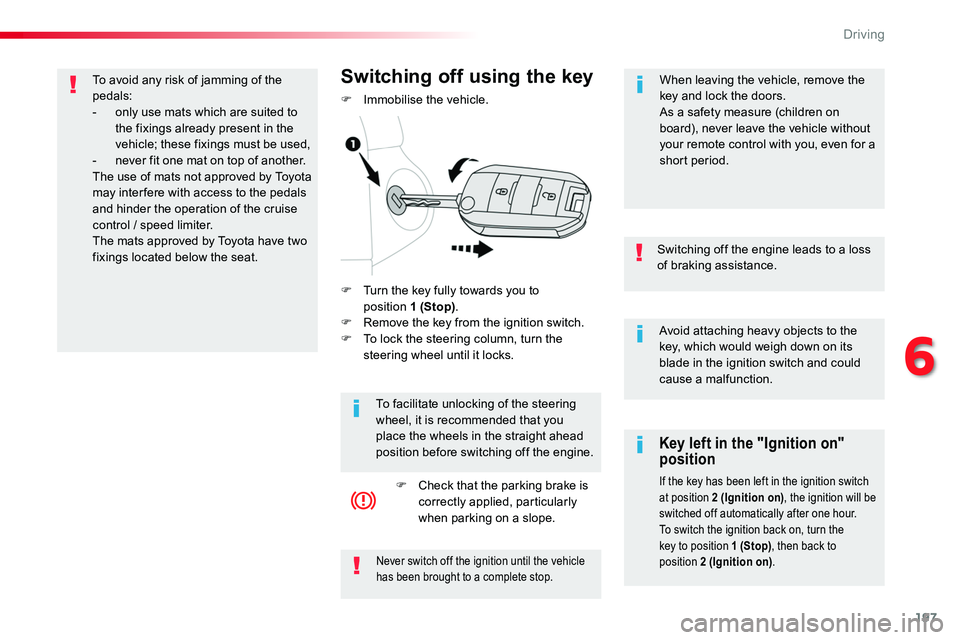
F Turn the key fully towards you to position 1 (Stop).F Remove the key from the ignition switch.F To lock the steering column, turn the steering wheel until it locks.
Switching off using the key
F Immobilise the vehicle.
To facilitate unlocking of the steering wheel, it is recommended that you place the wheels in the straight ahead position before switching off the engine.
F Check that the parking brake is correctly applied, particularly when parking on a slope.
When leaving the vehicle, remove the key and lock the doors.As a safety measure (children on board), never leave the vehicle without your remote control with you, even for a short period.
To avoid any risk of jamming of the pedals:- only use mats which are suited to the fixings already present in the vehicle; these fixings must be used,- never fit one mat on top of another.The use of mats not approved by Toyota may inter fere with access to the pedals and hinder the operation of the cruise
control / speed limiter.The mats approved by Toyota have two fixings located below the seat.
6
Driving
Page 292 of 504

292
F Access to the spare wheel is from the rear.F Open the rear wing doors with glass windows or the rear tailgate, according to the configuration of your vehicle.
F Access the carrier bolt, located on the rear door sill.
F Turn the bolt anti-clockwise using the wheelbrace (about 14 turns) until the carrier is low enough to allow the carrier hook to be disengaged.
Access to the spare wheel
F If your vehicle is fitted with a towbar, raise the rear of the vehicle using the jack (must be at jacking point B) to allow sufficient space to remove the spare wheel.
Removing
To avoid any unwanted opening of the electric side door(s), deactivate the "Hands-Free Access" function in the vehicle configuration menu.For more information on the Kick-activated side doors opening and
locking, refer to the corresponding section.
In the event of a breakdown
Page 305 of 504
305
Rear lamps
(rear wing doors with glass
windows)
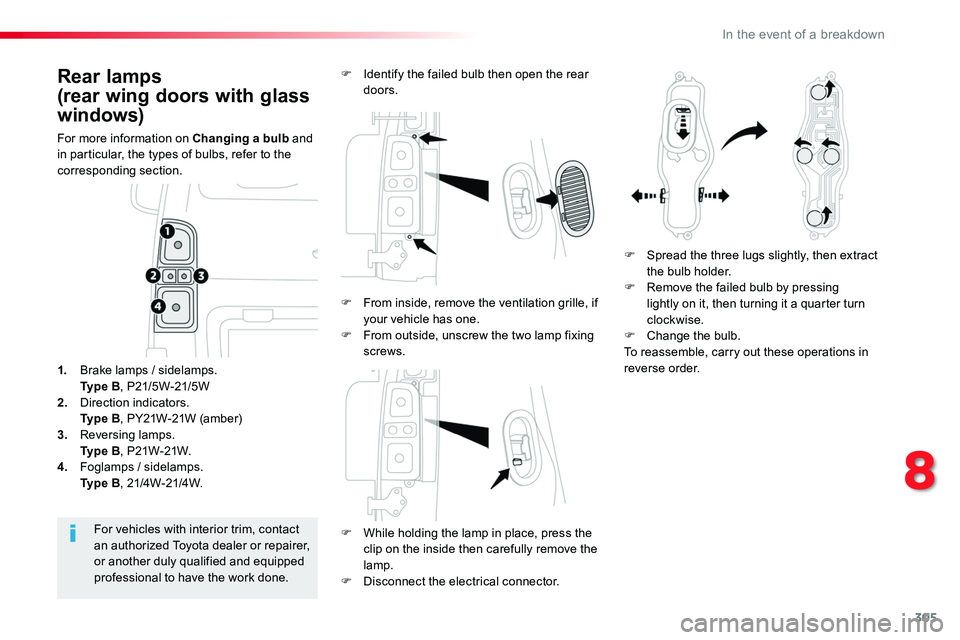
For more information on Changing a bulb and in particular, the types of bulbs, refer to the corresponding section.
F While holding the lamp in place, press the clip on the inside then carefully remove the lamp.F Disconnect the electrical connector.
For vehicles with interior trim, contact an authorized Toyota dealer or repairer, or another duly qualified and equipped professional to have the work done.
1. Brake lamps / sidelamps. Ty p e B, P21/5W-21/5W2. Direction indicators. Ty p e B, PY21W-21W (amber)3. Reversing lamps. Ty p e B, P21W-21W.4. Foglamps / sidelamps. Ty p e B, 21/4W-21/4W.
F Identify the failed bulb then open the rear doors.
F Spread the three lugs slightly, then extract the bulb holder.F Remove the failed bulb by pressing lightly on it, then turning it a quarter turn clockwise.F Change the bulb.To reassemble, carry out these operations in reverse order.
F From inside, remove the ventilation grille, if your vehicle has one.F From outside, unscrew the two lamp fixing screws.
8
In the event of a breakdown