Page 25 of 40
23
Audio
USB/AUX port
Entune™ 3.0 Audio
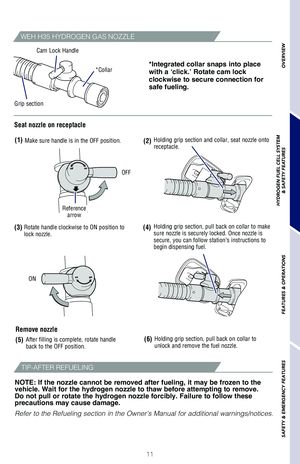
OVERVIEW
HYDROGEN FUEL CELL SYSTEM
& SAFETY FEATURES
FEATURES & OPERATIONS
SAFETY & EMERGENCY FEATURES
Eject CD CD playerTouch screen display
By inserting a USB or an auxiliary cable plug into the USB/AUX port, you can listen
to music from a portable audio device through the vehicle’s speaker s\
ystem while in
USB/AUX mode.
Refer to the Navigation System Owner’s Manual and 2018 Entune™ 3.0\
Audio
Quick Reference Guide for more details.
Push to turn
ON/OFF
Push to display
HOME screen
Push to access
AUDIO system
Push to display
MAP screen Push to display
MENU screen
Seek station/
CD track select
Turn to tune radio
stations manually or
select tracks or files
Push to display
Bluetooth
® hands-free
system
Push to display
APPS screen
Page 26 of 40
24
Wireless charger
Designed for car accessories. Power switch must be set at “ACCESSORY”\
or “ON” in
order to use power outlets.
(1) Open console box
Operation
indicator light
Power
supply switch
Charge area
(3) Place charging side of
portable device down and
light indicates when it is
charging. (orange)
(2) Press power button,
indicator light turns on when
in operation. (green)
FEATURES & OPERATIONS
Power outlets
Designed for car accessories. Power switch must be set at “ACCESSORY”\
or “ON”
in order to use power outlets.
Push to open cover
Push to open cover
12V DC
USB CHARGERS
Page 27 of 40
 25
Odometer/trip meter and
reset switch
Audio/Multimedia remote control
Voice command switch
End call
Start call/
Mobile Assitant access*
Steering wheel switches
& telephone controls (Bluetooth®)")
25
Odometer/trip meter and
reset switch
Audio/Multimedia remote control
Voice command switch
End call
Start call/
Mobile Assitant access*
Steering wheel switches
& telephone controls (Bluetooth®)
: Volume Control
: Push to change an audio
mode. Push and hold to
turn the audio mutes or
pauses.
: Use to search within
the selected audio
medium (radio, CD,
etc.).
OVERVIEW
HYDROGEN FUEL CELL SYSTEM
& SAFETY FEATURES
FEATURES & OPERATIONS
SAFETY & EMERGENCY FEATURES
Steering wheel telephone switches
Microphone
Bluetooth® technology allows dialing or receipt of calls without removing your han\
ds
from the steering wheel or using a cable to connect the compatible telep\
hone and
the system.
* Push and hold to access Mobile Assistant. Once you connect a compatible,\
registered mobile phone, you can access Siri® Eyes Free using Mobile Assistant
access switch.
Refer to the “Bluetooth
® Device Pairing Section” in this guide for more information
about phone connections and compatibility.
Refer to the “Navigation System Owner’s Manual” for more detail\
s.
NOTE: Concentrating on the road should always be your first priority while
driving. Do not use the Entune system if it will distract you.
Page 28 of 40
26
FEATURES & OPERATIONS
Clock
Clock
Using steering wheel switches, select “Home” from multi-informatio\
n screen, then
select “
” to set clock:
(1) Round to the nearest hour, press
or , select and press .
(2) Time adjustment, press
or , select and press .
(3) Press
or , select hours and minutes or press or , to select 12-24 hour
clock and adjust.
(4) Press
when finished.
Page 29 of 40
 27
Multi-Information Display (MID)
Select category and items
Select/SetReturn to the previous screen
Drive information
• Energy monitor
• Fuel cell system indicator and ECO meter
• Fuel consump")
27
Multi-Information Display (MID)
Select category and items
Select/SetReturn to the previous screen
Drive information
• Energy monitor
• Fuel cell system indicator and ECO meter
• Fuel consumption history display
• Drive monitor
• ECO diary
• Power meter
Navigation system-linked display
Select to display the following navigation system-linked information. • Route guidance
• Compass display (north-up display/heading-up display)
Audio system-linked display
Select to enable selection of an audio source or track on the display us\
ing the
meter control switches.
Driving assist systems display
Displays when each driving assistance system is used. • Dynamic Radar Cruise Control (DRCC)
• Lane Departure Alert (LDA)
• Intuitive parking assist
• Pre-Collision System (PCS)
Warning message display
Select to display warning messages and measures to be taken if a malfunc\
tion is
detected.
Setting display
• Intuitive parking assist
• Blind Spot Monitor (BSM)
• Clock
• Customize
OVERVIEW
HYDROGEN FUEL CELL SYSTEM
& SAFETY FEATURES
FEATURES & OPERATIONS
SAFETY & EMERGENCY FEATURES
Page 30 of 40
 28
Dynamic Radar Cruise Control (DRCC)
FEATURES & OPERATIONS
Vehicle-to-vehicle distance buttonSet speed
Dynamic radar control switch Indicators
Display
Refer to the Owner’s Manual for more details")
28
Dynamic Radar Cruise Control (DRCC)
FEATURES & OPERATIONS
Vehicle-to-vehicle distance buttonSet speed
Dynamic radar control switch Indicators
Display
Refer to the Owner’s Manual for more details and complete safety prec\
autions
before attempting to use “Dynamic Radar Cruise Control.”
In distance control mode, the vehicle is designed to cruise at a set spe\
ed,
decelerate to maintain a selected distance from a slower vehicle traveli\
ng in front,
and accelerate back up to the selected speed if the vehicle in front cha\
nges lanes
or speeds up.
(1) Push the ON-OFF button to activate/deactivate the system.
(2) To set, pull the lever down.
(3) To increase the set speed, push the lever up.
To decrease, push the lever down. Move the lever momentarily to adjust i\
n 1
mph increments. Hold the lever up/down to adjust in 5 mph increments.
(4) To cancel cruise control, pull the lever toward you or depress the\
brake pedal. To resume, push the lever up.
(1) (2) (3)Increase/Resume
Decrease
Cancel
Push the vehicle-to-vehicle distance button to change distance.
DISTANCE CONTROL MODE
Push Long Medium Short
160 ft.* 130 ft.* 100 ft.*
Preceding
vehicle mark
*Approximately
Page 31 of 40
29
CHANGE TO CONSTANT SPEED MODE
To select constant speed mode
(1) Push the ON-OFF button.
(2) Push the lever away from you and hold until the “
” indicator appears.
To set, cancel and resume a speed refer to Distance control mode. (1)
(2)
Garage door opener (Homelink®)*
Garage door openers manufactured under license from HomeLink®* can be
programmed to operate garage doors, estate gates, security lighting, etc\
.
Refer to “Garage door opener,” Section 6-4 in the Owner’s Manua\
l for more details.
For programming assistance, contact HomeLink
® at 1-800-355-3515, or visit http://
www.homelink.com.
* HomeLink® is a registered trademark of Gentex Corporation.
Homelink® indicator light
Homelink® icon -
illuminates while operating
Garage door operation indicatorsButtons
OVERVIEW
HYDROGEN FUEL CELL SYSTEM
& SAFETY FEATURES
FEATURES & OPERATIONS
SAFETY & EMERGENCY FEATURES
Page 32 of 40
 30
Emergency tire puncture repair kit
Tire Pressure Monitoring (warning) System (TPMS)
SAFETY & EMERGENCY FEATURES
Your vehicle is not equipped with a spare tire, but instead is equipped \
with an
em")
30
Emergency tire puncture repair kit
Tire Pressure Monitoring (warning) System (TPMS)
SAFETY & EMERGENCY FEATURES
Your vehicle is not equipped with a spare tire, but instead is equipped \
with an
emergency tire puncture repair kit (bottle of sealant and compressor.)\
After temporarily repairing the tire with the repair kit, have the tire \
repaired or
replaced by your Toyota dealer.
Refer to the Owner’s Manual for more details.
If the Tire Pressure Warning indicator “
” illuminates without blinking, adjust tire
pressures to factory-specified levels.* The light will turn off after a \
few minutes. The
warning light is designed to turn on when tire pressure is critically lo\
w, but it may
also come on due to temperature changes or changes in tire pressure from\
natural
air leakage.
If the tire pressure indicator flashes for more than 60 seconds and then\
remains on,
take the vehicle to your local Toyota dealer.
Refer to the Owner’s Manual for more details.
* Refer to load label on door jamb or the Owner’s Manual for tire inf\
lation
specifications.
LOCATION
Towing eyeletJack handleJack
Emergency tire puncture repair kit
Wheel nut wrench


 23
Audio
USB/AUX port
Entune™ 3.0 Audio
OVERVIEW
HYDROGEN FUEL CELL SYSTEM
& SAFETY FEATURES
FEATURES & OPERATIONS
SAFETY & EMERGENCY FEATURES
Eject CD CD playerTouch screen display
By inserting a U")
 24
Wireless charger
Designed for car accessories. Power switch must be set at “ACCESSORY”\
or “ON” in
order to use power outlets.
(1) Open console box
Operation
indicator light
Power
supp")
 26
FEATURES & OPERATIONS
Clock
Clock
Using steering wheel switches, select “Home” from multi-informatio\
n screen, then
select “
” to set clock:
(1) Round to the nearest hour, press
or , se")
 29
CHANGE TO CONSTANT SPEED MODE
To select constant speed mode
(1) Push the ON-OFF button.
(2) Push the lever away from you and hold until the “
” indicator appears.
To set, cancel and resum")