Page 77 of 660
771-2. Child safety
1
AVENSIS_OM_OM20C79E_(EE)
For safety and security
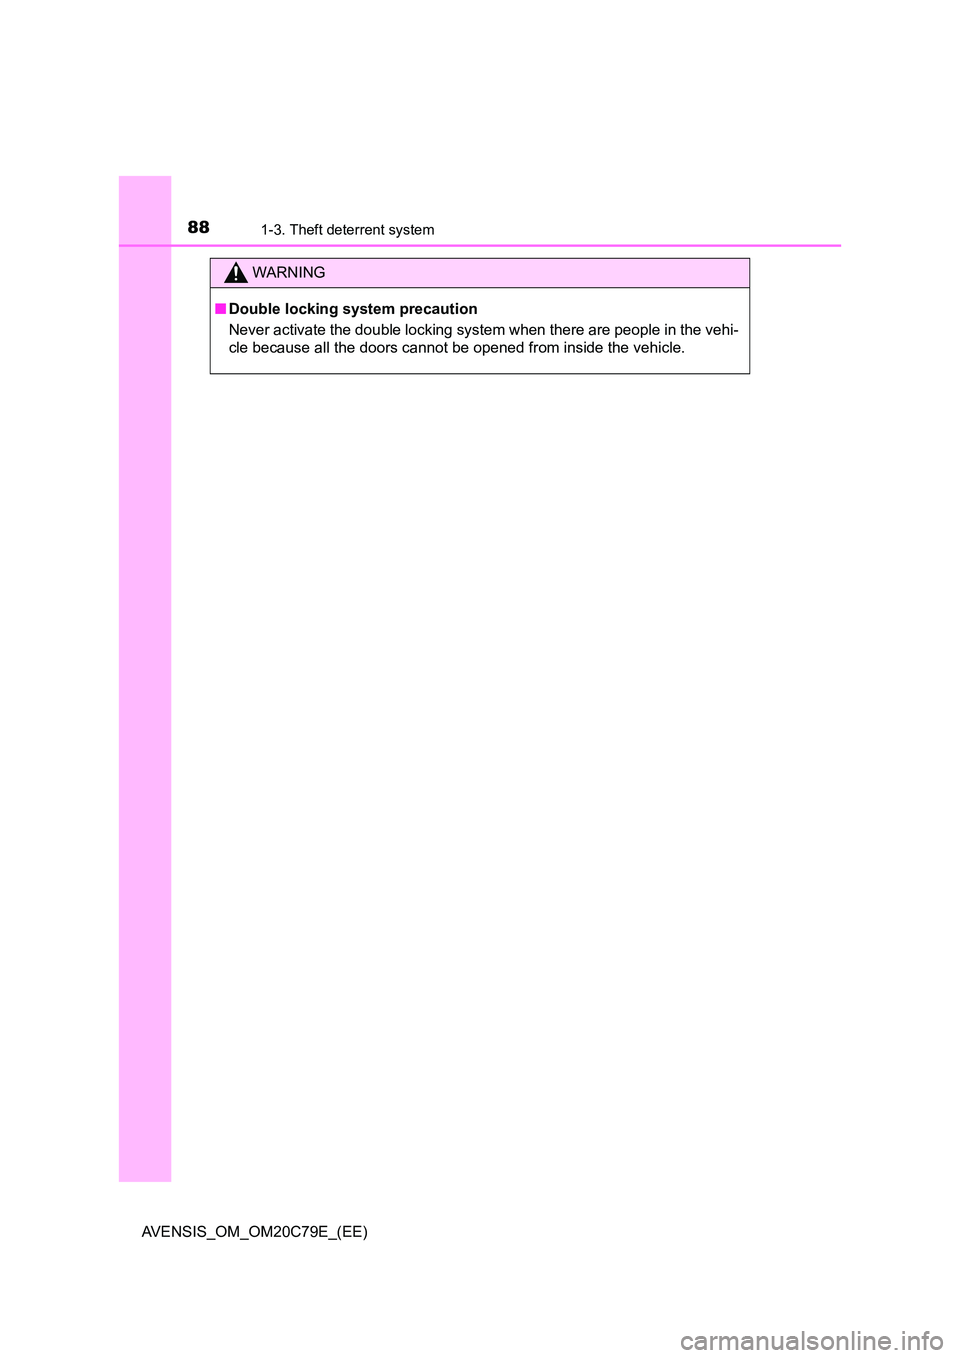
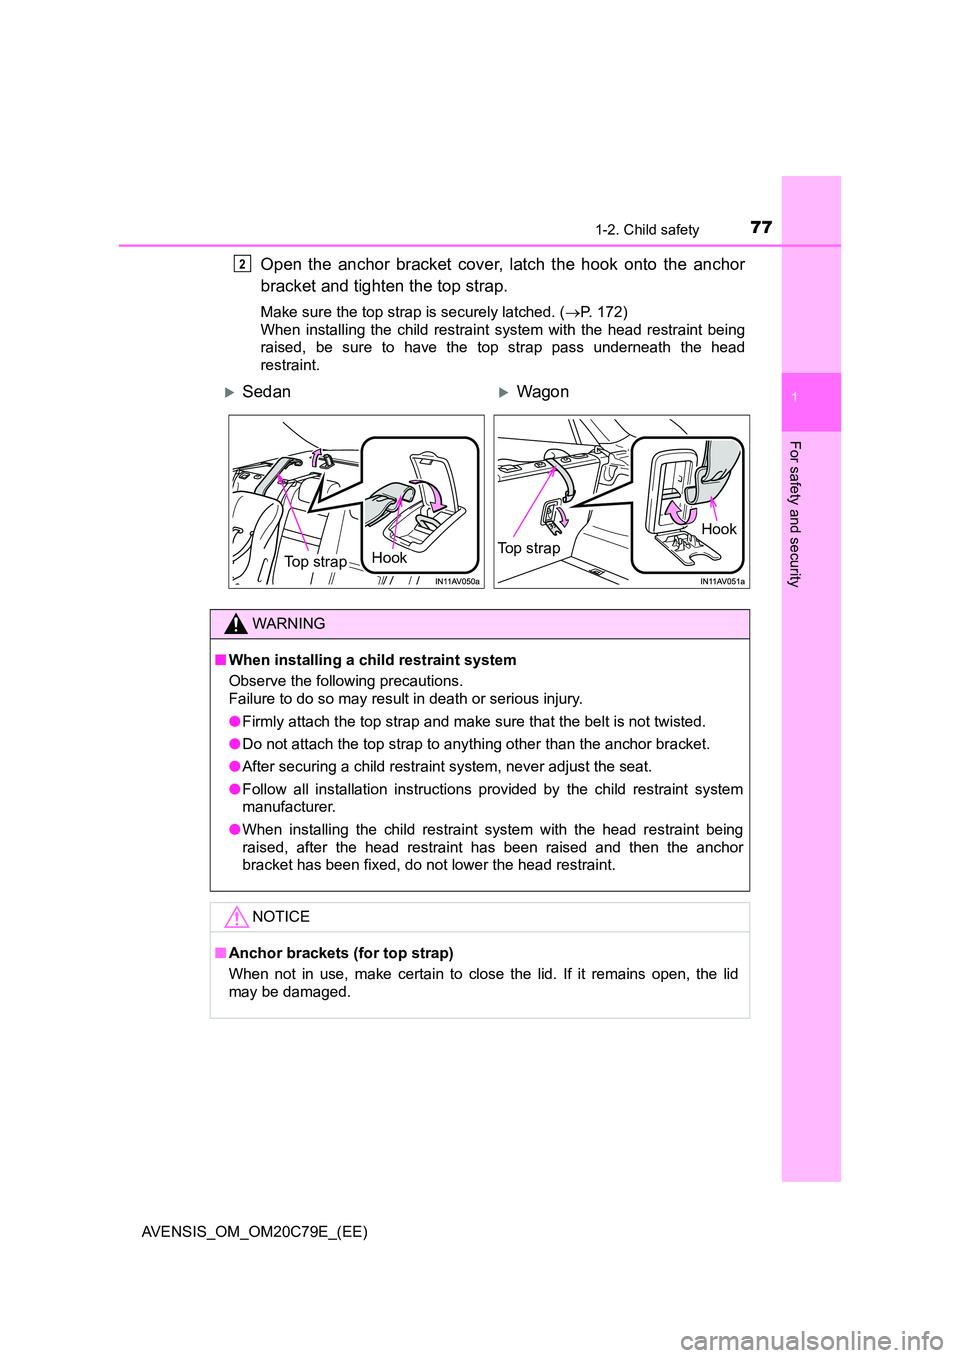
Open the anchor bracket cover, latch the hook onto the anchor
bracket and tighten the top strap.
Make sure the top strap is securely latched. ( P. 172)
When installing the child restraint system with the head restraint being
raised, be sure to have the top strap pass underneath the head
restraint.
2
SedanWagon
Hook Top strap
Hook
Top strap
WARNING
■ When installing a child restraint system
Observe the following precautions.
Failure to do so may result in death or serious injury.
● Firmly attach the top strap and make sure that the belt is not twisted.
● Do not attach the top strap to anything other than the anchor bracket.
● After securing a child restraint system, never adjust the seat.
● Follow all installation instructions provided by the child restraint system
manufacturer.
● When installing the child restraint system with the head restraint being
raised, after the head restraint has been raised and then the anchor
bracket has been fixed, do not lower the head restraint.
NOTICE
■ Anchor brackets (for top strap)
When not in use, make certain to close the lid. If it remains open, the lid
may be damaged.
Page 88 of 660
881-3. Theft deterrent system
AVENSIS_OM_OM20C79E_(EE)
WARNING
■Double locking system precaution
Never activate the double locking system when there are people in the vehi-
cle because all the doors cannot be opened from inside the vehicle.
Page 97 of 660
97
2Instrument cluster
AVENSIS_OM_OM20C79E_(EE)2. Instrument cluster
Warning lights and
indicators ........................... 98
Gauges and meters ........... 104
Multi-information display
(with monochrome
display) ............................ 108
Multi-information display
(with color display) ........... 111
Fuel consumption
information ....................... 117
Page 98 of 660
982. Instrument cluster
AVENSIS_OM_OM20C79E_(EE)
Warning lights and indicators
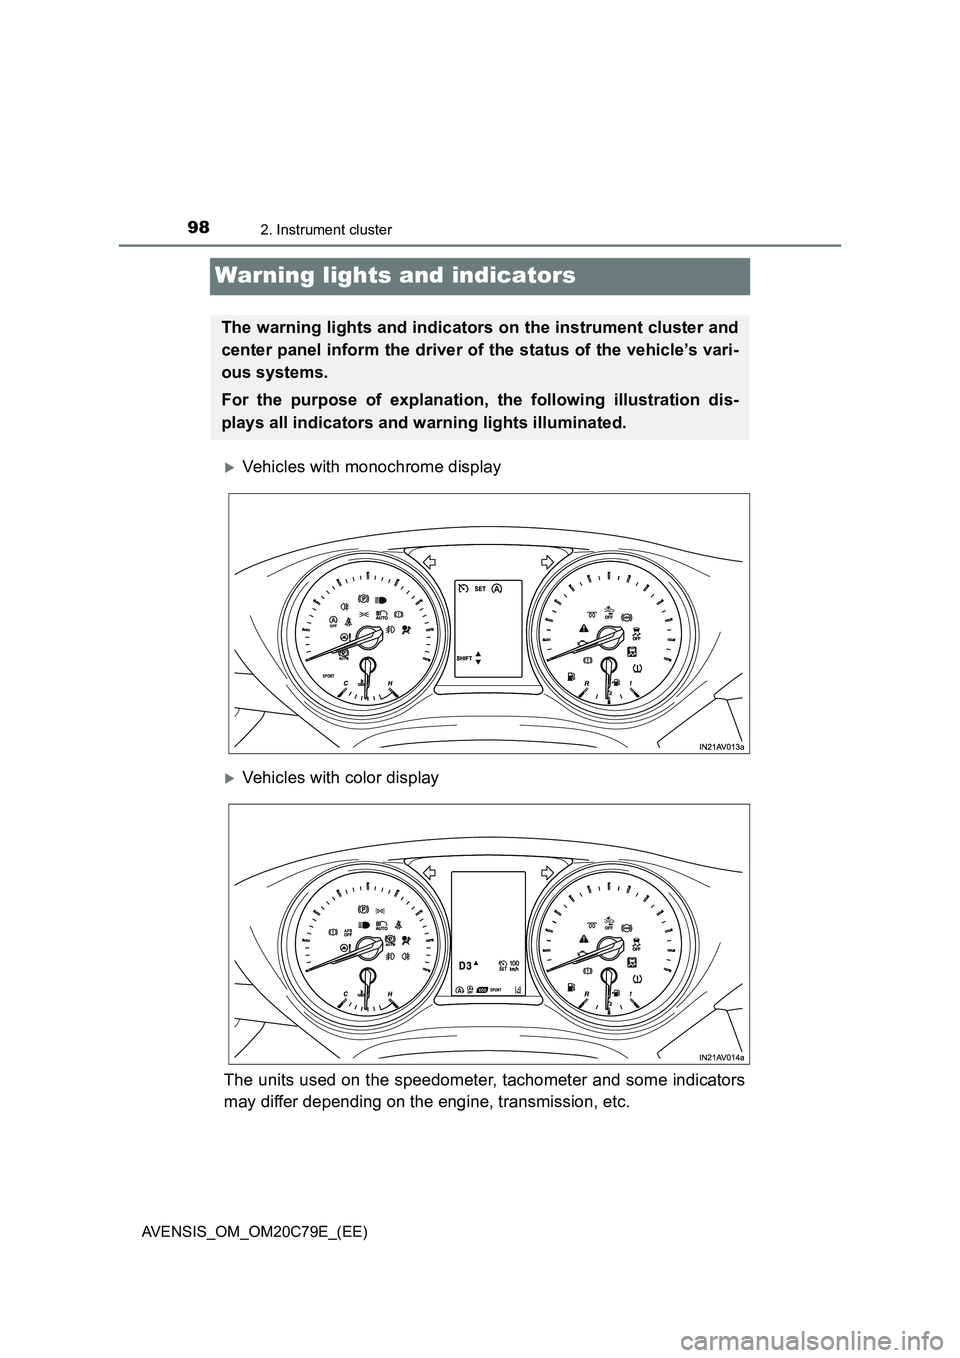
Vehicles with monochrome display
Vehicles with color display
The units used on the speedometer, tachometer and some indicators
may differ depending on the engine, transmission, etc.
The warning lights and indicators on the instrument cluster and
center panel inform the driver of the status of the vehicle’s vari-
ous systems.
For the purpose of explanation, the following illustration dis-
plays all indicators and warning lights illuminated.
Page 99 of 660
992. Instrument cluster
2
Instrument cluster
AVENSIS_OM_OM20C79E_(EE)
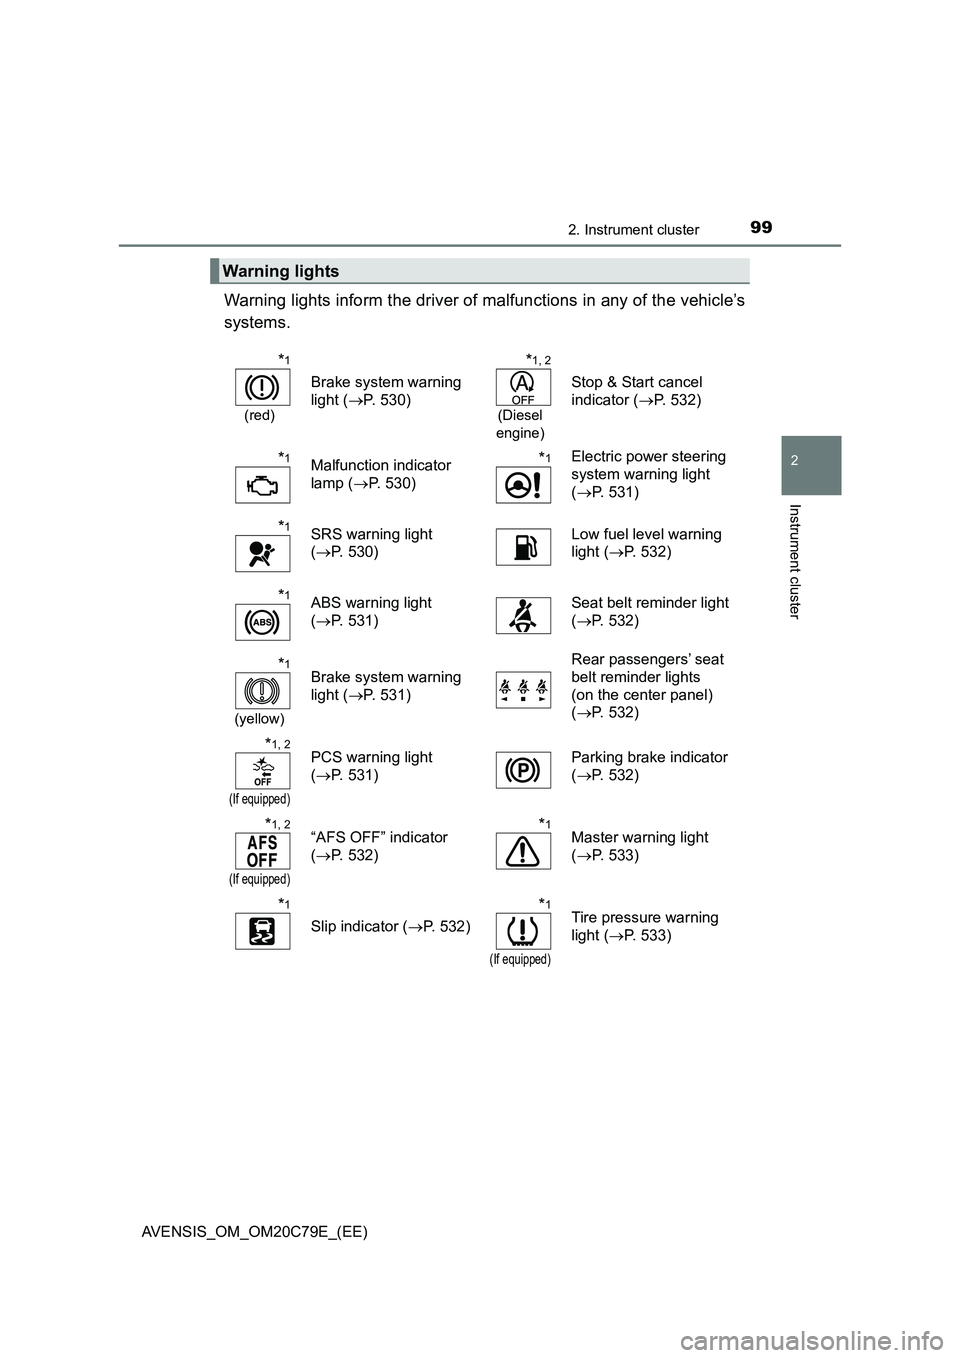
Warning lights inform the driver of malfunctions in any of the vehicle’s
systems.
Warning lights
*1
(red)
Brake system warning
light (P. 530)
*1, 2
(Diesel
engine)
Stop & Start cancel
indicator (P. 532)
*1Malfunction indicator
lamp (P. 530)*1Electric power steering
system warning light
(P. 531)
*1SRS warning light
(P. 530)Low fuel level warning
light (P. 532)
*1ABS warning light
(P. 531)Seat belt reminder light
(P. 532)
*1
(yellow)
Brake system warning
light (P. 531)Rear passengers’ seat
belt reminder lights
(on the center panel)
(P. 532)
*1, 2
(If equipped)
PCS warning light
(P. 531)Parking brake indicator
(P. 532)
*1, 2
(If equipped)
“AFS OFF” indicator
(P. 532)*1Master warning light
(P. 533)
*1
Slip indicator (P. 532)
*1
(If equipped)
Tire pressure warning
light (P. 533)
Page 102 of 660

1022. Instrument cluster
AVENSIS_OM_OM20C79E_(EE)
*1: These lights turn on when the engine switch is turned to the “ON” position
(vehicles without smart entry & start system) or IGNITION ON mode (vehi-
cles with smart entry & start system) to indicate that a system check is
being performed. They will turn off after the engine is started, or after a few
seconds. There may be a malfunction in a system if a light does not turn
on, or if the lights do not turn off. Have the vehicle inspected by any autho-
rized Toyota retailer or Toyota authorized repairer, or any reliable repairer.
*2: The light flashes to indicate that the system is operating.
*3: The light turns on when the system is turned off.
*4: This light illuminates on the multi-information display.
*5: For vehicles with the color display, this light illuminates on the multi-infor-
mation display.
*1
(If equipped)
Auto P-off indicator
( P. 231)
*1, 3
(If equipped)
PCS warning light
( P. 262)
*4
(If equipped)
Shift position indicator
( P. 222)
*5
(If equipped)
“SPORT” indicator
( P. 220)
*4
(If equipped)
Shift position indicator
( P. 222)
Parking brake indicator
( P. 230)
*1, 4
(If equipped)
Gear Shift Indicator
( P. 226)(If equipped)
Low outside
temperature indicator
( P. 107)
“PASSENGER
AIRBAG” indicator
(on the center
panel) ( P. 5 2 )
Page 103 of 660

1032. Instrument cluster
2
Instrument cluster
AVENSIS_OM_OM20C79E_(EE)
■Eco Driving Indicator Light (if equipped)
● The vehicle is being driven in “SPORT” mode (P. 220)
● If equipped, the paddle shift switch is operated while the shift position is D
● The vehicle speed is approximately 130 km/h (80 mph) or higher.
During Eco-Friendly acceleration (Eco-
driving), Eco Driving Indicator Light will
turn on. When the acceleration exceeds
Zone of Eco driving, and when the vehicle
is stopped, the light turns off.
Eco Driving Indicator Light will not operate
in the following conditions:
● The shift lever is in anything other than
D.
WARNING
■ If a safety system warning light does not come on
Should a safety system light such as ABS and SRS airbag warning light not
come on when you start the engine, this could mean that these systems are
not available to help protect you in an accident, which could result in death
or serious injury. Have the vehicle inspected by any authorized Toyota
retailer or Toyota authorized repairer, or any reliable repairer immediately if
this occurs.
Page 108 of 660
1082. Instrument cluster
AVENSIS_OM_OM20C79E_(EE)
Multi-information display (with mono-
chrome display)
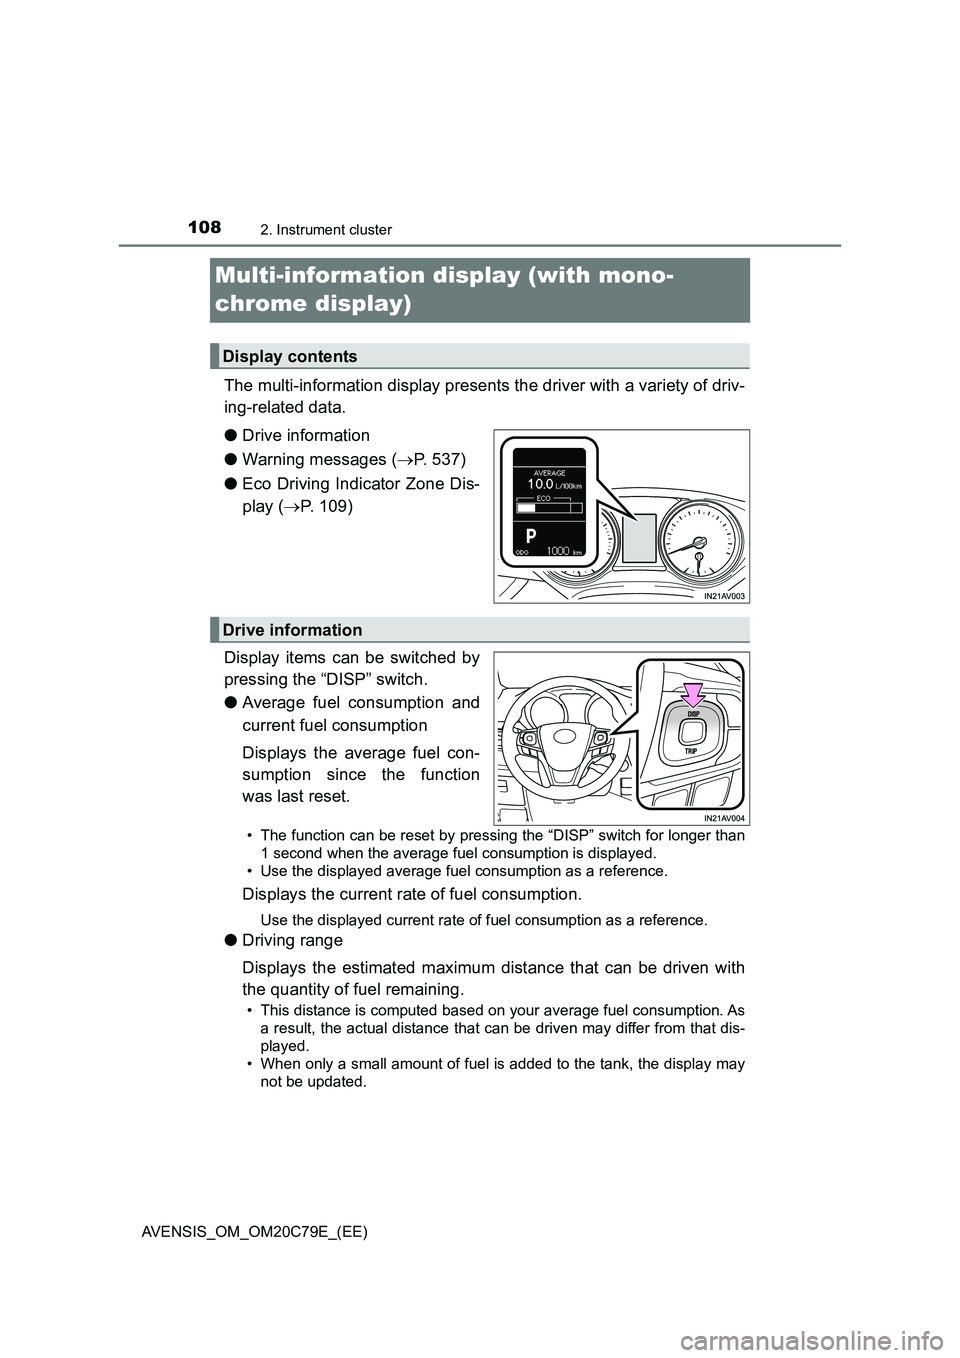
The multi-information display presents the driver with a variety of driv-
ing-related data.
●Drive information
●Warning messages (P. 537)
●Eco Driving Indicator Zone Dis-
play (P. 109)
Display items can be switched by
pressing the “DISP” switch.
●Average fuel consumption and
current fuel consumption
Displays the average fuel con-
sumption since the function
was last reset.
• The function can be reset by pressing the “DISP” switch for longer than
1 second when the average fuel consumption is displayed.
• Use the displayed average fuel consumption as a reference.
Displays the current rate of fuel consumption.
Use the displayed current rate of fuel consumption as a reference.
●Driving range
Displays the estimated maximum distance that can be driven with
the quantity of fuel remaining.
• This distance is computed based on your average fuel consumption. As
a result, the actual distance that can be driven may differ from that dis-
played.
• When only a small amount of fuel is added to the tank, the display may
not be updated.
Display contents
Drive information