2018 TOYOTA AURIS ECO mode
[x] Cancel search: ECO modePage 444 of 592
4447-3. Do-it-yourself maintenance
UK AURIS_HV_HB_EE (OM12M49E)
■ The initialization operation (vehicles with a tire pressure warning sys-
tem)
● Make sure to carry out initialization after adjusting the tire inflation pressure.
Also, make sure the tires are cold before carrying out initialization or tire
inflation pressure adjustment.
● If you have accidentally turned the power switch off during initialization, it is
not necessary to press the reset switch again as initialization will restart
automatically when the power switch has been turned to ON mode for the
next time.
● If you accidentally press the reset switch when initialization is not necessary,
adjust the tire inflation pressure to the specified level when the tires are
cold, and conduct initialization again.
■ Warning performance of the tire pressure warning system (vehicles with
a tire pressure warning system)
The warning of the tire pressure warning system will change in accordance
with driving conditions. For this reason, the system may give a warning even
if the tire pressure does not reach a low enough level, or if the pressure is
higher than the pressure that was adjusted to when the system was initial-
ized.
■ When initialization of the tire pressure warning system has failed (vehi-
cles with a tire pressure warning system)
Initialization can be completed in a few minutes. However, in the following
cases, the settings have not been recorded and the system will not operate
properly. If repeated attempts to record tire inflation pressure settings are
unsuccessful, have the vehicle inspected by any authorized Toyota dealer or
repairer, or another duly qualified and equipped professional as soon as pos-
sible.
● When operating the tire pressure warning reset switch, the tire pressure
warning light does not blink 3 times.
● After driving for a certain period of time since the initialization has been
completed, the warning light comes on after blinking for 1 minute.
■ Registering ID codes (vehicles with a tire pressure warning system)
The ID codes of the tire pressure warning valve and transmitters for two sets
of wheels can be registered.
It is not necessary to register the ID codes when replacing normal tires with
snow tires, if the ID codes for the wheels of both normal tires and snow tires
are registered beforehand.
For information about changing ID codes, ask any authorized Toyota dealer
or repairer, or another duly qualified and equipped professional.
Page 451 of 592
4517-3. Do-it-yourself maintenance
UK AURIS_HV_HB_EE (OM12M49E)
7
Maintenance and care
WARNING
■When inspecting or replacing tires
Observe the following precautions to prevent accidents.
Failure to do so may cause damage to parts of the drivetrain as well as dan-
gerous handling characteristics, which may lead to an accident resulting in
death or serious injury.
● Do not mix tires of different makes, models or tread patterns.
Also, do not mix tires of remarkably different treadwear.
● Do not use tire sizes other than those recommended by Toyota.
● Do not mix differently constructed tires (radial, bias-belted or bias-ply
tires).
● Do not mix summer, all season and snow tires.
● Do not use tires that have been used on another vehicle.
Do not use tires if you do not know how they were used previously.
● Vehicles with a compact spare tire: Do not tow if your vehicle has a com-
pact spare tire installed.
■ When initializing the tire pressure warning system (vehicles with a tire
pressure warning system)
Do not operate the tire pressure warning reset switch without first adjusting
the tire inflation pressure to the specified level. Otherwise, the tire pressure
warning light may not come on even if the tire inflation pressure is low, or it
may come on when the tire inflation pressure is actually normal.
Page 496 of 592
4968-2. Steps to take in an emergency
UK AURIS_HV_HB_EE (OM12M49E)
■ If the tire pressure warning light frequently comes on after blinking for 1
minute (vehicles with a tire pressure warning system)
If the tire pressure warning light frequently comes on after blinking for 1 min-
ute when the power switch is turned to ON mode, have it checked by any
authorized Toyota dealer or repairer, or another duly qualified and equipped
professional.
■ Warning buzzer
In some cases, the buzzer may not be heard because of noisy place or an
audio sound.
■ Electric power steering system warning light (warning buzzer)
When the 12-volt battery charge becomes insufficient or the voltage tempo-
rarily drops, the electric power steering system warning light may come on
and the warning buzzer may sound.
Page 500 of 592
5008-2. Steps to take in an emergency
UK AURIS_HV_HB_EE (OM12M49E)
The following messages may be displayed. Take the appropriate
action as shown below:
■If “12-volt battery low. Shifting unavailable. Read Owner’s
Manual.” is displayed
Indicates that an attempt was made to change the shift position
when the voltage of the 12-volt battery was low.
Charge or replace the 12-volt battery.
■If “Shifting temporar ily unavailable. Wait a moment and try
again.” is displayed
Indicates that the shift lever and P position switch were operated
repeatedly in quick succession.
Wait approximately 20 seconds a nd then change the shift position.
■If “Switched to N. To engage P mode, stop car then press P
switch.” is displayed
Indicates that the P position swit ch has been pressed while driving
and that the shift position has been changed to N automatically.
To enable shifting to P, stop the vehicle completely and press the P
position switch. To continue driving, change the shift position to D or
R.
If the shifting operation of the hybrid transmission is rejected
Page 535 of 592
5358-2. Steps to take in an emergency
UK AURIS_HV_HB_EE (OM12M49E)
8
When trouble arises
One of the following may be the cause of the problem:
● The 12-volt battery may be discharged. (P. 539)
● One or both of the 12-volt battery terminals may be disconnected.
( P. 434)
Contact any authorized Toyota dealer or repairer, or another duly qualified
and equipped professional if the problem cannot be repaired, or if repair
procedures are unknown.
When the hybrid system does not start, the following steps can be
used as an interim measure to star t the hybrid system if the power
switch is functioning normally.
Do not use this starting procedure except in case of emergency.
Set the parking brake.
Turn the power switch to ACCESSORY mode.
Press and hold the power switch for about 15 seconds while
depressing the brake pedal firmly.
Even if the hybrid system can be started using the above steps, the
system may be malfunctioning. Have the vehicle inspected by any
authorized Toyota dealer or repairer, or another duly qualified and
equipped professional.
The interior lights and headlight s do not turn on, or the horn
does not sound.
Emergency start function
1
2
3
Page 537 of 592
5378-2. Steps to take in an emergency
UK AURIS_HV_HB_EE (OM12M49E)
8
When trouble arises
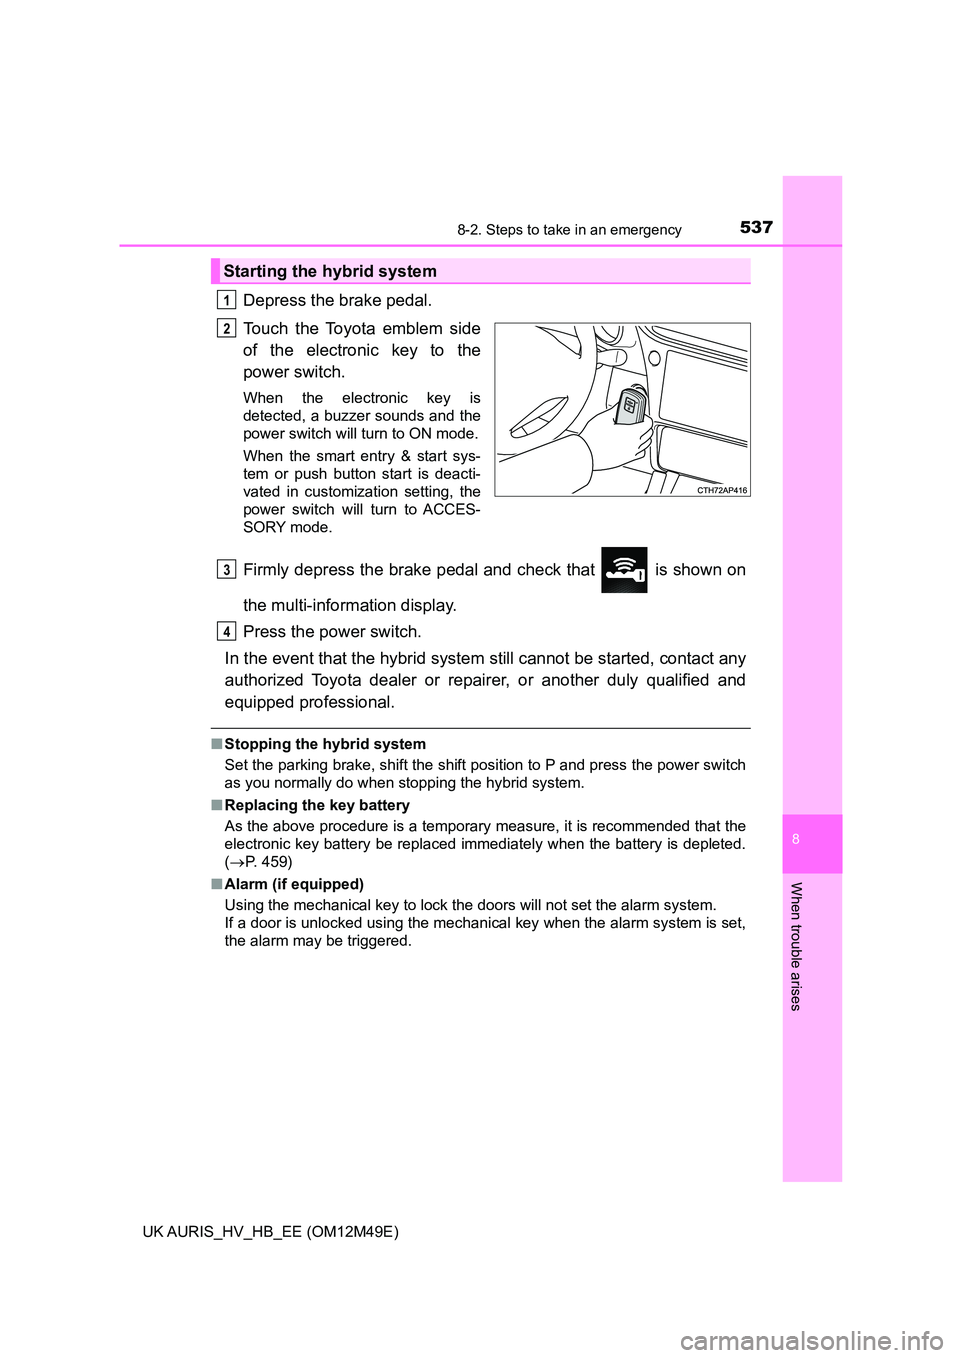
Depress the brake pedal.
Touch the Toyota emblem side
of the electronic key to the
power switch.
When the electronic key is
detected, a buzzer sounds and the
power switch will turn to ON mode.
When the smart entry & start sys-
tem or push button start is deacti-
vated in customization setting, the
power switch will turn to ACCES-
SORY mode.
Firmly depress the brake pedal and check that is shown on
the multi-information display.
Press the power switch.
In the event that the hybrid system still cannot be started, contact any
authorized Toyota dealer or repairer, or another duly qualified and
equipped professional.
■ Stopping the hybrid system
Set the parking brake, shift the shift position to P and press the power switch
as you normally do when stopping the hybrid system.
■ Replacing the key battery
As the above procedure is a temporary measure, it is recommended that the
electronic key battery be replaced immediately when the battery is depleted.
( P. 459)
■ Alarm (if equipped)
Using the mechanical key to lock the doors will not set the alarm system.
If a door is unlocked using the mechanical key when the alarm system is set,
the alarm may be triggered.
Starting the hybrid system
1
2
3
4
Page 540 of 592
5408-2. Steps to take in an emergency
UK AURIS_HV_HB_EE (OM12M49E)
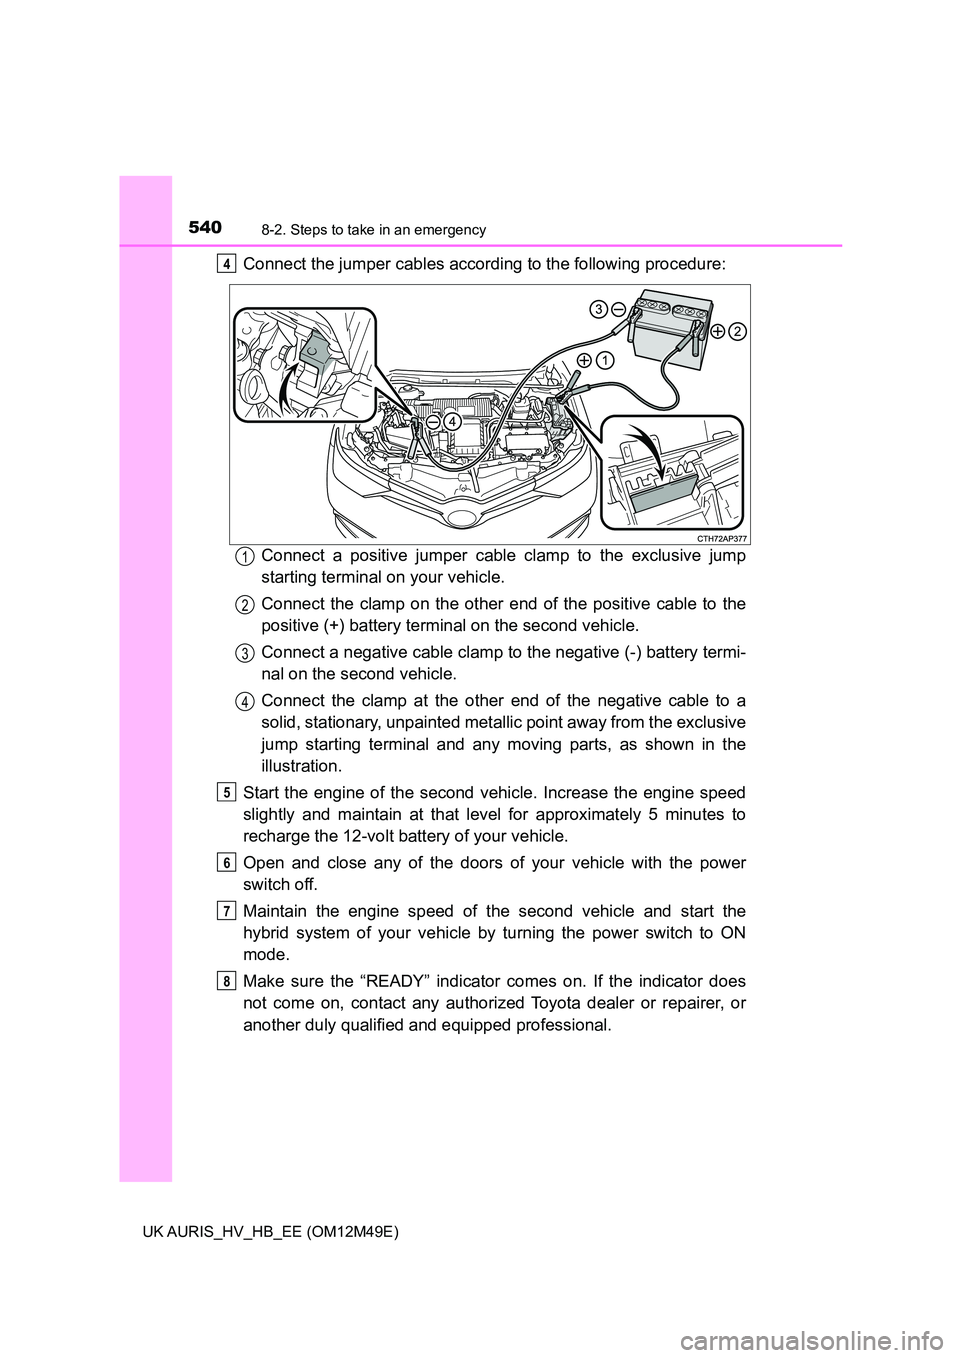
Connect the jumper cables according to the following procedure:
Connect a positive jumper cable clamp to the exclusive jump
starting terminal on your vehicle.
Connect the clamp on the other e nd of the positive cable to the
positive (+) battery terminal on the second vehicle.
Connect a negative cable clamp to the negative (-) battery termi-
nal on the second vehicle.
Connect the clamp at the other end of the negative cable to a
solid, stationary, unpainted metallic point away from the exclusive
jump starting terminal and any moving parts, as shown in the
illustration.
Start the engine of the second v ehicle. Increase the engine speed
slightly and maintain at that level for approximately 5 minutes to
recharge the 12-volt battery of your vehicle.
Open and close any of the doors of your vehicle with the power
switch off.
Maintain the engine speed of t he second vehicle and start the
hybrid system of your vehicle by turning the power switch to ON
mode.
Make sure the “READY” indicator comes on. If the indicator does
not come on, contact any authorized Toyota dealer or repairer, or
another duly qualified and equipped professional.
4
1
2
3
4
5
6
7
8
Page 542 of 592
5428-2. Steps to take in an emergency
UK AURIS_HV_HB_EE (OM12M49E)
■ When recharging or replacing the 12-volt battery
● Vehicles with a smart entry & start system: In some cases, it may not be
possible to unlock the doors using the smart entry & start system when the
12-volt battery is discharged. Use the wireless remote control or the
mechanical key to lock or unlock the doors.
● The hybrid system may not start on the first attempt after the 12-volt battery
has recharged but will start normally after the second attempt. This is not a
malfunction.
● The power switch mode is memorized by the vehicle. When the 12-volt bat-
tery is reconnected, the system will return to the mode it was in before the
12-volt battery was discharged. Before disconnecting the 12-volt battery,
turn the power switch off.
If you are unsure what mode the power switch was in before the 12-volt bat-
tery discharged, be especially careful when reconnecting the 12-volt battery.
WARNING
■ Avoiding 12-volt battery fires or explosions
Observe the following precautions to prevent accidentally igniting the flam-
mable gas that may be emitted from the 12-volt battery:
● Make sure each jumper cable is connected to the correct terminal and that
it is not unintentionally in contact with any other than the intended terminal.
● Do not allow the other end of the jumper cable connected to the “+” termi-
nal to come into contact with any other parts or metal surfaces in the area,
such as brackets or unpainted metal.
● Do not allow the + and - clamps of the jumper cables to come into contact
with each other.
● Do not smoke, use matches, cigarette lighters or allow open flame near
the 12-volt battery.