Page 15 of 213

Adjusting the Opening Height
You can adjust the opening height of the
powered liftgate to make it easier to reach:
1. Open the liftgate, then manually lower or
raise it to the desired opening height.
2. Press and hold the button on the
underside of the liftgate for two seconds
until you hear a
confirmation chime.
3.Confirm that you have set it to the desired
height by closing the liftgate, then
reopening it.
Accessing the Cargo Area To access the cargo area inside the Model X
rear trunk, push down on the ridged portion of the handle of the cargo cover and then pull
up. You can then adjust the position of the
cargo cover or completely remove it from
Model X.
Caution: Never load more than 175 lbs
(80 kg) on the rear load floor (above the
lower trunk compartment) or more than
130 lbs (60 kg) in the lower trunk
compartment. Doing so can cause
damage.Interior Emergency Trunk Release
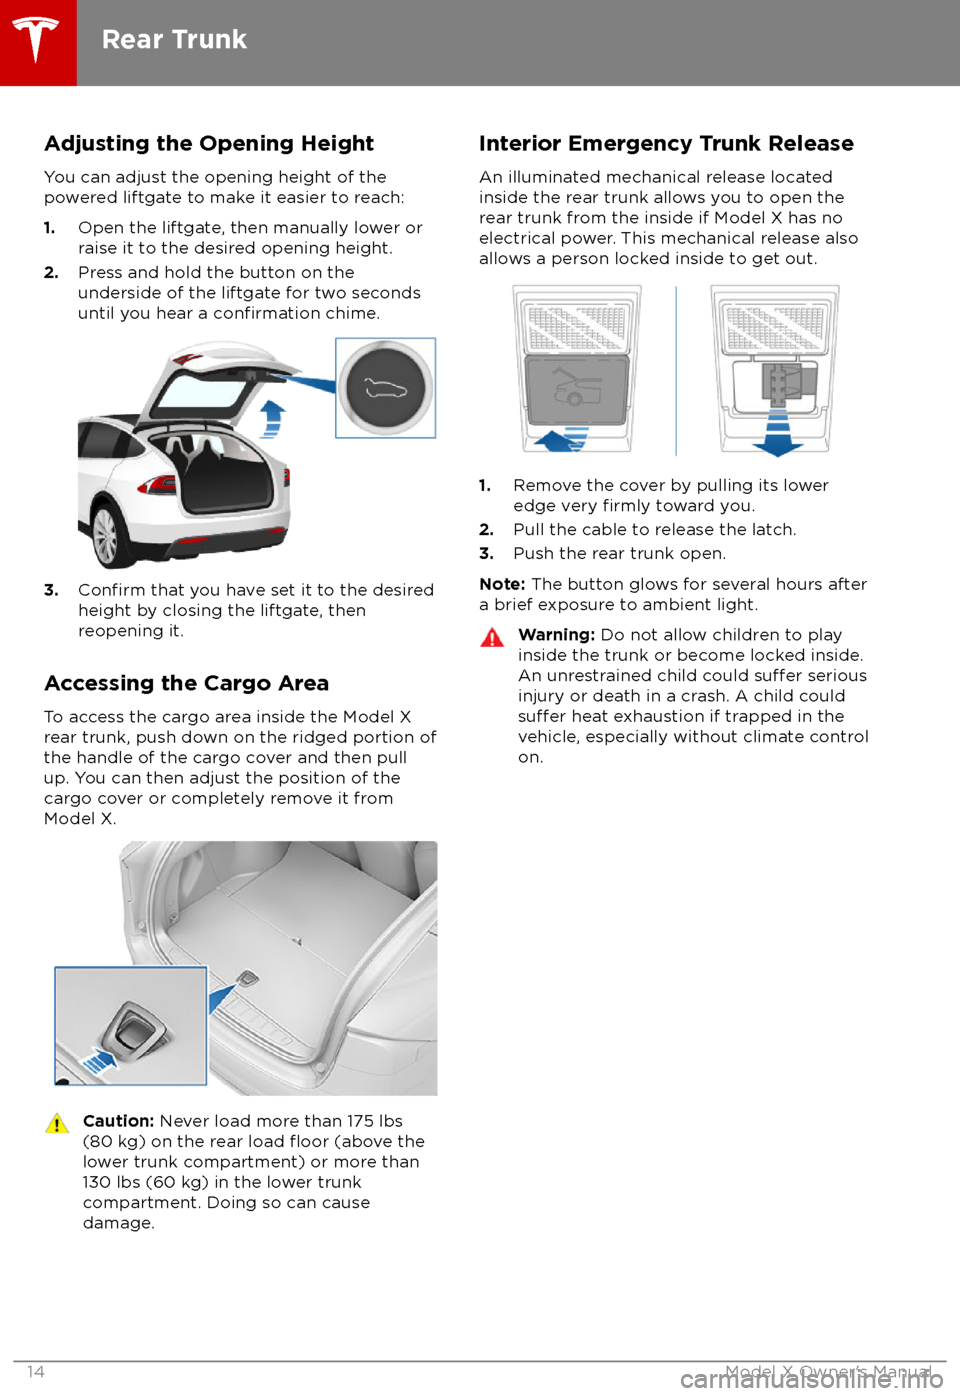
An illuminated mechanical release located
inside the rear trunk allows you to open the
rear trunk from the inside if Model X has no
electrical power. This mechanical release also
allows a person locked inside to get out.
1. Remove the cover by pulling its lower
edge very firmly toward you.
2. Pull the cable to release the latch.
3. Push the rear trunk open.
Note: The button glows for several hours after
a brief exposure to ambient light.
Warning: Do not allow children to play
inside the trunk or become locked inside.
An unrestrained child could
suffer serious
injury or death in a crash. A child could
suffer heat exhaustion if trapped in the
vehicle, especially without climate control
on.
Rear Trunk
14Model X Owner
Page 17 of 213
Note: The interior release button glows
following a brief exposure to ambient light.Warning: People should never climb
inside the front trunk. Never shut the
front trunk when a person is inside.Warning: Care should be taken to ensure
that objects inside the front trunk do not
bump against the release button, causing the trunk to accidentally open.
Front Trunk
16Model X Owner
Page 174 of 213

Removing the Maintenance PanelTo check
fluid levels, remove the maintenance
panel:
1. Open the hood.
2. Pull the maintenance panel upward to
release the clips that hold it in place.
Caution: The maintenance panel protects
the front trunk from water. When re-
attaching, make sure it is fully seated.
Checking Battery Coolant
If the quantity of
fluid in the cooling system
drops below the recommended level, the
instrument panel displays a warning message.
Stop driving Model X as soon as safety
permits and contact Tesla.
Fluid Level Check
Tesla checks the Battery coolant level at the
regularly scheduled maintenance intervals.
DO NOT REMOVE THE FILLER CAP AND DO NOT ADD FLUID. Doing so can result in
damage not covered by the warranty.
Do Not Top Up Battery Coolant
Warning: Battery coolant can be
hazardous and can irritate eyes and skin.
Under no circumstances should you
remove the
filler cap and/or add coolant.
If the instrument panel warns you that the
fluid level is low, contact Tesla
immediately.
To maximize the performance and life of the
Battery, the cooling system uses a specificmixture of G-48 ethylene-glycol coolant
(HOAT). Contact Tesla for more specificinformation about the coolant.
Checking Brake FluidWarning: Contact Tesla immediately if
you notice increased movement of the brake pedal or a
significant loss of brakefluid. Driving under these conditions can
result in extended stopping distances or complete brake failure.
The Brake indicator on the
instrument panel alerts you if the
quantity of
fluid in the brake
reservoir drops below the
recommended level. If it displays
while driving, stop as soon as safety
permits by gently applying the
brakes. Do not continue driving.
Contact Tesla immediately.
Fluid Level Check
Tesla checks the brake
fluid level at the
regularly scheduled maintenance intervals.
Topping Up the Brake Fluid
Do not top up your brake
fluid. Tesla service
does this when you bring Model X in for
regular servicing. The following instructions
are provided for information purposes and future reference only:
1. Clean the
filler cap before removing it to
prevent dirt from entering the reservoir.
2. Unscrew the cap and remove it.
3. Top up the reservoir to the MAX mark
using the appropriate brake
fluid.4. Replace the filler cap, ensuring it is fully
secured.
Warning: Only use new fluid from a
sealed air-tight container. Never use
previously used
fluid or fluid from a
previously opened container