2018 TESLA MODEL X height
[x] Cancel search: heightPage 10 of 213

Note: You can configure Model X to open the
falcon wing doors to a lower height setting by
using the touchscreen ( Controls > Settings >
Doors & Locks > FALCON DOOR HEIGHT ).
Note: If a falcon wing door detects an
obstacle while closing, it reverses a few inches
before it stops moving.Warning: Whenever a front door is
partially open (approximately 20
Page 15 of 213

Adjusting the Opening Height
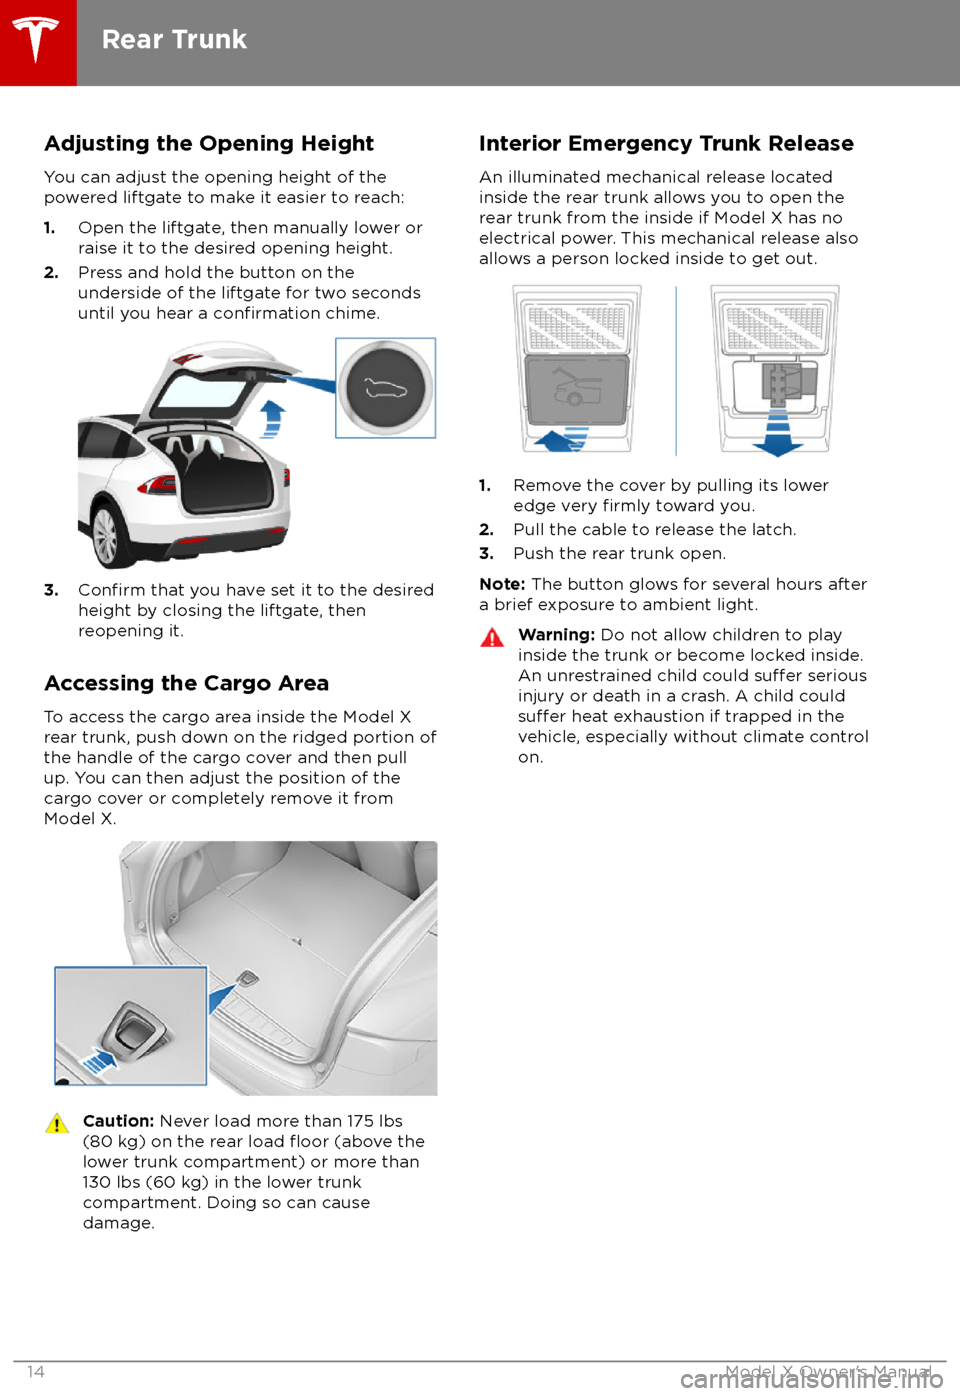
You can adjust the opening height of the
powered liftgate to make it easier to reach:
1. Open the liftgate, then manually lower or
raise it to the desired opening height.
2. Press and hold the button on the
underside of the liftgate for two seconds
until you hear a
confirmation chime.
3.Confirm that you have set it to the desired
height by closing the liftgate, then
reopening it.
Accessing the Cargo Area To access the cargo area inside the Model X
rear trunk, push down on the ridged portion of the handle of the cargo cover and then pull
up. You can then adjust the position of the
cargo cover or completely remove it from
Model X.
Caution: Never load more than 175 lbs
(80 kg) on the rear load floor (above the
lower trunk compartment) or more than
130 lbs (60 kg) in the lower trunk
compartment. Doing so can cause
damage.Interior Emergency Trunk Release
An illuminated mechanical release located
inside the rear trunk allows you to open the
rear trunk from the inside if Model X has no
electrical power. This mechanical release also
allows a person locked inside to get out.
1. Remove the cover by pulling its lower
edge very firmly toward you.
2. Pull the cable to release the latch.
3. Push the rear trunk open.
Note: The button glows for several hours after
a brief exposure to ambient light.
Warning: Do not allow children to play
inside the trunk or become locked inside.
An unrestrained child could
suffer serious
injury or death in a crash. A child could
suffer heat exhaustion if trapped in the
vehicle, especially without climate control
on.
Rear Trunk
14Model X Owner
Page 28 of 213

Wearing Seat BeltsUsing seat belts and child safety seats is the
most
effective way to protect occupants if a
collision occurs. Therefore, wearing a seat belt is required by law in most jurisdictions.
Both the driver and passenger seats are
equipped with three-point inertia reel seat
belts. Inertia reel belts are automatically
tensioned to allow occupants to move
comfortably during normal driving conditions.
To securely hold child safety seats, all
passenger seating positions are equipped with
an automatic locking retractor (ALR) that, by
pulling the seat belt beyond the length
needed for a typical adult occupant, locks the
belt into place until the seat belt is unbuckled
(see Installing Seat Belt Retained Child Seats
on page 34).
The seat belt reel automatically locks to prevent movement of occupants if Model X
experiences a force associated with hard acceleration, braking, cornering, or an impact
in a collision.
The seat belt reminder on the
instrument panel alerts you if a seat
belt for an occupied seat is not
fastened. If the belt remains unfastened, the reminder
flashes and
an intermittent chime sounds. If all
occupants are buckled up and the
reminder stays on, re-fasten seat
belts to ensure they are correctly
latched. Also remove any heavy
objects (such as a briefcase) from an
unoccupied seat. If the reminder
light continues to stay on, contact
Tesla.
To Fasten a Belt
1. Ensure correct positioning of the seat (see
Correct Driving Position on page 20).
2. Draw the belt out smoothly, ensuring the
belt lays
flat across the pelvis, chest and
mid-point of your collar bone, between
the neck and shoulder.
3. Insert the latch plate into the buckle and
press together until you hear a click
indicating it is locked in place.
4. Pull the belt to check that it is securely
fastened.
5. Pull the diagonal part of the belt toward
the reel to remove excess slack.
To Adjust the Shoulder Anchor Height
Model X is equipped with an adjustable
shoulder anchor for each front seat to ensure
that the seat belt is positioned correctly. The
seat belt should lay
flat across the mid-point
of your collar bone while in the correct driving
position (see Correct Driving Position on page
20). Adjust the height of the shoulder anchor
if the seat belt is not positioned correctly:
1. Press and hold the button on the shoulder
anchor to release the locking mechanism.
2. While holding the button, move the
shoulder anchor up or down as necessary
so that the seat belt is positioned correctly.
3. Release the button on the shoulder anchor
so that it locks into position.
4. Without pressing the button, pull on the
seat belt webbing and attempt to move
the shoulder anchor downwards to check that it is locked into position.
Seat Belts
Seating and Safety Restraints27
Page 134 of 213

Note: Manually lowering the suspension to
Standard or Low while at a saved location also
removes the auto-raising location.
Automatic Lowering
When Model X is moving above typical driveway or parking lot speeds, Smart Air
Suspension automatically lowers ride height to
improve aerodynamics and handling. For most
average speed driving, the suspension is
automatically set to Standard. As described
above, when you make manual height adjustments, the suspension automatically
lowers at increased driving speeds.
When carrying loads, Smart Air Suspension
also maintains a level height between the front
and rear.
You can adjust the speed at which the Air
Suspension automatically transitions to the
LOW ride height by touching Controls >
Suspension > Automatic Lowering on the
touchscreen. This setting is saved to your
Driver
Profile.
Note: You can temporarily override the ride
height by pressing the brake pedal, touching an air suspension control in Controls >
Suspension , and then manually choosing a
ride height. Your suspension
Page 182 of 213

Exterior DimensionsAOverall Length199 in5,052 mm
B
Overall Width (including mirrors)Overall Width (including folded
mirrors
Overall Width (excluding mirrors)89 in 82 in
79 in2,272 mm 2,017 mm
1,999 mmCOverall Height66 in*1,684 mm*DWheel Base117 in2,965 mmEOverhang - Front39 in989 mmFOverhang - Rear43 in1,098 mm
G
Ground Clearance:
Standard, with skis
Standard, without skis
Very high, with skis
Very high, without skis7 in
7 in
8 in
9 in171 mm
183 mm 211 mm
223 mmHTrack - Front
Track - Rear67 in
67 in1,711 mm
1,723 mm*Values are approximate. The dimensions can vary depending on vehicle configuration and
various other factors.
Interior Dimensions
Head RoomFront Rear
Third41.7 in
40.9 in 37.1 in1059 mm
1039 mm 942 mmLeg RoomFrontRear
Third41.2 in
38.4 in 32.7 in1046 mm
975 mm831 mmShoulder RoomFront Rear
Third60.7 in 56.8 in 40 in1542 mm
1442 mm 1016 mm
Dimensions and Weights
Specifications181
Page 188 of 213

Understanding Tire MarkingsLaws require tire manufacturers to place standardized information on the sidewall of all tires. Thisinformation
identifies and describes the fundamental characteristics of the tire.
1Tire category. P indicates that the tire is for passenger vehicles.2Tire width. This 3-digit number is the width (in millimeters) of the tire from sidewall
edge to sidewall edge.3Aspect ratio. This 2-digit number is the sidewall height as a percentage of the tread
width. So, if the tread width is 205 mm, and the aspect ratio is 50, the sidewall height is 102 mm.4Tire construction. R indicates that the tire is of Radial ply construction.5Wheel diameter. This 2-digit number is the diameter of the wheel rim in inches.6Load index. This 2 or 3-digit number is the weight each tire can support. This number is
not always shown.7Speed rating. When stated, indicates the maximum speed (in mph) at which the tire can be used for extended periods. Q=99 mph (160 km/h), R=106 mph (170 km/h), S=112 mph (180 km/h), T=118 mph (190 km/h), U=124 mph (200 km/h), H=130 mph(210 km/h), V=149 mph (240 km/h), W=168 mph (270 km/h), Y=186 mph (300 km/h).8Tire composition and materials. The number of plies in both the tread area and thesidewall area indicates how many layers of rubber coated material make up the structure of the tire. Information is also provided on the type of materials used.9Maximum tire load. The maximum load which can be carried by the tire.
Wheels and Tires
Specifications187
Page 195 of 213

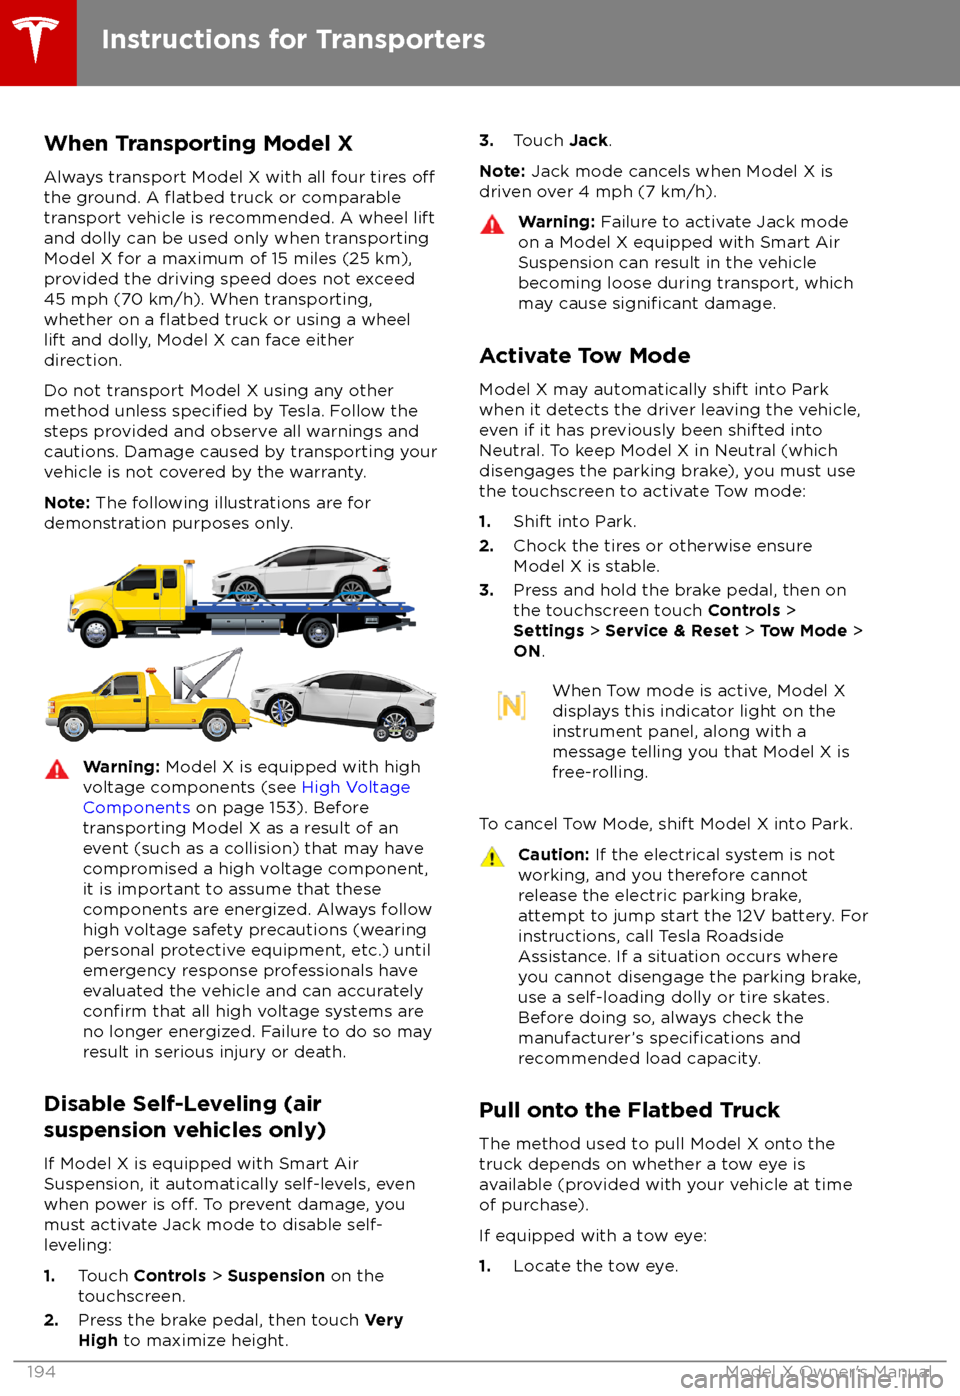
When Transporting Model X
Always transport Model X with all four tires
offthe ground. A flatbed truck or comparable
transport vehicle is recommended. A wheel lift
and dolly can be used only when transporting Model X for a maximum of 15 miles (25 km),provided the driving speed does not exceed
45 mph (70 km/h). When transporting,
whether on a
flatbed truck or using a wheel
lift and dolly, Model X can face either
direction.
Do not transport Model X using any other method unless
specified by Tesla. Follow the
steps provided and observe all warnings and
cautions. Damage caused by transporting your
vehicle is not covered by the warranty.
Note: The following illustrations are for
demonstration purposes only.
Warning: Model X is equipped with high
voltage components (see High Voltage
Components on page 153). Before
transporting Model X as a result of an
event (such as a collision) that may have
compromised a high voltage component, it is important to assume that these
components are energized. Always follow
high voltage safety precautions (wearing
personal protective equipment, etc.) until
emergency response professionals have
evaluated the vehicle and can accurately
confirm that all high voltage systems are
no longer energized. Failure to do so may
result in serious injury or death.
Disable Self-Leveling (air
suspension vehicles only)
If Model X is equipped with Smart Air
Suspension, it automatically self-levels, even
when power is
off. To prevent damage, you
must activate Jack mode to disable self- leveling:
1. Touch Controls > Suspension on the
touchscreen.
2. Press the brake pedal, then touch Very
High to maximize height.
3.
Touch Jack.
Note: Jack mode cancels when Model X is
driven over 4 mph (7 km/h).Warning: Failure to activate Jack mode
on a Model X equipped with Smart Air
Suspension can result in the vehicle
becoming loose during transport, which
may cause
significant damage.
Activate Tow Mode
Model X may automatically shift into Park
when it detects the driver leaving the vehicle,
even if it has previously been shifted into
Neutral. To keep Model X in Neutral (which
disengages the parking brake), you must use
the touchscreen to activate Tow mode:
1. Shift into Park.
2. Chock the tires or otherwise ensure
Model X is stable.
3. Press and hold the brake pedal, then on
the touchscreen touch Controls >
Settings > Service & Reset > Tow Mode >
ON .
When Tow mode is active, Model X
displays this indicator light on the
instrument panel, along with a
message telling you that Model X is
free-rolling.
To cancel Tow Mode, shift Model X into Park.
Caution: If the electrical system is not
working, and you therefore cannot
release the electric parking brake,
attempt to jump start the 12V battery. For
instructions, call Tesla Roadside
Assistance. If a situation occurs where
you cannot disengage the parking brake,
use a self-loading dolly or tire skates.
Before doing so, always check the
manufacturer
Page 209 of 213

H
hazard warning
flashers 64
head restraints 25
head supports 25
headlightsadaptive 63
after exit 63
high beams 63
heated wipers 65
heating 126
height adjustments (suspension)auto-raising 132
automatic and manual settings 133
disabling (Jack mode) 133
high beam headlights 63
high voltageBattery specifications 185
components 153
safety 162
hills, stopping on 72
Home location 144
HomeLinkFCC certification 201
programming and using 148
hood 15
horn 49
I IC
certifications 200identification labels 177
Insane acceleration (performance dual motor) 73
Insane setting (dual-motor) 119
instant range 76
instrument panelcharging status 160
cleaning 170
overview of 54interiorcleaning 170
dimensions 181
lights 60
overview 2
temperature control 126
Internet radio 136
intrusion detection 147
ISOFIX child seats, installing 34
J
J1772 154
Jack mode 133
jacking 175
KkeyFCC and IC certifications 200
how to use 4
key not inside 51
ordering extras 7
replacing battery 5
keyless entry 4
L
labelStatutory Plate 179
Tire and Loading Information 179
lane assist 106
lane change flash 64
lane change, automatic 100
lane departure warning 106
Language & Units 122
language setting 122
Launch Mode (performance dual motor) 73
liftgateadjust opening height 14
opening 13
lifting 175
lightsadaptive headlights 63
hazard warning 64
headlights after exit 63
turn signals 63
load limits 178
location-based suspension 132
locking and unlocking doors 4
Ludicrous acceleration (performance dual
motor) 73
Ludicrous setting (dual-motor) 119
lug nut covers 166
lumbar support 20
M
maintenancebrake fluid, checking 173
cleaning 169
daily and monthly checks 162
fluid replacement intervals 162
panel, removing 173
replacing wipers 172
service intervals 162
tires 163
washer
fluid, topping up 174
map updates 145
maps 141
mats 171
Max Battery Power 119
Index
208Model X Owner