2018 TESLA MODEL X stop start
[x] Cancel search: stop startPage 67 of 213

Braking SystemsWarning: Properly functioning braking
systems are critical to ensure safety. If you experience a problem with the brake
pedal, brake caliper, or any component of
a Model X braking system, contact Tesla
immediately.
Model X has an anti-lock braking system
(ABS) that prevents the wheels from locking
when you apply maximum brake pressure. This
improves steering control during heavy
braking in most road conditions.
During emergency braking conditions, the
ABS constantly monitors the speed of each
wheel and varies the brake pressure according
to the grip available.
The alteration of brake pressure can be felt as
a pulsing sensation through the brake pedal.
This demonstrates that the ABS is operating
and is not a cause for concern. Keep
firm and
steady pressure on the brake pedal while
experiencing the pulsing.
The ABS indicator flashes briefly on
the instrument panel when you firststart Model X. If this indicator lights
up at any other time, an ABS fault
has occurred and the ABS is not
operating. Contact Tesla. The braking
system remains fully operational and
is not
affected by an ABS failure.
However, braking distances may
increase.
If the instrument panel displays this
indicator at any time other than
displaying
briefly when you first start
Model X, a brake system fault is
detected or the brake
fluid level is
low. Contact Tesla immediately.
Emergency Braking
In an emergency, fully press the brake pedal and maintain
firm pressure, even on low
traction surfaces. The ABS varies the braking
pressure to each wheel according to the
amount of traction available. This prevents
wheels from locking and ensures that you stop
as safely as possible.
Warning: Do not pump the brake pedal.
Doing so interrupts operation of the ABS
and can increase braking distance.Warning: Always maintain a safe distance
from the vehicle in front of you and beaware of hazardous driving conditions.
While the ABS can improve stopping
distance, it cannot overcome the laws of physics. It also does not prevent the
danger of hydroplaning (where a layer of
water prevents direct contact between the tires and the road).
Automatic Emergency Braking automatically
applies full braking in situations where a
collision is considered imminent (see Automatic Emergency Braking on page 109).
Warning: Automatic Emergency Braking
is not designed to prevent a collision. At best, it can minimize the impact of a
frontal collision by attempting to reduce
your driving speed. Depending on Automatic Emergency Braking to avoid a
collision can result in serious injury or death.
Brake Wear
Model X brake pads are equipped with wear indicators. A wear indicator is a thin metal
strip attached to the brake pad that squeals as
it rubs against the rotor when the pad wears
down. This squealing sound indicates that the
brake pads have reached the end of their service life and require replacement. To
replace the brake pads, contact Tesla Service.
Brakes must be periodically inspected visually by removing the tire and wheel. For detailed
specifications and service limits for rotors and
brake pads, see Brakes on page 184.
Warning:
Neglecting to replace worn
brake pads damages the braking system
and can result in a braking hazard.
Regenerative Braking
Whenever Model X is moving and your foot is
off the accelerator, regenerative braking slows
down Model X and feeds any surplus energy
back to the Battery.
By anticipating your stops and reducing or
removing pressure from the accelerator pedal
to slow down, you can take advantage of regenerative braking to increase driving range.
Of course, this is no substitute for regular
braking when needed for safety.
Note: If regenerative braking is aggressively
slowing Model X (such as when your foot is
completely
off the accelerator pedal at
highway speeds), the brake lights turn on to
alert others that you are slowing down.
Brakes
66Model X Owner
Page 160 of 213

Note: If charging at a Tesla Supercharger, and
paid supercharging is potentially in effect, the
charging screen also displays information
about your previous or current Supercharger
session (see Supercharger Usage Fees and
Idle Fees on page 161).
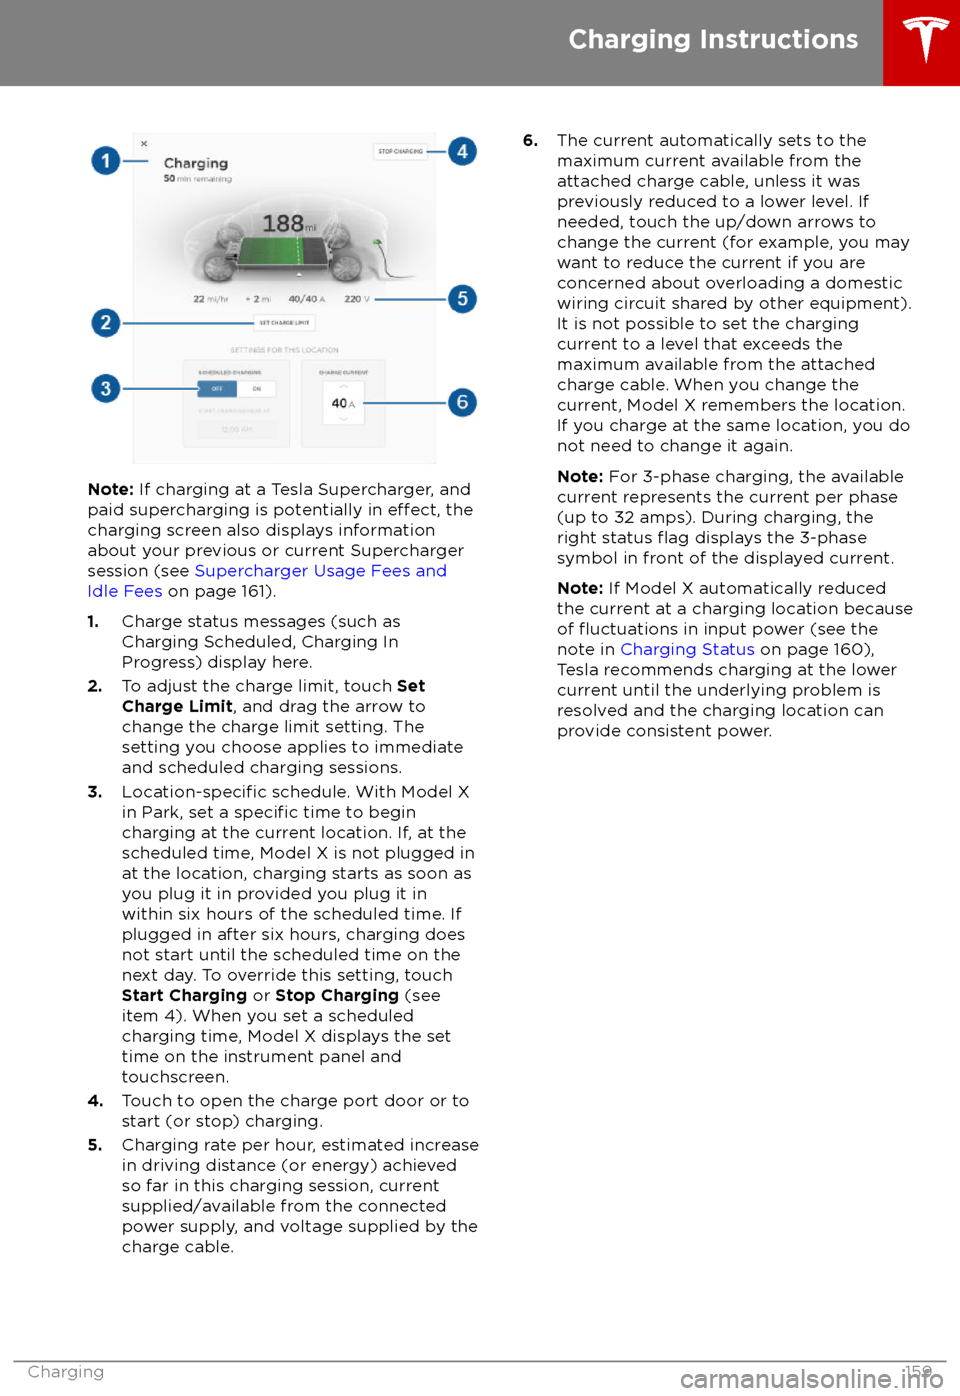
1. Charge status messages (such as
Charging Scheduled, Charging In
Progress) display here.
2. To adjust the charge limit, touch Set
Charge Limit , and drag the arrow to
change the charge limit setting. The
setting you choose applies to immediate
and scheduled charging sessions.
3.
Location-specific schedule. With Model X
in Park, set a specific time to begin
charging at the current location. If, at the
scheduled time, Model X is not plugged in
at the location, charging starts as soon as
you plug it in provided you plug it in
within six hours of the scheduled time. If
plugged in after six hours, charging does
not start until the scheduled time on the
next day. To override this setting, touch Start Charging or Stop Charging (see
item 4). When you set a scheduled
charging time, Model X displays the set
time on the instrument panel and
touchscreen.
4. Touch to open the charge port door or to
start (or stop) charging.
5. Charging rate per hour, estimated increase
in driving distance (or energy) achieved
so far in this charging session, current
supplied/available from the connected
power supply, and voltage supplied by the
charge cable.
6. The current automatically sets to the
maximum current available from the
attached charge cable, unless it was
previously reduced to a lower level. If
needed, touch the up/down arrows to change the current (for example, you may
want to reduce the current if you are
concerned about overloading a domestic
wiring circuit shared by other equipment).
It is not possible to set the charging
current to a level that exceeds the
maximum available from the attached charge cable. When you change the
current, Model X remembers the location.
If you charge at the same location, you do
not need to change it again.
Note: For 3-phase charging, the available
current represents the current per phase
(up to 32 amps). During charging, the
right status
flag displays the 3-phase
symbol in front of the displayed current.
Note: If Model X automatically reduced
the current at a charging location because
of
Page 162 of 213

Supercharger Usage Fees and IdleFees
When charging using a Tesla supercharger,
PAID SUPERCHARGING information displays at the bottom of the charging screen. Thisinformation includes the location, the time
that charging started, and an estimate of how
much the session will cost. When you stop
charging, the
final cost displays until a new
Supercharging session begins. If free charging
is applicable, the cost displays as zero.
When charging at a Tesla supercharger, you
are subject to idle fees. Idle fees are designed
to encourage drivers to move their vehiclefrom the Supercharger when charging iscomplete and are in
effect whenever at least
half of the Superchargers at a site are
occupied. The Tesla mobile app
notifies you
when charging nears completion, and again when charging is complete. Additional
notifications are sent if idle fees are incurred.
Idle fees are waived if you move your vehicle
within
five minutes of charging completion.
Log into your Tesla Account to view fees and
details about Supercharger sessions, track the
remaining balance of free credits, set up a payment method, and make payments. Once a
payment method is saved, fees are automatically paid from your account.
Charging Instructions
Charging161
Page 165 of 213

Inspecting and Maintaining TiresRegularly inspect the tread and side walls for
any sign of distortion (bulges), foreign objects,
cuts or wear.Warning: Do not drive Model X if a tire is
damaged, excessively worn, or inflated to
an incorrect pressure. Check tires
regularly for wear, and ensure there are
no cuts, bulges or exposure of the ply/
cord structure.
Tire Wear
Adequate tread depth is important for proper
tire performance. Tires with a tread depth less
than 3 mm are more likely to hydroplane in
wet conditions and should not be used. Tires
with a tread depth less than 4 mm do not
perform well in snow and slush and should not
be used when driving in winter conditions.
Model X is originally
fitted with tires that have
wear indicators molded into the tread pattern. When the tread has been worn down to 3 mm,
the indicators start to appear at the surface of
the tread pattern, producing the
effect of a
continuous band of rubber across the width of
the tire. For optimal performance and safety,
Tesla recommends replacing tires before the
wear indicators are visible.
Tire Rotation, Balance, and Wheel Alignment
Model X tires cannot be rotated, as tires are
asymmetrical and front tires are a
differentsize from rear tires.
Unbalanced wheels (sometimes noticeable as
vibration through the steering wheel)
affectvehicle handling and tire life. Even with regular
use, wheels can get out of balance. Therefore,
they should be balanced as required.
If tire wear is uneven (on one side of the tire
only) or becomes abnormally excessive, check
the alignment of wheels.
Note: When replacing only two tires, always
install the new tires on the rear.
Punctured Tires
A puncture eventually causes the tire to lose pressure, which is why it is important to check
tire pressures frequently. Permanently repair
or replace punctured or damaged tires as
soon as possible.
Your tubeless tires may not leak when
penetrated, provided the object remains in the tire. If, however, you feel a sudden vibration or
ride disturbance while driving, or you suspect a tire is damaged, immediately reduce yourspeed. Drive slowly, while avoiding heavy
braking or sharp steering and, when safe to do so, stop the vehicle. Arrange to have Model X
transported to a Tesla Service Center, or to a nearby tire repair center.
Note: In some cases, you can temporarily
repair small tire punctures (under 6 mm) using an optional tire repair kit available from Tesla.
This allows you to slowly drive Model X to Tesla or to a nearby tire repair facility.Warning: Do not drive with a punctured
tire, even if the puncture has not caused the tire to
deflate. A punctured tire candeflate suddenly at any time.
Flat Spots
If Model X is stationary for a long period in
high temperatures, tires can form
flat spots.
When Model X is driven, these flat spots cause
a vibration which gradually disappears as the
tires warm up and regain their original shape.
To minimize
flat spots during storage, inflatetires to the maximum pressure indicated on the tire wall. Then, before driving, release airto adjust tire pressure to the recommended
levels.
Improving Tire Mileage To improve the mileage you get from your
tires, maintain tires at the recommended tire
pressures, observe speed limits and advisory
speeds, and avoid: