Page 89 of 165

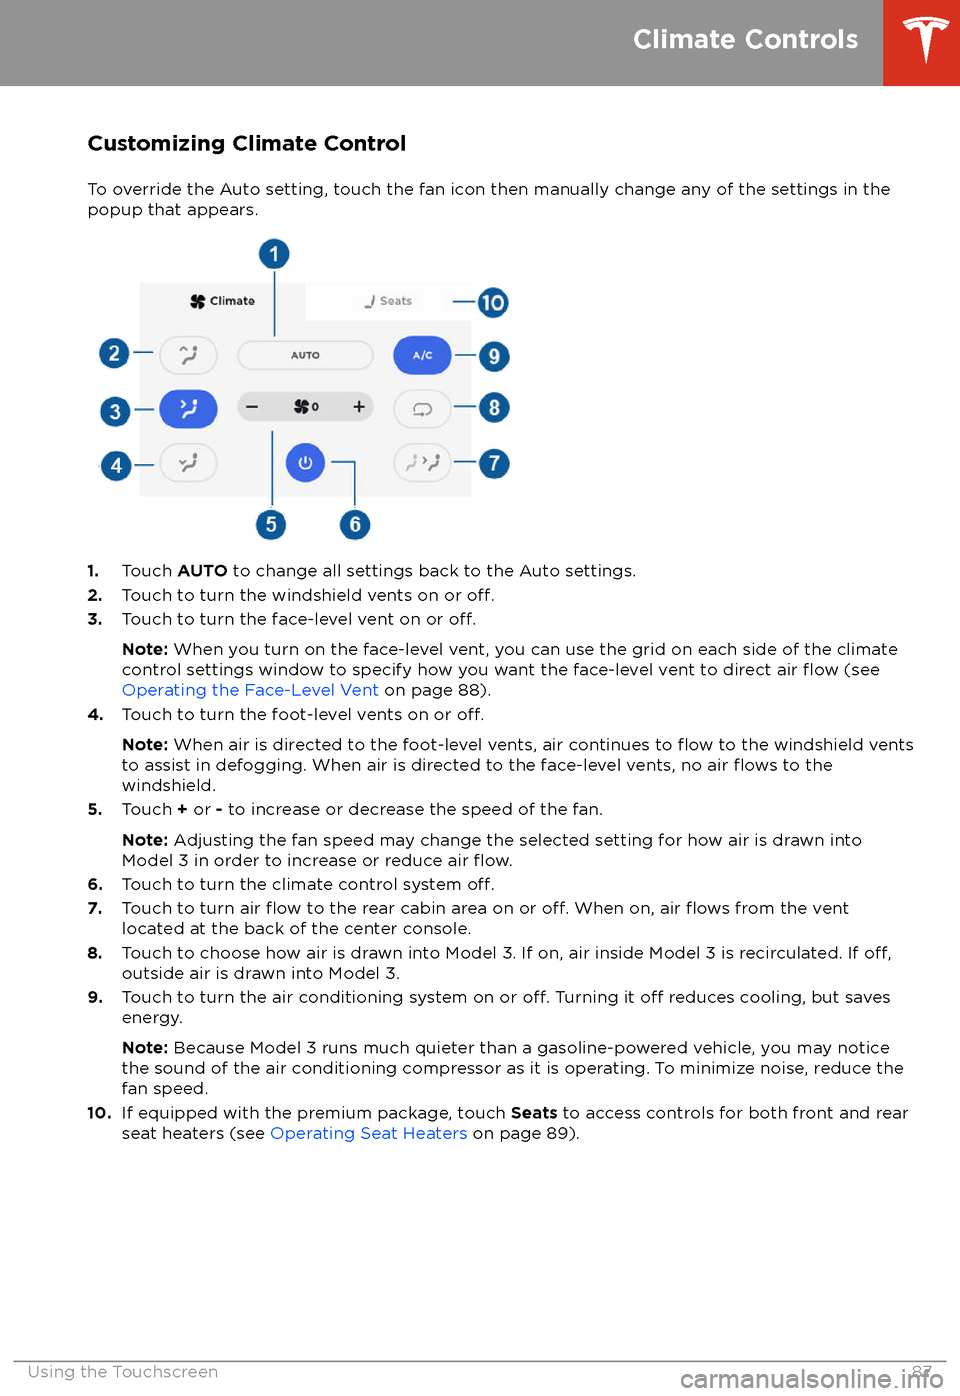
Customizing Climate ControlTo override the Auto setting, touch the fan icon then manually change any of the settings in thepopup that appears.
1. Touch AUTO to change all settings back to the Auto settings.
2. Touch to turn the windshield vents on or off.3.Touch to turn the face-level vent on or off.
Note: When you turn on the face-level vent, you can use the grid on each side of the climate
control settings window to specify how you want the face-level vent to direct air flow (see
Operating the Face-Level Vent on page 88).
4. Touch to turn the foot-level vents on or
off.
Note: When air is directed to the foot-level vents, air continues to flow to the windshield vents
to assist in defogging. When air is directed to the face-level vents, no air flows to the
windshield.
5. Touch + or - to increase or decrease the speed of the fan.
Note: Adjusting the fan speed may change the selected setting for how air is drawn into
Model 3 in order to increase or reduce air
flow.6. Touch to turn the climate control system off.7. Touch to turn air flow to the rear cabin area on or off. When on, air flows from the vent
located at the back of the center console.
8. Touch to choose how air is drawn into Model 3. If on, air inside Model 3 is recirculated. If
off,outside air is drawn into Model 3.
9. Touch to turn the air conditioning system on or off. Turning it off reduces cooling, but saves
energy.
Note: Because Model 3 runs much quieter than a gasoline-powered vehicle, you may notice
the sound of the air conditioning compressor as it is operating. To minimize noise, reduce the fan speed.
10. If equipped with the premium package, touch Seats to access controls for both front and rear
seat heaters (see Operating Seat Heaters on page 89).
Climate Controls
Using the Touchscreen87
Page 90 of 165
Operating the Face-Level Vent
Model 3 has a unique horizontal face-level
vent that spans the width of the dashboard.
Using the touchscreen, you can pinpoint
exactly where you want to direct the air
flowing from this vent when heating or cooling
the cabin area.
When the face-level vent is turned on (see
Customizing Climate Control on page 87), you
can control the driver and passenger side
separately using the corresponding grids that
appear on each side of the climate control
settings window.
1. Driver vent and control grid
2. Passenger vent and control grid
Simply drag the oblong or circle(s) on the control grid to direct air
flow from the
corresponding vent to wherever you want it. You can also touch a location on the grid tomove the oblong or circle(s) to that location.
Note: The line across the center of the grid
represents the center of the headrest on the
corresponding front seat.
This example illustrates how moving the single
oblong in the driver
Page 126 of 165

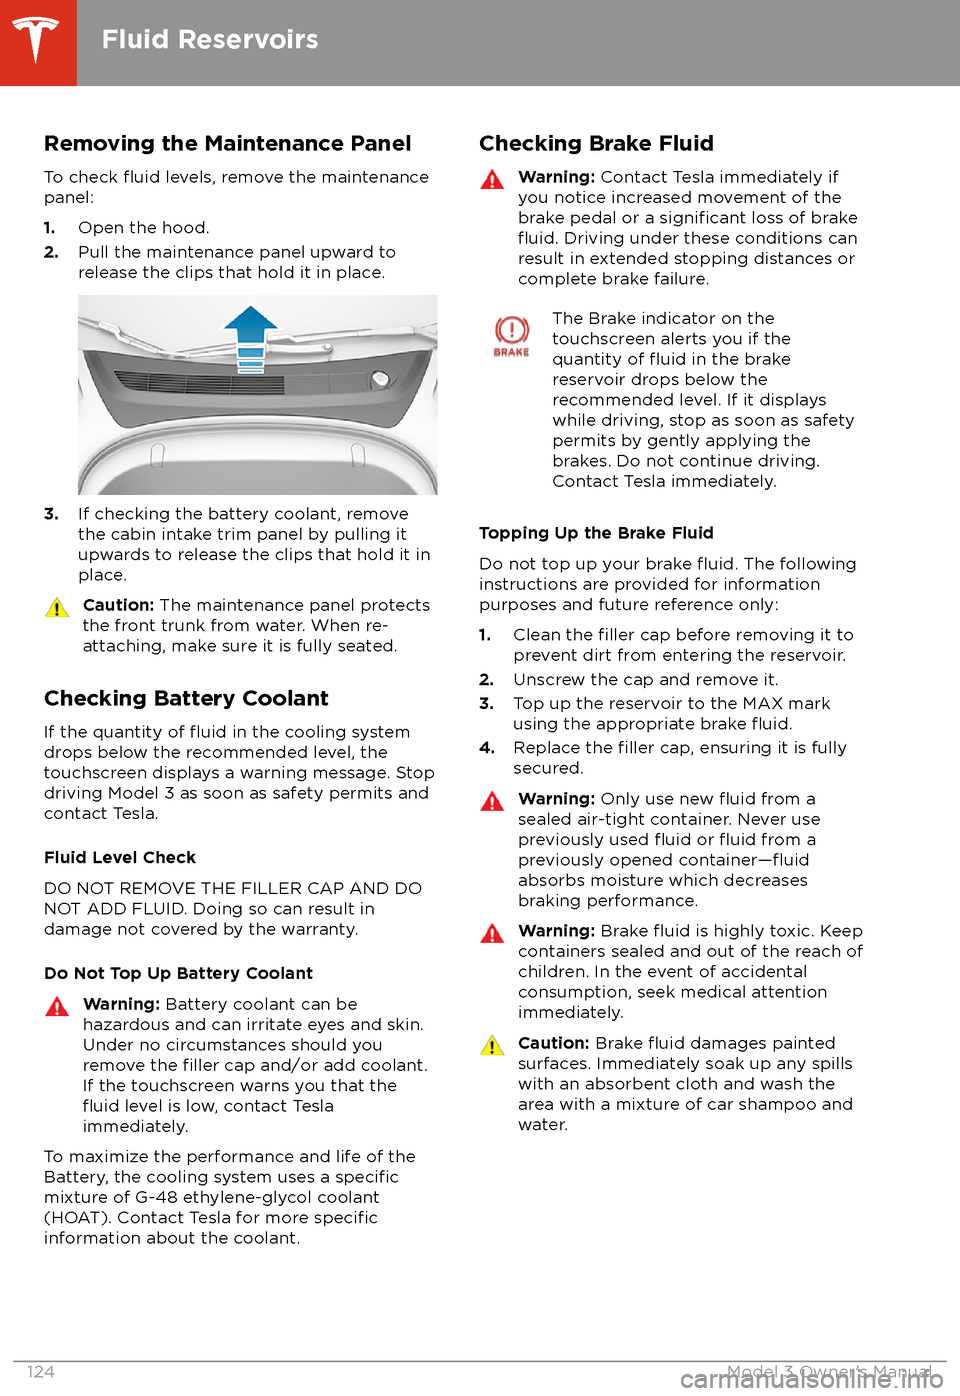
Removing the Maintenance PanelTo check
fluid levels, remove the maintenance
panel:
1. Open the hood.
2. Pull the maintenance panel upward to
release the clips that hold it in place.
3. If checking the battery coolant, remove
the cabin intake trim panel by pulling it
upwards to release the clips that hold it in
place.
Caution: The maintenance panel protects
the front trunk from water. When re-
attaching, make sure it is fully seated.
Checking Battery Coolant
If the quantity of
fluid in the cooling system
drops below the recommended level, the
touchscreen displays a warning message. Stop
driving Model 3 as soon as safety permits and
contact Tesla.
Fluid Level Check
DO NOT REMOVE THE FILLER CAP AND DO
NOT ADD FLUID. Doing so can result in damage not covered by the warranty.
Do Not Top Up Battery Coolant
Warning: Battery coolant can be
hazardous and can irritate eyes and skin.
Under no circumstances should you
remove the
filler cap and/or add coolant.
If the touchscreen warns you that the
fluid level is low, contact Tesla
immediately.
To maximize the performance and life of the
Battery, the cooling system uses a specificmixture of G-48 ethylene-glycol coolant
(HOAT). Contact Tesla for more specificinformation about the coolant.
Checking Brake FluidWarning: Contact Tesla immediately if
you notice increased movement of the brake pedal or a
significant loss of brakefluid. Driving under these conditions can
result in extended stopping distances or complete brake failure.
The Brake indicator on the
touchscreen alerts you if the
quantity of
fluid in the brake
reservoir drops below the
recommended level. If it displays
while driving, stop as soon as safety
permits by gently applying the
brakes. Do not continue driving.
Contact Tesla immediately.
Topping Up the Brake Fluid
Do not top up your brake
fluid. The following
instructions are provided for information purposes and future reference only:
1. Clean the
filler cap before removing it to
prevent dirt from entering the reservoir.
2. Unscrew the cap and remove it.
3. Top up the reservoir to the MAX mark
using the appropriate brake
fluid.4. Replace the filler cap, ensuring it is fully
secured.
Warning: Only use new fluid from a
sealed air-tight container. Never use
previously used
fluid or fluid from a
previously opened container