2018 SUBARU WRX ECU
[x] Cancel search: ECUPage 372 of 578

(385,1)
北米Model "A1700BE-B" EDITED: 2017/ 10/ 11
Continuously variable trans-
missionThe continuously variable transmission is
electronically controlled and provides an
infinite number of forward speeds and 1
reverse speed. It also has a manual mode.
WARNING
Do not shift from the“P”or“N”
position into the“D”or“R”position
while depressing the accelerator
pedal. This may cause the vehicle
to jump forward or backward.
CAUTION
.Observe the following precau-
tions. Otherwise, the transmis-
sion could be damaged.
–Shift into the“P”or“R”posi-
tion only after the vehicle has
completely stopped.
–Do not shift from the“D”
position into the“R”position
or vice versa until the vehicle
has completely stopped.
.Do not race the engine for more
than 5 seconds in any position
except the“N”or“P”positionwhen the brake is applied or
when chocks are used in the
wheels. This may cause the
transmission fluid to overheat.
.Never move the vehicle as fol-
lows. Doing so may result in an
unexpected accident or malfunc-
tion.
–Moving rearward by inertia
with the select lever set in a
forward driving position.
–Moving forward by inertia with
the select lever set in the“R”
position.
.When parking the vehicle, first
securely apply the parking brake
and then place the select lever in
the“P”position. Do not park for a
long time with the select lever in
any other position as doing so
could result in a dead battery.
NOTE.When the engine coolant tempera-
ture is still low, the transmission will
upshift to higher engine speeds than
when the coolant temperature is suffi-
ciently high in order to shorten the
warm-up time and improve driveability.
The gearshift timing will automaticallyshift to the normal timing after the
engine has warmed up.
.Immediately after transmission fluid
is replaced, you may feel that the
transmission operation is somewhat
unusual. This results from invalidation
of data which the on-board computer
has collected and stored in memory to
allow the transmission to shift at the
most appropriate times for the current
condition of your vehicle. Optimized
shifting will be restored as the vehicle
continues to be driven for a while.
.When driving under continuous hea-
vy load conditions such as when climb-
ing a long, steep hill, the engine speed
or the vehicle speed may automatically
be reduced. This is not a malfunction.
This phenomenon results from the
engine control function maintaining
the cooling performance of the vehicle.
The engine and vehicle speed will
return to a normal speed when the
engine is able to maintain the optimum
cooling performance after the heavy
load decreases. Take extremely care
when driving under a heavy load.
.The continuously variable transmis-
sion is a chain type system that pro-
vides superior transmission efficiency
for maximum fuel economy. At times,
depending on varying driving condi-
tions, a chain operating noise may be
–CONTINUED–
Starting and operating/Continuously variable transmission
7-23
7
Page 436 of 578

(451,1)
北米Model "A1700BE-B" EDITED: 2017/ 10/ 11
Loading your vehicle
WARNING
.Never allow passengers to ride
on a folded rear seatback or in the
trunk. Doing so may result in
serious injury.
.Never stack luggage or other
cargo higher than the top of the
seatback because it could tumble
forward and injure passengers in
the event of a sudden stop or
accident. Keep luggage or cargo
low, as close to the floor as
possible.
.Stow cargo and luggage in the
trunk whenever possible..To prevent cargo and luggage
from sliding forward during brak-
ing, do not stack anything in the
enlarged trunk. Keep cargo and
luggage low, as close to the floor
as possible.
.When you carry something inside
the vehicle, secure it whenever
you can to prevent it from being
thrown around inside the vehicle
during sudden stops, sharp turns
or in an accident.
.Do not pile heavy loads on the
roof. These loads raise the vehi-
cle’s center of gravity and make it
more prone to tip over.
.Secure lengthy items properly to
prevent them from shooting for-
ward and causing serious injury
during a sudden stop.
.Never exceed the maximum load
limit. If you do, some parts on
your vehicle can break, or it can
change the way your vehicle
handles. This could result in loss
of control and cause personal
injury. Also, overloading can
shorten the life of your vehicle.
.Do not place cargo or luggage in
or on the following locations as
the item may get under theclutch, brake, or accelerator ped-
al and prevent the pedals from
being depressed properly, block
the driver’s vision, or hit the
driver or passengers, causing
an accident:
–At the feet of the driver
–On the front passenger or rear
seats (when stacking items)
–On the rear shelf
–On the instrument panel
–On the dashboard
CAUTION
Do not carry spray cans, containers
with flammable or corrosive liquids
or any other dangerous items inside
the vehicle.NOTEFor better fuel economy, do not carry
unneeded cargo.
–CONTINUED–
Driving tips/Loading your vehicle
8-11
8
Page 438 of 578

(453,1)
北米Model "A1700BE-B" EDITED: 2017/ 10/ 11
&Precautions for TYPE RAThe roof carrier and other equipment
cannot be attached on the carbon roof
because of the design.
WARNING
Do not place a roof carrier or any
other equipment on the roof of the
vehicle. Due to the design of the
roof, the cargo may fall off and cause
an accident.&Roof molding and crossbar (if
equipped)
CAUTION
.For cargo carrying purposes, the
roof molding must be used to-
gether with a roof crossbar kit
and the appropriate carrying at-
tachment. Otherwise, damage tothe roof or paint or a dangerous
road hazard due to loss of cargo
could result.
.When using the roof crossbar kit,
make sure that the total weight of
the crossbars, carrying attach-
ment and cargo does not exceed
the maximum load limit. Over-
loading may cause damage to
the vehicle and create a safety
hazard.
Cargo can be carried after securing the
roof crossbar kit to the roof molding and
installing the appropriate carrying attach-
ment. When installing the roof crossbar kit,
follow the manufacturer’s instructions.
When carrying cargo on the roof using the
roof crossbar kit and carrying attachments,
never exceed the maximum load limit as
explained below. You should also be
careful that the vehicle does not exceed
the Gross Vehicle Weight Rating (GVWR)
and front and rear Gross Axle Weight
Rating (GAWR). For information about
loading cargo into or onto your vehicle,
refer to“Loading your vehicle”F8-11. The
maximum total load on the roof (including
crossbars, carrying attachments and car-
go) must not exceed88 lbs (40 kg). Refer
to the crossbar installation instructions for
the maximum crossbar capacity. Place the
–CONTINUED–
Driving tips/Loading your vehicle
8-13
8
Page 439 of 578

(454,1)
北米Model "A1700BE-B" EDITED: 2017/ 10/ 11
heaviest load at the bottom, close to the
roof, and evenly distribute the cargo.
Always properly secure all cargo.
!Installing carrying attachments on
the crossbars
When installing any carrying attachments
such as the load carriers, crossbars, bike
carrier, ski carrier, kayak carrier, cargo
basket, etc., follow the manufacturer’s
instructions of the load capacity and make
sure that the attachments are securely
installed. Use only attachments designed
specifically for the crossbars. Before oper-
ating the vehicle, make sure that the cargo
is properly secured on the attachment.NOTERemember that the vehicle’s center of
gravity is altered with the weight of the
load on the roof, thus affecting the
driving characteristics.
Drive carefully. Avoid rapid starts, hard
cornering and abrupt stops. Crosswind
effects will be increased.!Removal and installation of the
crossbars
Each of the two roof moldings has two
mounting points for crossbars. Each
mounting point is fitted with a cover. Use
a screwdriver to remove the covers. When
installing the crossbars on the roof mold-
ing, follow the manufacturer’s instructions.
Trailer towing
CAUTION
Your vehicle is neither designed nor
intended to be used for trailer tow-
ing. Therefore, never tow a trailer
with your vehicle.
SUBARU assumes no responsibility for
injuries or vehicle damage that may result
from trailer towing, from any trailer towing
equipment or from any errors or omissions
in the instructions accompanying such
equipment. SUBARU warranties do not
apply to vehicle damage or malfunction
caused by trailer towing.
Driving tips/Trailer towing
8-14
Page 441 of 578

(456,1)
北米Model "A1700BE-B" EDITED: 2017/ 10/ 11
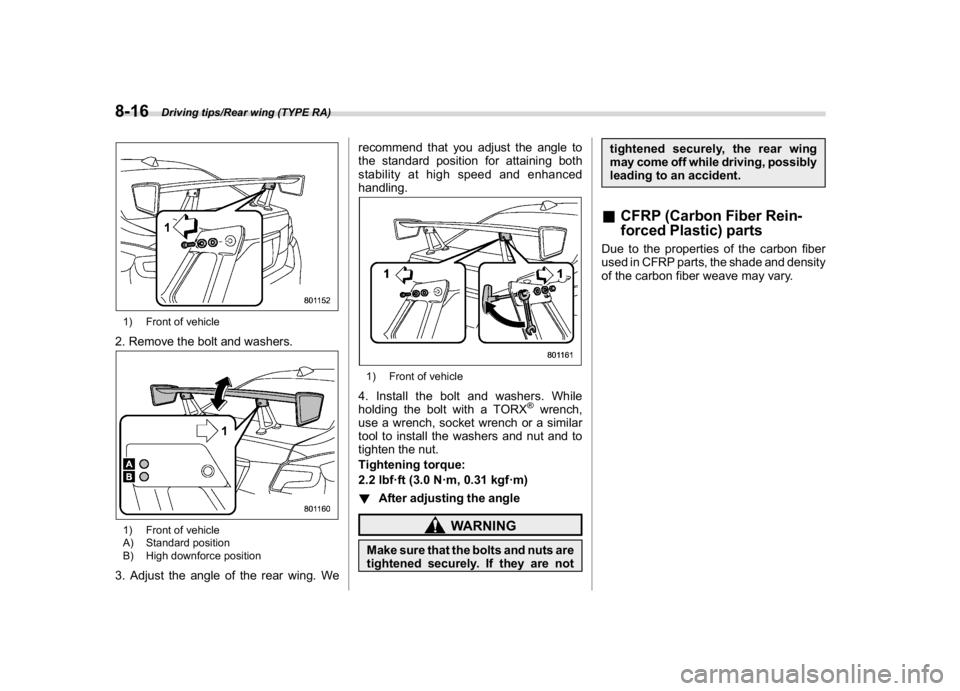
1) Front of vehicle2. Remove the bolt and washers.1) Front of vehicle
A) Standard position
B) High downforce position3. Adjust the angle of the rear wing. Werecommend that you adjust the angle to
the standard position for attaining both
stability at high speed and enhanced
handling.
1) Front of vehicle4. Install the bolt and washers. While
holding the bolt with a TORX
®wrench,
use a wrench, socket wrench or a similar
tool to install the washers and nut and to
tighten the nut.
Tightening torque:
2.2 lbf·ft (3.0 N·m, 0.31 kgf·m)
!After adjusting the angle
WARNING
Make sure that the bolts and nuts are
tightened securely. If they are nottightened securely, the rear wing
may come off while driving, possibly
leading to an accident.
&CFRP (Carbon Fiber Rein-
forced Plastic) partsDue to the properties of the carbon fiber
used in CFRP parts, the shade and density
of the carbon fiber weave may vary.
Driving tips/Rear wing (TYPE RA)
8-16
Page 446 of 578

(463,1)
北米Model "A1700BE-B" EDITED: 2017/ 10/ 11
1) Wheel nut wrench
2) Screwdriver
3) Jack
4) Towing hook (eye bolt)A jack handle is stored under the floor of
the trunk. A jack and a towing hook are
stored in the tool bucket that is located in
the recess of the spare tire wheel. A
screwdriver and a wheel nut wrench are
stored in the vinyl bag. You can also store
these tools in the tool bucket.NOTEFor how to use the jack, refer to“Flat
tires”F9-5.
Flat tiresIf you have a flat tire while driving, never
brake suddenly; keep driving straight
ahead while gradually reducing speed.
Then slowly pull off the road to a safe
place.&Changing a flat tire!Models with flat tire repair kit
It may be difficult to change a flat tire.
However, it may be possible to seal the
tire. For details, refer to“Sealing flat tire
(models with flat tire repair kit)”F9-8.
!Models without flat tire repair kit
WARNING
.Do not jack up the vehicle on an
incline or a loose road surface.
The jack can come out of the
jacking point or sink into the
ground and this can result in a
severe accident.
.Use only the jack provided with
your vehicle. The jack supplied
with the vehicle is designed only
for changing a tire. Never get
under the vehicle while support-
ing the vehicle with this jack..Before using the jack, be sure
that there are no occupants or
cargo in the vehicle.
.Always turn off the engine before
raising the flat tire off the ground
using the jack. Never swing or
push the vehicle supported with
the jack. The jack can come out of
the jacking point due to a jolt and
this can result in a severe acci-
dent.
1. Park on a hard, level surface, when-
ever possible, then stop the engine.
2. Set the parking brake securely and
shift the shift lever in reverse (MT models)
or the select lever to the“P”(Park) position
(CVT models).
3. Turn on the hazard warning flasher and
have everyone get out of the vehicle.
–CONTINUED–
In case of emergency/Flat tires
9-5
9
Page 449 of 578

(466,1)
北米Model "A1700BE-B" EDITED: 2017/ 10/ 11
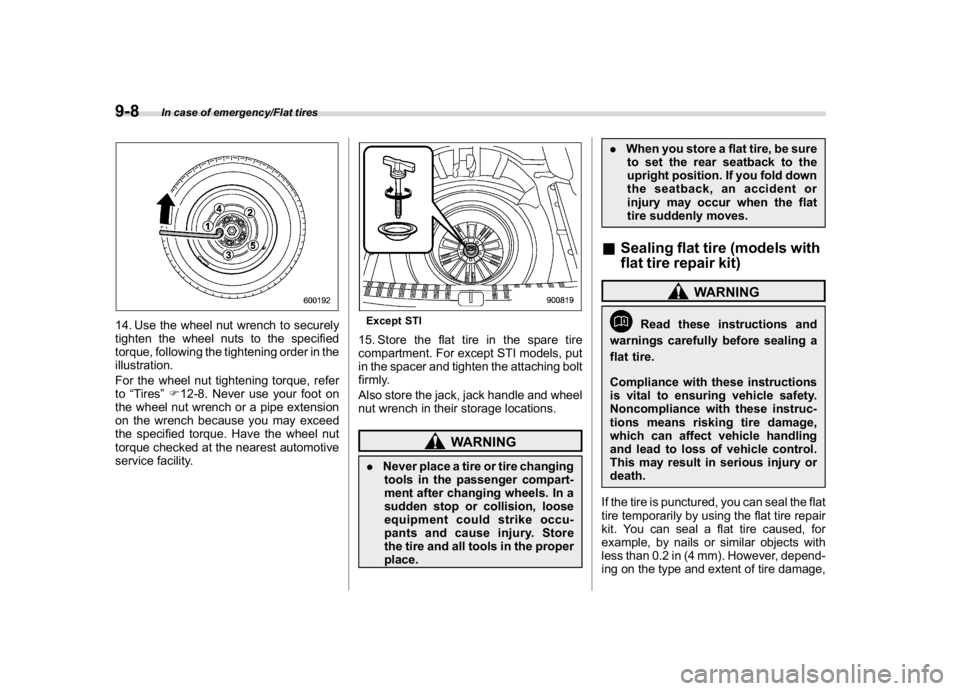
14. Use the wheel nut wrench to securely
tighten the wheel nuts to the specified
torque, following the tightening order in the
illustration.
For the wheel nut tightening torque, refer
to“Tires”F12-8. Never use your foot on
the wheel nut wrench or a pipe extension
on the wrench because you may exceed
the specified torque. Have the wheel nut
torque checked at the nearest automotive
service facility.
Except STI15. Store the flat tire in the spare tire
compartment. For except STI models, put
in the spacer and tighten the attaching bolt
firmly.
Also store the jack, jack handle and wheel
nut wrench in their storage locations.
WARNING
.Never place a tire or tire changing
tools in the passenger compart-
ment after changing wheels. In a
sudden stop or collision, loose
equipment could strike occu-
pants and cause injury. Store
the tire and all tools in the proper
place..When you store a flat tire, be sure
to set the rear seatback to the
upright position. If you fold down
the seatback, an accident or
injury may occur when the flat
tire suddenly moves.
&Sealing flat tire (models with
flat tire repair kit)
WARNING
Read these instructions and
warnings carefully before sealing a
flat tire.
Compliance with these instructions
is vital to ensuring vehicle safety.
Noncompliance with these instruc-
tions means risking tire damage,
which can affect vehicle handling
and lead to loss of vehicle control.
This may result in serious injury or
death.
If the tire is punctured, you can seal the flat
tire temporarily by using the flat tire repair
kit. You can seal a flat tire caused, for
example, by nails or similar objects with
less than 0.2 in (4 mm). However, depend-
ing on the type and extent of tire damage,
In case of emergency/Flat tires
9-8
Page 451 of 578

(468,1)
北米Model "A1700BE-B" EDITED: 2017/ 10/ 11
.Do not tow a trailer.
.If used for a purpose other than
sealing a flat tire, the flat tire
repair kit may cause a severe
accident or injury due to the fact
that compressed air can act as an
explosive or propellant.
.Safely park your vehicle on the
roadside so that you do not
obstruct the flow of traffic and
so that you are able to seal the flat
tire without being in danger.
.Apply the parking brake, even if
the vehicle is parked on a level
road, to make sure that the vehi-
cle will not move.
.Stop the engine before sealing
the flat tire.
.Turn on the hazard warning
flasher while sealing the flat tire.
.Do not attempt to remove foreign
objects like nails or screws that
have penetrated the tire. Leave
them as they are.
.Never leave the flat tire repair kit
unattended while in use.
.Only one tire can be repaired with
one bottle of sealant.
.The tires can be repaired when
the ambient temperature is�228F(�308C) or higher.
CAUTION
.Remember that the flat tire repair
kit only provides temporary mo-
bility. Regulations concerning
tire repair after usage of flat tire
repair kit may differ from country
to country. We recommend that
you consult your SUBARU dealer
or tire dealer for advice.
.Store the flat tire repair kit safely
and secure it in the cargo area.
Storing it anywhere in the pas-
senger compartment is not advi-
sable because it could strike an
occupant in the event of a sudden
stop or collision and cause injury.
.Use the flat tire repair kit with
original vehicle tires only.
.Do not keep the air compressor
operating for more than 10 min-
utes, otherwise there is a risk of
overheating.
.The temperature of the air com-
pressor may become high. Be
careful not to burn yourself.
.When raining, take measures to
prevent the air compressor frombeing exposed directly to the
rain. Exposing to rain may cause
a malfunction.
.Do not use air compressors other
than the one in the repair kit.
Using an air compressor other
than the one in the repair kit may
damage the tires.
.Do not disassemble or modify the
air compressor to enable the use
of a power supply or a battery
other than DC12V.
.If a temporary puncture repair is
performed with the repair kit, the
Tire Pressure Monitoring System
(TPMS) may not operate nor-
mally.
In case of emergency/Flat tires
9-10