2018 SUBARU WRX battery
[x] Cancel search: batteryPage 459 of 578

(476,1)
北米Model "A1700BE-B" EDITED: 2017/ 10/ 11
Jump starting
WARNING
.Battery fluid is SULFURIC ACID.
Do not let it come in contact with
the eyes, skin, clothing or the
vehicle.
If battery fluid gets on you, thor-
oughly flush the exposed area
with water immediately. Get med-
ical help if the fluid has entered
your eyes.
If battery fluid is accidentally
swallowed, immediately drink a
large amount of milk or water,
and obtain immediate medical
help.
Keep everyone including chil-
dren away from the battery.
.The gas generated by a battery
explodes if a flame or spark is
brought near it. Do not smoke or
light a match while jump starting.
.Never attempt jump starting if the
discharged battery is frozen. It
could cause the battery to burst
or explode.
.Whenever working on or around a
battery, always wear suitable eyeprotectors, and remove metal
objects such as rings, bands or
other metal jewelry.
.Be sure the jumper cables and
clamps on them do not have
loose or missing insulation.
Do not jump start unless cables
in suitable condition are avail-
able.
.A running engine can be danger-
ous. Keep your fingers, hands,
clothing, hair and tools away
from the cooling fan, belts and
any other moving engine parts.
Removing rings, watches and
ties is advisable.
.Jump starting is dangerous if it
done incorrectly. If you are un-
sure about the proper procedure
for jump starting, consult a com-
petent mechanic.
When your vehicle does not start due to a
run down (discharged) battery, the vehicle
may be jump started by connecting your
battery to another battery (called the
booster battery) with jumper cables.
&How to jump start1. Make sure the booster battery is 12
volts and the negative terminal is
grounded.
2. If the booster battery is in another
vehicle, do not let the two vehicles touch.
3. Turn off all unnecessary lights and
accessories.
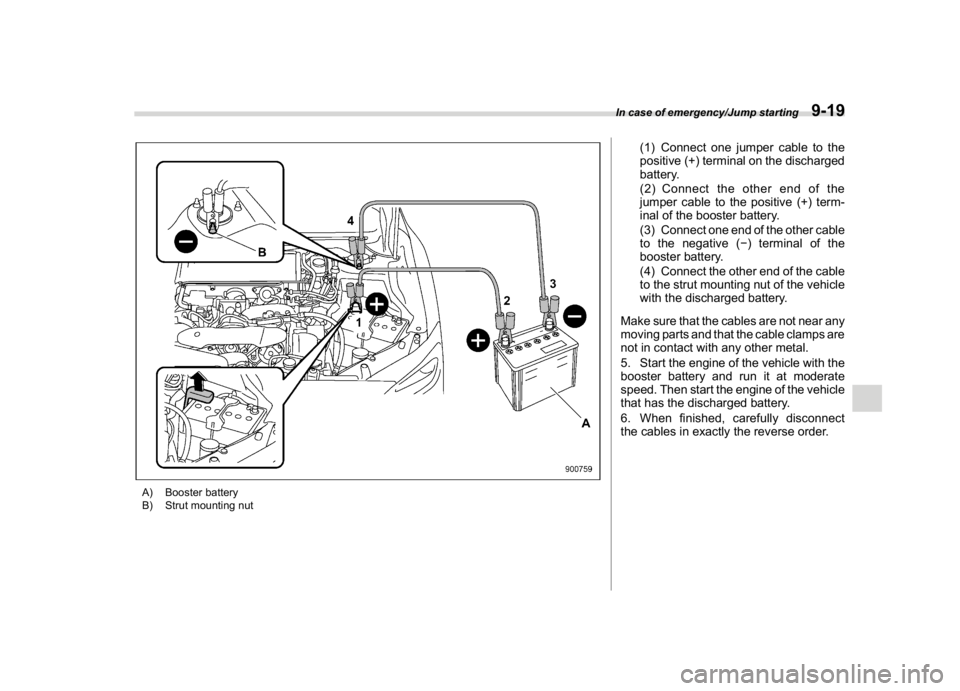
4. Connect the jumper cables exactly in
the sequence illustrated.
In case of emergency/Jump starting
9-18
Page 460 of 578

(477,1)
北米Model "A1700BE-B" EDITED: 2017/ 10/ 11
A) Booster battery
B) Strut mounting nut
(1) Connect one jumper cable to the
positive (+) terminal on the discharged
battery.
(2) Connect the other end of the
jumper cable to the positive (+) term-
inal of the booster battery.
(3) Connect one end of the other cable
to the negative (�) terminal of the
booster battery.
(4) Connect the other end of the cable
to the strut mounting nut of the vehicle
with the discharged battery.
Make sure that the cables are not near any
moving parts and that the cable clamps are
not in contact with any other metal.
5. Start the engine of the vehicle with the
booster battery and run it at moderate
speed. Then start the engine of the vehicle
that has the discharged battery.
6. When finished, carefully disconnect
the cables in exactly the reverse order.
In case of emergency/Jump starting
9-19
9
Page 467 of 578

(484,1)
北米Model "A1700BE-B" EDITED: 2017/ 10/ 11
Access key fob–if access key
fob does not operate properly
CAUTION
Keep metallic objects, magnetic
sources and signal transmitters
away from the area between the
access key fob and the push-button
ignition switch. They may interfere
with the communication between
the access key fob and the push-
button ignition switch.
The following functions may be inoperable
because of strong radio signals in the
surrounding area or a low battery condition
of the access key fob.
.Locking/unlocking doors
.Switching power status
.Starting the engine
In such cases, perform the following
procedure. When the battery of the access
key fob is discharged, replace it with a new
one. Refer to“Replacing battery of access
key fob”F11-52.
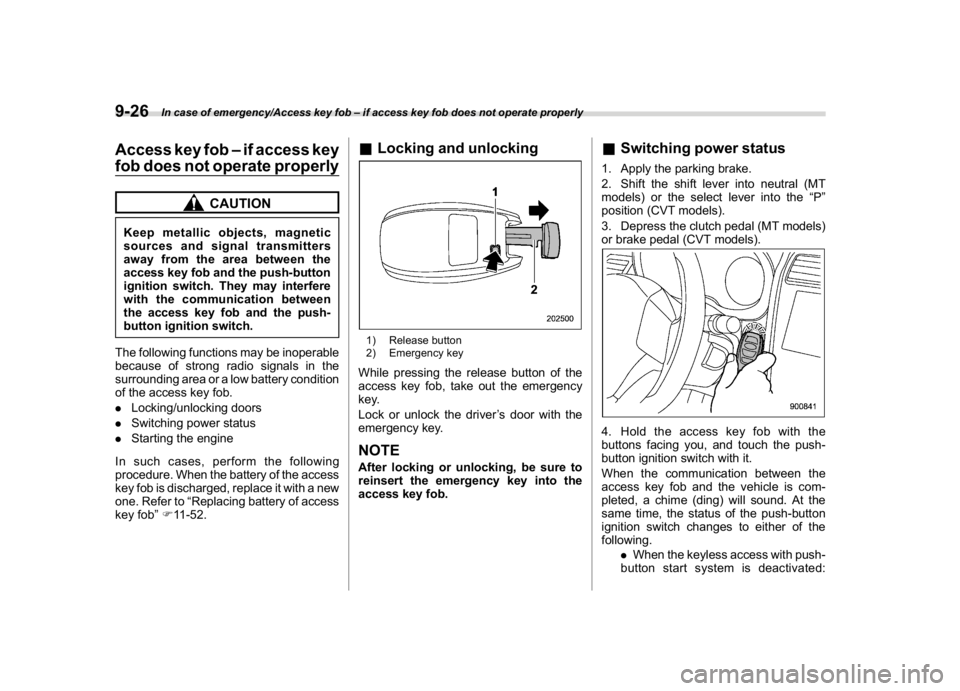
&Locking and unlocking1) Release button
2) Emergency keyWhile pressing the release button of the
access key fob, take out the emergency
key.
Lock or unlock the driver’s door with the
emergency key.NOTEAfter locking or unlocking, be sure to
reinsert the emergency key into the
access key fob.
&Switching power status1. Apply the parking brake.
2. Shift the shift lever into neutral (MT
models) or the select lever into the“P”
position (CVT models).
3. Depress the clutch pedal (MT models)
or brake pedal (CVT models).4. Hold the access key fob with the
buttons facing you, and touch the push-
button ignition switch with it.
When the communication between the
access key fob and the vehicle is com-
pleted, a chime (ding) will sound. At the
same time, the status of the push-button
ignition switch changes to either of the
following.
.When the keyless access with push-
button start system is deactivated:
In case of emergency/Access key fob–if access key fob does not operate properly
9-26
Page 479 of 578

(500,1)
北米Model "A1700BE-B" EDITED: 2017/ 10/ 11
Parking brake stroke (models without
electronic parking brake system)................... 11-30
Tires and wheels................................................. 11-30
Types of tires...................................................... 11-30
Tire pressure monitoring system (TPMS)
(if equipped)..................................................... 11-30
Tire inspection.................................................... 11-32
Tire pressures and wear...................................... 11-32
Wheel balance.................................................... 11-34
Wear indicators................................................... 11-35
Rotational direction of tires................................. 11-35
Tire rotation........................................................ 11-36
Tire replacement................................................. 11-36
Wheel replacement............................................. 11-37
Alloy wheels........................................................ 11-38
Windshield washer fluid..................................... 11-38
Replacement of wiper blades............................ 11-39
Windshield wiper blade assembly........................ 11-40
Windshield wiper blade rubber............................ 11-40
Battery................................................................. 11-41Fuses....................................................................11-42
Installation of accessories..................................11-44
Replacing bulbs...................................................11-44
Headlights (models with LED headlights)............ 11-44
High beam headlight
(models without LED headlights)..................... 11-44
Low beam headlight*, front side marker light,
parking light* and front turn signal light*......... 11-46
Front turn signal light
(models with LED headlights).......................... 11-48
Front fog light
(models with the LED front fog light)............... 11-48
Front fog light (models without the LED front
fog light) (if equipped)..................................... 11-49
Rear combination lights...................................... 11-49
License plate light.............................................. 11-50
Other bulbs........................................................ 11-51
Replacing battery................................................11-51
Safety precautions.............................................. 11-51
Replacing battery of access key fob................... 11-52
Replacing transmitter battery.............................. 11-53
Maintenance and service
Page 480 of 578

(501,1)
北米Model "A1700BE-B" EDITED: 2017/ 10/ 11
Maintenance scheduleU.S. models
The scheduled maintenance items re-
quired to be serviced at regular intervals
are shown in the“Warranty and Mainte-
nance Booklet”. For details, read the
separate“Warranty and Maintenance
Booklet”.
Canada models
The scheduled maintenance items re-
quired to be serviced at regular intervals
are shown in the“Warranty and Service
Booklet”. For details, read the separate
“Warranty and Service Booklet”.
Other models
Some items of your vehicle are required to
be serviced at scheduled intervals. For
details about your maintenance schedule,
read the separate“Warranty and Main-
tenance Booklet”.NOTEYou can set a reminder to be displayed
when a scheduled maintenance item is
almost due. For details, refer to“Main-
tenance settings”F3-59.
Maintenance precautionsWhen maintenance and service are re-
quired, it is recommended that all work be
done by an authorized SUBARU dealer.
If you perform maintenance and service by
yourself, you should familiarize yourself
with the information provided in this sec-
tion on general maintenance and service
for your SUBARU.
Incorrect or incomplete service could
cause improper or unsafe vehicle opera-
tion. Any problems caused by improper
maintenance and service performed by
you are not eligible for warranty coverage.
WARNING
.Testing of an All-Wheel Drive
model must NEVER be performed
on a single two-wheel dynam-
ometer or similar apparatus. At-
tempting to do so will result in
transmission damage and in un-
controlled vehicle movement and
may cause an accident or injuries
to persons nearby.
.Always select a safe area when
performing maintenance on your
vehicle.
.Always be very careful to avoidinjury when working on the vehi-
cle. Remember that some of the
materials in the vehicle may be
hazardous if improperly used or
handled, for example, battery
acid.
.Your vehicle should only be ser-
viced by persons fully competent
to do so. Serious personal injury
may result to persons not experi-
enced in servicing vehicles.
.Always use the proper tools and
make certain that they are well
maintained.
.Never get under the vehicle sup-
ported only by a jack. Always use
safety stands to support the
vehicle.
.Never keep the engine running in
a poorly ventilated area, such as
a garage or other closed areas.
.Do not smoke or allow open
flames around the fuel or battery.
This will cause a fire.
.Because the fuel system is under
pressure, replacement of the fuel
filter should be performed only
by your SUBARU dealer.
.Wear adequate eye protection to
guard against getting oil or fluids
–CONTINUED–
Maintenance and service/Maintenance schedule
11-3
11
Page 488 of 578

(509,1)
北米Model "A1700BE-B" EDITED: 2017/ 10/ 11
Engine compartment overview&STI
1) Power steering fluid reservoir
(page 11-23)
2) Brake fluid reservoir/Clutch fluid reservoir
(page 11-24)
3) Fuse box (page 11-42)
4) Battery (page 11-41)
5) Windshield washer tank (page 11-38)
6) Engine oil filler cap (page 11-13)
7) Engine coolant reservoir (page 11-17)
8) Engine oil level gauge (page 11-13)
9) Coolant filler tank cap (page 11-17)
10) Air cleaner case (page 11-18)
–CONTINUED–
Maintenance and service/Engine compartment overview
11-11
11
Page 489 of 578

(510,1)
北米Model "A1700BE-B" EDITED: 2017/ 10/ 11
&Except STI
1) Brake fluid reservoir/Clutch fluid reservoir
(MT models) (page 11-24)
2) Fuse box (page 11-42)
3) Battery (page 11-41)
4) Windshield washer tank (page 11-38)
5) Engine oil filler cap (page 11-13)
6) Engine coolant reservoir (page 11-17)
7) Radiator cap (page 11-17)
8) Engine oil filter (page 11-15)
9) Engine oil level gauge (page 11-13)
10) Air cleaner case (page 11-18)
Maintenance and service/Engine compartment overview
11-12
Page 506 of 578

(527,1)
北米Model "A1700BE-B" EDITED: 2017/ 10/ 11
CAUTION
.It is recommended that you dis-
connect the vehicle battery be-
fore replacing the brake pad.
However, it is dangerous to dis-
connect the vehicle battery. We
recommend that you have your
SUBARU dealer replace the brake
pad.
.If you continue to drive despite
the scraping noise from the audi-
ble brake pad wear indicator, it
will result in the need for costly
brake rotor repair or replace-
ment.&Breaking-in of new brake
pads (models with electronic
parking brake system)When replacing the brake pad, use only
genuine SUBARU parts. After replace-
ment, break in the new parts as follows.
!Brake pad
While maintaining a speed of 30 to 40 mph
(50 to 65 km/h), step on the brake pedal
lightly. Repeat this five or more times. Also,
apply and release the electronic parking
brake five or more times.
&Breaking-in of new brake
pads and linings (models
without electronic parking
brake system)When replacing the brake pad or lining,
use only genuine SUBARU parts. After
replacement, break in the new parts as
follows.
!Brake pad and lining
While maintaining a speed of 30 to 40 mph
(50 to 65 km/h), step on the brake pedal
lightly. Repeat this five or more times.
!Parking brake lining
1. Drive the vehicle at a speed of approxi-
mately 22 mph (35 km/h).
2. With the parking brake release button
pushed in, pull the parking brake lever
SLOWLY and GENTLY (pulling with a
force of approximately 33.7 lbf [150 N,
15.3 kgf]).
3. Drive the vehicle for approximately 220
yards (200 meters) in this condition.
4. Wait 5 to 10 minutes for the parking
brake to cool down. Repeat this proce-
dure.
5. Check the parking brake stroke. If the
parking brake stroke is out of the specified
range, adjust it by turning the adjusting nut
located on the parking brake lever.
Parking brake stroke:
7–8 notches / 45 lbf (200 N, 20.4 kgf)
WARNING
Select a safe location and situation
for break-in driving.
CAUTION
Pulling the parking brake lever too
forcefully may cause the rear wheels
to lock. To avoid this, be certain to
pull the lever up slowly and gently.
Maintenance and service/Replacement of brake pad and lining
11-29
11