Page 526 of 578
(547,1)
北米Model "A1700BE-B" EDITED: 2017/ 10/ 11
&Front fog light (models with-
out the LED front fog light) (if
equipped)
NOTEIt may be difficult to replace the bulbs.
Have the bulbs replaced by your
SUBARU dealer if necessary.1. Remove the clips.
2. Turn over the mud guard.3. Disconnect the electrical connector
from the bulb as pushing the tab.
4. Remove the bulb by turning it counter-
clockwise.
5. Replace the bulb with a new one.
6. Reattach the mud guard.&Rear combination lights
–CONTINUED–
Maintenance and service/Replacing bulbs
11-49
11
Page 527 of 578

(548,1)
北米Model "A1700BE-B" EDITED: 2017/ 10/ 11
1. Remove the clips from the trunk trim
with a flat-head screwdriver.2. Open the rear portion of the trunk trim
panel as illustrated.NOTEMake sure that the“
*”part of the trunk
trim in the illustration does not contact
the trunk lid stay. If the“
*”part is bent,
the trunk trim may be torn.
1) Rear side marker light
2) Backup light
3) Rear turn signal light3. Remove the bulb socket from the rear
combination light assembly by turning it
counterclockwise.
4. Pull the bulb out of the bulb socket and
replace it with a new one.
5. Set the bulb socket into the rear
combination light assembly and turn it
clockwise until it locks.
6. Secure the rear trunk trim panel with
the clips.NOTEWhen replacing a bulb of the rear side
marker light, detach the bulb socket of
the backup light in advance. Afterreplacing the bulb, first attach the side
marker light, and then attach the back-
up light.
&License plate light1. Open the trunk and remove the clips
from the trunk lid trim with a flat-head
screwdriver.
2. Turn over the trunk lid trim.
Maintenance and service/Replacing bulbs
11-50
Page 528 of 578

(549,1)
北米Model "A1700BE-B" EDITED: 2017/ 10/ 11
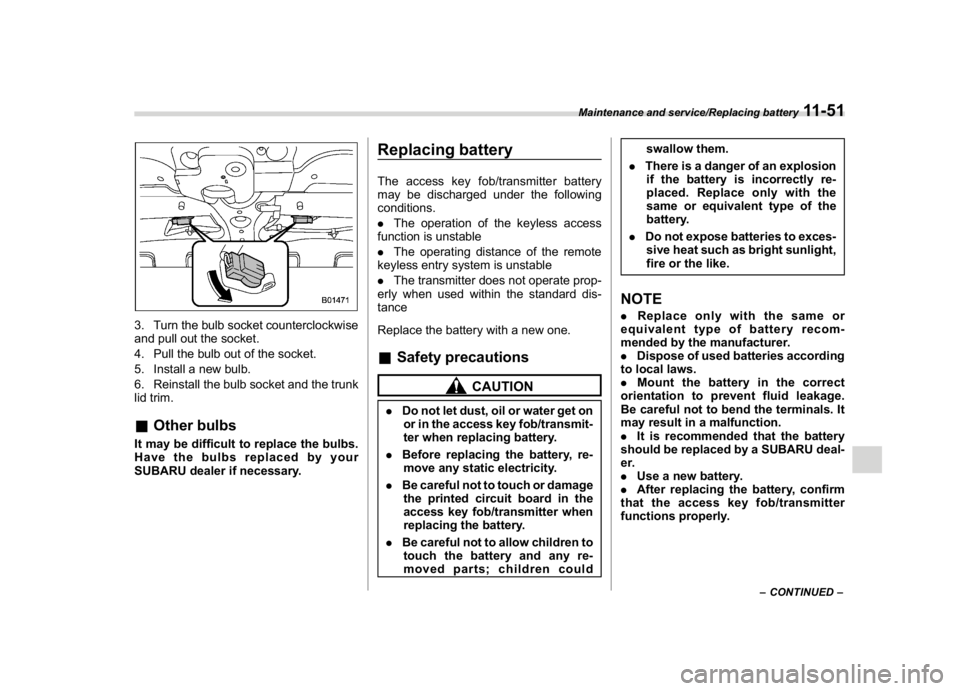
3. Turn the bulb socket counterclockwise
and pull out the socket.
4. Pull the bulb out of the socket.
5. Install a new bulb.
6. Reinstall the bulb socket and the trunk
lid trim.&Other bulbsIt may be difficult to replace the bulbs.
Have the bulbs replaced by your
SUBARU dealer if necessary.
Replacing batteryThe access key fob/transmitter battery
may be discharged under the following
conditions.
.The operation of the keyless access
function is unstable
.The operating distance of the remote
keyless entry system is unstable
.The transmitter does not operate prop-
erly when used within the standard dis-
tance
Replace the battery with a new one.&Safety precautions
CAUTION
.Do not let dust, oil or water get on
or in the access key fob/transmit-
ter when replacing battery.
.Before replacing the battery, re-
move any static electricity.
.Be careful not to touch or damage
the printed circuit board in the
access key fob/transmitter when
replacing the battery.
.Be careful not to allow children to
touch the battery and any re-
moved parts; children couldswallow them.
.There is a danger of an explosion
if the battery is incorrectly re-
placed. Replace only with the
same or equivalent type of the
battery.
.Do not expose batteries to exces-
sive heat such as bright sunlight,
fire or the like.
NOTE.Replace only with the same or
equivalent type of battery recom-
mended by the manufacturer.
.Dispose of used batteries according
to local laws.
.Mount the battery in the correct
orientation to prevent fluid leakage.
Be careful not to bend the terminals. It
may result in a malfunction.
.It is recommended that the battery
should be replaced by a SUBARU deal-
er.
.Use a new battery.
.After replacing the battery, confirm
that the access key fob/transmitter
functions properly.
–CONTINUED–
Maintenance and service/Replacing battery
11-51
11
Page 529 of 578
(550,1)
北米Model "A1700BE-B" EDITED: 2017/ 10/ 11
&Replacing battery of access
key fob
CAUTION
When removing or reinstalling the
access key fob cover, make sure that
the plastic part does not come off or
become misaligned.
Battery: Button battery CR20321) Release button
2) Emergency key1. Take out the emergency key.
2. Wrap a flat-head screwdriver with vinyl
tape or a cloth, and insert it in the gap to
remove the cover.3. Take out the battery using a flat-head
screwdriver with vinyl tape or a cloth.
4. Insert a new battery with its positive (+)
side facing upward as shown in the figure.5. Attach the cover to the access key fob
by fitting the projections and recesses
together.
6. Reinstall the emergency key.
Maintenance and service/Replacing battery
11-52
Page 530 of 578
(551,1)
北米Model "A1700BE-B" EDITED: 2017/ 10/ 11
&Replacing transmitter battery1. Open the key head using a flat-head
screwdriver.2. Remove the transmitter case from the
key head.
3. Open the transmitter case by releasing
the hooks.1) Negative (�) side facing up4. Replace the old battery with a new
battery (typeCR1620or equivalent) mak-
ing sure to install the new battery with thenegative (�) side facing up.
5. Put together the transmitter case by
fitting the hooks on the case.
6. Reinstall the transmitter case in the
key head.
7. Refit the removed half of the key head.
After the battery is replaced, the trans-
mitter must be synchronized with the
remote keyless entry system’s control
unit. Press either the“
”or“
”button
six times to synchronize the unit.
Maintenance and service/Replacing battery
11-53
11
Page 537 of 578

(560,1)
北米Model "A1700BE-B" EDITED: 2017/ 10/ 11
&Manual transmission, front differential and rear differential gear oilOil Manual transmission oilFront differential gear oil (CVT
models)Rear differential gear oil
Oil
gradeSTI.API classification GL-5
(75W-90)*
3
—
API classification GL-5
Except STI.SUBARU Extra MT*
3
.API classification GL-5
(75W-90)*
4
.SUBARU Extra MT*
3
.API classification GL-5
(75W-90)
SAE viscosity No. and
applicable tempera-
ture——.75W-90*
.90
*: recommended
Oil ca-
pacity*
1
STI 4.3 US qt (4.1 liters, 3.6 Imp qt)—1.1 US qt (1.0 liter, 0.9 Imp qt)
Except STI 3.5 US qt (3.3 liters, 2.9 Imp qt) 1.5 US qt (1.4 liters, 1.2 Imp qt) 0.8 US qt (0.8 liters, 0.7 Imp qt)
Remarks*2
“Manual transmission oil”F11-22
“Front differential gear oil (CVT
models) and rear differential gear
oil”F11-23
“Front differential gear oil (CVT models) and rear differential
gear oil”F11-23
*1: The indicated oil quantity is only a guideline. The necessary quantity for replacement may differ slightly depending on the temperature and other
factors. Check the oil level after refilling the gearbox with oil.
*2: For more details about maintenance and service, refer to the indicated section.
*3: The vehicle is filled at the factory with this oil.
*4: You may use this type of manual transmission oil. However, using this type of oil will detract from driveability and fuel efficiency.
Specifications/Specifications
12-6
Page 538 of 578

(561,1)
北米Model "A1700BE-B" EDITED: 2017/ 10/ 11
&Fluids
Fluid
Fluid type*
1
Fluid capacity*
2
Remarks*
3
Continuously variable transmission
fluid (CVT models)Consult your SUBARU dealer. 13.1 US qt (12.4 liters, 10.9 Imp qt)“
Continuously variable transmis-
sion fluid”F11-22
Brake fluidFMVSS No. 116, DOT 3 or DOT 4 brake
fluid—“
Brake fluid”F11-24
Clutch fluid (MT models)FMVSS No. 116, DOT 3 or DOT 4 brake
fluid—“
Clutch fluid (MT models)”F11-25
Power steering fluid (STI)· SUBARU ATF
·“Dexron III”Type Automatic Transmis-
sion Fluid
· IDEMITSU ATF HP0.7 US qt (0.7 liter, 0.6 Imp qt)“
Power steering fluid (STI)”F11 -
23
*1: Use one of the indicated types of fluid.
*2: The indicated fluid quantity is only a guideline. The necessary quantity for replacement may differ slightly depending on the temperature and other
factors.
*3: For more details about maintenance and service, refer to the indicated section.&Engine coolant
Vehicle model Coolant capacity Coolant type
STI 8.2 US qt (7.7 liters, 6.8 Imp qt)
SUBARU Super Coolant
Except STIMT models 8.6 US qt (8.1 liters, 7.2 Imp qt)
CVT models8.8 US qt (8.3 liters, 7.3 Imp qt)
The indicated coolant quantity is only a guideline. The necessary quantity for replacement may differ slightly depending on the temperature and other
factors. For more details about maintenance and service, refer to“
Cooling system”F11-16.
–CONTINUED–
Specifications/Specifications
12-7
12
Page 548 of 578

(573,1)
北米Model "A1700BE-B" EDITED: 2017/ 10/ 11
For U.S.A...............................................................13-2
Tire information.....................................................13-2
Tire labeling..........................................................13-2
Recommended tire inflation pressure....................13-4
Glossary of tire terminology..................................13-5
Tire care–maintenance and safety practices......13-10
Vehicle load limit–how to determine..................13-10
Determining compatibility of tire and vehicle
load capacities..................................................13-13Adverse safety consequences of overloading
on handling and stopping and on tires.............13-14
Steps for Determining Correct Load Limit ...........13-14
Uniform tire quality gradingstandards.............13-15
Treadwear...........................................................13-15
Traction AA, A, B, C............................................13-15
Temperature A, B, C...........................................13-15
Reporting safety defects(U.S.A.)......................13-16
Consumer information and Reporting safety defects
13